

React コンポーネント間の通信のためのシンプルな共通テクニック (組織化および共有)

この記事では、シンプルで使いやすい React コンポーネント間で通信する一般的な方法を紹介します。React 知識の主な内容の 1 つは、コンポーネント間の通信です。ここでは、一般的なコンポーネント通信のいくつかの一般的な方法を例と組み合わせて紹介します。分かりやすいのでまとめておくのがオススメですので皆さんの参考になれば幸いです。

1. 親子コンポーネントの通信
原則: 親コンポーネントは props を通じて子コンポーネントと通信します (vue の props とは異なります)。 、子コンポーネント コンポーネントは、コールバック イベントを通じて親コンポーネントと通信します。
まず、親コンポーネント Parent.js と子コンポーネント Children.js を作成します。この 2 つの関係は直接の親子関係です。
Parent.js の親コンポーネントは次のとおりです。親コンポーネントにデフォルトの状態を与え、子コンポーネントを導入し、toChildren={this.state.msg} を子コンポーネントに追加します。子コンポーネントです。
import React from 'react';
import { Button } from 'element-react';
import Children from './Children';
class Parent extends React.Component {
constructor(props) {
super(props);
this.state = {
msg:'父组件传递给子组件'
};
this.changeMsg = this.changeMsg.bind(this)
}
changeMsg(){
this.setState({
msg:'父组件传递给子组件(改变之后的内容)'
})
}
render(){
return (
<p style={{backgroundColor:'#f7ba2a',padding:'20px',width:'500px',margin:'auto',textAlign:'center'}}>
<p>父子组件通信实例</p>
<Button onClick={this.changeMsg}>父传子</Button>
<Children toChildren={this.state.msg}></Children>
</p>
)
}
}
export default ParentChildren.js のサブコンポーネントは以下の通りで、初期状態は親コンポーネントから props を通じて渡された値を取得します。
import React from 'react';
class Children extends React.Component {
constructor(props) {
super(props);
this.state = {
msg:this.props.toChildren //通过props拿到父组件传过来的值
};
}
render(){
return (
<p style={{backgroundColor:'#13ce66',padding:'10px',width:'200px',margin:'auto',marginTop:'20px'}}>
<p>从父组件传过来:</p>
<span style={{color:'blue'}}>{this.state.msg}</span>
</p>
)
}
}
export default Children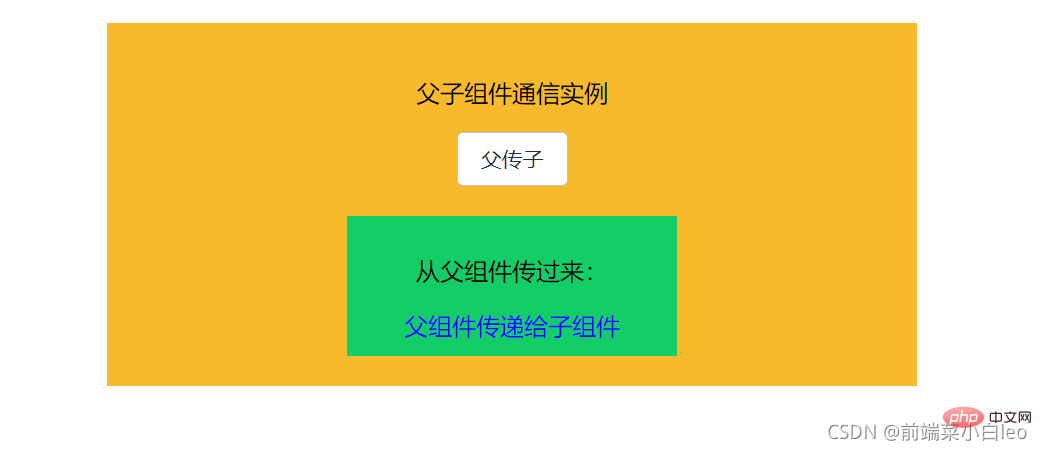
Note: サブコンポーネントの値は、親コンポーネントによってサブコンポーネントに配置されたフィールド プロパティ、つまり ## と一致している必要があります。 # この例では、次のように toChildren とします。


import React from 'react';
import Children from './Children';
class Parent extends React.Component {
constructor(props) {
super(props);
this.state = {
msg:'父组件传递给子组件',
fromChildrn:''
};
this.changeMsg = this.changeMsg.bind(this)
}
changeMsg(val){
this.setState({
fromChildrn: val
})
}
render(){
return (
<p style={{backgroundColor:'#f7ba2a',padding:'20px',width:'500px',margin:'auto',textAlign:'center'}}>
<p>父子组件通信实例</p>
<span style={{color:'red'}}>{this.state.fromChildrn}</span>
<Children toChildren={this.state.msg} callback={this.changeMsg}></Children>
</p>
)
}
}
export default Parentimport React from 'react';
import { Button } from 'element-react';
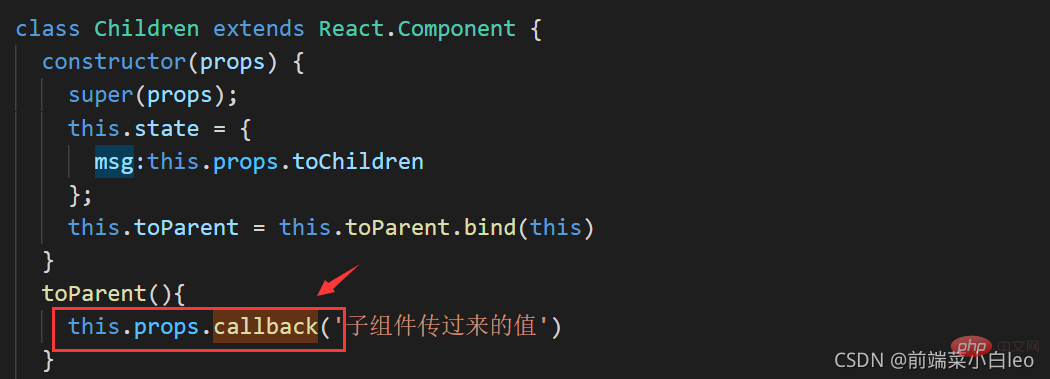
class Children extends React.Component {
constructor(props) {
super(props);
this.state = {
msg:this.props.toChildren
};
this.toParent = this.toParent.bind(this)
}
toParent(){
this.props.callback('子组件传过来的值') //子组件通过此触发父组件的回调方法
}
render(){
return (
<p style={{backgroundColor:'#13ce66',padding:'10px',width:'200px',margin:'auto',marginTop:'20px'}}>
<p>从父组件传过来:</p>
<span style={{color:'blue'}}>{this.state.msg}</span>
<Button onClick={this.toParent}>子传父</Button>
</p>
)
}
}
export default ChildrenNote: コールバック関数の名前props の内容は一貫している必要があります。つまり、この例では callback は次のようになります
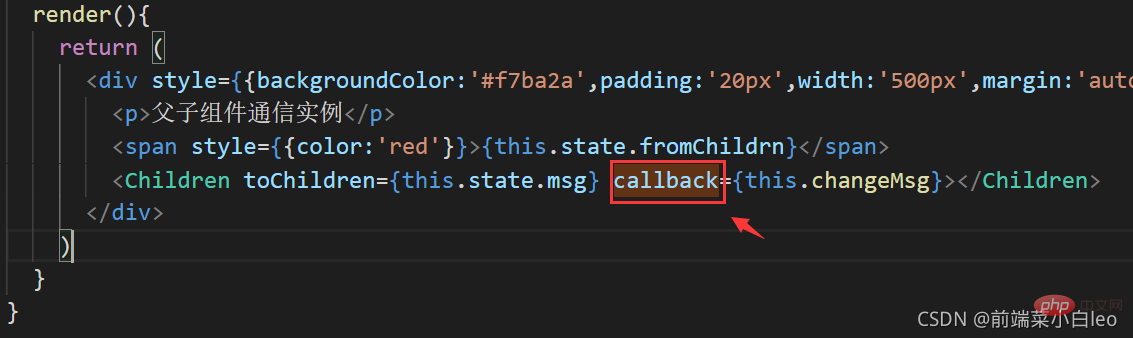
#概要: 上記は 直接の父と子ですコンポーネント通信の方法の 1 つは、props を介した親から子への通信であり、子から親へはコールバックが実行されます。
2. レベル間のコンポーネント通信 親コンポーネントの中に子コンポーネントがあり、この子コンポーネントの中に子コンポーネントがあり、これを一時的に「孫コンポーネント」と呼ぶとします。親コンポーネントが必要な場合 「孫コンポーネント」と通信する場合、レイヤーごとの値の受け渡しとレイヤー間の値の受け渡しという 2 つの一般的に使用される方法があります。 1. 層ごとに値を渡すこの方法は、上記の直接の親子通信に基づいており、中間層を追加します。たとえば、親コンポーネントと「孫」コンポーネントが通信する場合、最初に父と息子と通信し、次に子と「孫」と通信することができ、送信レベルは親→子→孫となります。同様にpropsも受け渡し、コールバック経由でアップロードします。興味があれば、自分で実装することもできます。2. レベル間の値の転送
名前が示すように、親は子 (中間層) コンポーネントを経由せずに「孫」と通信します。これは、コンテキストにつながります。
React 公式ドキュメントではコンテキストについて説明しています:典型的な React アプリケーションでは、データは props 属性 Yes を介して上から下 (親から子) に渡されますが、このアプローチはアプリケーション内の多くのコンポーネントで必要とされる特定の種類のプロパティ (ロケール設定、UI テーマなど) では非常に面倒です。 Context は、コンポーネント ツリーの各レベルで明示的に props を渡すことなく、コンポーネント間でそのような値を共有する方法を提供します。
一文の要約は次のとおりです:クロスレベルの値の転送、状態の共有。
簡単な例を見て、使用法を直接説明します。 まず、context.js ファイルを (親および子孫と同じディレクトリに) 作成します。デフォルト値はオブジェクトです。import React from "react";
const MyContext = React.createContext({text:'luck'});
export default MyContextimport React from 'react';
import Children from './Children';
import MyContext from './context';
class Parent extends React.Component {
constructor(props) {
super(props);
}
// 使用一个 Provider 来将当前的 value 传递给以下的组件树。
// 无论多深,任何组件都能读取这个值。
render(){
return (
<p style={{backgroundColor:'#f7ba2a',padding:'20px',width:'500px',margin:'auto',textAlign:'center'}}>
<p>context通信实例</p>
<MyContext.Provider value={{text:'good luck'}}>
<Children></Children>
</MyContext.Provider>
</p>
)
}
}
export default Parentimport React from 'react';
import Grandson from './Grandson';
class Children extends React.Component {
render(){
return (
<p>
<Grandson></Grandson>
</p>
)
}
}
export default Childrenstatic contextType = MyContext を追加する必要もあります。この時点で、最も近いものを直接取得できます。 this.context を介した上位層 Provider によって渡される値、この時点では this.context = {text:good lucky}、つまり親コンポーネントが値を渡します。
import React from 'react';
import MyContext from './context';
class Grandson extends React.Component {
static contextType = MyContext
render(){
return (
<p style={{backgroundColor:'#13ce66',padding:'10px',width:'200px',margin:'auto',marginTop:'20px'}}>
<p>通过context传过来:</p>
<span style={{color:'blue'}}>{this.context.text}</span>
</p>
)
}
}
export default Grandson ## 上記は親→孫の処理、つまり下向きの処理ですが、孫→親から親に値をアップロードしたい場合は、コールバック方法を使用できます
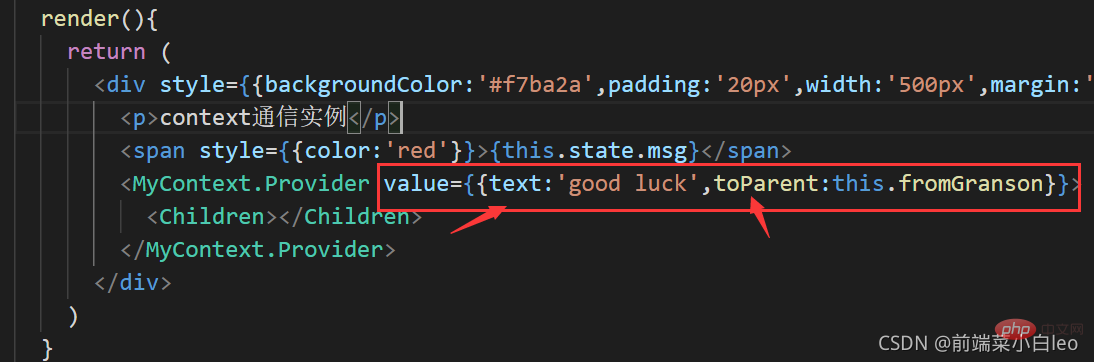
对父组件进行传值修改,在传过来的对象中添加一个属性,里面绑定父组件的方法value={{text:'good luck',toParent:this.fromGranson}}
import React from 'react';
import Children from './Children';
import MyContext from './context';
class Parent extends React.Component {
constructor(props) {
super(props);
this.state = {
msg:''
};
this.fromGranson = this.fromGranson.bind(this)
}
fromGranson(val){
this.setState({
msg:val
})
}
// 使用一个 Provider 来将当前的 theme 传递给以下的组件树。
// 无论多深,任何组件都能读取这个值。
render(){
return (
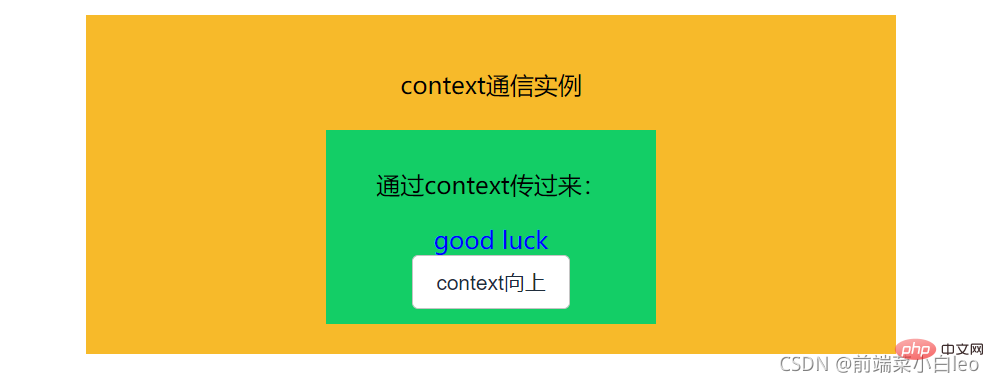
<p style={{backgroundColor:'#f7ba2a',padding:'20px',width:'500px',margin:'auto',textAlign:'center'}}>
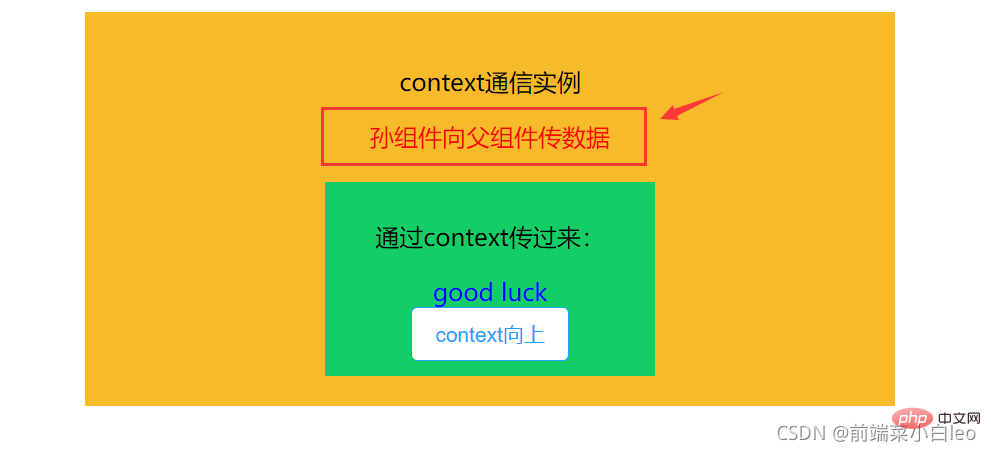
<p>context通信实例</p>
<span style={{color:'red'}}>{this.state.msg}</span>
<MyContext.Provider value={{text:'good luck',toParent:this.fromGranson}}>
<Children></Children>
</MyContext.Provider>
</p>
)
}
}
export default Parent然后在孙组件中添加一个按钮,绑定方法,执行函数回调
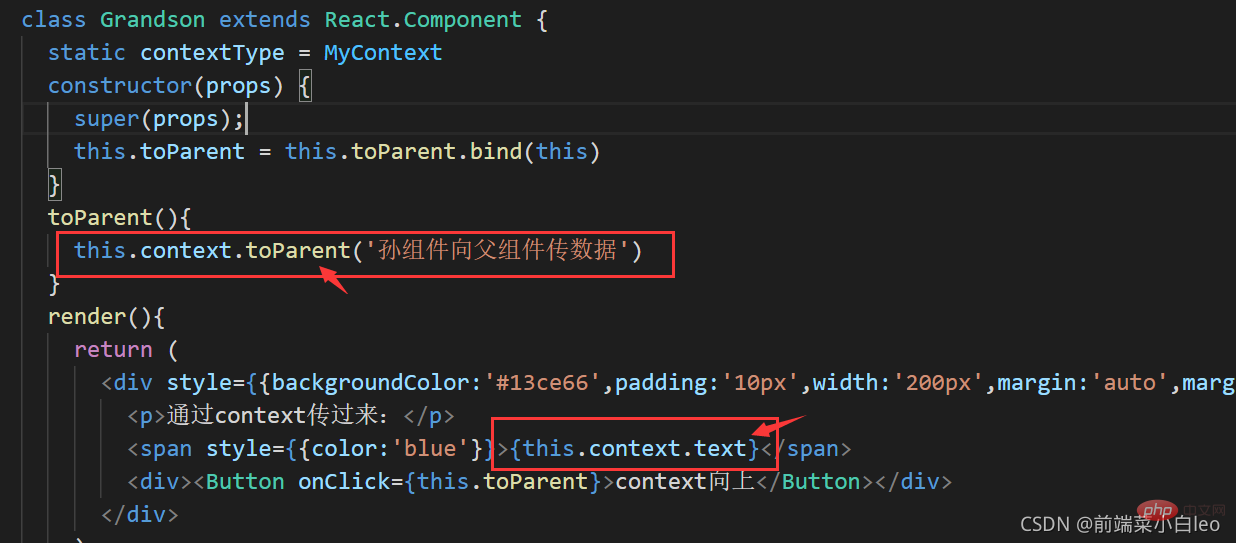
toParent(){
this.context.toParent('孙组件向父组件传数据')
}
import React from 'react';
import MyContext from './context';
import { Button } from 'element-react'
class Grandson extends React.Component {
static contextType = MyContext
constructor(props) {
super(props);
this.toParent = this.toParent.bind(this)
}
toParent(){
this.context.toParent('孙组件向父组件传数据')
}
render(){
return (
<p style={{backgroundColor:'#13ce66',padding:'10px',width:'200px',margin:'auto',marginTop:'20px'}}>
<p>通过context传过来:</p>
<span style={{color:'blue'}}>{this.context.text}</span>
<p><Button onClick={this.toParent}>context向上</Button></p>
</p>
)
}
}
export default Grandson默认的页面为:
点击按钮之后,执行context中的回调,向上传值。
不管层级有多深,都可以使用context进行向下或向上传值。
注意:在下层组件中取的context中的字段需与value中传递字段保持一致。text与toParent
以上就是Context的大致使用,更多细节请往React官方文档:
Context – React=https://react.docschina.org/docs/context.html
三、兄弟(无嵌套)组件通信
当两个组件互不嵌套,处在同个层级或者不同层级上,他们之间要进行通信,有以下几种常用方法
1、某个组件先将值传到同一个父组件,然后在通过父组件传给另外一个组件,用到父子组件传值
2、使用缓存sessionStorage、localStorage等
3、如果两个组件之间存在跳转,可以使用路由跳转传值,附上详细用法
React学习笔记 -- 组件通信之路由传参(react-router-dom)_前端菜小白leo的博客-CSDN博客
4、event(发布--订阅)
首先,安装event
npm install event -save
新建一个event.js
import { EventEmitter } from 'events';
export default new EventEmitter();然后另两个组件处于同层级(不同个父组件或者不同层级都可以)
import React from 'react';
import Grandson from './Grandson';
import GrandsonOther from './GrandsonOther';

class Children extends React.Component {
  render(){
    return (
      <p>
        <Grandson></Grandson>
        <GrandsonOther></GrandsonOther>
      </p>
    )
  }
}

export default Children组件一,导入event,在componentDidMount阶段添加监听addListener(订阅),在componentWillUnmount移除监听removeListener,事件名称与组件二中emit一致。
import React from 'react';
import event from '../event';
class Grandson extends React.Component {
constructor(props) {
super(props);
this.state = {
msg:''
}
}
componentDidMount(){
event.addListener('eventMsg',val => {
this.setState({
msg:val
})
})
}
componentWillUnmount(){
event.removeListener('eventMsg')
}
render(){
return (
<p style={{backgroundColor:'#13ce66',padding:'10px',width:'200px',margin:'auto',marginTop:'20px'}}>
<p>组件一</p>
<p>通过event传过来:</p>
<span style={{color:'red'}}>{this.state.msg}</span>
</p>
)
}
}
export default Grandson组件二,导入event,按钮绑定方法,使用event.emit触发(发布)事件。
import React from 'react';
import event from '../event';
import { Button } from 'element-react'
class Grandson extends React.Component {
constructor(props) {
super(props);
this.state = {
msg:''
}
this.toOther = this.toOther.bind(this)
}
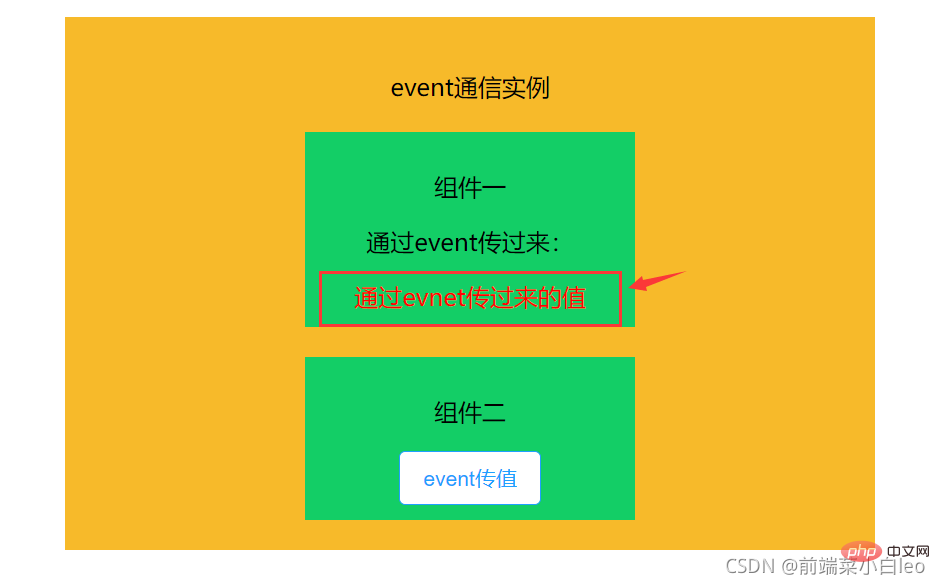
toOther(){
event.emit('eventMsg','通过evnet传过来的值')
}
render(){
return (
<p style={{backgroundColor:'#13ce66',padding:'10px',width:'200px',margin:'auto',marginTop:'20px'}}>
<p>组件二</p>
<span style={{color:'blue'}}>{this.state.msg}</span>
<p><Button onClick={this.toOther}>event传值</Button></p>
</p>
)
}
}
export default Grandson点击按钮,组件二发布事件,组件一监听(订阅)事件,更新内容。(如果交换发布者订阅者身份,写法一致)

注意:如果两个组件使用event进行通信,确保发布订阅的事件名称一致,如上例中 eventMsg
小结: event的方式比较灵活,不管是父子、跨级、还是同级,甚至毫无关联的组件,都可以使用此方式进行通信。
四、路由传值
React学习笔记 -- 组件通信之路由传参(react-router-dom)_前端菜小白leo的博客-CSDN博客
五、Redux
Redux基本用法(在react中使用,链路打通)_前端菜小白leo的博客-CSDN博客
总结:主要讲了react中常用的组件通信方式,在平时工作中,根据不同的应用场景,选择不同的通信方式,会让通信流程更加简单、清晰。
对比Vue中的组件通信方式,你会发现很多相似之处:
Vue组件间的通信方式(多种场景,通俗易懂,建议收藏)_前端菜小白leo的博客-CSDN博客
推荐学习:《react视频教程》
以上がReact コンポーネント間の通信のためのシンプルな共通テクニック (組織化および共有)の詳細内容です。詳細については、PHP 中国語 Web サイトの他の関連記事を参照してください。

ホットAIツール

Undresser.AI Undress
リアルなヌード写真を作成する AI 搭載アプリ

AI Clothes Remover
写真から衣服を削除するオンライン AI ツール。

Undress AI Tool
脱衣画像を無料で

Clothoff.io
AI衣類リムーバー

Video Face Swap
完全無料の AI 顔交換ツールを使用して、あらゆるビデオの顔を簡単に交換できます。

人気の記事
ホットツール

メモ帳++7.3.1
使いやすく無料のコードエディター

SublimeText3 中国語版
中国語版、とても使いやすい

ゼンドスタジオ 13.0.1
強力な PHP 統合開発環境

ドリームウィーバー CS6
ビジュアル Web 開発ツール

SublimeText3 Mac版
神レベルのコード編集ソフト(SublimeText3)
ホットトピック
 7683
7683
 15
1639
14
1393
52
1286
25
1229
29
15
1639
14
1393
52
1286
25
1229
29

 React と WebSocket を使用してリアルタイム チャット アプリを構築する方法
Sep 26, 2023 pm 07:46 PM
React と WebSocket を使用してリアルタイム チャット アプリを構築する方法
Sep 26, 2023 pm 07:46 PM
React と WebSocket を使用してリアルタイム チャット アプリケーションを構築する方法 はじめに: インターネットの急速な発展に伴い、リアルタイム コミュニケーションがますます注目を集めています。ライブチャット アプリは、現代の社会生活や仕事生活に不可欠な部分になっています。この記事では、React と WebSocket を使用して簡単なリアルタイム チャット アプリケーションを構築する方法と、具体的なコード例を紹介します。 1. 技術的な準備 リアルタイム チャット アプリケーションの構築を開始する前に、次のテクノロジとツールを準備する必要があります。 React: 構築用の 1 つ
 React フロントエンドとバックエンドの分離ガイド: フロントエンドとバックエンドの分離と独立したデプロイメントを実現する方法
Sep 28, 2023 am 10:48 AM
React フロントエンドとバックエンドの分離ガイド: フロントエンドとバックエンドの分離と独立したデプロイメントを実現する方法
Sep 28, 2023 am 10:48 AM
React フロントエンドとバックエンドの分離ガイド: フロントエンドとバックエンドの分離と独立したデプロイメントを実現する方法、特定のコード例が必要です 今日の Web 開発環境では、フロントエンドとバックエンドの分離がトレンドになっています。フロントエンド コードとバックエンド コードを分離することで、開発作業がより柔軟かつ効率的になり、チームのコラボレーションが促進されます。この記事では、React を使用してフロントエンドとバックエンドの分離を実現し、それによって分離と独立したデプロイの目標を達成する方法を紹介します。まず、フロントエンドとバックエンドの分離とは何かを理解する必要があります。従来の Web 開発モデルでは、フロントエンドとバックエンドが結合されています。
 React と Flask を使用してシンプルで使いやすい Web アプリケーションを構築する方法
Sep 27, 2023 am 11:09 AM
React と Flask を使用してシンプルで使いやすい Web アプリケーションを構築する方法
Sep 27, 2023 am 11:09 AM
React と Flask を使用してシンプルで使いやすい Web アプリケーションを構築する方法 はじめに: インターネットの発展に伴い、Web アプリケーションのニーズはますます多様化および複雑化しています。使いやすさとパフォーマンスに対するユーザーの要件を満たすために、最新のテクノロジー スタックを使用してネットワーク アプリケーションを構築することがますます重要になっています。 React と Flask は、フロントエンドおよびバックエンド開発用の 2 つの非常に人気のあるフレームワークであり、うまく連携してシンプルで使いやすい Web アプリケーションを構築します。この記事では、React と Flask を活用する方法について詳しく説明します。
 React と RabbitMQ を使用して信頼性の高いメッセージング アプリを構築する方法
Sep 28, 2023 pm 08:24 PM
React と RabbitMQ を使用して信頼性の高いメッセージング アプリを構築する方法
Sep 28, 2023 pm 08:24 PM
React と RabbitMQ を使用して信頼性の高いメッセージング アプリケーションを構築する方法 はじめに: 最新のアプリケーションは、リアルタイム更新やデータ同期などの機能を実現するために、信頼性の高いメッセージングをサポートする必要があります。 React はユーザー インターフェイスを構築するための人気のある JavaScript ライブラリであり、RabbitMQ は信頼性の高いメッセージング ミドルウェアです。この記事では、React と RabbitMQ を組み合わせて信頼性の高いメッセージング アプリケーションを構築する方法を紹介し、具体的なコード例を示します。 RabbitMQ の概要:
 React コード デバッグ ガイド: フロントエンドのバグをすばやく見つけて解決する方法
Sep 26, 2023 pm 02:25 PM
React コード デバッグ ガイド: フロントエンドのバグをすばやく見つけて解決する方法
Sep 26, 2023 pm 02:25 PM
React コード デバッグ ガイド: フロントエンドのバグをすばやく見つけて解決する方法 はじめに: React アプリケーションを開発するとき、アプリケーションをクラッシュさせたり、不正な動作を引き起こしたりする可能性のあるさまざまなバグに遭遇することがよくあります。したがって、デバッグ スキルを習得することは、すべての React 開発者にとって不可欠な能力です。この記事では、フロントエンドのバグを見つけて解決するための実践的なテクニックをいくつか紹介し、読者が React アプリケーションのバグをすばやく見つけて解決できるようにする具体的なコード例を示します。 1. デバッグツールの選択: In Re
 React Router ユーザーガイド: フロントエンドルーティング制御の実装方法
Sep 29, 2023 pm 05:45 PM
React Router ユーザーガイド: フロントエンドルーティング制御の実装方法
Sep 29, 2023 pm 05:45 PM
ReactRouter ユーザーガイド: フロントエンドルーティング制御の実装方法 シングルページアプリケーションの人気に伴い、フロントエンドルーティングは無視できない重要な部分になりました。 React エコシステムで最も人気のあるルーティング ライブラリとして、ReactRouter は豊富な機能と使いやすい API を提供し、フロントエンド ルーティングの実装を非常にシンプルかつ柔軟にします。この記事では、ReactRouter の使用方法と具体的なコード例を紹介します。 ReactRouter を最初にインストールするには、次のものが必要です
 React と Google BigQuery を使用して高速データ分析アプリケーションを構築する方法
Sep 26, 2023 pm 06:12 PM
React と Google BigQuery を使用して高速データ分析アプリケーションを構築する方法
Sep 26, 2023 pm 06:12 PM
React と Google BigQuery を使用して高速データ分析アプリケーションを構築する方法 はじめに: 今日の情報爆発の時代において、データ分析はさまざまな業界で不可欠なリンクとなっています。中でも、高速かつ効率的なデータ分析アプリケーションを構築することは、多くの企業や個人が追求する目標となっています。この記事では、React と Google BigQuery を使用して高速データ分析アプリケーションを構築する方法を紹介し、詳細なコード例を示します。 1. 概要 React はビルドするためのツールです
 React と Apache Kafka を使用してリアルタイム データ処理アプリケーションを構築する方法
Sep 27, 2023 pm 02:25 PM
React と Apache Kafka を使用してリアルタイム データ処理アプリケーションを構築する方法
Sep 27, 2023 pm 02:25 PM
React と Apache Kafka を使用してリアルタイム データ処理アプリケーションを構築する方法 はじめに: ビッグ データとリアルタイム データ処理の台頭により、リアルタイム データ処理アプリケーションの構築が多くの開発者の追求となっています。人気のあるフロントエンド フレームワークである React と、高性能分散メッセージング システムである Apache Kafka を組み合わせることで、リアルタイム データ処理アプリケーションを構築できます。この記事では、React と Apache Kafka を使用してリアルタイム データ処理アプリケーションを構築する方法を紹介します。
