void write(int c)
単一文字を書き込みます。書き込まれる文字は、指定された整数値の下位 16 ビットに含まれており、上位 16 ビットは無視されます。つまり、0 ~ 65535 の Unicode コードを記述します。 |
|
void write(char[] cbuf)
文字配列を書き込みます。 |
|
void write(char[] cbuf,int off,int len)
文字配列の特定の部分を書き込みます。 off から len 文字を書き込みます |
|
void write(String str)
文字列を書き込みます。 |
|
void write(String str,int off,int len)
文字列の特定の部分を書き込みます。 |
|
voidlush()
このストリームのバッファをフラッシュし、即座に目的の宛先に書き込みます。 |
|
public void close() throws IOException
この出力ストリームを閉じ、ストリームに関連付けられたすべてのシステム リソースを解放します。 |
|
主要实现类:FileWriter
输出操作,对应的File
可以不存在的。并不会报异常
File
对应的硬盘中的文件如果不存在,在输出的过程中,会自动创建此文件。
File对应的硬盘中的文件如果存在:
- 如果流使用的构造器是:
FileWriter(file,false) / FileWriter(file)
:对原有文件的覆盖
- 如果流使用的构造器是:
FileWriter(file,true)
:不会对原有文件覆盖,而是在原有文件基础上追加内容
//从内存中写出数据到硬盘的文件里。
@Test
public void testFileWriter() {
FileWriter fw = null;
try {
//1.提供File类的对象,指明写出到的文件
File file = new File("hello1.txt");
//2.提供FileWriter的对象,用于数据的写出
fw = new FileWriter(file,false);
//3.写出的操作
fw.write("I have a dream!\n");
fw.write("you need to have a dream!");
} catch (IOException e) {
e.printStackTrace();
} finally {
//4.流资源的关闭
if(fw != null){
try {
fw.close();
} catch (IOException e) {
e.printStackTrace();
}
}
}
}
ログイン後にコピー
6. 练习:复制操作
代码演示:
@Test
public void testFileReaderFileWriter() {
FileReader fr = null;
FileWriter fw = null;
try {
//1.创建File类的对象,指明读入和写出的文件
File srcFile = new File("hello.txt");
File destFile = new File("hello2.txt");
//不能使用字符流来处理图片等字节数据// File srcFile = new File("爱情与友情.jpg");// File destFile = new File("爱情与友情1.jpg");
//2.创建输入流和输出流的对象
fr = new FileReader(srcFile);
fw = new FileWriter(destFile);
//3.数据的读入和写出操作
char[] cbuf = new char[5];
int len;//记录每次读入到cbuf数组中的字符的个数
while((len = fr.read(cbuf)) != -1){
//每次写出len个字符
fw.write(cbuf,0,len);
}
} catch (IOException e) {
e.printStackTrace();
} finally {
//4.关闭流资源
//方式一:// try {// if(fw != null)// fw.close();// } catch (IOException e) {// e.printStackTrace();// }finally{// try {// if(fr != null)// fr.close();// } catch (IOException e) {// e.printStackTrace();// }// }
//方式二:
try {
if(fw != null)
fw.close();
} catch (IOException e) {
e.printStackTrace();
}
try {
if(fr != null)
fr.close();
} catch (IOException e) {
e.printStackTrace();
}
}
}}
ログイン後にコピー
@Test
public void testFileInputOutputStream() {
FileInputStream fis = null;
FileOutputStream fos = null;
try {
//
File srcFile = new File("爱情与友情.jpg");
File destFile = new File("爱情与友情2.jpg");
//
fis = new FileInputStream(srcFile);
fos = new FileOutputStream(destFile);
//复制的过程
byte[] buffer = new byte[5];
int len;
while((len = fis.read(buffer)) != -1){
fos.write(buffer,0,len);
}
} catch (IOException e) {
e.printStackTrace();
} finally {
if(fos != null){
//
try {
fos.close();
} catch (IOException e) {
e.printStackTrace();
}
}
if(fis != null){
try {
fis.close();
} catch (IOException e) {
e.printStackTrace();
}
}
}
}
//指定路径下文件的复制
public void copyFile(String srcPath,String destPath){
FileInputStream fis = null;
FileOutputStream fos = null;
try {
//
File srcFile = new File(srcPath);
File destFile = new File(destPath);
//
fis = new FileInputStream(srcFile);
fos = new FileOutputStream(destFile);
//复制的过程
byte[] buffer = new byte[1024];
int len;
while((len = fis.read(buffer)) != -1){
fos.write(buffer,0,len);
}
} catch (IOException e) {
e.printStackTrace();
} finally {
if(fos != null){
//
try {
fos.close();
} catch (IOException e) {
e.printStackTrace();
}
}
if(fis != null){
try {
fis.close();
} catch (IOException e) {
e.printStackTrace();
}
}
}
}
@Test
public void testCopyFile(){
long start = System.currentTimeMillis();
String srcPath = "C:\\Users\\Administrator\\Desktop\\01-视频.avi";
String destPath = "C:\\Users\\Administrator\\Desktop\\02-视频.avi";// String srcPath = "hello.txt";// String destPath = "hello3.txt";
copyFile(srcPath,destPath);
long end = System.currentTimeMillis();
System.out.println("复制操作花费的时间为:" + (end - start));//618
}}
ログイン後にコピー
三、节点流(或文件流)
1. 概述
定义文件路径时,注意:可以用“/
”或者“\\
”。
在写入一个文件时,如果使用构造器FileOutputStream(file),
则目录下有同名文 件将被覆盖。 如果使用构造器FileOutputStream(file,true)
,则目录下的同名文件不会被覆盖, 在文件内容末尾追加内容。
在读取文件时,必须保证该文件已存在,否则报异常。
字节流操作字节,比如:.mp3
,.avi
,.rmvb
,.mp4
,.jpg
,.doc
,.ppt
字符流操作字符,只能操作普通文本文件。最常见的文本文件:txt
,.java
,.c
,.cpp
等语言的源代码。尤其注意.doc
,excel
,ppt
这些不是文本文件。
2. 读取文件
1.建立一个流对象,将已存在的一个文件加载进流。
java FileReader fr = new FileReader(new File(“Test.txt”));
2.创建一个临时存放数据的数组。
java char[] ch = new char[1024];
3.调用流对象的读取方法将流中的数据读入到数组中。
java fr.read(ch);
4.关闭资源。
java fr.close();
FileReader fr = null;try {fr = new FileReader(new File("c:\\test.txt"));char[] buf = new char[1024];int len;while ((len = fr.read(buf)) != -1) {System.out.print(new String(buf, 0, len));}} catch (IOException e) {System.out.println("read-Exception :" + e.getMessage());} finally {if (fr != null) {try {fr.close();} catch (IOException e) {System.out.println("close-Exception :" + e.getMessage());} } }
ログイン後にコピー
3. 写入文件
1.创建流对象,建立数据存放文件
FileWriter fw = new FileWriter(new File(“Test.txt”));
2.调用流对象的写入方法,将数据写入流
fw.write(“atguigu-songhongkang”);
3.关闭流资源,并将流中的数据清空到文件中。
fw.close();
FileWriter fw = null;try {fw = new FileWriter(new File("Test.txt"));fw.write("atguigu-songhongkang");} catch (IOException e) {e.printStackTrace();} finally {if (fw != null)try {fw.close();} catch (IOException e) {e.printStackTrace();} }
ログイン後にコピー
四、缓冲流
1. 概述
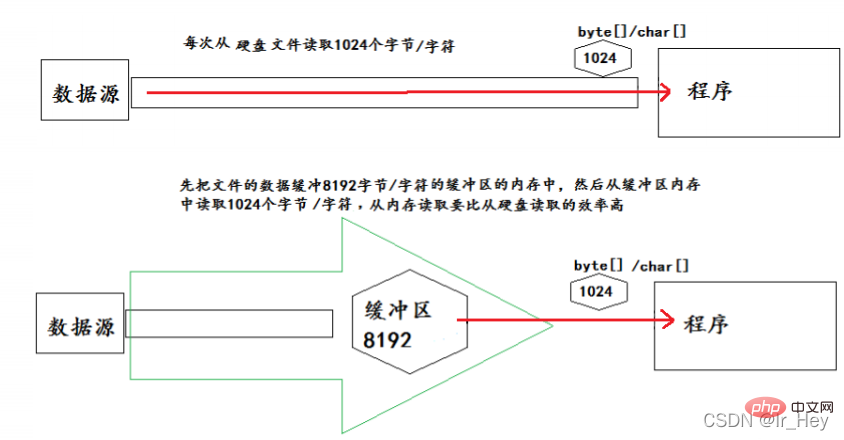
为了提高数据读写的速度,Java API提供了带缓冲功能的流类,在使用这些流类时,会创建一个内部缓冲区数组,缺省使用8192个字节(8Kb)的缓冲区。
缓冲流要“套接”在相应的节点流之上,根据数据操作单位可以把缓冲流分为:
-
BufferedInputStream
和 BufferedOutputStream
-
BufferedReader
和BufferedWriter
当读取数据时,数据按块读入缓冲区,其后的读操作则直接访问缓冲区
当使用BufferedInputStream
读取字节文件时,BufferedInputStream
会一次性从文件中读取8192个(8Kb),存在缓冲区中,直到缓冲区装满了,才重新从文件中读取下一个8192个字节数组。
向流中写入字节时,不会直接写到文件,先写到缓冲区中直到缓冲区写满,BufferedOutputStream
才会把缓冲区中的数据一次性写到文件里。使用方法 flush()
可以强制将缓冲区的内容全部写入输出流
关闭流的顺序和打开流的顺序相反。只要关闭最外层流即可,关闭最外层流也 会相应关闭内层节点流
flush()
方法的使用:手动将buffer
中内容写入文件
如果是带缓冲区的流对象的close()
方法,不但会关闭流,还会在关闭流之前刷新缓冲区,关闭后不能再写出
2. 实现非文本文件的复制
@Test
public void BufferedStreamTest() throws FileNotFoundException {
BufferedInputStream bis = null;
BufferedOutputStream bos = null;
try {
//1.造文件
File srcFile = new File("爱情与友情.jpg");
File destFile = new File("爱情与友情3.jpg");
//2.造流
//2.1 造节点流
FileInputStream fis = new FileInputStream((srcFile));
FileOutputStream fos = new FileOutputStream(destFile);
//2.2 造缓冲流
bis = new BufferedInputStream(fis);
bos = new BufferedOutputStream(fos);
//3.复制的细节:读取、写入
byte[] buffer = new byte[10];
int len;
while((len = bis.read(buffer)) != -1){
bos.write(buffer,0,len);// bos.flush();//刷新缓冲区
}
} catch (IOException e) {
e.printStackTrace();
} finally {
//4.资源关闭
//要求:先关闭外层的流,再关闭内层的流
if(bos != null){
try {
bos.close();
} catch (IOException e) {
e.printStackTrace();
}
}
if(bis != null){
try {
bis.close();
} catch (IOException e) {
e.printStackTrace();
}
}
//说明:关闭外层流的同时,内层流也会自动的进行关闭。关于内层流的关闭,我们可以省略.// fos.close();// fis.close();
}
}
ログイン後にコピー
3. 实现文件复制
@Test
public void testCopyFileWithBuffered(){
long start = System.currentTimeMillis();
String srcPath = "C:\\Users\\Administrator\\Desktop\\01-视频.avi";
String destPath = "C:\\Users\\Administrator\\Desktop\\03-视频.avi";
copyFileWithBuffered(srcPath,destPath);
long end = System.currentTimeMillis();
System.out.println("复制操作花费的时间为:" + (end - start));//618 - 176
}
//实现文件复制的方法
public void copyFileWithBuffered(String srcPath,String destPath){
BufferedInputStream bis = null;
BufferedOutputStream bos = null;
try {
//1.造文件
File srcFile = new File(srcPath);
File destFile = new File(destPath);
//2.造流
//2.1 造节点流
FileInputStream fis = new FileInputStream((srcFile));
FileOutputStream fos = new FileOutputStream(destFile);
//2.2 造缓冲流
bis = new BufferedInputStream(fis);
bos = new BufferedOutputStream(fos);
//3.复制的细节:读取、写入
byte[] buffer = new byte[1024];
int len;
while((len = bis.read(buffer)) != -1){
bos.write(buffer,0,len);
}
} catch (IOException e) {
e.printStackTrace();
} finally {
//4.资源关闭
//要求:先关闭外层的流,再关闭内层的流
if(bos != null){
try {
bos.close();
} catch (IOException e) {
e.printStackTrace();
}
}
if(bis != null){
try {
bis.close();
} catch (IOException e) {
e.printStackTrace();
}
}
//说明:关闭外层流的同时,内层流也会自动的进行关闭。关于内层流的关闭,我们可以省略.// fos.close();// fis.close();
}
}
/*
使用BufferedReader和BufferedWriter实现文本文件的复制
*/
@Test
public void testBufferedReaderBufferedWriter(){
BufferedReader br = null;
BufferedWriter bw = null;
try {
//创建文件和相应的流
br = new BufferedReader(new FileReader(new File("dbcp.txt")));
bw = new BufferedWriter(new FileWriter(new File("dbcp1.txt")));
//读写操作
//方式一:使用char[]数组// char[] cbuf = new char[1024];// int len;// while((len = br.read(cbuf)) != -1){// bw.write(cbuf,0,len);// // bw.flush();// }
//方式二:使用String
String data;
while((data = br.readLine()) != null){
//方法一:// bw.write(data + "\n");//data中不包含换行符
//方法二:
bw.write(data);//data中不包含换行符
bw.newLine();//提供换行的操作
}
} catch (IOException e) {
e.printStackTrace();
} finally {
//关闭资源
if(bw != null){
try {
bw.close();
} catch (IOException e) {
e.printStackTrace();
}
}
if(br != null){
try {
br.close();
} catch (IOException e) {
e.printStackTrace();
}
}
}
}}
ログイン後にコピー
五、 转换流
1. 概述
转换流提供了在字节流和字符流之间的转换
Java API提供了两个转换流:
-
InputStreamReader
:将InputStream
转换为Reader
-
OutputStreamWriter
:将Writer
转换为OutputStream
字节流中的数据都是字符时,转成字符流操作更高效。
很多时候我们使用转换流来处理文件乱码问题。实现编码和 解码的功能。
2. InputStreamReader
概述
- 实现将字节的输入流按指定字符集转换为字符的输入流。
- 需要和
InputStream
“套接”。
构造器
|
public InputStreamReader(InputStream in) |
public InputSreamReader(InputStream in,String charsetName) |
3. OutputStreamWriter
概述
- 实现将字符的输出流按指定字符集转换为字节的输出流。
(2)构造器
|
public OutputStreamWriter(OutputStream out) |
public OutputSreamWriter(OutputStream out,String charsetName) |
4. 代码演示
代码演示1:
@Test
public void test1() throws IOException {
FileInputStream fis = new FileInputStream("dbcp.txt");// InputStreamReader isr = new InputStreamReader(fis);//使用系统默认的字符集
//参数2指明了字符集,具体使用哪个字符集,取决于文件dbcp.txt保存时使用的字符集
InputStreamReader isr = new InputStreamReader(fis,"UTF-8");//使用系统默认的字符集
char[] cbuf = new char[20];
int len;
while((len = isr.read(cbuf)) != -1){
String str = new String(cbuf,0,len);
System.out.print(str);
}
isr.close();
}
ログイン後にコピー
代码演示2:
@Test
public void test2() throws Exception {
//1.造文件、造流
File file1 = new File("dbcp.txt");
File file2 = new File("dbcp_gbk.txt");
FileInputStream fis = new FileInputStream(file1);
FileOutputStream fos = new FileOutputStream(file2);
InputStreamReader isr = new InputStreamReader(fis,"utf-8");
OutputStreamWriter osw = new OutputStreamWriter(fos,"gbk");
//2.读写过程
char[] cbuf = new char[20];
int len;
while((len = isr.read(cbuf)) != -1){
osw.write(cbuf,0,len);
}
//3.关闭资源
isr.close();
osw.close();
}}
ログイン後にコピー
六、标准输入、输出流
1. 概述
System.in
和System.out
分别代表了系统标准的输入和输出设备
默认输入设备是:键盘,输出设备是:显示器
System.in
的类型是InputStream
,System.out
的类型是PrintStream
,其是OutputStream
的子类,FilterOutputStream
的子类
重定向:通过System类的setIn,setOut方法对默认设备进行改变。
public static void setIn(InputStream in)
public static void setOut(PrintStream out)
2. 代码演示
/*
从键盘输入字符串,要求将读取到的整行字符串转成大写输出。然后继续进行输入操作,
直至当输入“e”或者“exit”时,退出程序。
方法一:使用Scanner实现,调用next()返回一个字符串
方法二:使用System.in实现。System.in ---> 转换流 ---> BufferedReader的readLine()
*/
public static void main(String[] args) {
BufferedReader br = null;
try {
InputStreamReader isr = new InputStreamReader(System.in);
br = new BufferedReader(isr);
while (true) {
System.out.println("请输入字符串:");
String data = br.readLine();
if ("e".equalsIgnoreCase(data) || "exit".equalsIgnoreCase(data)) {
System.out.println("程序结束");
break;
}
String upperCase = data.toUpperCase();
System.out.println(upperCase);
}
} catch (IOException e) {
e.printStackTrace();
} finally {
if (br != null) {
try {
br.close();
} catch (IOException e) {
e.printStackTrace();
}
}
}
}
ログイン後にコピー
七. 打印流
1. 概述
实现将基本数据类型的数据格式转化为字符串输出
打印流:PrintStream
和PrintWriter
提供了一系列重载的print()
和println()
方法,用于多种数据类型的输出
PrintStream
和PrintWriter
的输出不会抛出IOException
异常
PrintStream
和PrintWriter
有自动flush
功能
PrintStream
打印的所有字符都使用平台的默认字符编码转换为字节。 在需要写入字符而不是写入字节的情况下,应该使用 PrintWriter
类。
System.out
返回的是PrintStream
的实例
2. 代码演示
/*
2. 打印流:PrintStream 和PrintWriter
2.1 提供了一系列重载的print() 和 println()
2.2 练习:
*/
@Test
public void test2() {
PrintStream ps = null;
try {
FileOutputStream fos = new FileOutputStream(new File("D:\\IO\\text.txt"));
// 创建打印输出流,设置为自动刷新模式(写入换行符或字节 '\n' 时都会刷新输出缓冲区)
ps = new PrintStream(fos, true);
if (ps != null) {// 把标准输出流(控制台输出)改成文件
System.setOut(ps);
}
for (int i = 0; i <h2>八、数据流</h2><blockquote><p> 为了方便地操作Java语言的基本数据类型和String的数据,可以使用数据流。</p></blockquote><blockquote>
<p> 数据流有两个类:(用于读取和写出基本数据类型、String类的数据)</p>
<ol>
<li><code>DataInputStream</code></li>
<li><code>DataOutputStream</code></li>
</ol>
<p>分别“套接”在 <code>InputStream</code> 和 <code>OutputStream</code> 子类的流上</p>
</blockquote><blockquote><p><code>DataInputStream</code>中的方法:</p></blockquote>
ログイン後にコピー
|
boolean readBoolean() |
byte readByte() char |
readChar() |
float readFloat() |
double readDouble() |
long readLong() |
int readInt() |
short readShort() |
String readUTF() |
void readFully(byte[] b) |
補足: DataOutputStream のメソッド: 上記のメソッドの read を対応する write に変更します
推奨学習: "java ビデオ チュートリアル "