カスタム カレンダー Vue コンポーネントを開発する方法。次の記事では、カスタム カレンダー コンポーネントをカプセル化する方法を段階的に説明します。皆さんのお役に立てれば幸いです。

ご存知のとおり、一般的に、プロジェクトでカレンダー コンポーネントが必要な場合、サードパーティの UI ライブラリまたは既製のコンポーネントに含まれることがよくあります。サードパーティのプラグイン。多くの友人にとって、カレンダー コンポーネントを初めて見たとき、無意識のうちに、非常に複雑で、開始する方法がないと考えます。しかし、このカレンダー プラグインのソース コードを読んでみると、思ったほど複雑ではないことがわかりました。私は、カレンダーコンポーネントを作る場合、次の開発ステップに進む前に、少なくともその年の前後10年分のカレンダーデータを取得する必要があると愚かにも考えていました。
しかし、dycalendar.js のソース コードを読んでみると、一方では、自分があまりにも愚かで、問題を複雑に考えすぎていると感じました。著者の明晰な思考にも感心します。読んでみて、とてもためになったと感じました。
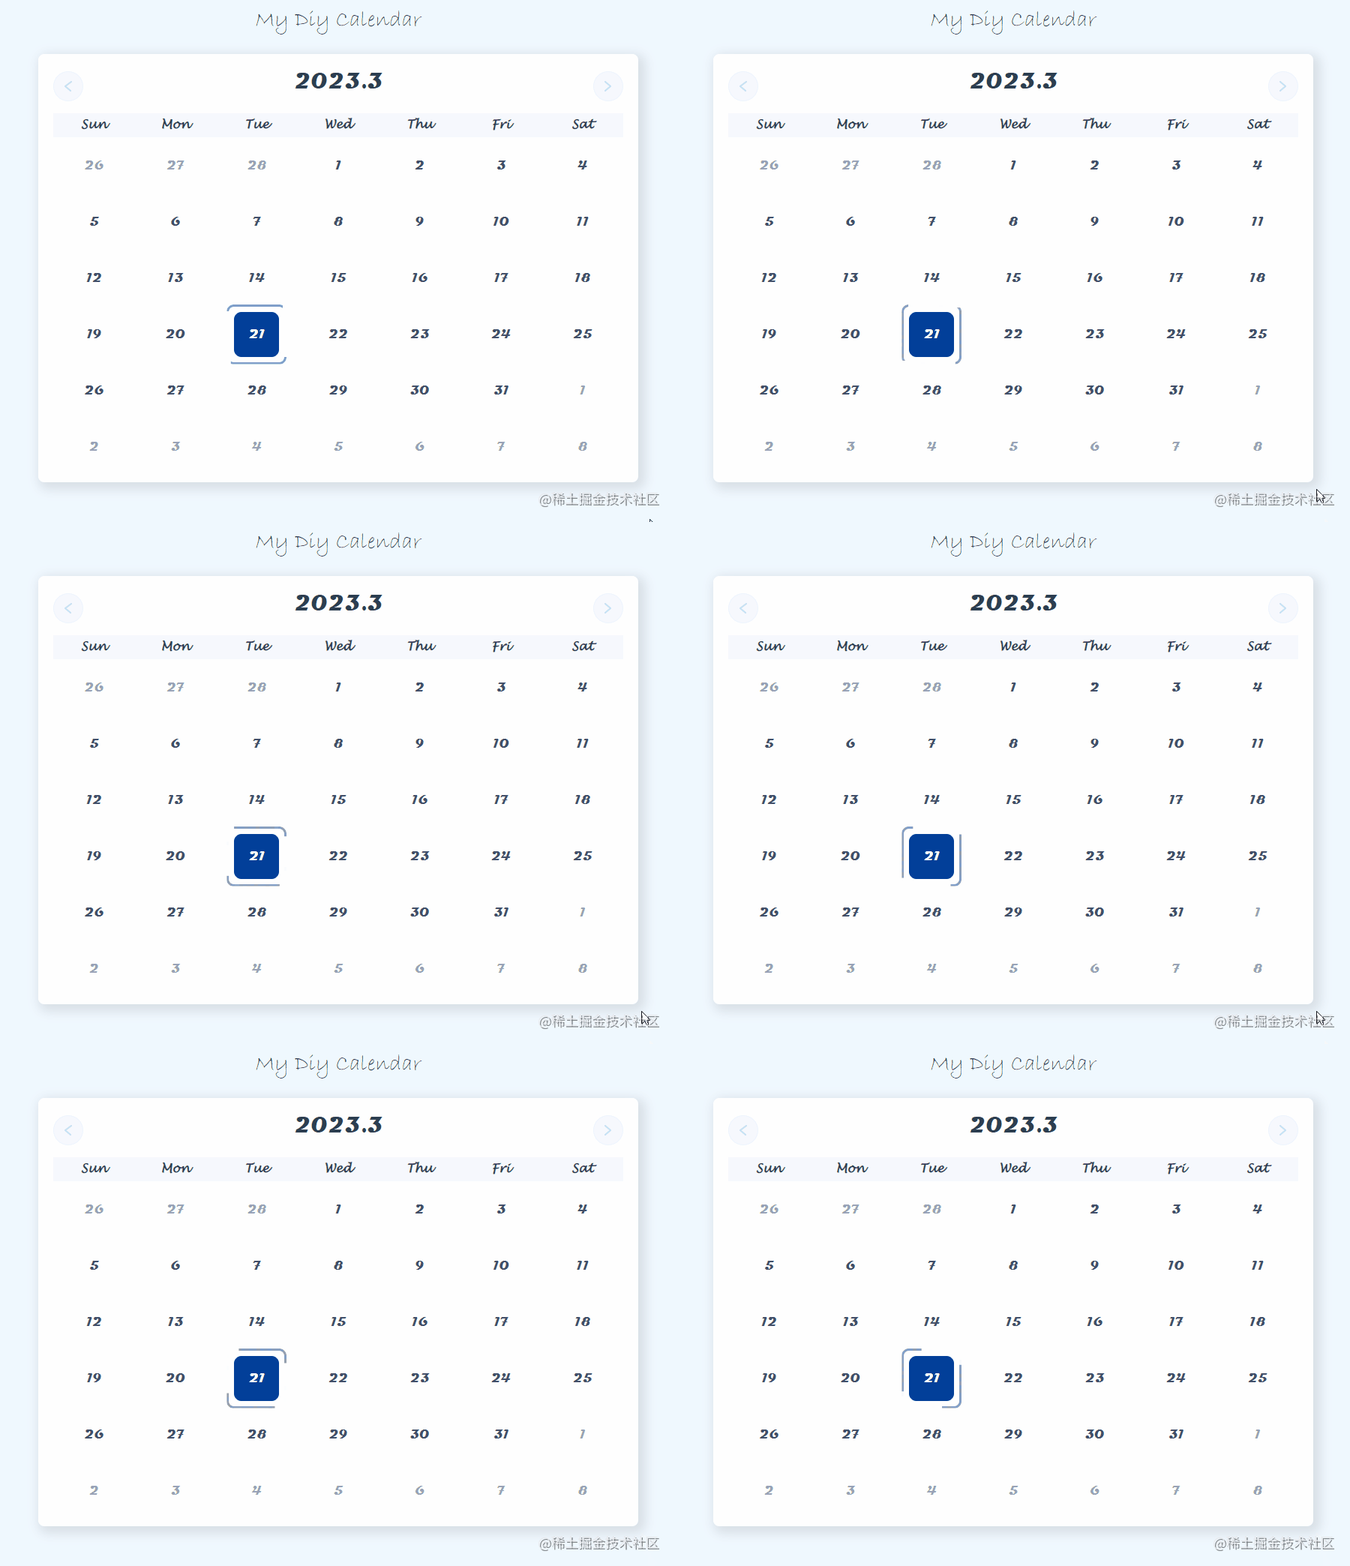
作者のアイデアロジックを整理した後、このアイデアに基づいて vue コンポーネントを開発しました。下の図に示すように:

#次に、独自のカレンダー コンポーネントを開発する方法を確認してください。 [関連する推奨事項: vuejs ビデオ チュートリアル 、Web フロントエンド開発 ]
現在の年、現在の月、現在の日付など) , 現在の曜日 ,現在の月の合計日数 ,現在の月の最初の日が曜日に対応します,先月の合計日数 待機する日数。 カレンダー日付データ リスト を生成し、それをループ内のテンプレートにレンダリングします。 一般に、成熟したカレンダー コンポーネントでは、日付は双方向バインド変数です。使いやすさを追求し、双方向バインディングも採用しています。
<script>import { reactive, ref, computed, watch } from "vue";const props = defineProps({  modelValue: Date,
});const emits = defineEmits(["update:modelValue"]);/**
 * 最小年份
 */const MIN_YEAR = 1900;/**
 * 最大年份
 */const MAX_YEAR = 9999;/**
 * 目标日期
*/const targetDate = ref(props.modelValue);复制代码</script>次に、月と日付を表すためにいくつかの定数を初期化する必要もあります:
/**
 * 有关月度的名称列表
 */const monthNameList = {  chineseFullName: [    "一月",    "二月",    "三月",    "四月",    "五月",    "六月",    "七月",    "八月",    "九月",    "十月",    "十一月",    "十二月",
  ],  fullName: [    "January",    "February",    "March",    "April",    "May",    "June",    "July",    "August",    "September",    "October",    "November",    "December",
  ],  mmm: [    "Jan",    "Feb",    "Mar",    "Apr",    "May",    "Jun",    "Jul",    "Aug",    "Sep",    "Oct",    "Nov",    "Dec",
  ],
};/**
 * 有关周几的名称列表
 */const dayNameList = [
  {    chineseFullName: "周日",    chineseShortName: "日",    fullName: "Sunday",    shortName: "Sun",    dayNumber: 0,
  },
  {    chineseFullName: "周一",    chineseShortName: "一",    fullName: "Monday",    shortName: "Mon",    dayNumber: 1,
  },
  {    chineseFullName: "周二",    chineseShortName: "二",    fullName: "Tuesday",    shortName: "Tue",    dayNumber: 2,
  },
  {    chineseFullName: "周三",    chineseShortName: "三",    fullName: "Wednesday",    shortName: "Wed",    dayNumber: 3,
  },
  {    chineseFullName: "周四",    chineseShortName: "四",    fullName: "Thursday",    shortName: "Thu",    dayNumber: 4,
  },
  {    chineseFullName: "周五",    chineseShortName: "五",    fullName: "Friday",    shortName: "Fri",    dayNumber: 5,
  },
  {    chineseFullName: "周六",    chineseShortName: "六",    fullName: "Saturday",    shortName: "Sat",    dayNumber: 6,
  },
];复制代码次に、いくつかの vue 応答データを準備します:
/**
 * 今日
 */const today = new Date();/**
 * 日历的各项属性
 */const calendarProps = reactive({  target: {    year: null,    month: null,    date: null,    day: null,    monthShortName: null,    monthFullName: null,    monthChineseFullName: null,    firstDay: null,    firstDayIndex: null,    totalDays: null,
  },  previous: {    totalDays: null,
  },
});/**
 * 用于展现的日历数据
*/const calendarData = ref([]);复制代码次に、setCalendarProps メソッドを通じてカレンダーのさまざまなプロパティを取得し、calendarProps にデータを 1 つずつ入力します。
function setCalendarProps() {  if (!targetDate.value) {
    targetDate.value = today;
  }  // 获取目标日期的年月日星期几数据
  calendarProps.target.year = targetDate.value.getFullYear();
  calendarProps.target.month = targetDate.value.getMonth();
  calendarProps.target.date = targetDate.value.getDate();
  calendarProps.target.day = targetDate.value.getDay();  if (
    calendarProps.target.year  MAX_YEAR
  ) {    console.error("无效的年份,请检查传入的数据是否是正常");    return;
  }  // 获取到目标日期的月份【中文】名称
  let dateString;
  dateString = targetDate.value.toString().split(" ");
  calendarProps.target.monthShortName = dateString[1];
  calendarProps.target.monthFullName =
    monthNameList.fullName[calendarProps.target.month];
  calendarProps.target.monthChineseFullName =
    monthNameList.chineseFullName[calendarProps.target.month];  // 获取目标月份的第一天是星期几,和在星期几中的索引值
  const targetMonthFirstDay = new Date(
    calendarProps.target.year,
    calendarProps.target.month,    1
  );
  calendarProps.target.firstDay = targetMonthFirstDay.getDay();
  calendarProps.target.firstDayIndex = dayNameList.findIndex(    (day) => day.dayNumber === calendarProps.target.firstDay
  );  // 获取目标月份总共多少天
  const targetMonthLastDay = new Date(
    calendarProps.target.year,
    calendarProps.target.month + 1,    0
  );
  calendarProps.target.totalDays = targetMonthLastDay.getDate();  // 获取目标月份的上个月总共多少天
  const previousMonth = new Date(
    calendarProps.target.year,
    calendarProps.target.month,    0
  );
  calendarProps.previous.totalDays = previousMonth.getDate();
}复制代码注意すべき点は、今月の日数と先月の日数を取得する場合、日付値がこのメソッドを実行すると、現時点での0
に設定されることです。これは、日付値が0の場合、返される Date オブジェクトは前月の最終日であるためです。したがって、今月の日数を取得するには、今月の月の値に1を加算する必要があります。
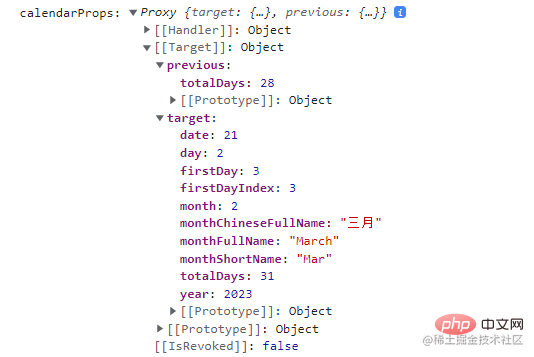
calendarProps の値は次のようになります:

今月の最初の日に対応する曜日のインデックス値,今月は何日あるのかand先月の合計日数 何日これら 3 つのコア データの後、対応するカレンダー データの生成を開始できます。
アイデアは次のとおりです:
に設定されます。次に、今月の最初の日に対応する曜日インデックス値 から増分を開始します。今月の前後の日付を計算するアルゴリズムを設定します。 後で日付の切り替えとスタイルの区別を容易にするために、生成されたデータは、今月か前月かを示す日付タイプ - /**
* 生成日历的数据
*/function setCalendarData() { let i; let date = 1; const originData = []; const firstRow = []; // 设置第一行数据
for (i = 0; i 次に、対応する HTML テンプレートをレンダリングし、
calendarData のデータに基づいてスタイルを追加するだけです。 <h3 data-id="heading-6">5. テンプレートとスタイル パーツを追加します</h3>
<p> 一般に、カレンダー コンポーネントはグリッド状の構造をしているため、レンダリングにはテーブル メソッドを選択します。ただ、他に方法はないかと言うと、フレックスレイアウトを使うとか、グリッドレイアウトを使うとか、まだいくつかありますが、この方法を使ってしまうと、<code>calendarDataのデータ構造が今のままではなくなります。 。
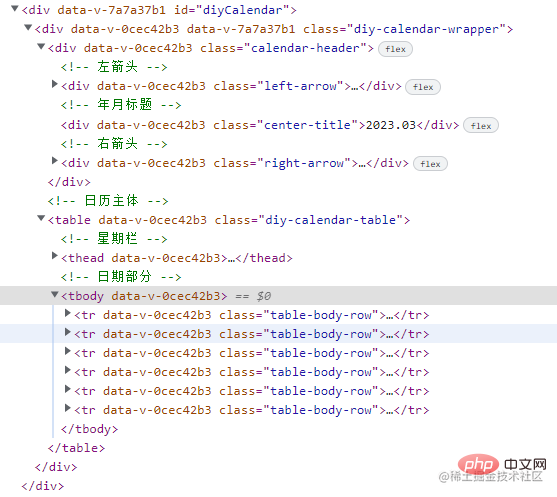
dom の構造は以下の通りです:

ボタン枠の流れるような効果については、Su Su さんの記事を参考に作成しました。詳細については、次を参照してください:
クリップパスは、境界線を流れるボタンのアニメーションを実装しますjuejin.cn/post/719877…
次に、残りのスタイル部分です。即興で作成することも、UI デザインに基づいて作成することもできます。絵を描くだけです。 皆さんも UI 姉妹の精緻なデザイン画を体験したことがあると思います (喜喜
具体的なコード部分は記事には掲載しません。必要に応じて、完全なソースを直接表示できます)以下のコード
非常に面倒だと思われる一部のコンポーネントには、次のようなコア ロジックがある可能性があります。はそれほど複雑ではありません。場合によっては、コードを 1 行ずつ逆アセンブルして読み、アイデアを明確にするだけの忍耐が必要な場合もあります。
(学習ビデオの共有: vuejs 入門チュートリアル 、 基本的なプログラミング ビデオ)
以上がvue を使用してカスタム カレンダー コンポーネントをカプセル化する方法の詳細な説明の詳細内容です。詳細については、PHP 中国語 Web サイトの他の関連記事を参照してください。