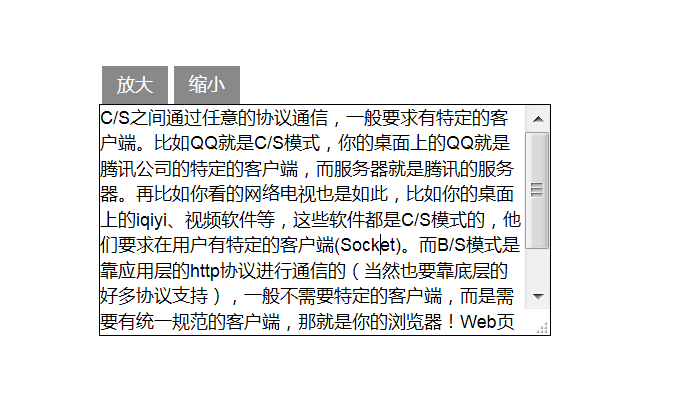
今日は JQuery を使っていくつかの小さなコードを書く方法を学びました。コードは次のとおりです。
<!DOCTYPE HTML>
<html lang="en">
<head>
  <meta charset="UTF-8">
  <title></title>
  <style type="text/css" media="screen">
  *{
    margin :0;
    padding :0;
    font : normal 12px/17px Arial;
  }
  .msg{
    width :300px;
    margin : 100px;
  }
  .msg_caption{
    width :100%;
    overflow : hidden;
    margin-botton : 1px;
  }
  .msg_caption span{
    display : block;
    float : left;
    margin :0 2px;
    padding :4px 10px;
    background :#898989;
    cursor : pointer;
    color : white;
  }
  .msg textarea{
    width :300px;
    height : 80px 100%;
    border :1px solid #000;
  }
  </style>

  <script type="text/javascript" src="../jquery1.11.js"></script>
  <script type="text/javascript" charset="utf-8">
  $(function(){
      var $comment = $("#comment");
      $('.bigger').click(function(){//绑定扩大按钮
        if(!$comment.is(":animated")){//判断对象是否处于动画状态,不是才执行里面代码
          if($comment.height()<500){
            $comment.animate({
              height : "+=50"
            },1000);//重新设置高度,在原来的基础上+50
          }
        }
        });
      $('.smaller').click(function(){//绑定缩小按钮
        if(!$comment.is(":animated")){//判断对象是否处于动画状态,不是才执行里面代码
          if($comment.height()>50){
            $comment.animate({
              height : "-=50"
            },1000);//重新设置高度,在原来的基础上-50
          }
        }
        });
      })
  </script>
</head>
<body>
  <form action="" method="post">
  <div class="msg">
    <div class="msg_caption">
      <span class="bigger" >放大</span>
      <span class="smaller" >缩小</span>
    </div>
    <div>
      <textarea id="comment" rows="8" cols="20">C/S之间通过任意的协议通信,一般要求有特定的客户端。比如QQ就是C/S模式,你的桌面上的QQ就是腾讯公司的特定的客户端,而服务器就是腾讯的服务器。再比如你看的网络电视也是如此,比如你的桌面上的iqiyi、视频软件等,这些软件都是C/S模式的,他们要求在用户有特定的客户端(Socket)。而B/S模式是靠应用层的http协议进行通信的(当然也要靠底层的好多协议支持),一般不需要特定的客户端,而是需要有统一规范的客户端,那就是你的浏览器!Web页就是B/S 模式,也就是说咱们说的网站就是B/S模式。 </textarea>
    </div>
  </div>
</form>
</body>
</html>

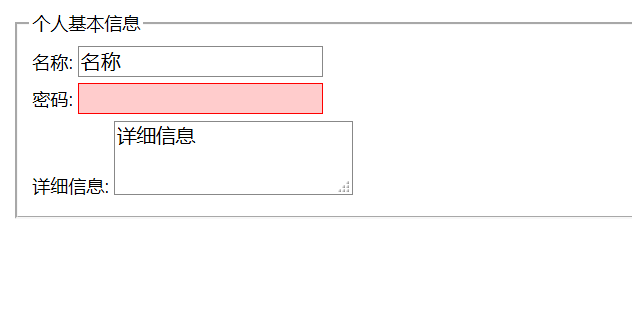
別の入力タグ、コード:
<!DOCTYPE HTML>
<html lang="en">
<head>
  <meta charset="UTF-8">
  <title></title>
  <style type="text/css" media="screen">
  body{
    font : normal 12px/17px Arial;
  }
  div{
    padding :2px;
  }
  input,textarea{
    width : 12em;
    border :1px solid #888;
  }
  .focus{
    border : 1px solid #f00;
    background : #fcc;
  }
  </style>
  <script type="text/javascript" src="../jquery1.11.js"></script>
  <script type="text/javascript" charset="utf-8">
$(function(){
    $(":input").focus(function(){
      $(this).addClass("focus");
      if($(this).val() == this.defaultValue){
        $(this).val("");
          };
      }).blur(function(){
        $(this).removeClass("focus");
        if($(this).val() == ''){
          $(this).val(this.defaultValue);
          };
        });
    //addClass:为每个匹配的元素添加指定的类名,一个或多个用空格分开,添加属性
    //val():获得或者更改value属性对应的值
    //defaultValue():获取默认值的value
    //removeClass():删除对应的class属性
    });
  </script>
</head>
<body>
  <form action="" method="post" id="regForm">
    <fieldset>
      <legend>个人基本信息</legend>
      <div>
        <label for="username">名称:</label>
        <input id="username" type="text" value="名称" />
      </div>
      <div>
        <label for="pass">密码:</label>
        <input id="pass" type="password" value="密码" />
      </div>
      <div>
        <label for="msg">详细信息:</label>
        <textarea id="msg" rows="2" cols="20">详细信息</textarea>
      </div>
    </fieldset>
  </form>
</body>
</html>

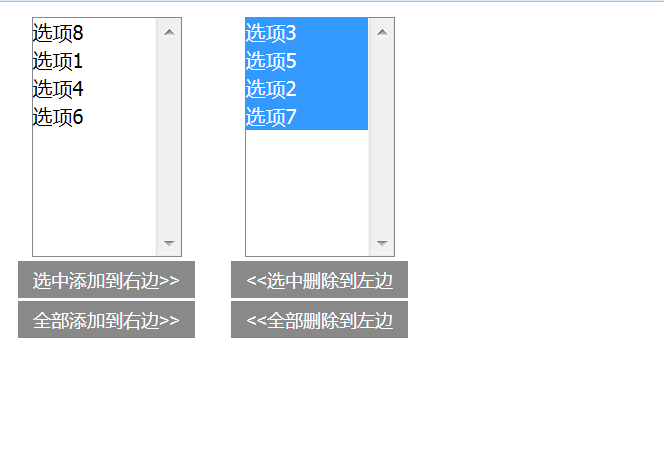
3 番目は選択です。これは QQ スペースとタオバオで広く使用されているため、コードは次のとおりです。
<!DOCTYPE HTML>
<html lang="en">
<head>
  <meta charset="UTF-8">
  <title></title>
  <style type="text/css">
* { margin:0; padding:0; }
div.centent {
  float:left;
  text-align: center;
  margin: 10px;
}
span {
  display:block;
  margin:2px 2px;
  padding:4px 10px;
  background:#898989;
  cursor:pointer;
  font-size:12px;
  color:white;
}
</style>
  <script type="text/javascript" src="../jquery1.11.js"></script>
  <script type="text/javascript" charset="utf-8">
  $(function(){
      //移动到右边
      $("#add").click(function(){
        //获取选中的项,删除然后再移动到右边,这里是选择移动;
        $('#select1 option:selected').appendTo('#select2');
        });
      //移动到左边
      $("#remove").click(function(){
        $('#select2 option:selected').appendTo('#select1');
        })
      //全部到右边
      $("#add_all").click(function(){
        $('#select1 option').appendTo('#select2');
        })
      //全部到左边
      $("#remove_all").click(function(){
        $('#select2 option').appendTo('#select1');
        })
      //双击选项
      $('#select1').dblclick(function(){
        //这里先定位#select1这个大的选择框,然后定位到里面的被选择的元素组陈的集合
          //this就是表示这个集合,当我们按Ctrl或者shift的时候,我们操作的就是这个集合
          //$("option:selected",this).appendTo("#select2");
        $("option:selected",this).appendTo("#select2");
        })
      //双击选项
      $('#select2').dblclick(function(){
        $("option:selected",this).appendTo("#select1");
        })
      });
  </script>
</head>
<body>
  <div class="centent">
    <select multiple="multiple" id="select1" style="width:100px;height:160px;">
      <option value="1">选项1</option>
      <option value="2">选项2</option>
      <option value="3">选项3</option>
      <option value="4">选项4</option>
      <option value="5">选项5</option>
      <option value="6">选项6</option>
      <option value="7">选项7</option>
    </select>
    <div>
      <span id="add" >选中添加到右边>></span>
      <span id="add_all" >全部添加到右边>></span>
    </div>
  </div>

  <div class="centent">
    <select multiple="multiple" id="select2" style="width: 100px;height:160px;">
      <option value="8">选项8</option>
    </select>
    <div>
      <span id="remove"><<选中删除到左边</span>
      <span id="remove_all"><<全部删除到左边</span>
    </div>
  </div>
</body>
</html>

操作チェックボックス
html
<a href="javascript:;" id="all">全部选择</a><br>
 <a href="javascript:;" id="delAll">取消选择</a><br>
 <a href="javascript:;" id="antiAll">反向选择</a>
 <p><input type="checkbox" name="checkbox1">A
 <input type="checkbox" name="checkbox1"> B
 <input type="checkbox" name="checkbox1">C</p>
 <p><input type="checkbox" name="checkbox1">D
 <input type="checkbox" name="checkbox1">E
 <input type="checkbox" name="checkbox1">F</p>
//全部选择
 $("#all").click(function(){
 $("input[name='checkbox1']").each(function(){
  $(this).attr("checked",true);
 });
 });
function checkAll(){
 for(i=0;i<newTask.length;i++){
 e=newTask.elements[i];
 if(e.type=='checkbox'){
  if(e.checked=false){
  e.checked=true;
  }else{
  e.checked=true;
  }
 }
 }
}
//取消选择
 $("#delAll").click(function(){
 $("input[name='checkbox1']").each(function(){
  $(this).attr("checked",false);
 });
 });
function delAll(){
 for(i=0;i<newTask.length;i++){
 e=newTask.elements[i];
 if(e.type=='checkbox'){
  if(e.checked=true){
  e.checked=false;
  }
  else{
  e.checked=false;
  }
 }
 }
}
//反向选择
 $("#antiAll").click(function(){
 $("input[name='checkbox1']").each(function(){
  $(this).attr("checked",!this.checked);
   });
function antiAll(){
 for(i=0;i<newTask.length;i++){
 e=newTask.elements[i];
 if(e.type=='checkbox'){
  e.checked=!e.checked;
 }
 }
}