

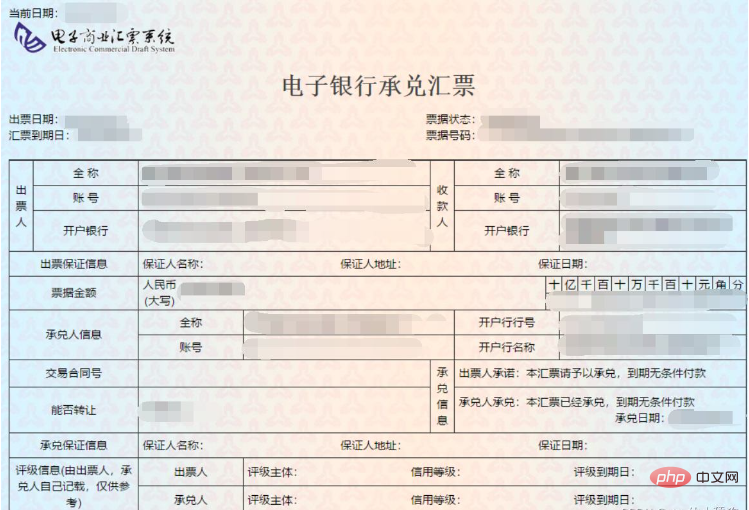
Python を使用してバッチデータ抽出を実装する方法

構成要件
1.ImageMagick
2.tesseract-OCR
3.Python3.7
4.from PIL import Image as PI
5.import io
6.import os
7.import pyocr.builders
8.from cnocr import CnOcr
import データはデジタル形式に変換されますが、これに基づいて、最初に大文字の漢字と数字の変換を完了する必要があります。
def chineseNumber2Int(strNum: str):
    result = 0
    temp = 1  # 存放一个单位的数字如:十万
    count = 0  # 判断是否有chArr
    cnArr = ['壹', '贰', '叁', '肆', '伍', '陆', '柒', '捌', '玖']
    chArr = ['拾', '佰', '仟', '万', '亿']
    for i in range(len(strNum)):
        b = True
        c = strNum[i]
        for j in range(len(cnArr)):
            if c == cnArr[j]:
                if count != 0:
                    result += temp
                    count = 0
                temp = j + 1
                b = False
                break
        if b:
            for j in range(len(chArr)):
                if c == chArr[j]:
                    if j == 0:
                        temp *= 10
                    elif j == 1:
                        temp *= 100
                    elif j == 2:
                        temp *= 1000
                    elif j == 3:
                        temp *= 10000
                    elif j == 4:
                        temp *= 100000000
                count += 1
        if i == len(strNum) - 1:
            result += temp
return result上記のコードは、大文字と数字を変換するために使用できます。たとえば、「200000」をエクスポートするには「2万元」と入力し、それを数字に変換すると、表が大幅に簡素化されます。テーブル操作を完了しながらデータをアーカイブするのに役立ちます。 
図に示すように、小さな黒い点がマウスの位置で、描画ソフトウェアの左下隅がその座標です。
発行日を抽出します
def text1(new_img):
    #提取出票日期
    left = 80
    top = 143
    right = 162
    bottom = 162
    image_text1 = new_img.crop((left, top, right, bottom))
    #展示图片
    #image_text1.show()
    txt1 = tool.image_to_string(image_text1)
    print(txt1)
return str(txt1)金額を引き出します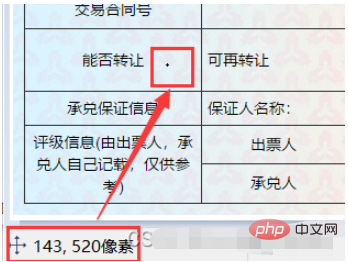
def text2(new_img):
    #提取金额
    left = 224
    top = 355
    right = 585
    bottom = 380
    image_text2 = new_img.crop((left, top, right, bottom))
    #展示图片
    #image_text2.show()
    image_text2.save("img/tmp.png")
    temp = ocr.ocr("img/tmp.png")
    temp="".join(temp[0])
    txt2=chineseNumber2Int(temp)
    print(txt2)
return txt2def text3(new_img):
#提取出票人
left = 177
top = 207
right = 506
bottom = 231
image_text3 = new_img.crop((left, top, right, bottom))
#展示图片
#image_text3.show()
image_text3.save("img/tmp.png")
temp = ocr.ocr("img/tmp.png")
txt3="".join(temp[0])
print(txt3)
return txt3ログイン後にコピー
支払い銀行を抽出しますdef text3(new_img):
#提取出票人
left = 177
top = 207
right = 506
bottom = 231
image_text3 = new_img.crop((left, top, right, bottom))
#展示图片
#image_text3.show()
image_text3.save("img/tmp.png")
temp = ocr.ocr("img/tmp.png")
txt3="".join(temp[0])
print(txt3)
return txt3def text4(new_img):
#提取付款行
left = 177
top = 274
right = 492
bottom = 311
image_text4 = new_img.crop((left, top, right, bottom))
#展示图片
#image_text4.show()
image_text4.save("img/tmp.png")
temp = ocr.ocr("img/tmp.png")
txt4="".join(temp[0])
print(txt4)
return txt4ログイン後にコピー
為替手形到着日の抽出def text4(new_img):
#提取付款行
left = 177
top = 274
right = 492
bottom = 311
image_text4 = new_img.crop((left, top, right, bottom))
#展示图片
#image_text4.show()
image_text4.save("img/tmp.png")
temp = ocr.ocr("img/tmp.png")
txt4="".join(temp[0])
print(txt4)
return txt4def text5(new_img):
#提取汇票到日期
left = 92
top = 166
right = 176
bottom = 184
image_text5 = new_img.crop((left, top, right, bottom))
#展示图片
#image_text5.show()
txt5 = tool.image_to_string(image_text5)
print(txt5)
return txt5ログイン後にコピー
手形書類の抽出def text5(new_img):
#提取汇票到日期
left = 92
top = 166
right = 176
bottom = 184
image_text5 = new_img.crop((left, top, right, bottom))
#展示图片
#image_text5.show()
txt5 = tool.image_to_string(image_text5)
print(txt5)
return txt5def text6(new_img):
#提取票据号码
left = 598
top = 166
right = 870
bottom = 182
image_text6 = new_img.crop((left, top, right, bottom))
#展示图片
#image_text6.show()
txt6 = tool.image_to_string(image_text6)
print(txt6)
return txt6ログイン後にコピー
すべてのデータを抽出したら、設定プロセスに入ります。最初に請求書ファイルを作成し、そのファイル名とパスを取得します。 def text6(new_img):
#提取票据号码
left = 598
top = 166
right = 870
bottom = 182
image_text6 = new_img.crop((left, top, right, bottom))
#展示图片
#image_text6.show()
txt6 = tool.image_to_string(image_text6)
print(txt6)
return txt6ocr=CnOcr()
tool = pyocr.get_available_tools()[0]
filePath='img'
img_name=[]
for i,j,name in os.walk(filePath):
img_name=nameログイン後にコピー
完全なデータを取得したら、そのデータを Excel にインポートできます。 ocr=CnOcr()
tool = pyocr.get_available_tools()[0]
filePath='img'
img_name=[]
for i,j,name in os.walk(filePath):
img_name=namecount=1
book = xlwt.Workbook(encoding='utf-8',style_compression=0)
sheet = book.add_sheet('test',cell_overwrite_ok=True)
for i in img_name:
img_url = filePath+"/"+i
with open(img_url, 'rb') as f:
a = f.read()
new_img = PI.open(io.BytesIO(a))
## 写入csv
col = ('年份','出票日期','金额','出票人','付款行全称','汇票到日期','备注')
for j in range(0,7):
sheet.write(0,j,col[j])
book.save('1.csv')
shijian=text1(new_img)
sheet.write(count,0,shijian[0:4])
sheet.write(count,1,shijian[5:])
sheet.write(count,2,text2(new_img))
sheet.write(count,3,text3(new_img))
sheet.write(count,4,text4(new_img))
sheet.write(count,5,text5(new_img))
sheet.write(count,6,text6(new_img))
count = count + 1ログイン後にコピー
この時点で、完全なプロセスは終了です。 すべてのソース コードを添付しますcount=1
book = xlwt.Workbook(encoding='utf-8',style_compression=0)
sheet = book.add_sheet('test',cell_overwrite_ok=True)
for i in img_name:
img_url = filePath+"/"+i
with open(img_url, 'rb') as f:
a = f.read()
new_img = PI.open(io.BytesIO(a))
## 写入csv
col = ('年份','出票日期','金额','出票人','付款行全称','汇票到日期','备注')
for j in range(0,7):
sheet.write(0,j,col[j])
book.save('1.csv')
shijian=text1(new_img)
sheet.write(count,0,shijian[0:4])
sheet.write(count,1,shijian[5:])
sheet.write(count,2,text2(new_img))
sheet.write(count,3,text3(new_img))
sheet.write(count,4,text4(new_img))
sheet.write(count,5,text5(new_img))
sheet.write(count,6,text6(new_img))
count = count + 1from wand.image import Image
from PIL import Image as PI
import pyocr
import io
import re
import os
import shutil
import pyocr.builders
from cnocr import CnOcr
import requests
import xlrd
import xlwt
from openpyxl import load_workbook
def chineseNumber2Int(strNum: str):
result = 0
temp = 1 # 存放一个单位的数字如:十万
count = 0 # 判断是否有chArr
cnArr = ['壹', '贰', '叁', '肆', '伍', '陆', '柒', '捌', '玖']
chArr = ['拾', '佰', '仟', '万', '亿']
for i in range(len(strNum)):
b = True
c = strNum[i]
for j in range(len(cnArr)):
if c == cnArr[j]:
if count != 0:
result += temp
count = 0
temp = j + 1
b = False
break
if b:
for j in range(len(chArr)):
if c == chArr[j]:
if j == 0:
temp *= 10
elif j == 1:
temp *= 100
elif j == 2:
temp *= 1000
elif j == 3:
temp *= 10000
elif j == 4:
temp *= 100000000
count += 1
if i == len(strNum) - 1:
result += temp
return result
def text1(new_img):
#提取出票日期
left = 80
top = 143
right = 162
bottom = 162
image_text1 = new_img.crop((left, top, right, bottom))
#展示图片
#image_text1.show()
txt1 = tool.image_to_string(image_text1)
print(txt1)
return str(txt1)
def text2(new_img):
#提取金额
left = 224
top = 355
right = 585
bottom = 380
image_text2 = new_img.crop((left, top, right, bottom))
#展示图片
#image_text2.show()
image_text2.save("img/tmp.png")
temp = ocr.ocr("img/tmp.png")
temp="".join(temp[0])
txt2=chineseNumber2Int(temp)
print(txt2)
return txt2
def text3(new_img):
    #提取出票人
    left = 177
    top = 207
    right = 506
    bottom = 231
    image_text3 = new_img.crop((left, top, right, bottom))
    #展示图片
    #image_text3.show()
    image_text3.save("img/tmp.png")
    temp = ocr.ocr("img/tmp.png")
    txt3="".join(temp[0])
    print(txt3)
    return txt3
def text4(new_img):
    #提取付款行
    left = 177
    top = 274
    right = 492
    bottom = 311
    image_text4 = new_img.crop((left, top, right, bottom))
    #展示图片
    #image_text4.show()
    image_text4.save("img/tmp.png")
    temp = ocr.ocr("img/tmp.png")
    txt4="".join(temp[0])
    print(txt4)
    return txt4
def text5(new_img):
    #提取汇票到日期
    left = 92
    top = 166
    right = 176
    bottom = 184
    image_text5 = new_img.crop((left, top, right, bottom))
    #展示图片
    #image_text5.show()
    txt5 = tool.image_to_string(image_text5)
    print(txt5)
    return txt5
def text6(new_img):
    #提取票据号码
    left = 598
    top = 166
    right = 870
    bottom = 182
    image_text6 = new_img.crop((left, top, right, bottom))
    #展示图片
    #image_text6.show()
    txt6 = tool.image_to_string(image_text6)
    print(txt6)
    return txt6
ocr=CnOcr()
tool = pyocr.get_available_tools()[0]
filePath='img'
img_name=[]
for i,j,name in os.walk(filePath):
    img_name=name
count=1
book = xlwt.Workbook(encoding='utf-8',style_compression=0)
sheet = book.add_sheet('test',cell_overwrite_ok=True)
for i in img_name:
    img_url = filePath+"/"+i
    with open(img_url, 'rb') as f:
        a = f.read()
    new_img = PI.open(io.BytesIO(a))
    ## 写入csv
    col = ('年份','出票日期','金额','出票人','付款行全称','汇票到日期','备注')
    for j in range(0,7):
        sheet.write(0,j,col[j])
    book.save('1.csv')
    shijian=text1(new_img)
    sheet.write(count,0,shijian[0:4])
    sheet.write(count,1,shijian[5:])
    sheet.write(count,2,text2(new_img))
    sheet.write(count,3,text3(new_img))
    sheet.write(count,4,text4(new_img))
    sheet.write(count,5,text5(new_img))
    sheet.write(count,6,text6(new_img))
count = count + 1以上がPython を使用してバッチデータ抽出を実装する方法の詳細内容です。詳細については、PHP 中国語 Web サイトの他の関連記事を参照してください。

ホットAIツール

Undresser.AI Undress
リアルなヌード写真を作成する AI 搭載アプリ

AI Clothes Remover
写真から衣服を削除するオンライン AI ツール。

Undress AI Tool
脱衣画像を無料で

Clothoff.io
AI衣類リムーバー

AI Hentai Generator
AIヘンタイを無料で生成します。

人気の記事
ホットツール

メモ帳++7.3.1
使いやすく無料のコードエディター

SublimeText3 中国語版
中国語版、とても使いやすい

ゼンドスタジオ 13.0.1
強力な PHP 統合開発環境

ドリームウィーバー CS6
ビジュアル Web 開発ツール

SublimeText3 Mac版
神レベルのコード編集ソフト(SublimeText3)
ホットトピック
 7566
7566
 15
1386
52
87
11
28
105
15
1386
52
87
11
28
105

 PHPおよびPython:コードの例と比較
Apr 15, 2025 am 12:07 AM
PHPおよびPython:コードの例と比較
Apr 15, 2025 am 12:07 AM
PHPとPythonには独自の利点と短所があり、選択はプロジェクトのニーズと個人的な好みに依存します。 1.PHPは、大規模なWebアプリケーションの迅速な開発とメンテナンスに適しています。 2。Pythonは、データサイエンスと機械学習の分野を支配しています。
 Python vs. JavaScript:コミュニティ、ライブラリ、リソース
Apr 15, 2025 am 12:16 AM
Python vs. JavaScript:コミュニティ、ライブラリ、リソース
Apr 15, 2025 am 12:16 AM
PythonとJavaScriptには、コミュニティ、ライブラリ、リソースの観点から、独自の利点と短所があります。 1)Pythonコミュニティはフレンドリーで初心者に適していますが、フロントエンドの開発リソースはJavaScriptほど豊富ではありません。 2)Pythonはデータサイエンスおよび機械学習ライブラリで強力ですが、JavaScriptはフロントエンド開発ライブラリとフレームワークで優れています。 3)どちらも豊富な学習リソースを持っていますが、Pythonは公式文書から始めるのに適していますが、JavaScriptはMDNWebDocsにより優れています。選択は、プロジェクトのニーズと個人的な関心に基づいている必要があります。
 Dockerの原則の詳細な説明
Apr 14, 2025 pm 11:57 PM
Dockerの原則の詳細な説明
Apr 14, 2025 pm 11:57 PM
DockerはLinuxカーネル機能を使用して、効率的で孤立したアプリケーションランニング環境を提供します。その作業原則は次のとおりです。1。ミラーは、アプリケーションを実行するために必要なすべてを含む読み取り専用テンプレートとして使用されます。 2。ユニオンファイルシステム(UnionFS)は、違いを保存するだけで、スペースを節約し、高速化する複数のファイルシステムをスタックします。 3.デーモンはミラーとコンテナを管理し、クライアントはそれらをインタラクションに使用します。 4。名前空間とcgroupsは、コンテナの分離とリソースの制限を実装します。 5.複数のネットワークモードは、コンテナの相互接続をサポートします。これらのコア概念を理解することによってのみ、Dockerをよりよく利用できます。
 ターミナルVSCODEでプログラムを実行する方法
Apr 15, 2025 pm 06:42 PM
ターミナルVSCODEでプログラムを実行する方法
Apr 15, 2025 pm 06:42 PM
VSコードでは、次の手順を通じて端末でプログラムを実行できます。コードを準備し、統合端子を開き、コードディレクトリが端末作業ディレクトリと一致していることを確認します。プログラミング言語(pythonのpython your_file_name.pyなど)に従って実行コマンドを選択して、それが正常に実行されるかどうかを確認し、エラーを解決します。デバッガーを使用して、デバッグ効率を向上させます。
 Visual StudioコードはPythonで使用できますか
Apr 15, 2025 pm 08:18 PM
Visual StudioコードはPythonで使用できますか
Apr 15, 2025 pm 08:18 PM
VSコードはPythonの書き込みに使用でき、Pythonアプリケーションを開発するための理想的なツールになる多くの機能を提供できます。ユーザーは以下を可能にします。Python拡張機能をインストールして、コードの完了、構文の強調表示、デバッグなどの関数を取得できます。デバッガーを使用して、コードを段階的に追跡し、エラーを見つけて修正します。バージョンコントロールのためにGitを統合します。コードフォーマットツールを使用して、コードの一貫性を維持します。糸くずツールを使用して、事前に潜在的な問題を発見します。
 Python:自動化、スクリプト、およびタスク管理
Apr 16, 2025 am 12:14 AM
Python:自動化、スクリプト、およびタスク管理
Apr 16, 2025 am 12:14 AM
Pythonは、自動化、スクリプト、およびタスク管理に優れています。 1)自動化:OSやShutilなどの標準ライブラリを介してファイルバックアップが実現されます。 2)スクリプトの書き込み:Psutilライブラリを使用してシステムリソースを監視します。 3)タスク管理:スケジュールライブラリを使用してタスクをスケジュールします。 Pythonの使いやすさと豊富なライブラリサポートにより、これらの分野で優先ツールになります。
 Windows 8でコードを実行できます
Apr 15, 2025 pm 07:24 PM
Windows 8でコードを実行できます
Apr 15, 2025 pm 07:24 PM
VSコードはWindows 8で実行できますが、エクスペリエンスは大きくない場合があります。まず、システムが最新のパッチに更新されていることを確認してから、システムアーキテクチャに一致するVSコードインストールパッケージをダウンロードして、プロンプトとしてインストールします。インストール後、一部の拡張機能はWindows 8と互換性があり、代替拡張機能を探すか、仮想マシンで新しいWindowsシステムを使用する必要があることに注意してください。必要な拡張機能をインストールして、適切に動作するかどうかを確認します。 Windows 8ではVSコードは実行可能ですが、開発エクスペリエンスとセキュリティを向上させるために、新しいWindowsシステムにアップグレードすることをお勧めします。
 VSCODE拡張機能は悪意がありますか?
Apr 15, 2025 pm 07:57 PM
VSCODE拡張機能は悪意がありますか?
Apr 15, 2025 pm 07:57 PM
VSコード拡張機能は、悪意のあるコードの隠れ、脆弱性の活用、合法的な拡張機能としての自慰行為など、悪意のあるリスクを引き起こします。悪意のある拡張機能を識別する方法には、パブリッシャーのチェック、コメントの読み取り、コードのチェック、およびインストールに注意してください。セキュリティ対策には、セキュリティ認識、良好な習慣、定期的な更新、ウイルス対策ソフトウェアも含まれます。
