最近の作業要件により、構成ホット リロード機能を実装するために、既存のプロジェクトに新しい機能を追加する必要があります。いわゆる構成ホットリロードとは、サービスが構成更新メッセージを受信した後、サービスを再起動せずに最新の構成を使用してタスクを実行できることを意味します。
以下では、マルチプロセス、マルチスレッド、およびコルーチンのメソッドを使用して、構成のホットリロードを実装します。
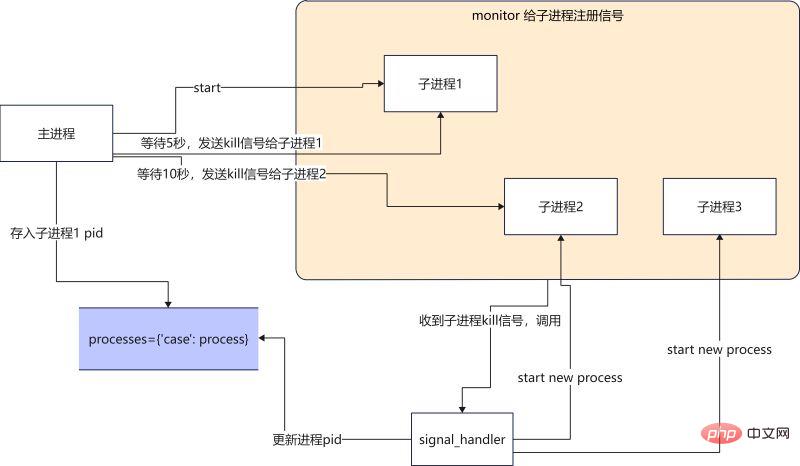
コード実装で複数のプロセスを使用する場合、メイン プロセス 1 が構成を更新して命令を送信し、タスク呼び出しはプロセス 2 になります。構成ホットロードを実装しますか? 毛織物?

メイン プロセスが構成更新メッセージを受信するとき (構成読み取りはどのように構成更新メッセージを受信しますか? ?ここではまだ説明しません)、メインプロセスはサブプロセス 1 に kill シグナルを送信し、サブプロセス 1 は kill シグナルを受信した後に終了し、その後、信号処理関数が最新の構成ファイルを使用して新しいプロセスを開始します。 . ミッションを続行します。
#main 関数
def main():
    # 启动一个进程执行任务
    p1 = Process(target=run, args=("p1",))
    p1.start()

    monitor(p1, run) # 注册信号
    processes["case100"] = p1 #将进程pid保存
    num = 0
    while True: # 模拟获取配置更新
        print(
            f"{multiprocessing.active_children()=}, count={len(multiprocessing.active_children())}\n")
        print(f"{processes=}\n")
        sleep(2)
        if num == 4:
            kill_process(processes["case100"]) # kill 当前进程
        if num == 8:
            kill_process(processes["case100"]) # kill 当前进程
        if num == 12:
            kill_process(processes["case100"]) # kill 当前进程
num += 1signal_handler 関数
def signal_handler(process: Process, func, signum, frame):
    # print(f"{signum=}")
    global counts

    if signum == 17:  # 17 is SIGCHILD
        # 这个循环是为了忽略SIGTERM发出的信号,避免抢占了主进程发出的SIGCHILD
        for signame in [SIGTERM, SIGCHLD, SIGQUIT]:
            signal.signal(signame, SIG_DFL)

        print("Launch a new process")
        p = multiprocessing.Process(target=func, args=(f"p{counts}",))
        p.start()
        monitor(p, run)
        processes["case100"] = p
        counts += 1

    if signum == 2:
        if process.is_alive():
            print(f"Kill {process} process")
            process.terminate()
        signal.signal(SIGCHLD, SIG_IGN)
sys.exit("kill parent process")完全なコードは次のとおりです
#! /usr/local/bin/python3.8
from multiprocessing import Process
from typing import Dict
import signal
from signal import SIGCHLD, SIGTERM, SIGINT, SIGQUIT, SIG_DFL, SIG_IGN
import multiprocessing
from multiprocessing import Process
from typing import Callable
from data import processes
import sys
from functools import partial
import time
processes: Dict[str, Process] = {}
counts = 2
def run(process: Process):
while True:
print(f"{process} running...")
time.sleep(1)
def kill_process(process: Process):
print(f"kill {process}")
process.terminate()
def monitor(process: Process, func: Callable):
for signame in [SIGTERM, SIGCHLD, SIGINT, SIGQUIT]:
# SIGTERM is kill signal.
# No SIGCHILD is not trigger singnal_handler,
# No SIGINT is not handler ctrl+c,
# No SIGQUIT is RuntimeError: reentrant call inside <_io.BufferedWriter name='<stdout>'>
signal.signal(signame, partial(signal_handler, process, func))
def signal_handler(process: Process, func, signum, frame):
print(f"{signum=}")
global counts
if signum == 17: # 17 is SIGTERM
for signame in [SIGTERM, SIGCHLD, SIGQUIT]:
signal.signal(signame, SIG_DFL)
print("Launch a new process")
p = multiprocessing.Process(target=func, args=(f"p{counts}",))
p.start()
monitor(p, run)
processes["case100"] = p
counts += 1
if signum == 2:
if process.is_alive():
print(f"Kill {process} process")
process.terminate()
signal.signal(SIGCHLD, SIG_IGN)
sys.exit("kill parent process")
def main():
p1 = Process(target=run, args=("p1",))
p1.start()
monitor(p1, run)
processes["case100"] = p1
num = 0
while True:
print(
f"{multiprocessing.active_children()=}, count={len(multiprocessing.active_children())}\n")
print(f"{processes=}\n")
time.sleep(2)
if num == 4:
kill_process(processes["case100"])
if num == 8:
kill_process(processes["case100"])
if num == 12:
kill_process(processes["case100"])
num += 1
if __name__ == '__main__':
main()multiprocessing.active_children()=[<Process name='Process-1' pid=2533 parent=2532 started>], count=1
processes={'case100': <Process name='Process-1' pid=2533 parent=2532 started>}
p1 running...
p1 running...
kill <Process name='Process-1' pid=2533 parent=2532 started>
multiprocessing.active_children()=[<Process name='Process-1' pid=2533 parent=2532 started>], count=1
processes={'case100': <Process name='Process-1' pid=2533 parent=2532 started>}
signum=17
Launch a new process
p2 running...
p2 running...
multiprocessing.active_children()=[<Process name='Process-2' pid=2577 parent=2532 started>], count=1
processes={'case100': <Process name='Process-2' pid=2577 parent=2532 started>}
p2 running...
p2 running...
multiprocessing.active_children()=[<Process name='Process-2' pid=2577 parent=2532 started>], count=1
processes={'case100': <Process name='Process-2' pid=2577 parent=2532 started>}
p2 running...
p2 running...
multiprocessing.active_children()=[<Process name='Process-2' pid=2577 parent=2532 started>], count=1
processes={'case100': <Process name='Process-2' pid=2577 parent=2532 started>}
p2 running...
p2 running...
kill <Process name='Process-2' pid=2577 parent=2532 started>
signum=17
Launch a new process
multiprocessing.active_children()=[<Process name='Process-2' pid=2577 parent=2532 stopped exitcode=-SIGTERM>], count=1
processes={'case100': <Process name='Process-3' pid=2675 parent=2532 started>}
p3 running...
p3 running...
multiprocessing.active_children()=[<Process name='Process-3' pid=2675 parent=2532 started>], count=1利点: セマフォを使用すると、複数のプロセス間の通信の問題に対処できます。
欠点: コードを書くのが難しく、書かれたコードを理解するのが難しい。セマフォの使用法に精通している必要がありますが、そうでないと、自分でバグを作成するのが簡単です (経験豊富なドライバーを除き、すべての初心者は注意してセマフォを使用する必要があります)。 ##process.terminate()
送信されたシグナルはSIGTERM
数値は 15 ですが、signal_handler が初めてシグナルを受信したときは数値 = 17 です。シグナルが 15 の場合、前のプロセスを強制終了できないという問題が発生します。セマフォに詳しい方、アドバイスをいただければ幸いです。 multiprocessing.Event を使用して構成のホット ロードを実装する実装ロジックは、メイン プロセス 1 が構成を更新し、指示を送信することです。プロセス 2 はスケジュール タスクを開始します。
スケジューラー関数
def scheduler():
    while True:
        print('wait message...')
        case_configurations = scheduler_notify_queue.get()
        print(f"Got case configurations {case_configurations=}...")

        task_schedule_event.set() # 设置set之后, is_set 为True

        print(f"Schedule will start ...")
        while task_schedule_event.is_set(): # is_set 为True的话,那么任务就会一直执行
            run(case_configurations)

print("Clearing all scheduling job ...")event_scheduler関数
def event_scheduler(case_config):

    scheduler_notify_queue.put(case_config)
    print(f"Put cases config to the Queue ...")

    task_schedule_event.clear() # clear之后,is_set 为False
    print(f"Clear scheduler jobs ...")

print(f"Schedule job ...")完全なコード 実行結果は次のとおりです
import multiprocessing
import time


scheduler_notify_queue = multiprocessing.Queue()
task_schedule_event = multiprocessing.Event()


def run(case_configurations: str):
    print(f'{case_configurations} running...')
    time.sleep(3)


def scheduler():
    while True:
        print('wait message...')
        case_configurations = scheduler_notify_queue.get()

        print(f"Got case configurations {case_configurations=}...")
        task_schedule_event.set()

        print(f"Schedule will start ...")
        while task_schedule_event.is_set():
            run(case_configurations)

        print("Clearing all scheduling job ...")


def event_scheduler(case_config: str):

    scheduler_notify_queue.put(case_config)
    print(f"Put cases config to the Queue ...")

    task_schedule_event.clear()
    print(f"Clear scheduler jobs ...")

    print(f"Schedule job ...")


def main():
    scheduler_notify_queue.put('1')
    p = multiprocessing.Process(target=scheduler)
    p.start()

    count = 1
    print(f'{count=}')
    while True:
        if count == 5:
            event_scheduler('100')
        if count == 10:
            event_scheduler('200')
        count += 1
        time.sleep(1)


if __name__ == '__main__':
main()wait message... Got case configurations case_configurations='1'... Schedule will start ... 1 running... 1 running... Put cases config to the Queue ... Clear scheduler jobs ... Schedule job ... Clearing all scheduling job ... wait message... Got case configurations case_configurations='100'... Schedule will start ... 100 running... Put cases config to the Queue ... Clear scheduler jobs ... Schedule job ... Clearing all scheduling job ... wait message... Got case configurations case_configurations='200'... Schedule will start ... 200 running... 200 running...
マルチスレッドやコルーチンを利用する場合も、実際には上記の実装方法と同じです。唯一の違いは、queue
とevent
.# threading scheduler_notify_queue = queue.Queue() task_schedule_event = threading.Event() # async scheduler_notify_queue = asyncio.Queue() task_schedule_event = asyncio.Event()
以上がPython で構成ファイルのホットロードを実装する方法の詳細内容です。詳細については、PHP 中国語 Web サイトの他の関連記事を参照してください。