

Java ArrayQueue ソース コードを分析します。

ArrayQueue の内部実装
ArrayQueue の内部実装について説明する前に、まず ArrayQueue## について見てみましょう。 # 使用例:
public void testQueue() {
    ArrayQueue<Integer> queue = new ArrayQueue<>(10);
    queue.add(1);
    queue.add(2);
    queue.add(3);
    queue.add(4);
    System.out.println(queue);
    queue.remove(0); // 这个参数只能为0 表示删除队列当中第一个元素,也就是队头元素
    System.out.println(queue);
    queue.remove(0);
    System.out.println(queue);
}
// 输出结果
[1, 2, 3, 4]
[2, 3, 4]
[3, 4]ArrayQueue は循環配列によって内部実装されており、これにより、 とは異なり、データの追加と削除の時間計算量が同じになることが保証されます。 ArrayListデータの削除。時間計算量は です。 ArrayQueue 内には 2 つの整数データ head と tail があります。これら 2 つの機能は主にキューの先頭と末尾、およびその初期値を指すことです。メモリ内のレイアウトは以下のようになります:
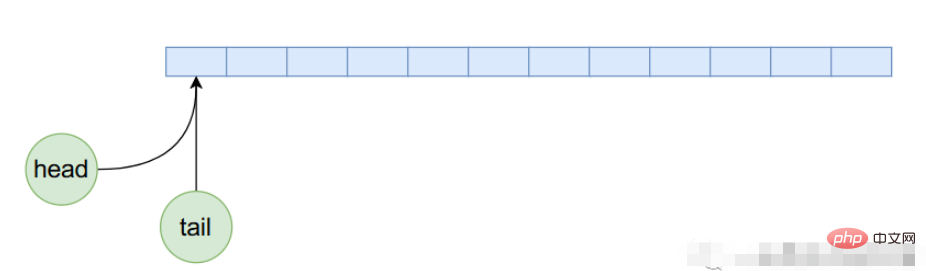
headとtailの値は両方とも初期状態では 0 に等しく、配列内の最初のデータを指します。 ArrayQueue に 5 つのデータを追加すると、そのメモリ レイアウトは次のようになります。
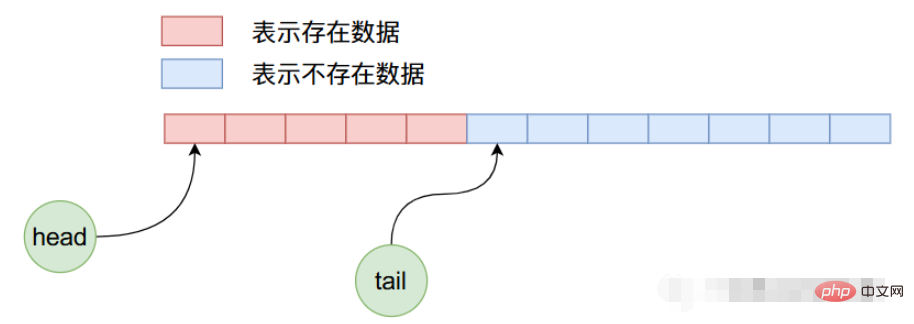
ArrayQueue の内部データ レイアウトは次のようになります。


ArrayQueue 内に実装されています。
public ArrayQueue(int capacity) {
    this.capacity = capacity + 1;
    this.queue = newArray(capacity + 1);
    this.head = 0;
    this.tail = 0;
}

@SuppressWarnings("unchecked")
private T[] newArray(int size) {
    return (T[]) new Object[size];
}
ログイン後にコピー
上記のコンストラクター コードは比較的理解しやすく、主に、によって入力された配列空間の長さに基づいて配列に適用されます。配列を申請すると、さらに 1 つのスペースが申請されます。 add functionpublic ArrayQueue(int capacity) {
this.capacity = capacity + 1;
this.queue = newArray(capacity + 1);
this.head = 0;
this.tail = 0;
}
@SuppressWarnings("unchecked")
private T[] newArray(int size) {
return (T[]) new Object[size];
}public boolean add(T o) {
queue[tail] = o;
// 循环使用数组
int newtail = (tail + 1) % capacity;
if (newtail == head)
throw new IndexOutOfBoundsException("Queue full");
tail = newtail;
return true; // we did add something
}ログイン後にコピー
上記のコードは比較的理解しやすいです。public boolean add(T o) {
queue[tail] = o;
// 循环使用数组
int newtail = (tail + 1) % capacity;
if (newtail == head)
throw new IndexOutOfBoundsException("Queue full");
tail = newtail;
return true; // we did add something
}ArrayQueue はループ内で配列にデータを追加できると上で述べました。これも反映されています上記のコードで。
public T remove(int i) {
    if (i != 0)
        throw new IllegalArgumentException("Can only remove head of queue");
    if (head == tail)
        throw new IndexOutOfBoundsException("Queue empty");
    T removed = queue[head];
    queue[head] = null;
    head = (head + 1) % capacity;
    return removed;
}
ログイン後にコピー
上記のコードからわかるように、public T remove(int i) {
if (i != 0)
throw new IllegalArgumentException("Can only remove head of queue");
if (head == tail)
throw new IndexOutOfBoundsException("Queue empty");
T removed = queue[head];
queue[head] = null;
head = (head + 1) % capacity;
return removed;
}remove 関数にパラメーター 0 を渡す必要があります。そうしないと、例外がスローされます。この関数では、現在の head 添字位置のデータのみを削除し、その後、head の値に 1 を加算する循環操作を実行します。
public T get(int i) {
    int size = size();
    if (i < 0 || i >= size) {
        final String msg = "Index " + i + ", queue size " + size;
        throw new IndexOutOfBoundsException(msg);
    }
    int index = (head + i) % capacity;
    return queue[index];
}
ログイン後にコピー
public T get(int i) {
int size = size();
if (i < 0 || i >= size) {
final String msg = "Index " + i + ", queue size " + size;
throw new IndexOutOfBoundsException(msg);
}
int index = (head + i) % capacity;
return queue[index];
}get関数のパラメータは、i 番目のデータが取得されることを示し、ith data is not 配列位置の i 番目のデータではなく、head から i 番目のデータです。コードは理解しやすいです。
public void resize(int newcapacity) {
    int size = size();
    if (newcapacity < size)
        throw new IndexOutOfBoundsException("Resizing would lose data");
    newcapacity++;
    if (newcapacity == this.capacity)
        return;
    T[] newqueue = newArray(newcapacity);
    for (int i = 0; i < size; i++)
        newqueue[i] = get(i);
    this.capacity = newcapacity;
    this.queue = newqueue;
    this.head = 0;
    this.tail = size;
}
ログイン後にコピー
public void resize(int newcapacity) {
int size = size();
if (newcapacity < size)
throw new IndexOutOfBoundsException("Resizing would lose data");
newcapacity++;
if (newcapacity == this.capacity)
return;
T[] newqueue = newArray(newcapacity);
for (int i = 0; i < size; i++)
newqueue[i] = get(i);
this.capacity = newcapacity;
this.queue = newqueue;
this.head = 0;
this.tail = size;
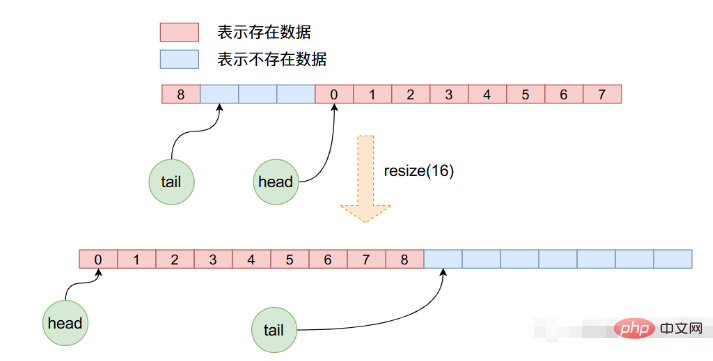
}resize関数では、まず新しい長さの配列空間を適用し、次に元の配列のデータを新しい配列にコピーします。注: このコピー プロセス中に、head と tail が再度更新されますが、前の操作では head が使用されていたため、これは単純な配列のコピーではありません。は 0 ではなくなる可能性があるため、新しいコピーを作成するには、古い配列から 1 つずつ取り出して、新しい配列に入れる必要があります。次の図は、このプロセスを明確に示しています:
以上がJava ArrayQueue ソース コードを分析します。の詳細内容です。詳細については、PHP 中国語 Web サイトの他の関連記事を参照してください。

ホットAIツール

Undresser.AI Undress
リアルなヌード写真を作成する AI 搭載アプリ

AI Clothes Remover
写真から衣服を削除するオンライン AI ツール。

Undress AI Tool
脱衣画像を無料で

Clothoff.io
AI衣類リムーバー

AI Hentai Generator
AIヘンタイを無料で生成します。

人気の記事
ホットツール

メモ帳++7.3.1
使いやすく無料のコードエディター

SublimeText3 中国語版
中国語版、とても使いやすい

ゼンドスタジオ 13.0.1
強力な PHP 統合開発環境

ドリームウィーバー CS6
ビジュアル Web 開発ツール

SublimeText3 Mac版
神レベルのコード編集ソフト(SublimeText3)
ホットトピック
 7467
7467
 15
1376
52
77
11
18
19
15
1376
52
77
11
18
19


 Java の乱数ジェネレーター
Aug 30, 2024 pm 04:27 PM
Java の乱数ジェネレーター
Aug 30, 2024 pm 04:27 PM
Java の乱数ジェネレーターのガイド。ここでは、Java の関数について例を挙げて説明し、2 つの異なるジェネレーターについて例を挙げて説明します。
 ジャワのウェカ
Aug 30, 2024 pm 04:28 PM
ジャワのウェカ
Aug 30, 2024 pm 04:28 PM
Java の Weka へのガイド。ここでは、weka java の概要、使い方、プラットフォームの種類、利点について例を交えて説明します。

 Java Springのインタビューの質問
Aug 30, 2024 pm 04:29 PM
Java Springのインタビューの質問
Aug 30, 2024 pm 04:29 PM
この記事では、Java Spring の面接で最もよく聞かれる質問とその詳細な回答をまとめました。面接を突破できるように。
 Java 8 Stream Foreachから休憩または戻ってきますか?
Feb 07, 2025 pm 12:09 PM
Java 8 Stream Foreachから休憩または戻ってきますか?
Feb 07, 2025 pm 12:09 PM
Java 8は、Stream APIを導入し、データ収集を処理する強力で表現力のある方法を提供します。ただし、ストリームを使用する際の一般的な質問は次のとおりです。 従来のループにより、早期の中断やリターンが可能になりますが、StreamのForeachメソッドはこの方法を直接サポートしていません。この記事では、理由を説明し、ストリーム処理システムに早期終了を実装するための代替方法を調査します。 さらに読み取り:JavaストリームAPIの改善 ストリームを理解してください Foreachメソッドは、ストリーム内の各要素で1つの操作を実行する端末操作です。その設計意図はです
 Java での日付までのタイムスタンプ
Aug 30, 2024 pm 04:28 PM
Java での日付までのタイムスタンプ
Aug 30, 2024 pm 04:28 PM
Java での日付までのタイムスタンプに関するガイド。ここでは、Java でタイムスタンプを日付に変換する方法とその概要について、例とともに説明します。
