Python で dwebsocket を使用してバックエンド データのリアルタイム更新を実現する方法
スケジュールされたタスクを実行するとき、実行率またはリアルタイム データの返還を知る必要があります。このときに使用できる方法は
1 です。Ajax がバックエンド サーバーに要求し、その後、フロントエンド ページが部分的にレンダリングされてパーセンテージを取得します
2. 長時間の接続通信には webscoket を使用し、更新します
Ajax の使用法では、interval 関数を使用してタイミング リクエストを実装します。
次の内容を views.py ファイルに追加します
from django.shortcuts import render,HttpResponse
from dwebsocket.decorators import accept_websocket
import time,random
import uuid
import json
@accept_websocket
def test_websocket(request):
cnt=1
if request.is_websocket():
while True:
messages = {
'time': time.strftime('%Y.%m.%d %H:%M:%S', time.localtime(time.time())),
'server_msg': 'hello%s'%time.time(),
'client_msg': 'msg%s'%time.time()
}
time.sleep(1)
cnt+=1
if cnt<=10:
request.websocket.send(json.dumps(messages))
else:
break
def test_websocket_client(request):
return render(request,'websocket_client.html',locals())Settings.py ファイルに dwebsocket を追加します
INSTALLED_APPS = [
'django.contrib.admin',
'django.contrib.auth',
'django.contrib.contenttypes',
'django.contrib.sessions',
'django.contrib.messages ',
'django.contrib.staticfiles',
'dwebsocket'
]
関連リンクを urls.py ファイルに追加します
urlpatterns = [
    path('test_websocket', views.test_websocket, name='test_websocket'),
    path('test_websocket_client', views.test_websocket_client, name='test_websocket_client'),
]直接アップロードHTML コード
<!DOCTYPE html>
<html lang="en">
<head>
<meta charset="UTF-8">
<title>dwebsocket实践</title>
<script src="http://code.jquery.com/jquery-1.11.1.min.js"></script>
<script type="text/javascript">
$(function () {
// $('#send_message').click(
// function() {
var socket = new WebSocket("ws://" + window.location.host + "/test_websocket");
socket.onopen = function () {
console.log('WebSocket open');//成功连接上Websocket
// socket.send($('#message').val());//发送数据到服务端
};
socket.onmessage = function (e) {
// console.log('message: ' + e.data);//打印服务端返回的数据
$('#messagecontainer').text('<p>' + JSON.parse(e.data).client_msg + '</p>'+'<p>' + JSON.parse(e.data).server_msg + '</p>');
// $('#messagecontainer').text('<p>' + JSON.parse(e.data).server_msg + '</p>');
};
socket.onclose=function () {
console.log("连接已关闭")
}
// });
});
</script>
</head>
<body>
<input type="text" id="message" value="请输入发送消息!" />
<button type="button" id="send_message">send message</button>
<h2 id="接受到消息">接受到消息</h2>
<div id="messagecontainer">
</div>
</body>
</html>次にプログラムを実行します

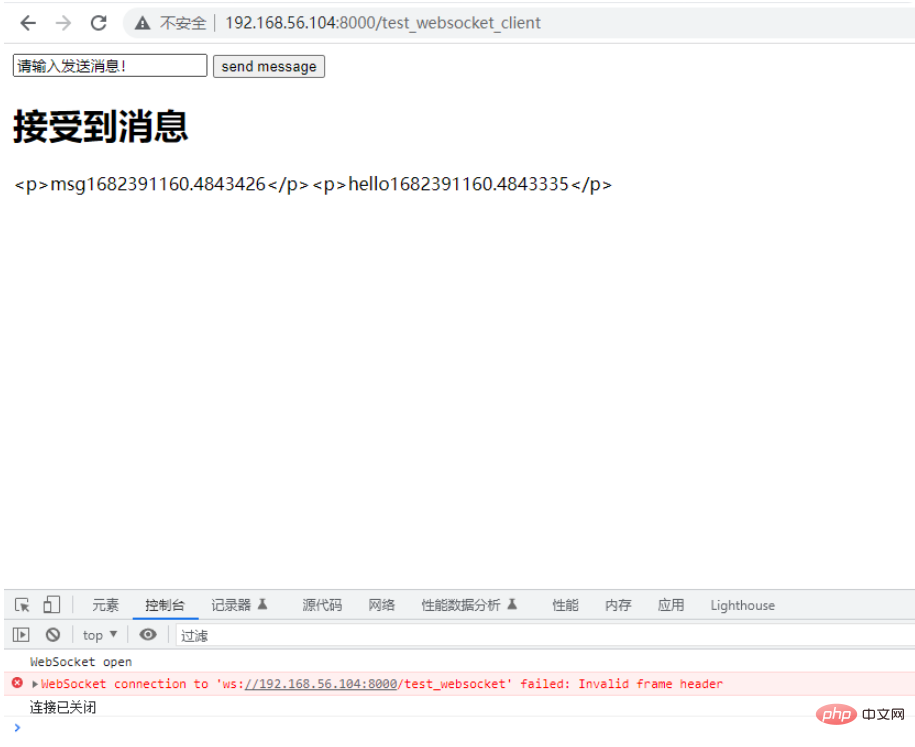
10 秒後に切断すると、望む結果が得られます
用事がある場合必要に応じて、test_websocket のロジックを変更し、返された結果に基づいてレンダリングできます
以上がPython で dwebsocket を使用してバックエンド データのリアルタイム更新を実現する方法の詳細内容です。詳細については、PHP 中国語 Web サイトの他の関連記事を参照してください。

ホットAIツール

Undresser.AI Undress
リアルなヌード写真を作成する AI 搭載アプリ

AI Clothes Remover
写真から衣服を削除するオンライン AI ツール。

Undress AI Tool
脱衣画像を無料で

Clothoff.io
AI衣類リムーバー

AI Hentai Generator
AIヘンタイを無料で生成します。

人気の記事

ホットツール

メモ帳++7.3.1
使いやすく無料のコードエディター

SublimeText3 中国語版
中国語版、とても使いやすい

ゼンドスタジオ 13.0.1
強力な PHP 統合開発環境

ドリームウィーバー CS6
ビジュアル Web 開発ツール

SublimeText3 Mac版
神レベルのコード編集ソフト(SublimeText3)

ホットトピック
 7364
7364
 15
15
 1628
1628
 14
14
 1353
1353
 52
52
 1265
1265
 25
25
 1214
1214
 29
29
 XML形式を開く方法
Apr 02, 2025 pm 09:00 PM
ほとんどのテキストエディターを使用して、XMLファイルを開きます。より直感的なツリーディスプレイが必要な場合は、酸素XMLエディターやXMLSPYなどのXMLエディターを使用できます。プログラムでXMLデータを処理する場合、プログラミング言語(Pythonなど)やXMLライブラリ(XML.ETREE.ELEMENTTREEなど)を使用して解析する必要があります。
 XML形式を美化する方法
Apr 02, 2025 pm 09:57 PM
XMLの美化は、合理的なインデンテーション、ラインブレーク、タグ組織など、本質的に読みやすさを向上させています。原則は、XMLツリーを通過し、レベルに応じてインデントを追加し、テキストを含む空のタグとタグを処理することです。 PythonのXML.ETREE.ELEMENTTREEライブラリは、上記の美化プロセスを実装できる便利なchile_xml()関数を提供します。
 携帯電話のXMLファイルをPDFに変換する方法は?
Apr 02, 2025 pm 10:12 PM
単一のアプリケーションで携帯電話でXMLからPDF変換を直接完了することは不可能です。クラウドサービスを使用する必要があります。クラウドサービスは、2つのステップで達成できます。1。XMLをクラウド内のPDFに変換し、2。携帯電話の変換されたPDFファイルにアクセスまたはダウンロードします。
 XMLをPDFに変換できるモバイルアプリはありますか?
Apr 02, 2025 pm 09:45 PM
XML構造が柔軟で多様であるため、すべてのXMLファイルをPDFSに変換できるアプリはありません。 XMLのPDFへのコアは、データ構造をページレイアウトに変換することです。これには、XMLの解析とPDFの生成が必要です。一般的な方法には、ElementTreeなどのPythonライブラリを使用してXMLを解析し、ReportLabライブラリを使用してPDFを生成することが含まれます。複雑なXMLの場合、XSLT変換構造を使用する必要がある場合があります。パフォーマンスを最適化するときは、マルチスレッドまたはマルチプロセスの使用を検討し、適切なライブラリを選択します。
 携帯電話でXMLをPDFに変換するとき、変換速度は高速ですか?
Apr 02, 2025 pm 10:09 PM
Mobile XMLからPDFへの速度は、次の要因に依存します。XML構造の複雑さです。モバイルハードウェア構成変換方法(ライブラリ、アルゴリズム)コードの品質最適化方法(効率的なライブラリ、アルゴリズムの最適化、キャッシュデータ、およびマルチスレッドの利用)。全体として、絶対的な答えはなく、特定の状況に従って最適化する必要があります。
 画像に変換されたXMLのサイズを制御する方法は?
Apr 02, 2025 pm 07:24 PM
XMLを介して画像を生成するには、XMLのメタデータ(サイズ、色)に基づいて画像を生成するために、ブリッジとしてグラフライブラリ(枕やJFreechartなど)を使用する必要があります。画像のサイズを制御するための鍵は、&lt; width&gt;の値を調整することです。および&lt; height&gt; XMLのタグ。ただし、実際のアプリケーションでは、XML構造の複雑さ、グラフ描画の細かさ、画像生成の速度とメモリ消費の速度、および画像形式の選択はすべて、生成された画像サイズに影響を与えます。したがって、グラフィックライブラリに熟練したXML構造を深く理解し、最適化アルゴリズムや画像形式の選択などの要因を考慮する必要があります。
 XMLをPDFに変換できるモバイルアプリはありますか?
Apr 02, 2025 pm 08:54 PM
XMLをPDFに直接変換するアプリケーションは、2つの根本的に異なる形式であるため、見つかりません。 XMLはデータの保存に使用され、PDFはドキュメントを表示するために使用されます。変換を完了するには、PythonやReportLabなどのプログラミング言語とライブラリを使用して、XMLデータを解析してPDFドキュメントを生成できます。
 携帯電話でXMLをPDFに変換する方法は?
Apr 02, 2025 pm 10:18 PM
携帯電話でXMLをPDFに直接変換するのは簡単ではありませんが、クラウドサービスの助けを借りて実現できます。軽量モバイルアプリを使用してXMLファイルをアップロードし、生成されたPDFを受信し、クラウドAPIで変換することをお勧めします。クラウドAPIはサーバーレスコンピューティングサービスを使用し、適切なプラットフォームを選択することが重要です。 XMLの解析とPDF生成を処理する際には、複雑さ、エラー処理、セキュリティ、および最適化戦略を考慮する必要があります。プロセス全体では、フロントエンドアプリとバックエンドAPIが連携する必要があり、さまざまなテクノロジーをある程度理解する必要があります。


