

springboot が netty フレームワークを統合する方法は何ですか?

Netty は、高性能 IO フレームワークであり、非常に使いやすい技術フレームワークです。
Netty は、NIO に基づいたクライアントおよびサーバー側のプログラミング フレームワークです。Netty を使用すると、特定のプロトコルを実装するクライアント アプリケーションやサーバー アプリケーションなどのネットワーク アプリケーションを簡単に開発できます。 Netty は、TCP および UDP に基づくソケット サービス開発などのネットワーク アプリケーションのプログラミングおよび開発プロセスを簡素化および合理化することに相当します。
「高速」かつ「シンプル」であるため、メンテナンスやパフォーマンスの問題は発生しません。 Netty は、複数のプロトコル (FTP、SMTP、HTTP などのさまざまなバイナリ テキスト プロトコルを含む) の実装経験を吸収するプロジェクトであり、非常に慎重に設計されています。最終的に、Netty は、アプリケーションのパフォーマンス、安定性、スケーラビリティを確保しながら、開発を容易にする方法を見つけることに成功しました。
まず第一に、pom
<?xml version="1.0" encoding="UTF-8"?>
<project xmlns="http://maven.apache.org/POM/4.0.0" xmlns:xsi="http://www.w3.org/2001/XMLSchema-instance"
         xsi:schemaLocation="http://maven.apache.org/POM/4.0.0 https://maven.apache.org/xsd/maven-4.0.0.xsd">
    <modelVersion>4.0.0</modelVersion>
    <parent>
        <groupId>org.springframework.boot</groupId>
        <artifactId>spring-boot-starter-parent</artifactId>
        <version>2.2.1.RELEASE</version>
        <relativePath/> <!-- lookup parent from repository -->
    </parent>
    <groupId>com.cxy</groupId>
    <artifactId>netty</artifactId>
    <version>0.0.1-SNAPSHOT</version>
    <name>netty</name>
    <description>Demo project for Spring Boot</description>

    <properties>
        <java.version>1.8</java.version>
    </properties>

    <dependencies>
        <dependency>
            <groupId>org.springframework.boot</groupId>
            <artifactId>spring-boot-starter-web</artifactId>
        </dependency>
        <dependency>
            <groupId>io.netty</groupId>
            <artifactId>netty-all</artifactId>
            <version>4.1.25.Final</version>
        </dependency>
        <dependency>
            <groupId>org.springframework.boot</groupId>
            <artifactId>spring-boot-starter-test</artifactId>
            <scope>test</scope>
            <exclusions>
                <exclusion>
                    <groupId>org.junit.vintage</groupId>
                    <artifactId>junit-vintage-engine</artifactId>
                </exclusion>
            </exclusions>
        </dependency>
    </dependencies>

    <build>
        <plugins>
            <plugin>
                <groupId>org.springframework.boot</groupId>
                <artifactId>spring-boot-maven-plugin</artifactId>
            </plugin>
        </plugins>
    </build>

</project>handler クラスをプロジェクト全体に導入することで、変更されたものではありません
package com.cxy.netty.controller;
import io.netty.buffer.ByteBuf;
import io.netty.channel.ChannelFutureListener;
import io.netty.channel.ChannelHandlerContext;
import io.netty.channel.ChannelInboundHandlerAdapter;
import io.netty.util.CharsetUtil;
public class EchoServerHandler extends ChannelInboundHandlerAdapter {
    @Override
    public void channelRead(ChannelHandlerContext ctx, Object msg){
        ByteBuf in = (ByteBuf) msg;
        System.out.println("Server received: " + in.toString(CharsetUtil.UTF_8));
        ctx.write(in);
    }
    public void channelReadComplete(ChannelHandlerContext ctx){
        ctx.writeAndFlush(ChannelFutureListener.CLOSE);
    public void exceptionCaught(ChannelHandlerContext ctx, Throwable cause){
        cause.printStackTrace();
        ctx.close();
}このハンドラーは公式 Web サイトからコピーされました
方法 1: @PostConstruct に注釈を付けます
package com.cxy.netty.controller;
import io.netty.bootstrap.ServerBootstrap;
import io.netty.channel.ChannelFuture;
import io.netty.channel.ChannelInitializer;
import io.netty.channel.EventLoopGroup;
import io.netty.channel.nio.NioEventLoopGroup;
import io.netty.channel.socket.SocketChannel;
import io.netty.channel.socket.nio.NioServerSocketChannel;
import org.slf4j.Logger;
import org.slf4j.LoggerFactory;
import org.springframework.boot.autoconfigure.web.ServerProperties;
import org.springframework.stereotype.Component;
import javax.annotation.PostConstruct;
import javax.annotation.PreDestroy;
import java.net.InetSocketAddress;
@Component
public class NettyServer {
    /*private  int port =8080;
    public int getPort() {
        return port;
    }
    public void setPort(int port) {
        this.port = port;
    }
    public NettyServer(int port) {
        this.port = port;
    }*/
    @PostConstruct
    public void start() throws Exception {
        System.out.println("启动记载netty");
        EventLoopGroup boss = new NioEventLoopGroup();
        EventLoopGroup work = new NioEventLoopGroup();
        ServerBootstrap b = new ServerBootstrap();
        b.group(boss,work)
                .channel(NioServerSocketChannel.class)
                .localAddress(new InetSocketAddress(8082))
                .childHandler(new ChannelInitializer<SocketChannel>() {
                    @Override
                    protected void initChannel(SocketChannel ch) throws Exception {
                        ch.pipeline().addLast(new EchoServerHandler());
                    }
                });
        System.out.println("启动加载netty2");
        ChannelFuture channelFuturef = b.bind().sync();
        if (channelFuturef.isSuccess()){
        System.out.println("启动成功");
        }
    }
}クリックして開始:
ログを表示します:
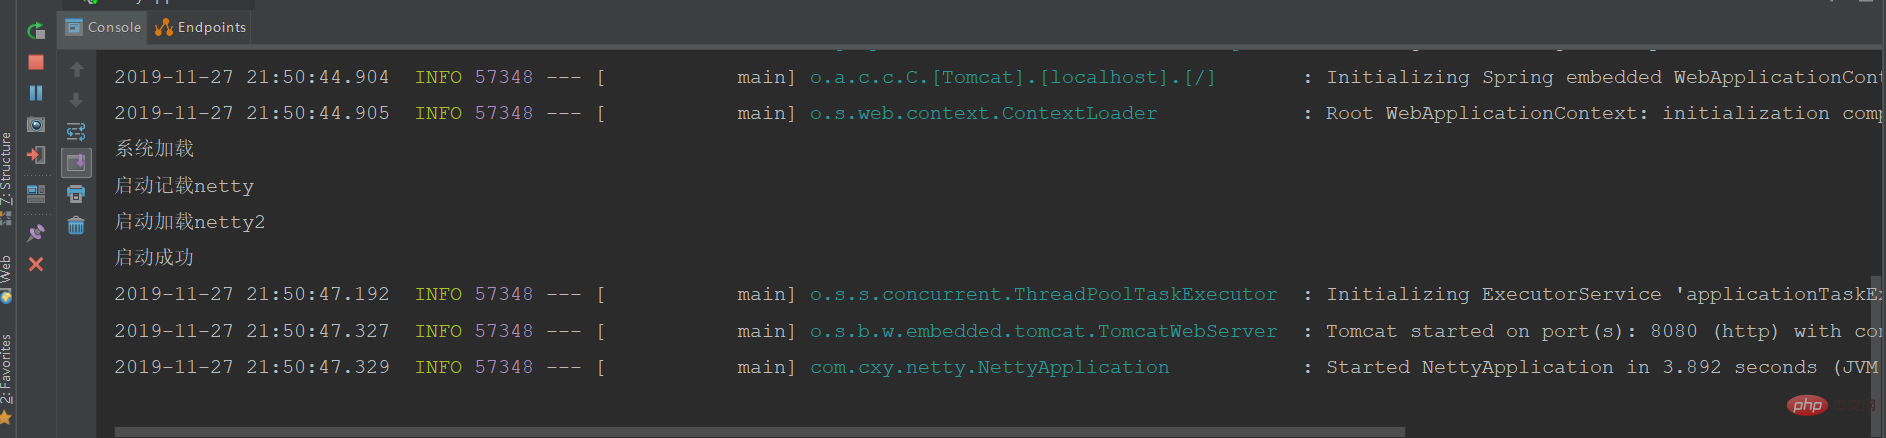
#開始されたことを示します
では、この注釈がなぜそれほど魅力的なのか:

# #意味について見てみましょう, クラスがロードされるときにこのメソッドもロードされることを意味します. 初期ロードの意味は次のとおりです:
@Documented
@Retention (RUNTIME)
@Target(METHOD)
public @interface PostConstruct {
}方法 2: リスナーを使用して開始します:
package com.cxy.netty.controller;
import javax.servlet.ServletContextEvent;
import javax.servlet.ServletContextListener;
/**
 * 系统初始化监听器
 * @author Administrator
 *
 */
public class InitListener implements ServletContextListener {
    @Override
    public void contextInitialized(ServletContextEvent sce) {

        NettyServer nettyServer = new NettyServer(8081);
        try {
            nettyServer.start();
        } catch (Exception e) {
            e.printStackTrace();
        }
    }

    @Override
    public void contextDestroyed(ServletContextEvent sce) {

    }
}クラスを開始します:
package com.cxy.netty;
import com.cxy.netty.controller.InitListener;
import com.cxy.netty.controller.NettyServer;
import org.springframework.boot.CommandLineRunner;
import org.springframework.boot.SpringApplication;
import org.springframework.boot.autoconfigure.SpringBootApplication;
import org.springframework.boot.web.servlet.ServletListenerRegistrationBean;
import org.springframework.context.annotation.Bean;
@SpringBootApplication
public class NettyApplication {
    /**
     * 注册监听器
     * @return
     */
    @SuppressWarnings({ "rawtypes", "unchecked" })
    @Bean
    public ServletListenerRegistrationBean servletListenerRegistrationBean() {
        ServletListenerRegistrationBean servletListenerRegistrationBean =
                new ServletListenerRegistrationBean();
        servletListenerRegistrationBean.setListener(new InitListener());
        return servletListenerRegistrationBean;
    }
    public static void main(String[] args) {
        SpringApplication.run(NettyApplication.class, args);
    }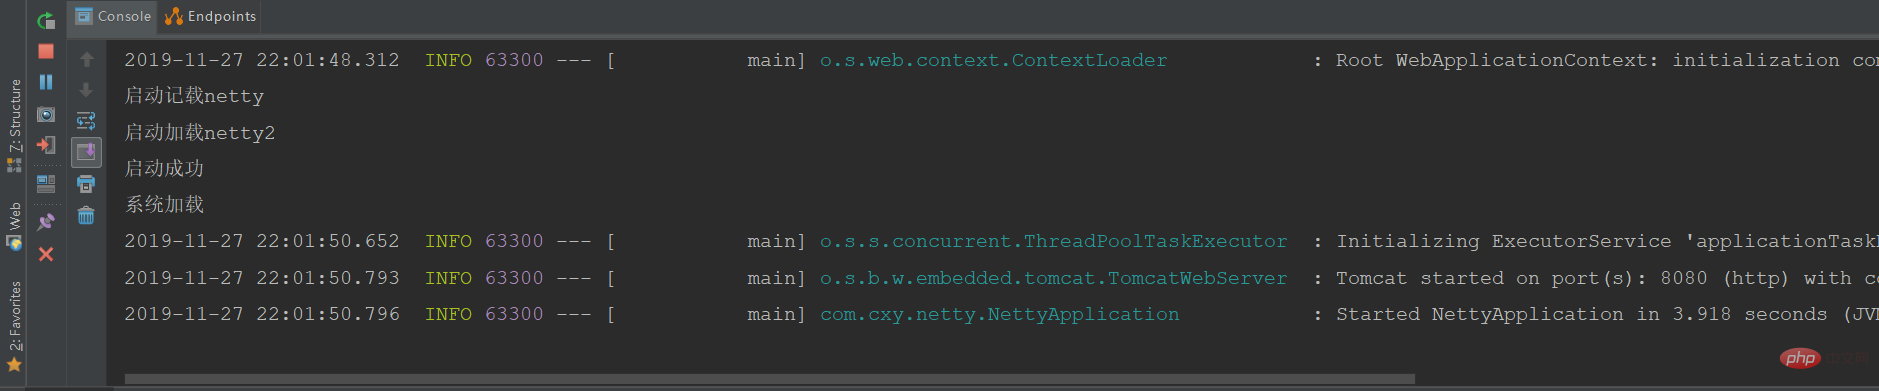
}ログを確認します:
package com.cxy.netty.controller;
import com.cxy.netty.controller.NettyServer;
import org.springframework.context.ApplicationListener;
import org.springframework.context.event.ContextRefreshedEvent;
import org.springframework.stereotype.Component;
@Component
public class NettyBooter implements ApplicationListener<ContextRefreshedEvent> {
    @Override
    public void onApplicationEvent(ContextRefreshedEvent event) {
        NettyServer nettyServer = new NettyServer(8081);
        try {
            nettyServer.start();
        } catch (Exception e) {
            e.printStackTrace();
        }
    }
}
ログイン後にコピー
Startupクラス: package com.cxy.netty.controller;
import com.cxy.netty.controller.NettyServer;
import org.springframework.context.ApplicationListener;
import org.springframework.context.event.ContextRefreshedEvent;
import org.springframework.stereotype.Component;
@Component
public class NettyBooter implements ApplicationListener<ContextRefreshedEvent> {
@Override
public void onApplicationEvent(ContextRefreshedEvent event) {
NettyServer nettyServer = new NettyServer(8081);
try {
nettyServer.start();
} catch (Exception e) {
e.printStackTrace();
}
}
}package com.cxy.netty;
import com.cxy.netty.controller.NettyServer;
import org.springframework.boot.CommandLineRunner;
import org.springframework.boot.SpringApplication;
import org.springframework.boot.autoconfigure.SpringBootApplication;
import org.springframework.boot.web.servlet.ServletListenerRegistrationBean;
import org.springframework.context.annotation.Bean;
@SpringBootApplication
public class NettyApplication {
/**
* 注册监听器
* @return
*/
/* @SuppressWarnings({ "rawtypes", "unchecked" })
@Bean
public ServletListenerRegistrationBean servletListenerRegistrationBean() {
ServletListenerRegistrationBean servletListenerRegistrationBean =
new ServletListenerRegistrationBean();
servletListenerRegistrationBean.setListener(new InitListener());
return servletListenerRegistrationBean;
}*/
public static void main(String[] args) {
SpringApplication.run(NettyApplication.class, args);
}
}
package com.cxy.netty;
import com.cxy.netty.controller.NettyServer;
import org.springframework.boot.CommandLineRunner;
import org.springframework.boot.SpringApplication;
import org.springframework.boot.autoconfigure.SpringBootApplication;
import org.springframework.boot.web.servlet.ServletListenerRegistrationBean;
import org.springframework.context.annotation.Bean;
/*
@SpringBootApplication
public class NettyApplication {
   */
/**
     * 注册监听器
     * @return
     *//*
   */
/* @SuppressWarnings({ "rawtypes", "unchecked" })
    @Bean
    public ServletListenerRegistrationBean servletListenerRegistrationBean() {
        ServletListenerRegistrationBean servletListenerRegistrationBean =
                new ServletListenerRegistrationBean();
        servletListenerRegistrationBean.setListener(new InitListener());
        return servletListenerRegistrationBean;
    }*//*
    public static void main(String[] args) {
        SpringApplication.run(NettyApplication.class, args);
    }
}
*/
@SpringBootApplication
public class NettyApplication implements CommandLineRunner {
    public static void main(String[] args) {
        SpringApplication.run(NettyApplication.class, args);
    }
    @Override
    public void run(String... args) throws Exception {
        NettyServer echoServer = new NettyServer(8083);
        echoServer.start();
    }
}ログイン後にコピーログを確認します:
package com.cxy.netty;
import com.cxy.netty.controller.NettyServer;
import org.springframework.boot.CommandLineRunner;
import org.springframework.boot.SpringApplication;
import org.springframework.boot.autoconfigure.SpringBootApplication;
import org.springframework.boot.web.servlet.ServletListenerRegistrationBean;
import org.springframework.context.annotation.Bean;
/*
@SpringBootApplication
public class NettyApplication {
*/
/**
* 注册监听器
* @return
*//*
*/
/* @SuppressWarnings({ "rawtypes", "unchecked" })
@Bean
public ServletListenerRegistrationBean servletListenerRegistrationBean() {
ServletListenerRegistrationBean servletListenerRegistrationBean =
new ServletListenerRegistrationBean();
servletListenerRegistrationBean.setListener(new InitListener());
return servletListenerRegistrationBean;
}*//*
public static void main(String[] args) {
SpringApplication.run(NettyApplication.class, args);
}
}
*/
@SpringBootApplication
public class NettyApplication implements CommandLineRunner {
public static void main(String[] args) {
SpringApplication.run(NettyApplication.class, args);
}
@Override
public void run(String... args) throws Exception {
NettyServer echoServer = new NettyServer(8083);
echoServer.start();
}
}
以上がspringboot が netty フレームワークを統合する方法は何ですか?の詳細内容です。詳細については、PHP 中国語 Web サイトの他の関連記事を参照してください。

ホットAIツール

Undresser.AI Undress
リアルなヌード写真を作成する AI 搭載アプリ

AI Clothes Remover
写真から衣服を削除するオンライン AI ツール。

Undress AI Tool
脱衣画像を無料で

Clothoff.io
AI衣類リムーバー

AI Hentai Generator
AIヘンタイを無料で生成します。

人気の記事
ホットツール

メモ帳++7.3.1
使いやすく無料のコードエディター

SublimeText3 中国語版
中国語版、とても使いやすい

ゼンドスタジオ 13.0.1
強力な PHP 統合開発環境

ドリームウィーバー CS6
ビジュアル Web 開発ツール

SublimeText3 Mac版
神レベルのコード編集ソフト(SublimeText3)
ホットトピック
 7532
7532
 15
1379
52
82
11
21
84
15
1379
52
82
11
21
84

 Springboot が Jasypt を統合して構成ファイルの暗号化を実装する方法
Jun 01, 2023 am 08:55 AM
Springboot が Jasypt を統合して構成ファイルの暗号化を実装する方法
Jun 01, 2023 am 08:55 AM
Jasypt の概要 Jasypt は、開発者が最小限の労力で基本的な暗号化機能を自分のプロジェクトに追加できる Java ライブラリであり、暗号化の仕組みを深く理解する必要はありません。一方向および双方向暗号化の高いセキュリティ。標準ベースの暗号化テクノロジー。パスワード、テキスト、数値、バイナリを暗号化します... Spring ベースのアプリケーション、オープン API への統合、JCE プロバイダーでの使用に適しています... 次の依存関係を追加します: com.github.ulisesbocchiojasypt-spring-boot-starter2. 1.1 Jasypt の特典はシステムのセキュリティを保護し、コードが漏洩した場合でもデータ ソースは保証されます。
 SpringBoot が Redisson を統合して遅延キューを実装する方法
May 30, 2023 pm 02:40 PM
SpringBoot が Redisson を統合して遅延キューを実装する方法
May 30, 2023 pm 02:40 PM
使用シナリオ 1. 注文は正常に行われましたが、支払いが 30 分以内に行われませんでした。支払いがタイムアウトになり、注文が自動的にキャンセルされました 2. 注文に署名があり、署名後 7 日間評価が行われませんでした。注文がタイムアウトして評価されない場合、システムはデフォルトでプラスの評価を設定します 3. 注文は正常に行われます。販売者が 5 分間注文を受け取らない場合、注文はキャンセルされます。 4. 配送がタイムアウトします。 SMS リマインダーをプッシュします... 遅延が長く、リアルタイム パフォーマンスが低いシナリオでは、タスク スケジュールを使用して定期的なポーリング処理を実行できます。例: xxl-job 今日は選択します
 Redis を使用して SpringBoot に分散ロックを実装する方法
Jun 03, 2023 am 08:16 AM
Redis を使用して SpringBoot に分散ロックを実装する方法
Jun 03, 2023 am 08:16 AM
1. Redis は分散ロックの原則を実装しており、分散ロックが必要な理由 分散ロックについて話す前に、分散ロックが必要な理由を説明する必要があります。分散ロックの反対はスタンドアロン ロックです。マルチスレッド プログラムを作成するとき、共有変数を同時に操作することによって引き起こされるデータの問題を回避します。通常、ロックを使用して共有変数を相互に除外し、データの正確性を確保します。共有変数の使用範囲は同じプロセス内です。共有リソースを同時に操作する必要があるプロセスが複数ある場合、どうすれば相互排他的になるのでしょうか?今日のビジネス アプリケーションは通常マイクロサービス アーキテクチャであり、これは 1 つのアプリケーションが複数のプロセスをデプロイすることも意味します。複数のプロセスが MySQL の同じレコード行を変更する必要がある場合、順序の乱れた操作によって引き起こされるダーティ データを避けるために、分散が必要です。今回導入するスタイルはロックされています。ポイントを獲得したい
 Springbootがjarパッケージにファイルを読み込んだ後にファイルにアクセスできない問題を解決する方法
Jun 03, 2023 pm 04:38 PM
Springbootがjarパッケージにファイルを読み込んだ後にファイルにアクセスできない問題を解決する方法
Jun 03, 2023 pm 04:38 PM
Springboot はファイルを読み取りますが、jar パッケージにパッケージ化した後、最新の開発にアクセスできません。jar パッケージにパッケージ化した後、Springboot がファイルを読み取れない状況があります。その理由は、パッケージ化後、ファイルの仮想パスが変更されるためです。は無効であり、ストリーム経由でのみアクセスできます。読み取ります。ファイルはリソースの下にあります publicvoidtest(){Listnames=newArrayList();InputStreamReaderread=null;try{ClassPathResourceresource=newClassPathResource("name.txt");Input
 SQL ステートメントを使用せずに Springboot+Mybatis-plus を実装して複数のテーブルを追加する方法
Jun 02, 2023 am 11:07 AM
SQL ステートメントを使用せずに Springboot+Mybatis-plus を実装して複数のテーブルを追加する方法
Jun 02, 2023 am 11:07 AM
Springboot+Mybatis-plus が SQL ステートメントを使用して複数テーブルの追加操作を実行しない場合、私が遭遇した問題は、テスト環境で思考をシミュレートすることによって分解されます: パラメーターを含む BrandDTO オブジェクトを作成し、パラメーターをバックグラウンドに渡すことをシミュレートします。 Mybatis-plus で複数テーブルの操作を実行するのは非常に難しいことを理解してください。Mybatis-plus-join などのツールを使用しない場合は、対応する Mapper.xml ファイルを設定し、臭くて長い ResultMap を設定するだけです。対応する SQL ステートメントを記述します。この方法は面倒に見えますが、柔軟性が高く、次のことが可能です。
 SpringBootとSpringMVCの比較と差異分析
Dec 29, 2023 am 11:02 AM
SpringBootとSpringMVCの比較と差異分析
Dec 29, 2023 am 11:02 AM
SpringBoot と SpringMVC はどちらも Java 開発で一般的に使用されるフレームワークですが、それらの間には明らかな違いがいくつかあります。この記事では、これら 2 つのフレームワークの機能と使用法を調べ、その違いを比較します。まず、SpringBoot について学びましょう。 SpringBoot は、Spring フレームワークに基づいたアプリケーションの作成と展開を簡素化するために、Pivotal チームによって開発されました。スタンドアロンの実行可能ファイルを構築するための高速かつ軽量な方法を提供します。
 SpringBoot が Redis をカスタマイズしてキャッシュのシリアル化を実装する方法
Jun 03, 2023 am 11:32 AM
SpringBoot が Redis をカスタマイズしてキャッシュのシリアル化を実装する方法
Jun 03, 2023 am 11:32 AM
1. RedisAPI のデフォルトのシリアル化メカニズムである RedisTemplate1.1 をカスタマイズします。API ベースの Redis キャッシュ実装では、データ キャッシュ操作に RedisTemplate テンプレートを使用します。ここで、RedisTemplate クラスを開いて、クラスのソース コード情報を表示します。publicclassRedisTemplateextendsRedisAccessorimplementsRedisOperations、BeanClassLoaderAware{//キーを宣言、値の各種シリアル化メソッド、初期値は空 @NullableprivateRedisSe
 Springbootでapplication.ymlの値を取得する方法
Jun 03, 2023 pm 06:43 PM
Springbootでapplication.ymlの値を取得する方法
Jun 03, 2023 pm 06:43 PM
プロジェクトでは、構成情報が必要になることがよくありますが、この情報はテスト環境と本番環境で構成が異なる場合があり、実際のビジネス状況に基づいて後で変更する必要がある場合があります。これらの構成をコードにハードコーディングすることはできません。構成ファイルに記述することをお勧めします。たとえば、この情報を application.yml ファイルに書き込むことができます。では、コード内でこのアドレスを取得または使用するにはどうすればよいでしょうか?方法は2つあります。方法 1: @Value アノテーションが付けられた ${key} を介して、構成ファイル (application.yml) 内のキーに対応する値を取得できます。この方法は、マイクロサービスが比較的少ない状況に適しています。方法 2: 実際には、プロジェクト、業務が複雑な場合、ロジック
