Linux システムに複数のバージョンの Nginx 用 PHP をインストールする方法
linux バージョン: 64 ビット centos 6.4
nginx バージョン: nginx1.8.0
php バージョン: php5.5.28 & php5.4.44
php5 の場合に注意してください。 5 は、メイン バージョンが /usr/local/php ディレクトリにインストールされているため、他のバージョンの php をインストールして、別のインストール ディレクトリを指定できます。
phpをインストールします
# wget http://cn2.php.net/get/php-5.4.44.tar.gz/from/this/mirror
# tar zxvf php-5.4.44.tar.gz
# cd php-5.4.44
#./configure --prefix=/usr/local/php5.4.44 \
--with-curl \
--with-freetype-dir \
--with-gd \
--with-gettext \
--with-iconv-dir \
--with-kerberos \
--with-libdir=lib64 \
--with-libxml-dir \
--with-mysql \
--with-mysqli \
--with-openssl \
--with-pcre-regex \
--with-pdo-mysql \
--with-pdo-sqlite \
--with-pear \
--with-png-dir \
--with-xmlrpc \
--with-xsl \
--with-zlib \
--enable-fpm \
--enable-bcmath \
--enable-libxml \
--enable-inline-optimization \
--enable-gd-native-ttf \
--enable-mbregex \
--enable-mbstring \
--enable-pcntl \
--enable-shmop \
--enable-soap \
--enable-sockets \
--enable-sysvsem \
--enable-xml \
--enable-zip
# make && make install
# cp -r ./sapi/fpm/php-fpm.conf /usr/local/php5.4.44/etc/php-fpm.conf
# cp php.ini-development /usr/local/php5.4.44/lib/php.ini
# cp -r ./sapi/fpm/php-fpm /etc/init.d/php-fpm5.4.44
メイン バージョン 5.5.28 は 9000 でリッスンするため、php-fpm.conf のリッスン ポートを 9001 に変更します。
; note: this value is mandatory.
listen = 127.0.0.1:9001
php-fpmの起動
# /etc/init.d/php-fpm5.4.44
phpのインストールが成功し、プロセスを確認します
#ps aux|grep php

このようにして、php-fpmは始められました。
nginx の構成
ポート 8054 の新しい構成を追加し、9001 と指定されたディレクトリを指すようにします:
server {
    listen    8054;
    server_name localhost;


    location / {
      #root  html;
root /usr/www5.4.44;
      index index.html index.htm;
    }


    error_page  500 502 503 504 /50x.html;
    location = /50x.html {
      root  html;
    }


location ~ \.php$ {
root html;
fastcgi_pass 127.0.0.1:9001;
fastcgi_index index.php;
include fastcgi_params;
fastcgi_param script_filename /usr/www5.4.44$fastcgi_script_name;
}

}nginx 構成ファイル nginx .conf
# cd /usr/local/nginx/conf
完全な nginx 構成は次のとおりです。
#user nobody;
worker_processes 4;

#error_log logs/error.log;
#error_log logs/error.log notice;
#error_log logs/error.log info;

#pid    logs/nginx.pid;


events {
  worker_connections 1024;
}


http {
  include    mime.types;
  default_type application/octet-stream;

  #log_format main '$remote_addr - $remote_user [$time_local] "$request" '
  #         '$status $body_bytes_sent "$http_referer" '
  #         '"$http_user_agent" "$http_x_forwarded_for"';

  #access_log logs/access.log main;

  sendfile    on;
  #tcp_nopush   on;

  #keepalive_timeout 0;
  keepalive_timeout 65;

  #gzip on;

  server {
    listen    80;
    server_name localhost;

    #charset koi8-r;

    #access_log logs/host.access.log main;

    location / {
      #root  html;
			root /usr/www;
      index index.html index.htm;
    }

    #error_page 404       /404.html;

    # redirect server error pages to the static page /50x.html
    #
    error_page  500 502 503 504 /50x.html;
    location = /50x.html {
      root  html;
    }

    # proxy the php scripts to apache listening on 127.0.0.1:80
    #
    #location ~ \.php$ {
    #  proxy_pass  http://127.0.0.1;
    #}

    # pass the php scripts to fastcgi server listening on 127.0.0.1:9000
    #
    #location ~ \.php$ {
    #  root      html;
    #  fastcgi_pass  127.0.0.1:9000;
    #  fastcgi_index index.php;
    #  fastcgi_param script_filename /scripts$fastcgi_script_name;
    #  include    fastcgi_params;
    #}

		location ~ \.php$ {
		root html;
		fastcgi_pass 127.0.0.1:9000;
		fastcgi_index index.php;
		include fastcgi_params;
		fastcgi_param script_filename /usr/www$fastcgi_script_name;
		}

    # deny access to .htaccess files, if apache's document root
    # concurs with nginx's one
    #
    #location ~ /\.ht {
    #  deny all;
    #}
  }

	server {
    listen    8054;
    server_name localhost;

    location / {
      #root  html;
			root /usr/www5.4.44;
      index index.html index.htm;
    }

    error_page  500 502 503 504 /50x.html;
    location = /50x.html {
      root  html;
    }

		location ~ \.php$ {
		root html;
		fastcgi_pass 127.0.0.1:9001;
		fastcgi_index index.php;
		include fastcgi_params;
		fastcgi_param script_filename /usr/www5.4.44$fastcgi_script_name;
		}

  }


  # another virtual host using mix of ip-, name-, and port-based configuration
  #
  #server {
  #  listen    8000;
  #  listen    somename:8080;
  #  server_name somename alias another.alias;

  #  location / {
  #    root  html;
  #    index index.html index.htm;
  #  }
  #}


  # https server
  #
  #server {
  #  listen    443 ssl;
  #  server_name localhost;

  #  ssl_certificate   cert.pem;
  #  ssl_certificate_key cert.key;

  #  ssl_session_cache  shared:ssl:1m;
  #  ssl_session_timeout 5m;

  #  ssl_ciphers high:!anull:!md5;
  #  ssl_prefer_server_ciphers on;

  #  location / {
  #    root  html;
  #    index index.html index.htm;
  #  }
  #}

}Restart nginx
# /usr/local/nginx/sbin/nginx -s reload
ファイアウォールで新しいポートを開く必要があることに注意してください。そうしないと、ポートは開かれません。アクセス可能:
ファイアウォール構成
xp などのローカル マシン上の仮想マシンの Web ページにアクセスする場合、centos6 の場合は、ポート 80 を開始するようにファイアウォールを変更する必要があります
# cd /etc/sysconfig
iptables ファイルを変更するか、vim で直接編集します
# vim /etc/sysconfig/iptables
次の行を追加してファイアウォール ポート 80:
を開きます-a input -m state --state new -m tcp -p tcp --dport 8054 -j accept
ファイアウォールを再起動します
# /etc/init.d/iptables restart
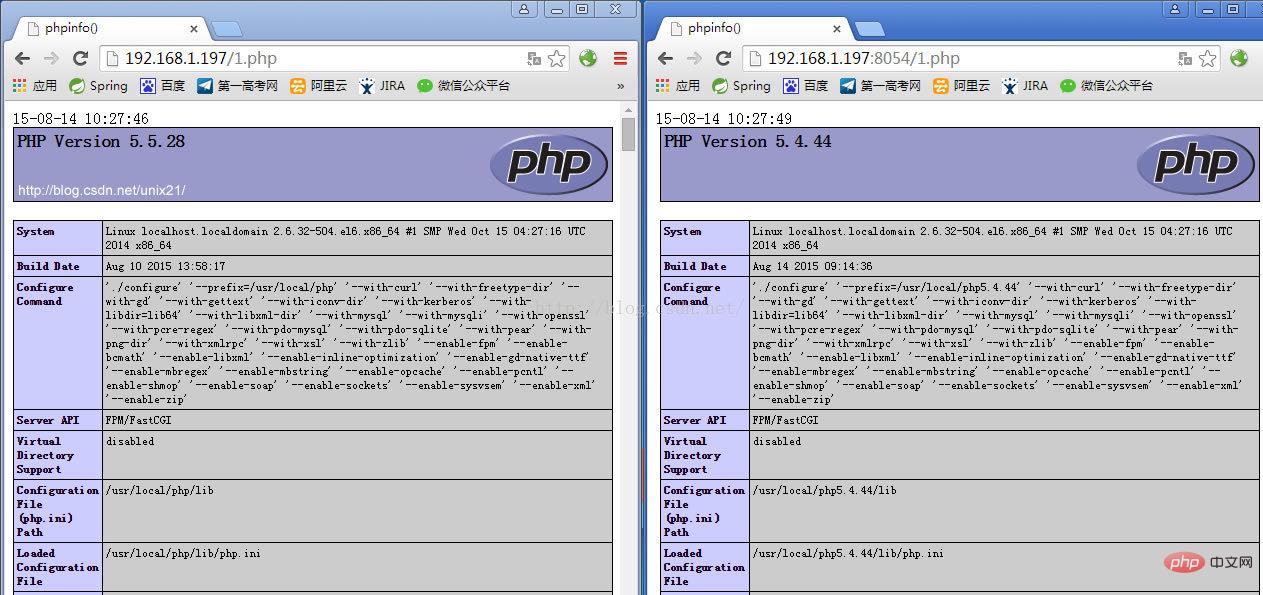
テストが成功した場合は、phpinfo( )

以上がLinux システムに複数のバージョンの Nginx 用 PHP をインストールする方法の詳細内容です。詳細については、PHP 中国語 Web サイトの他の関連記事を参照してください。

ホットAIツール

Undresser.AI Undress
リアルなヌード写真を作成する AI 搭載アプリ

AI Clothes Remover
写真から衣服を削除するオンライン AI ツール。

Undress AI Tool
脱衣画像を無料で

Clothoff.io
AI衣類リムーバー

AI Hentai Generator
AIヘンタイを無料で生成します。

人気の記事

ホットツール

メモ帳++7.3.1
使いやすく無料のコードエディター

SublimeText3 中国語版
中国語版、とても使いやすい

ゼンドスタジオ 13.0.1
強力な PHP 統合開発環境

ドリームウィーバー CS6
ビジュアル Web 開発ツール

SublimeText3 Mac版
神レベルのコード編集ソフト(SublimeText3)

ホットトピック
 7529
7529
 15
15
 1378
1378
 52
52
 81
81
 11
11
 21
21
 75
75
 PHP:データベースとサーバー側のロジックの処理
Apr 15, 2025 am 12:15 AM
PHPはMySQLIおよびPDO拡張機能を使用して、データベース操作とサーバー側のロジック処理で対話し、セッション管理などの関数を介してサーバー側のロジックを処理します。 1)MySQLIまたはPDOを使用してデータベースに接続し、SQLクエリを実行します。 2)セッション管理およびその他の機能を通じて、HTTPリクエストとユーザーステータスを処理します。 3)トランザクションを使用して、データベース操作の原子性を確保します。 4)SQLインジェクションを防ぎ、例外処理とデバッグの閉鎖接続を使用します。 5)インデックスとキャッシュを通じてパフォーマンスを最適化し、読みやすいコードを書き、エラー処理を実行します。
 PHPの目的:動的なWebサイトの構築
Apr 15, 2025 am 12:18 AM
PHPは動的なWebサイトを構築するために使用され、そのコア関数には次のものが含まれます。1。データベースに接続することにより、動的コンテンツを生成し、リアルタイムでWebページを生成します。 2。ユーザーのインタラクションを処理し、提出をフォームし、入力を確認し、操作に応答します。 3.セッションとユーザー認証を管理して、パーソナライズされたエクスペリエンスを提供します。 4.パフォーマンスを最適化し、ベストプラクティスに従って、ウェブサイトの効率とセキュリティを改善します。
 Dockerデスクトップの使用方法
Apr 15, 2025 am 11:45 AM
Dockerデスクトップの使用方法は? Dockerデスクトップは、ローカルマシンでDockerコンテナを実行するためのツールです。使用する手順には次のものがあります。1。Dockerデスクトップをインストールします。 2。Dockerデスクトップを開始します。 3。Docker Imageを作成します(DockerFileを使用); 4. Docker画像をビルド(Docker Buildを使用); 5。Dockerコンテナを実行します(Docker Runを使用)。
 Dockerでミラーを作成する方法
Apr 15, 2025 am 11:27 AM
Docker画像を作成する手順:ビルド命令を含むDockerFileを書きます。 Docker Buildコマンドを使用して、ターミナルで画像を作成します。画像にタグを付け、Dockerタグコマンドを使用して名前とタグを割り当てます。
 Dockerコンテナの名前を確認する方法
Apr 15, 2025 pm 12:21 PM
すべてのコンテナ(Docker PS)をリストする手順に従って、Dockerコンテナ名を照会できます。コンテナリストをフィルタリングします(GREPコマンドを使用)。コンテナ名(「名前」列にあります)を取得します。
 Docker用のコンテナを作成する方法
Apr 15, 2025 pm 12:18 PM
Dockerでコンテナを作成します。1。画像を引く:Docker Pull [ミラー名]2。コンテナを作成:Docker Run [Options] [Mirror Name] [コマンド]3。コンテナを起動:Docker Start [Container Name]
 Dockerによってコンテナを起動する方法
Apr 15, 2025 pm 12:27 PM
Docker Containerの起動手順:コンテナ画像を引く:「Docker Pull [Mirror Name]」を実行します。コンテナの作成:「docker create [options] [mirror name] [コマンドとパラメーター]」を使用します。コンテナを起動します:「docker start [container name or id]」を実行します。コンテナのステータスを確認してください:コンテナが「Docker PS」で実行されていることを確認します。
 VSCODEは拡張子をインストールできません
Apr 15, 2025 pm 07:18 PM
VSコード拡張機能のインストールの理由は、ネットワークの不安定性、許可不足、システム互換性の問題、VSコードバージョンが古すぎる、ウイルス対策ソフトウェアまたはファイアウォール干渉です。ネットワーク接続、許可、ログファイル、およびコードの更新、セキュリティソフトウェアの無効化、およびコードまたはコンピューターの再起動を確認することにより、問題を徐々にトラブルシューティングと解決できます。


