Vite ライブラリ モードを使用してパッケージ化すると、vite はすべてのスタイル ファイルを同じファイルにパッケージ化するため、ロードする必要がありますすべてのスタイル ファイルをインポートしても、オンデマンドでインポートする効果はありません。したがって、パッケージ化するときに、vite にスタイル ファイルをパッケージ化させることはできず、スタイル ファイルは gulp を使用してパッケージ化されます。そこでこの記事では、gulpを使ってスタイルファイルをパッケージ化する方法と、スタイルファイルをオンデマンドで読み込む方法を紹介します。
現在、多くのコンポーネント ライブラリのオンデマンド導入は、プラグインの助けを借りて解決されています。たとえば、ElementPlus unplugin-vue-components と unplugin-auto-import を使用すると、これら 2 つのプラグインは
import { Button } from "easyest";

//相当于
import "easyest/es/src/button/style/index.css";
import "easyest/es/src/button/index.mjs";を実装してオンデマンドの導入を実現できます。この記事の焦点はここではないため、ここではこれらのプラグインの使用が多すぎます。興味がある場合は、使用方法を直接問い合わせることができます unplugin-vue-components
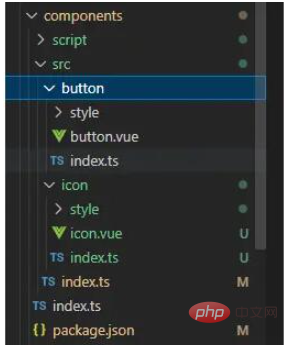
パッケージ化する前に、以前にパッケージ化されたファイルを削除する必要があることは誰もが知っているため、最初に削除関数を作成する必要があります。その前に、コンポーネント内にスクリプト関連のコンテンツを格納する新しいスクリプト フォルダーを作成します。スクリプト配下のビルド フォルダー内のコンテンツが、この記事で紹介するパッケージ化関連のコンテンツです。
コンポーネント ライブラリ パスを維持するために、script/utils に新しい paths.ts を作成します。最初にインストールすることを忘れないでください。
pnpm add @types/node -D -w
import { resolve } from "path";

//组件库根目录
export const componentPath = resolve(__dirname, "../../");

//pkg根目录
export const pkgPath = resolve(__dirname, "../../../");パッケージ ディレクトリの削除関数は、bulid/ の delpath.ts に配置できます。 utils. ここに注意してください。パッケージ化された最も簡単なパッケージが最終的に公開するパッケージであるため、package.json と README.md
import fs from "fs";
import { resolve } from "path";
import { pkgPath } from "./paths";
//保留的文件
const stayFile = ["package.json", "README.md"];

const delPath = async (path: string) => {
  let files: string[] = [];

  if (fs.existsSync(path)) {
    files = fs.readdirSync(path);

    files.forEach(async (file) => {
      let curPath = resolve(path, file);

      if (fs.statSync(curPath).isDirectory()) {
        // recurse
        if (file != "node_modules") await delPath(curPath);
      } else {
        // delete file
        if (!stayFile.includes(file)) {
          fs.unlinkSync(curPath);
        }
      }
    });

    if (path != `${pkgPath}/easyest`) fs.rmdirSync(path);
  }
};
export default delPath;ts と新しい es6 構文を使用する必要がありますが、これは gulp ではサポートされていないため、gulp がこれらをサポートできるようにするためにいくつかの依存関係をインストールする必要があります。Sucras を使用すると、gulp を実行して最新の構文を使用できますts
pnpm i gulp @types/gulp sucrase -D -w
build/index.ts
import delPath from "../utils/delpath";
import { series, parallel } from "gulp";
import { pkgPath } from "../utils/paths";
//删除easyest

export const removeDist = () => {
  return delPath(`${pkgPath}/easyest`);
};

export default series(async () => removeDist()); "scripts": {
"build:easyest": "gulp -f packages/components/script/build/index.ts"
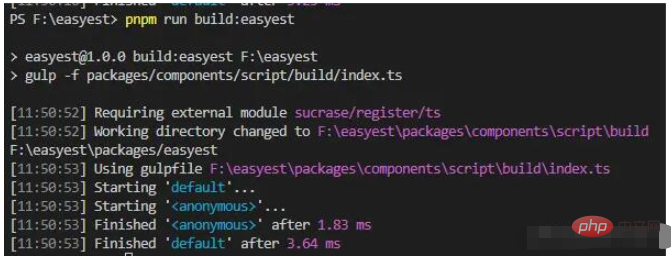
},easyest の下のファイルが削除されていることがわかります
 削除後、スタイルのパッケージ化を開始できます
gulp パッケージ化スタイル
をインストールする必要があり、同時にオートコンプリート CSS プレフィックス プラグインもインストールする必要があります。 gulp-autoprefixer とそれに対応する上記のファイル<div class="code" style="position:relative; padding:0px; margin:0px;"><pre class='brush:php;toolbar:false;'>pnpm add gulp-less @types/gulp-less gulp-autoprefixer @types/gulp-autoprefixer -D -w</pre><div class="contentsignin">ログイン後にコピー</div></div>次に、パッケージ化されたスタイル関数を記述します。ここでは、gulp の
関数と src 関数が使用されます。意味が分からない方は、前回の記事の gulp の紹介を読んでいただければと思います<div class="code" style="position:relative; padding:0px; margin:0px;"><pre class='brush:php;toolbar:false;'>//打包样式
export const buildStyle = () => {
return src(`${componentPath}/src/**/style/**.less`)
.pipe(less())
.pipe(autoprefixer())
.pipe(dest(`${pkgPath}/easyest/lib/src`))
.pipe(dest(`${pkgPath}/easyest/es/src`));
};</pre><div class="contentsignin">ログイン後にコピー</div></div>コンポーネントのパッケージ化
import { spawn } from "child_process";

export default async (command: string, path: string) => {
  //cmd表示命令,args代表参数,如 rm -rf  rm就是命令,-rf就为参数
  const [cmd, ...args] = command.split(" ");
  return new Promise((resolve, reject) => {
    const app = spawn(cmd, args, {
      cwd: path, //执行命令的路径
      stdio: "inherit", //输出共享给父进程
      shell: true, //mac不需要开启,windows下git base需要开启支持
    });
    //执行完毕关闭并resolve
    app.on("close", resolve);
  });
};//打包组件
export const buildComponent = async () => {
run("pnpm run build", componentPath);
};build/index.ts
はimport delPath from "../utils/delpath";
import { series, parallel, src, dest } from "gulp";
import { pkgPath, componentPath } from "../utils/paths";
import less from "gulp-less";
import autoprefixer from "gulp-autoprefixer";
import run from "../utils/run";
//删除dist
export const removeDist = () => {
return delPath(`${pkgPath}/easyest`);
};
//打包样式
export const buildStyle = () => {
return src(`${componentPath}/src/**/style/**.less`)
.pipe(less())
.pipe(autoprefixer())
.pipe(dest(`${pkgPath}/easyest/lib/src`))
.pipe(dest(`${pkgPath}/easyest/es/src`));
};
//打包组件
export const buildComponent = async () => {
  run("pnpm run build", componentPath);
};
export default series(
async () => removeDist(),
parallel(
async () => buildStyle(),
async () => buildComponent()
)
); 最後の vite パッケージは、less ファイル、components/vite を無視します。config.tsimport { defineConfig } from "vite";
import vue from "@vitejs/plugin-vue";
import dts from "vite-plugin-dts";
import DefineOptions from "unplugin-vue-define-options/vite";
export default defineConfig({
build: {
//打包文件目录
outDir: "es",
//压缩
//minify: false,
rollupOptions: {
//忽略打包vue和.less文件
external: ["vue", /\.less/],
...
}
});最終ルート ディレクトリ  pnpm run build

.less を  Change to
## に変更する必要があります。 #
 plugins: [
    vue(),
    DefineOptions(),
    dts({
      entryRoot: "./src",
      outputDir: ["../easyest/es/src", "../easyest/lib/src"],
      //指定使用的tsconfig.json为我们整个项目根目录下,如果不配置,你也可以在components下新建tsconfig.json
      tsConfigFilePath: "../../tsconfig.json",
    }),
    {
      name: "style",
      generateBundle(config, bundle) {
        //这里可以获取打包后的文件目录以及代码code
        const keys = Object.keys(bundle);

        for (const key of keys) {
          const bundler: any = bundle[key as any];
          //rollup内置方法,将所有输出文件code中的.less换成.css,因为我们当时没有打包less文件

          this.emitFile({
            type: "asset",
            fileName: key, //文件名名不变
            source: bundler.code.replace(/\.less/g, ".css"),
          });
        }
      },
    },
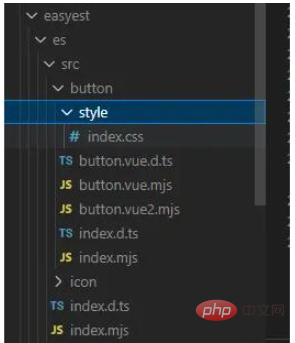
],components/vite.config.ts のプラグインで、pnpm run build: easyest を実行し、パッケージ化されたファイルの紹介を確認します #現時点では、 .less
.css に置き換えられています。パッケージ化が完了したら、次に行うことは公開することです!
以上がVue3 はどのように glup を使用してコンポーネント ライブラリをパッケージ化し、オンデマンド読み込みを実装しますか?の詳細内容です。詳細については、PHP 中国語 Web サイトの他の関連記事を参照してください。