
1. linux .net core の概要
これまで、Microsoft は独自のプラットフォームに対してのみ .net サポートを提供してきました。そのため、これは「理論上」クロスプラットフォームになります。 Linux および MacOS でのフレームワークのサポートは、サードパーティ プロジェクト (mono .net など) によってのみ提供されます。
Microsoft が完全なオープンソースの .net core を立ち上げるまで。このオープン ソース プラットフォームは .NET 標準と互換性があり、Windows、Linux、macOS 上で完全に一貫した API を提供します。このコンパクトな .net フレームワークは標準の .net のサブセットにすぎませんが、すでに非常に強力です。
この小さなフレームワークを使用すると、(一部の機能的な Python スクリプトと同様に) いくつかの機能的なアプリケーションを 3 つのプラットフォームで同時に実行できるようになりますが、一方で、サーバーがメンテナンス担当者を実行できるようにすることもできます。 Linux サーバー (特に Windows サーバーを実行するのが難しいサーバー) に asp.net サービス プログラムを展開します。
2. linux .net core2.0 環境導入前の準備
1. 環境説明:
サーバーシステム: centos 7.2 . 1511
2. インストール前の準備 (ファイアウォールをオフにする、selinux をオフにする)
1) ファイアウォールをオフにする:
systemctl stop firewalld.service #停止firewall
systemctl disable firewalld.service #禁止firewall开机启动
firewall-cmd --state #查看默认防火墙状态(关闭后显示notrunning,开启后显示running)
2) selinux をオフにする
sed -i "s/selinux=enforcing/selinux=disabled/g" /etc/selinux/config
変更の表示 最終的なファイルは次のとおりです:
[root@localhost ~]# cat /etc/selinux/config

# this file controls the state of selinux on the system.
# selinux= can take one of these three values:
#   enforcing - selinux security policy is enforced.
#   permissive - selinux prints warnings instead of enforcing.
#   disabled - no selinux policy is loaded.
selinux=disabled
# selinuxtype= can take one of three two values:
#   targeted - targeted processes are protected,
#   minimum - modification of targeted policy. only selected processes are protected.
#   mls - multi level security protection.
selinuxtype=targeted
3) centos を再起動します
reboot
3. Centos 展開.net core2.0 環境
1. dotnet 製品の追加
.net core をインストールする前に、Microsoft 製品フィードに登録する必要があります。これは一度だけ行う必要があります。まず、Microsoft 署名キーを登録し、次に Microsoft 製品フィードを追加します。
rpm --import https://packages.microsoft.com/keys/microsoft.asc
sh -c 'echo -e "[packages-microsoft-com-prod]nname=packages-microsoft-com-prod nbaseurl=https://packages.microsoft.com/yumrepos/microsoft-rhel7.3-prodnenabled=1ngpgcheck=1ngpgkey=https://packages.microsoft.com/keys/microsoft.asc" > /etc/yum.repos.d/dotnetdev.repo'
2. .net core sdk をインストールする
次の手順に進む前に、.net .net の以前のプレビュー バージョンをシステムから削除してください。
次のコマンドは、インストールする製品のリストを更新し、.net core に必要なコンポーネントをインストールしてから、.net core SDK をインストールします。
yum update
yum install libunwind libicu -y
yum install dotnet-sdk-2.0.0 -y
3. dotnet が正常にインストールされているかどうかを確認し、バージョンを確認します
dotnet --info
dotnet --version
4. .net core2.0 環境をテストします
cd /home
dotnet new console -o hwapp
cd hwapp
dotnet run
[root@localhost hwapp]# dotnet run
hello world!
ダウンロード アドレス:
##http://down.51cto.com/data/2334968
次のコマンドを実行します
cd /home/webapplication1
dotnet restore  //如果使过用测试方式一,就需先执行这命令重新加载一下当前新的网站文件
dotnet run
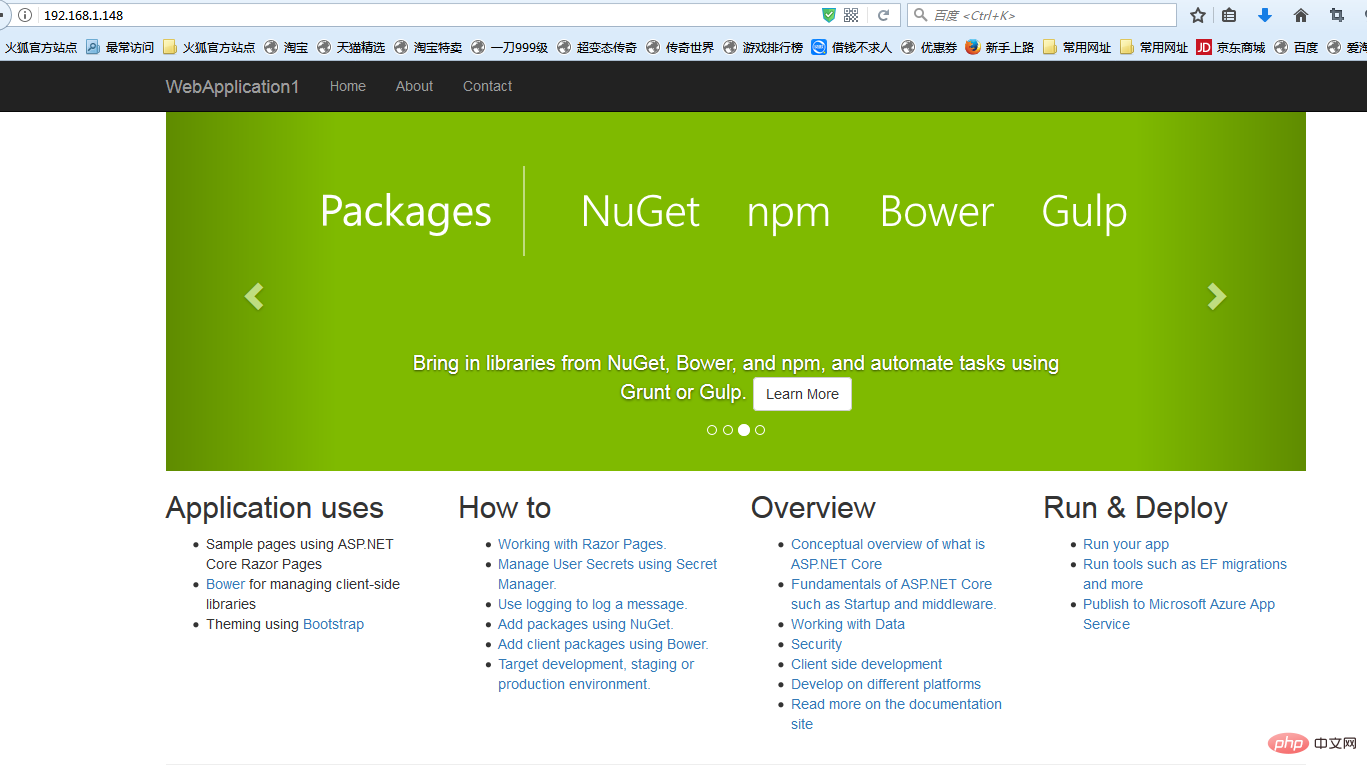
実行後、次の図が表示されます。
 ie
ie
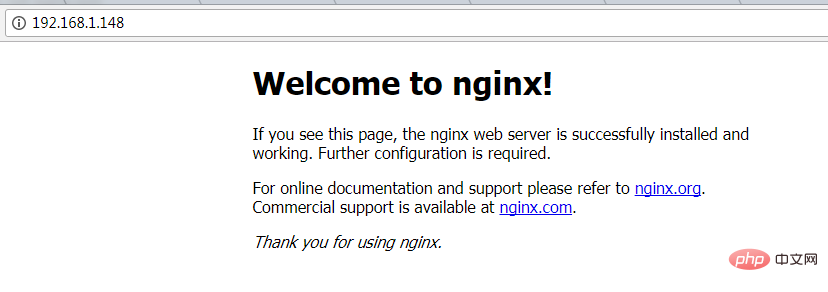
#1. nginx 環境をインストールします
[root@localhost ~]#curl -o nginx.rpm http://nginx.org/packages/centos/7/noarch/rpms/nginx-release-centos-7-0.el7.ngx.noarch.rpm
[root@localhost ~]#rpm -ivh nginx.rpm
[root@localhost ~]#yum install nginx -y
[root@localhost ~]# systemctl start nginx
[root@localhost ~]#systemctl enable nginx
created symlink from /etc/systemd/system/multi-user.target.wants/nginx.service to /usr/lib/systemd/system/nginx.service.
[root@localhost nginx-1.8.1]# ps -ef|grep nginx
root   14626   1 0 08:47 ?    00:00:00 nginx: master process nginx
nginx   14627 14626 0 08:47 ?    00:00:00 nginx: worker process
root   14636  3269 0 08:49 pts/1  00:00:00 grep --color=auto nginx
 nginx でよく使用される操作コマンド
systemctl start nginx.service #Start nginx service
Systemctl enable nginx.Service Service #Restartサービス## SystemCtl list-units –Type = serview#viewすべてのStarting Services # 4。ファイアウォール構成(システムにファイアウォールがある場合、ルールを記述する必要があります) コマンド: firewall-cmd –zone=public –add-port=80/tcp –permanent (ポート 80 を開く) コマンド: systemctl restart firewalld ( 5. asp.net core アプリケーションを転送するように nginx を設定する /etc/nginx/conf.d/default.conf ファイルを変更します。 ファイルの内容をserver {
listen 80;
location / {
proxy_pass http://localhost:88;
proxy_http_version 1.1;
proxy_set_header upgrade $http_upgrade;
proxy_set_header connection keep-alive;
proxy_set_header host $host;
proxy_cache_bypass $http_upgrade;
}
}[root@localhost nginx]# nginx -s reload
[root@localhost ~]# cd /home/webapplication1/
[root@localhost webapplication1]# dotnet run
using launch settings from /home/webapplication1/properties/launchsettings.json...
hosting environment: development
content root path: /home/webapplication1
now listening on: http://[::]:88
application started. press ctrl+c to shut down.
问题1:asp.net core应用程序运行在shell之中,如果关闭shell则会发现asp.net core应用被关闭,从而导致应用无法访问,这种情况当然是我们不想遇到的,而且生产环境对这种情况是零容忍的。
问题2:如果asp.net core进程意外终止那么需要人为连进shell进行再次启动,往往这种操作都不够及时。
问题3:如果服务器宕机或需要重启我们则还是需要连入shell进行启动。
为了解决这个问题,我们需要有一个程序来监听asp.net core 应用程序的状况。在应用程序停止运行的时候立即重新启动。这边我们用到了supervisor这个工具,supervisor使用python开发的。
1.安装supervisor
[root@localhost /]# yum install python-setuptools -y
[root@localhost /]#easy_install supervisor
2.配置supervisor
[root@localhost /]#mkdir /etc/supervisor
[root@localhost /]#echo_supervisord_conf > /etc/supervisor/supervisord.conf
修改supervisord.conf文件,将文件尾部的配置
[root@localhost /]# vi /etc/supervisor/supervisord.conf
将里面的最后两行:
;[include]
;files = relative/directory/*.ini
改为
[include]
files = conf.d/*.conf
ps:如果服务已启动,修改配置文件可用“supervisorctl reload”命令来使其生效
3.配置对asp.net core应用的守护
创建一个 webapplication1.conf文件,内容大致如下
[root@localhost /]# vi webapplication1.conf
[program:webapplication1]
command=dotnet webapplication1.dll ; 运行程序的命令
directory=/home/webapplication1/ ; 命令执行的目录
autorestart=true ; 程序意外退出是否自动重启
stderr_logfile=/var/log/webapplication1.err.log ; 错误日志文件
stdout_logfile=/var/log/webapplication1.out.log ; 输出日志文件
environment=aspnetcore_environment=production ; 进程环境变量
user=root ; 进程执行的用户身份
stopsignal=int
将文件拷贝至:“/etc/supervisor/conf.d/webapplication1.conf”下
[root@localhost /]#mkdir /etc/supervisor/conf.d
[root@localhost /]#cp webapplication1.conf /etc/supervisor/conf.d/
运行supervisord,查看是否生效
[root@localhost /]#supervisord -c /etc/supervisor/supervisord.confsupervisord -c /etc/supervisor/supervisord.conf
[root@localhost /]# ps -ef | grep webapplication1
root   29878 29685 0 09:57 ?    00:00:00 dotnet webapplication1.dll
root   29892 29363 0 09:57 pts/3  00:00:00 grep --color=auto webapplication1
如果存在dotnet webapplication1.dll 进程则代表运行成功,这时候在使用浏览器进行访问。
至此关于asp.net core应用程序的守护即配置完成。
supervisor守护进程常用操作
【启动supervisord】
确保配置无误后可以在每台主机上使用下面的命令启动supervisor的服务器端supervisord
supervisord
【停止supervisord】
supervisorctl shutdown
【重新加载配置文件】
supervisorctl reload
七 、配置supervisor开机启动
新建一个“supervisord.service”文件
[root@localhost /]# vi supervisord.service
# dservice for systemd (centos 7.0+)
# by et-cs (https://github.com/et-cs)
[unit]
description=supervisor daemon
[service]
type=forking
execstart=/usr/bin/supervisord -c /etc/supervisor/supervisord.conf
execstop=/usr/bin/supervisorctl shutdown
execreload=/usr/bin/supervisorctl reload
killmode=process
restart=on-failure
restartsec=42s
[install]
wantedby=multi-user.target
将文件拷贝至:“/usr/lib/systemd/system/supervisord.service”
[root@localhost /]# cp supervisord.service /usr/lib/systemd/system/
执行命令:systemctl enable supervisord
[root@localhost /]# systemctl enable supervisord
created symlink from /etc/systemd/system/multi-user.target.wants/supervisord.service to /usr/lib/systemd/system/supervisord.service.
执行命令:systemctl is-enabled supervisord #来验证是否为开机启动
[root@localhost /]# systemctl is-enabled supervisord
重启系统看能否能成功访问
[root@localhost /]# reboot
以上がCentos7環境で.NET Core2.0+Nginx+Supervisor環境を構築する方法の詳細内容です。詳細については、PHP 中国語 Web サイトの他の関連記事を参照してください。


![[Web フロントエンド] Node.js クイック スタート](https://img.php.cn/upload/course/000/000/067/662b5d34ba7c0227.png)


