nginx + tomcat を使用して静的ページと動的ページを分離する方法
実験環境: Windows
実験ツール: nginx、tomcat
Windows に nginx をインストールするのは非常に簡単です。公式 Web サイトにアクセスして圧縮パッケージをダウンロードし、解凍してダブルクリックします。解凍されたディレクトリ内の nginx.exe プログラムをクリックします。次に、ブラウザに「localhost」と入力すると、次の図が表示されます。これは、nginx がすでに動作していることを意味します。

nginx のワークフローは次のとおりです: 外部的には、nginx はサーバーです。すべてのリクエストは最初に nginx にリクエストされ、次に nginx はイントラネットへのリクエストを tomcat に分散します。 Tomcat がリクエストを処理した後、データを nginx に送信し、nginx がそれをユーザーに送信するというプロセス全体で、ユーザーは nginx がユーザーのリクエストを処理しているように感じられます。この場合、必ず nginx の設定が必要です。主な設定ファイルは conf フォルダー内の nginx.conf です。主に静的と動的を分離したため、静的ファイルのキャッシュやロード バランシングの設定は行っていません。
#user nobody;
worker_processes 2;

#error_log logs/error.log;
#error_log logs/error.log notice;
#error_log logs/error.log info;

#pid    logs/nginx.pid;


events {
  #nginx默认最大并发数是1024个用户线程
  worker_connections 1024;
}


http {
  include    mime.types;
  default_type application/octet-stream;

  #log_format main '$remote_addr - $remote_user [$time_local] "$request" '
  #         '$status $body_bytes_sent "$http_referer" '
  #         '"$http_user_agent" "$http_x_forwarded_for"';

  #access_log logs/access.log main;

  sendfile    on;
  #tcp_nopush   on;

  #keepalive_timeout 0;
  #http1.1在请求完之后还会保留一段时间的连接,所以这里的timeout时长不能太大,也不能太小,
  #太小每次都要建立连接,太大会浪费系统资源(用户不再请求服务器)
  keepalive_timeout 65;

  #gzip on;

  server {
  #nginx监听80端口
    listen    80;
    server_name localhost;

    #charset koi8-r;

    #access_log logs/host.access.log main;
  #这里的/表示所有的请求
    #location / {
    #将80端口的所有请求都转发到8080端口去处理,proxy_pass代表的是代理路径
   #  proxy_pass http://localhost:8080;
     # root  html;
      # index index.html index.htm;
    #}

  #对项目名进行访问就去访问tomcat服务
  location /student_vote {
      proxy_pass http://localhost:8080;
  }

  #对jsp和do结尾的url也去访问tomcat服务
  location ~ \.(jsp|do)$ {
      proxy_pass http://localhost:8080;
  }

  #对js、css、png、gif结尾的都去访问根目录下查找
  location ~ \.(js|css|png|gif)$ {
      root f:/javaweb;
  }


    #error_page 404       /404.html;

    # redirect server error pages to the static page /50x.html
    #
    error_page  500 502 503 504 /50x.html;
    location = /50x.html {
      root  html;
    }

    # proxy the php scripts to apache listening on 127.0.0.1:80
    #
    #location ~ \.php$ {
    #  proxy_pass  http://127.0.0.1;
    #}

    # pass the php scripts to fastcgi server listening on 127.0.0.1:9000
    #
    #location ~ \.php$ {
    #  root      html;
    #  fastcgi_pass  127.0.0.1:9000;
    #  fastcgi_index index.php;
    #  fastcgi_param script_filename /scripts$fastcgi_script_name;
    #  include    fastcgi_params;
    #}

    # deny access to .htaccess files, if apache's document root
    # concurs with nginx's one
    #
    #location ~ /\.ht {
    #  deny all;
    #}
  }


  # another virtual host using mix of ip-, name-, and port-based configuration
  #
  #server {
  #  listen    8000;
  #  listen    somename:8080;
  #  server_name somename alias another.alias;

  #  location / {
  #    root  html;
  #    index index.html index.htm;
  #  }
  #}


  # https server
  #
  #server {
  #  listen    443 ssl;
  #  server_name localhost;

  #  ssl_certificate   cert.pem;
  #  ssl_certificate_key cert.key;

  #  ssl_session_cache  shared:ssl:1m;
  #  ssl_session_timeout 5m;

  #  ssl_ciphers high:!anull:!md5;
  #  ssl_prefer_server_ciphers on;

  #  location / {
  #    root  html;
  #    index index.html index.htm;
  #  }
  #}

}上記の設定では、デフォルトの場所 / をコメントアウトしました。これは、動的か静的かにかかわらず、すべてのリクエストをインターセプトするためであり、もう 1 つは静的ファイルの設定です。 javaweb のワークスペースについては、次にその理由を説明します。
以前に作成したプロジェクトでは、ディレクトリ ファイル アクセスに常に jsp 組み込みオブジェクトを使用していましたが、nginx を使用すると、すべてを変更する必要があります。nginx を使用し、プロジェクトがパスを変更しない場合、常に変更できません。静的ファイルをロードし、ログを確認して次のエラーを見つけます: 2016/05/20 18:27:30 [error] 6748#6936: *225 createfile() "f:/javaweb/student_vote/lib/images/username .png"失敗しました (3: システムは指定されたパスを見つけることができません)、クライアント: 127.0.0.1、サーバー: localhost、リクエスト: "get /student_vote/lib/images/username.png http/1.1"、ホスト: "localhost"、リファラー: "http://localhost/student_vote/index.jsp"、一般的な情報は、jsp 内のファイルの構成に従って、nginx は /stdent_vote (これは私のプロジェクト名です)/lib/images から静的ファイルを検索します。 package にあるので、プロジェクト ファイルにあまり多くの変更を加えたくないのですが、実際には、jsp の組み込みオブジェクトを使用せずに、 http://localhost/username.png を直接使用して、組み込みオブジェクトではなく静的ファイルにアクセスするようにしました。ただし、この変更には修正が必要です。箇所が多いので、web-inf フォルダ配下の lib フォルダを先ほどのフォルダ、つまり フォルダと web フォルダに直接コピーしました。 -inf フォルダーは兄弟フォルダーです。
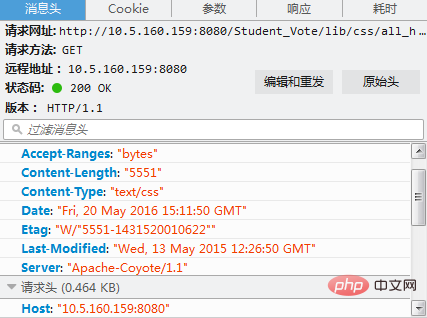
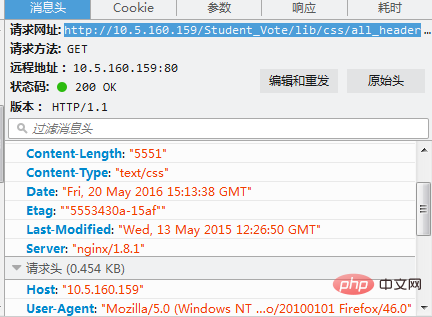
上記の操作により、動的と静的な分離が実現され、画像がなければ真実はありません。レンダリングは以下のようになります。

上の図では、サーバーが「apache-coyote/1.1」であることがわかります。 Tomcat用のコネクタです。

上記のサーバーは nginx として表示されます。これは、リクエストを受信する外部サーバーが nginx であることを意味します。
以上がnginx + tomcat を使用して静的ページと動的ページを分離する方法の詳細内容です。詳細については、PHP 中国語 Web サイトの他の関連記事を参照してください。

ホットAIツール

Undresser.AI Undress
リアルなヌード写真を作成する AI 搭載アプリ

AI Clothes Remover
写真から衣服を削除するオンライン AI ツール。

Undress AI Tool
脱衣画像を無料で

Clothoff.io
AI衣類リムーバー

AI Hentai Generator
AIヘンタイを無料で生成します。

人気の記事

ホットツール

メモ帳++7.3.1
使いやすく無料のコードエディター

SublimeText3 中国語版
中国語版、とても使いやすい

ゼンドスタジオ 13.0.1
強力な PHP 統合開発環境

ドリームウィーバー CS6
ビジュアル Web 開発ツール

SublimeText3 Mac版
神レベルのコード編集ソフト(SublimeText3)

ホットトピック
 7369
7369
 15
15
 1628
1628
 14
14
 1354
1354
 52
52
 1266
1266
 25
25
 1214
1214
 29
29
 Tomcat で複数のプロジェクトをデプロイする方法
Apr 21, 2024 am 09:33 AM
Tomcat を介して複数のプロジェクトをデプロイするには、プロジェクトごとに webapp ディレクトリを作成してから、次の操作を行う必要があります。 自動デプロイ: webapp ディレクトリを Tomcat の webapps ディレクトリに配置します。手動デプロイメント: Tomcat のマネージャー アプリケーションにプロジェクトを手動でデプロイします。プロジェクトがデプロイされると、そのデプロイメント名 (例: http://localhost:8080/project1) でアクセスできるようになります。
 Tomcat Web サイトのルート ディレクトリはどこですか?
Apr 21, 2024 am 09:27 AM
Tomcat Web サイトのルート ディレクトリは Tomcat の webapps サブディレクトリにあり、Web アプリケーション ファイル、静的リソース、および WEB-INF ディレクトリを保存するために使用されます。これは、Tomcat 構成ファイルで docBase 属性を検索することで見つかります。
 Tomcat で異なるポート番号を持つ 2 つのプロジェクトを実行する方法
Apr 21, 2024 am 09:00 AM
Tomcat サーバー上で異なるポート番号を使用してプロジェクトを実行するには、次の手順が必要です。server.xml ファイルを変更し、Connector 要素を追加してポート番号を定義します。 Context 要素を追加して、ポート番号に関連付けられたアプリケーションを定義します。 WAR ファイルを作成し、対応するディレクトリ (webapps または webapps/ROOT) にデプロイします。 Tomcat を再起動して変更を適用します。
 HTMLファイルからURLを生成する方法
Apr 21, 2024 pm 12:57 PM
HTML ファイルを URL に変換するには Web サーバーが必要です。これには次の手順が含まれます。 Web サーバーを取得します。 Webサーバーをセットアップします。 HTMLファイルをアップロードします。ドメイン名を作成します。リクエストをルーティングします。
 TomcatでHTMLとJSPを実行する方法
Apr 21, 2024 am 09:04 AM
Tomcat は HTML と JSP を実行できます。その方法は次のとおりです。HTML ファイルを Tomcat ディレクトリの対応するサブディレクトリにコピーし、ブラウザでアクセスします。 JSP ファイルを Tomcat ディレクトリの対応するサブディレクトリにコピーし、<%@ page %> ディレクティブを使用して Java コードを指定し、ブラウザでそのコードにアクセスします。
 Tomcatで文字化けが起こる原因
Apr 21, 2024 am 10:18 AM
Tomcat の文字化けの理由: 1. 文字セットの不一致、2. HTTP 応答ヘッダーが正しく設定されていない、4. Web ページのエンコードが間違っている、5. その他の理由。エンコードとプロキシ サーバーの問題)。
 Eclipseにサーバーを追加する方法
May 05, 2024 pm 07:27 PM
Eclipse にサーバーを追加するには、次の手順に従います。 サーバー ランタイム環境の作成 サーバーの構成 サーバー インスタンスの作成 サーバー ランタイム環境の選択 サーバー インスタンスの構成 サーバー デプロイメント プロジェクトの開始
 Tomcat の最大接続数と最大スレッド数
Apr 21, 2024 am 09:22 AM
Tomcat 接続の最大数は同時に接続するクライアントの数を制限し、スレッドの最大数はリクエストを同時に処理できるスレッドの数を制限します。これらの制限は、サーバー リソースの枯渇を防ぎ、サーバーの容量と負荷に一致するように、server.xml の maxConnections プロパティと maxThreads プロパティを設定することによって構成されます。


