SpringBoot が Mongodb を統合して追加、削除、変更を実装する方法
1. MongoDB とは
MongoDB は、私たちがこれまで慣れ親しんだリレーショナル データベース (MySQL、Oracle) とは異なり、必要なスケーラビリティと柔軟性を備えたドキュメント データベースです。必須のクエリとインデックス。
MongoDB は、柔軟な JSON のようなドキュメントにデータを保存します。つまり、ドキュメントのフィールドはドキュメントごとに異なり、データ構造は時間の経過とともに変化する可能性があります。ドキュメント モデルはアプリケーション コード内のオブジェクトにマップされ、データの操作が容易になります。 MongoDB は本質的に分散データベースであるため、高可用性、スケールアウト、地理的分散が組み込まれており、使いやすくなっています。さらに、MongoDB は無料のオープンソースです。
2. Window10 に MongoDB をインストールします
MongoDB 公式 Web サイトを開きます

MSI バージョン (インストール バージョン) をダウンロードします
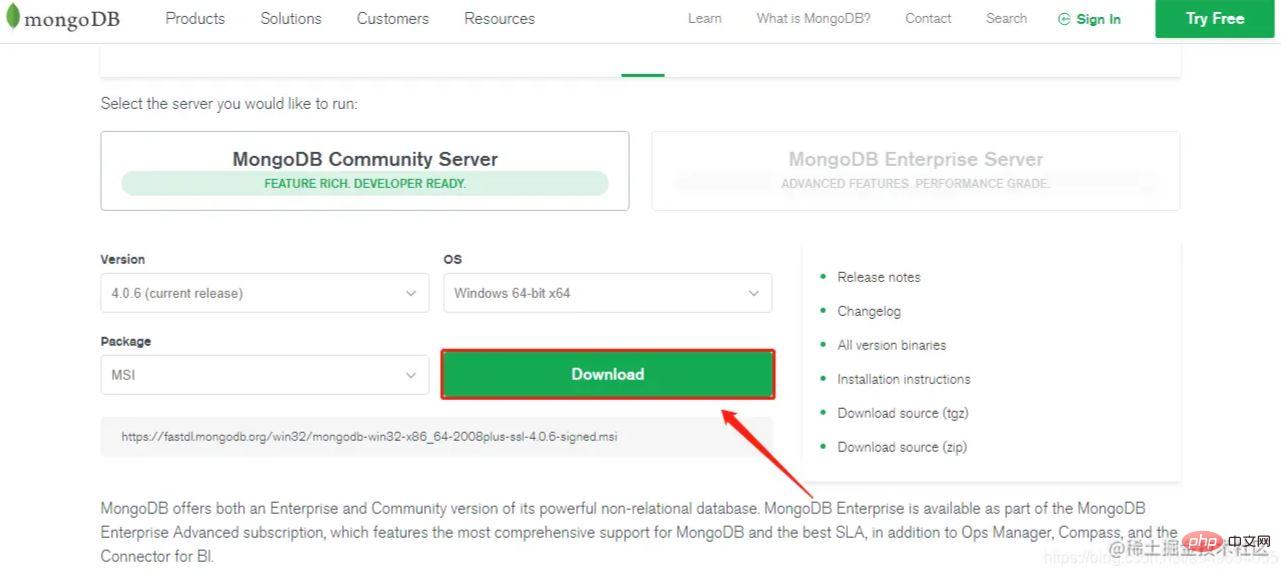
ダウンロードするときは、カスタムを選択します
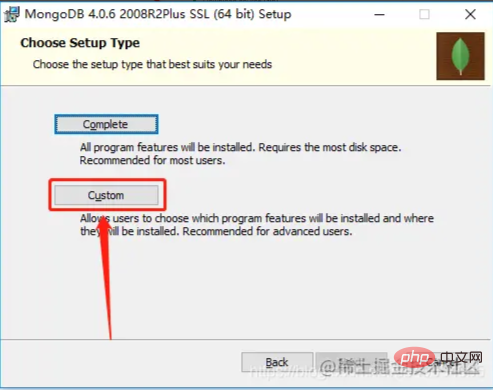
インストールするときは、インストール用のビジュアル プラグインをチェックしないように注意してください。インストールは非常に遅くなります (インターネット速度が十分に速い場合を除く)

3. MongoDB サービスの構成
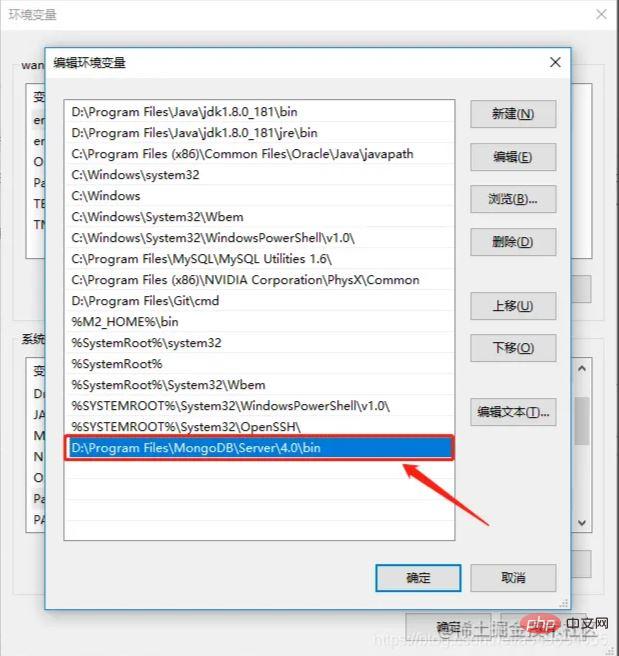
環境変数の構成
現在のパスをコピーします

[マイ コンピュータ] -> 右クリック -> [システムの詳細設定] -> [環境変数] -> [システム変数]
システム変数で Path を見つけて編集し、上でコピーしたパスを追加します
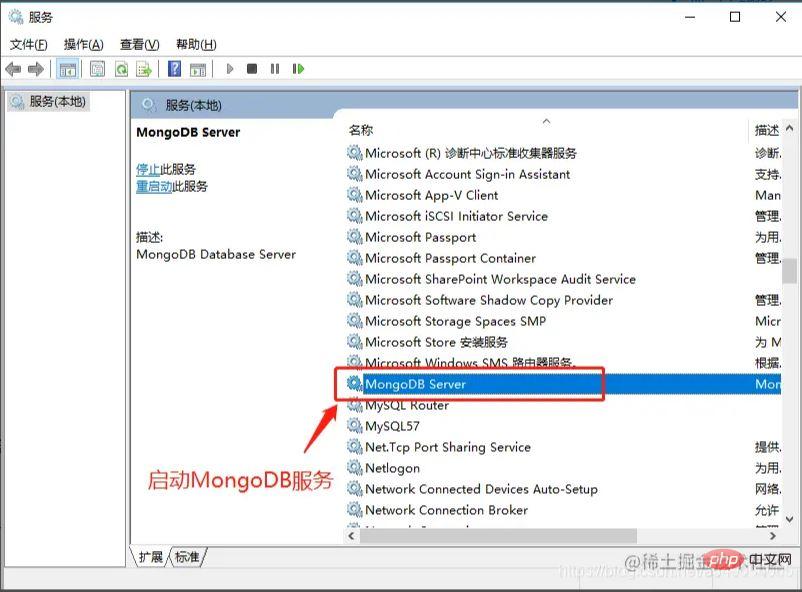
4. サービスを開始します
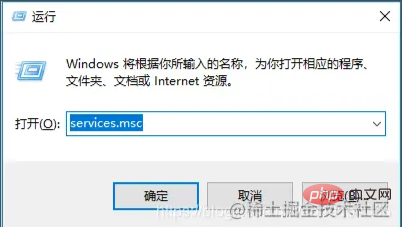
win R->サービスを開始します。 msc
127.0.0.1:2701
#」と入力します。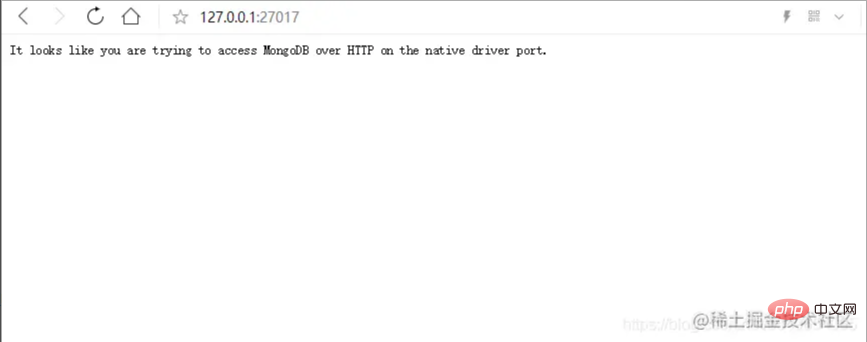 ## とブラウザに入力すると、この行の英語が表示されます。これは、サービスが正常に開始されたことを意味します。
5. SpringBoot は MongoDB を統合します
環境の準備オペレーティング システム: Window10
IDE: IntelliJ IDEA 2018.2.4
データベース: MongoDB
1) 依存関係を導入します
        <dependency>
            <groupId>org.springframework.boot</groupId>
            <artifactId>spring-boot-starter-data-mongodb</artifactId>
</dependency>2) application.yml に次の構成を追加します
spring:
  data:
    mongodb:
uri: mongodb://localhost/test_mongodb完全な構成情報は次のとおりです:
spring:
  data:
    mongodb:
      authentication-database: # Authentication database name.
      database: # Database name.
      field-naming-strategy: # Fully qualified name of the FieldNamingStrategy to use.
      grid-fs-database: # GridFS database name.
      host: # Mongo server host. Cannot be set with URI.
      password: # Login password of the mongo server. Cannot be set with URI.
      port: # Mongo server port. Cannot be set with URI.
      repositories:
        type: # Type of Mongo repositories to enable.
      uri: # Mongo database URI. Cannot be set with host, port and credentials.
username: # Login user of the mongo server. Cannot be set with URI.3) エンティティ クラス UserEntity を追加します
public class UserEntity {
    @Id
    private String uid;
    private String username;
    private String password;
    public String getUid() {
        return uid;
    }
    public void setUid(String uid) {
        this.uid = uid;
    }
    public String getUsername() {
        return username;
    }
    public void setUsername(String username) {
        this.username = username;
    }
    public String getPassword() {
        return password;
    }
    public void setPassword(String password) {
        this.password = password;
    }
    @Override
    public String toString() {
        return "UserEntity{" +
                "uid='" + uid + '\'' +
                ", username='" + username + '\'' +
                ", password='" + password + '\'' +
                '}';
    }
}4) 新しいテストを作成します。ここでは、MongoDB を表示するための視覚化ツールとして navicat を使用します。
テスト 1: 挿入操作
    @Autowired
    private MongoTemplate mongoTemplate;
    @Test
    public void saveUser(){
        UserEntity userEntity1 = new UserEntity();
        UserEntity userEntity2 = new UserEntity();
        UserEntity userEntity3 = new UserEntity();
        userEntity1.setUid("111");
        userEntity1.setUsername("用户1");
        userEntity1.setPassword("密码1");
        userEntity2.setUid("222");
        userEntity2.setUsername("用户2");
        userEntity2.setPassword("密码2");
        userEntity3.setUid("333");
        userEntity3.setUsername("用户3");
        userEntity3.setPassword("密码3");
        mongoTemplate.save(userEntity1);
        mongoTemplate.save(userEntity2);
        mongoTemplate.save(userEntity3);
}データベース情報:
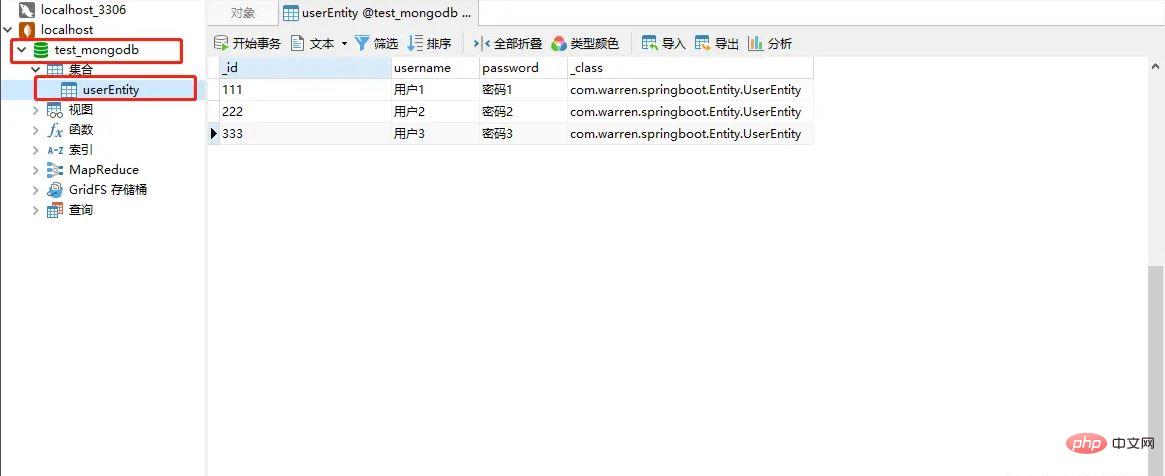 ご覧のとおり、MongoDB はデータベースを自動的に作成し、エンティティ クラス コレクション (データ テーブルとよく呼ばれます)。MongoTemplate を通じてデータベースの userEntity コレクションにいくつかのドキュメントを挿入しました (つまり、いくつかのレコードを挿入しました)。
は主キー、_class はエンティティ クラスのパッケージ名とクラス名です。 テスト 2: クエリ操作
    @Autowired
    private MongoTemplate mongoTemplate;
	@Test
    public void findUserByUserName(){
        String username = "用户1";
        Query query=new Query(Criteria.where("username").is(username));
        UserEntity user =  mongoTemplate.findOne(query , UserEntity.class);
        System.out.println(user);
}出力結果:
UserEntity{uid='111'、username='User 1'、password='Password 1'}テスト 3: 更新操作
Update 削除後のデータベースは図のようになります。@Autowired private MongoTemplate mongoTemplate; @Test public void updateUser(){ UserEntity userEntity = new UserEntity(); userEntity.setUid("111"); userEntity.setUsername("更新后的用户名"); userEntity.setPassword("更新后的密码"); Query query = new Query(Criteria.where("_id").is(userEntity.getUid())); Update update = Update.update("username",userEntity.getUsername()).set("password",userEntity.getPassword()); //更新返回结果集的第一条 mongoTemplate.updateFirst(query,update,UserEntity.class); //更新返回结果集的所有 //mongoTemplate.updateMulti(query,update,UserEntity.class); }ログイン後にコピー
 テスト 4: 削除操作
    @Autowired
    private MongoTemplate mongoTemplate;
	@Test
    public  void DeleteByUserId(){
        String id = "222";
        Query query=new Query(Criteria.where("_id").is(id));
        mongoTemplate.remove(query,UserEntity.class);
}削除後のデータベースは図のようになります。 :
以上がSpringBoot が Mongodb を統合して追加、削除、変更を実装する方法の詳細内容です。詳細については、PHP 中国語 Web サイトの他の関連記事を参照してください。

ホットAIツール

Undresser.AI Undress
リアルなヌード写真を作成する AI 搭載アプリ

AI Clothes Remover
写真から衣服を削除するオンライン AI ツール。

Undress AI Tool
脱衣画像を無料で

Clothoff.io
AI衣類リムーバー

AI Hentai Generator
AIヘンタイを無料で生成します。

人気の記事

ホットツール

メモ帳++7.3.1
使いやすく無料のコードエディター

SublimeText3 中国語版
中国語版、とても使いやすい

ゼンドスタジオ 13.0.1
強力な PHP 統合開発環境

ドリームウィーバー CS6
ビジュアル Web 開発ツール

SublimeText3 Mac版
神レベルのコード編集ソフト(SublimeText3)

ホットトピック
 7514
7514
 15
15
 1378
1378
 52
52
 79
79
 11
11
 19
19
 64
64
 navicat の有効期限が切れた場合の対処方法
Apr 23, 2024 pm 12:12 PM
Navicat の有効期限の問題を解決するには、ライセンスを更新する、自動更新を無効にする、Navicat プレミアム エッセンシャルの無料バージョンを使用する、などがあります。
 navicat を mongodb に接続する方法
Apr 24, 2024 am 11:27 AM
Navicat を使用して MongoDB に接続するには、次の手順を実行する必要があります: Navicat をインストールする MongoDB 接続を作成します: a. 接続名、ホスト アドレス、およびポートを入力します b. 認証情報を入力します (必要な場合) SSL 証明書を追加します (必要な場合) 接続を確認します接続を保存する
 net4.0の用途は何ですか
May 10, 2024 am 01:09 AM
.NET 4.0 はさまざまなアプリケーションの作成に使用され、オブジェクト指向プログラミング、柔軟性、強力なアーキテクチャ、クラウド コンピューティングの統合、パフォーマンスの最適化、広範なライブラリ、セキュリティ、スケーラビリティ、データ アクセス、モバイルなどの豊富な機能をアプリケーション開発者に提供します。開発サポート。
 サーバーレスアーキテクチャでのJava関数とデータベースの統合
Apr 28, 2024 am 08:57 AM
サーバーレス アーキテクチャでは、Java 関数をデータベースと統合して、データベース内のデータにアクセスして操作できます。主な手順には、Java 関数の作成、環境変数の構成、関数のデプロイ、および関数のテストが含まれます。これらの手順に従うことで、開発者はデータベースに保存されているデータにシームレスにアクセスする複雑なアプリケーションを構築できます。
 DebianでMongoDB自動拡張を構成する方法
Apr 02, 2025 am 07:36 AM
この記事では、自動拡張を実現するためにDebianシステムでMongodbを構成する方法を紹介します。主な手順には、Mongodbレプリカセットとディスクスペース監視のセットアップが含まれます。 1。MongoDBのインストール最初に、MongoDBがDebianシステムにインストールされていることを確認してください。次のコマンドを使用してインストールします。sudoaptupdatesudoaptinstinstall-yymongodb-org2。mongodbレプリカセットMongodbレプリカセットの構成により、自動容量拡張を達成するための基礎となる高可用性とデータ冗長性が保証されます。 Mongodbサービスを開始:Sudosystemctlstartmongodsudosys
 DebianでMongodbの高可用性を確保する方法
Apr 02, 2025 am 07:21 AM
この記事では、Debianシステムで非常に利用可能なMongoDBデータベースを構築する方法について説明します。データのセキュリティとサービスが引き続き動作し続けるようにするための複数の方法を探ります。キー戦略:レプリカセット:レプリカセット:レプリカセットを使用して、データの冗長性と自動フェールオーバーを実現します。マスターノードが失敗すると、レプリカセットが自動的に新しいマスターノードを選択して、サービスの継続的な可用性を確保します。データのバックアップと回復:MongoDumpコマンドを定期的に使用してデータベースをバックアップし、データ損失のリスクに対処するために効果的な回復戦略を策定します。監視とアラーム:監視ツール(プロメテウス、グラファナなど)を展開して、MongoDBの実行ステータスをリアルタイムで監視し、
 Nodejsをデータベースに接続する方法
Apr 21, 2024 am 06:16 AM
データベースに接続するために、Node.js は MySQL、PostgreSQL、MongoDB、Redis 用の複数のデータベース コネクタ パッケージを提供します。接続手順は次のとおりです: 1. 対応するコネクタ パッケージをインストールします。 2. 再利用可能な接続を維持するための接続プールを作成します。 3. データベースとの接続を確立します。注: 操作は非同期であり、セキュリティを確保し、パフォーマンスを最適化するためにエラーを処理する必要があります。
 navicat は mongodb に接続できますか?
Apr 23, 2024 pm 05:15 PM
はい、Navicat は MongoDB データベースに接続できます。具体的な手順は次のとおりです。 Navicat を開き、新しい接続を作成します。データベースの種類として MongoDB を選択します。 MongoDB のホスト アドレス、ポート、データベース名を入力します。 MongoDB のユーザー名とパスワードを入力します (必要な場合)。 「接続」ボタンをクリックします。


