Spring Security は、強力で高度にカスタマイズ可能な認証およびアクセス制御フレームワークであり、主に認証と認可の 2 つのことを行います。 SpringSecurityについては以前ブログを書いたことがあるのですが、その時はモックデータを基にした事例しか紹介しませんでしたが、今回は実データを基にした認証・認可の実装を紹介します。
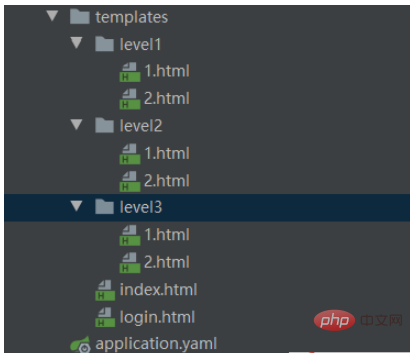
SpringSecurity をより適切に実証するために、最初に単純な Web プロジェクトを構築します。 thymeleaf 依存関係を導入します
<dependency>
    <groupid>org.springframework.boot</groupid>
    <artifactid>spring-boot-starter-thymeleaf</artifactid>
</dependency>
<dependency>
    <groupid>org.thymeleaf</groupid>
    <artifactid>thymeleaf-spring5</artifactid>
</dependency>
<dependency>
    <groupid>org.thymeleaf.extras</groupid>
    <artifactid>thymeleaf-extras-java8time</artifactid>
</dependency>
新しいログイン ページ、ホームページ、およびいくつかの異なるレベルの表示ページを作成します。login.html
nbsp;html>


    <meta>
    <title>登陆页</title>


<div>
    <form>
        <h3>登陆页</h3>
        <input>
        <input>
        <button>登陆</button>
    </form>
</div>
index.html
nbsp;html>


    <meta>
    <title>首页</title>


<div>
    <h3>首页</h3>
    <a>登陆</a>
    <div>
        <div>
            <h4>level1</h4>
            <a>level-1-1</a>
            <hr>
            <a>level-1-2</a>
        </div>
        <div>
            <h4>level2</h4>
            <a>level-2-1</a>
            <hr>
            <a>level-2-2</a>
        </div>
        <div>
            <h4>level3</h4>
            <a>level-3-1</a>
            <hr>
            <a>level-3-2</a>
        </div>
    </div>
</div>
さらに、ページにはいくつかの異なるレベルがあります。

それぞれ本文に対応する番号を書き込みます。
nbsp;html>


    <meta>
    <title>Title</title>


level-1-1
最後に、リクエストを受信するコントローラーを作成します:
@Controller
public class RouteController {

    @RequestMapping({"/","/index"})
    public String index(){
        return "index";
    }

    @RequestMapping("/login")
    public String toLogin(){
        return "login";
    }

    @RequestMapping("/level1/{id}")
    public String level1(@PathVariable("id")String id){
        return "level1/"+id;
    }
    @RequestMapping("/level2/{id}")
    public String level2(@PathVariable("id")String id){
        return "level2/"+id;
    }
    @RequestMapping("/level3/{id}")
    public String level3(@PathVariable("id")String id){
        return "level3/"+id;
    }
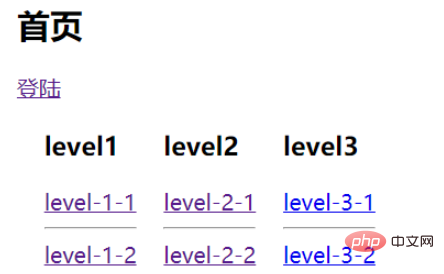
}最終的な効果は次のとおりです:

最後に、レベル ページを実現します。異なる権限を持つジャンプに応じて異なるレベル。

バックグラウンドは Mybatis および Mysql データベースに基づいて実装されているため、SpringSecurity の依存関係を導入することに加えて、Mybatis 関連の依存関係も導入する必要があります。設定ファイルにデータソース関連情報とMybatisの設定を追加します:
<dependency>
    <groupid>org.springframework.boot</groupid>
    <artifactid>spring-boot-starter-security</artifactid>
</dependency>
<dependency>
    <groupid>org.springframework.boot</groupid>
    <artifactid>spring-boot-starter-jdbc</artifactid>
</dependency>
<dependency>
    <groupid>mysql</groupid>
    <artifactid>mysql-connector-java</artifactid>
    <scope>runtime</scope>
</dependency>
<dependency>
    <groupid>org.mybatis.spring.boot</groupid>
    <artifactid>mybatis-spring-boot-starter</artifactid>
    <version>2.1.3</version>
</dependency>
(3) 認証・認可の実装
spring.datasource.url=jdbc:mysql://localhost:3306/security?serverTimezone=UTC&useUnicode=true&characterEncoding=utf-8
spring.datasource.username=root
spring.datasource.password=123456
spring.datasource.driver-class-name=com.mysql.cj.jdbc.Driver

mybatis.mapper-locations=classpath:mapper/*.xml
次は、これら 3 つのテーブルのエンティティ クラス、マッパー インターフェイス、および XML ファイルです。コードを見る必要はありません。主に、ユーザー名を通じてユーザーと関連するアクセス許可を検索する操作を実装します:
CREATE TABLE `roles` (
  `id` int(4) NOT NULL,
  `rolename` varchar(255) DEFAULT NULL,
  PRIMARY KEY (`id`)
) ENGINE=InnoDB DEFAULT CHARSET=utf8mb4;

CREATE TABLE `sysuser` (
  `id` int(4) NOT NULL,
  `username` varchar(255) NOT NULL,
  `password` varchar(255) NOT NULL,
  PRIMARY KEY (`id`)
) ENGINE=InnoDB DEFAULT CHARSET=utf8mb4;

CREATE TABLE `user_role` (
  `id` int(4) NOT NULL,
  `user_id` int(4) DEFAULT NULL,
  `role_id` int(4) DEFAULT NULL,
  PRIMARY KEY (`id`)
) ENGINE=InnoDB DEFAULT CHARSET=utf8mb4;
Mapper インターフェース:
@Data
public class Roles {
    private Integer id;
    private String roleName;
}

@Data
public class SysUser {
    private Integer id;
    private String userName;
    private String password;
    private List<roles> roles;
}</roles>xml 実装:
public interface UserMapper {
    public SysUser getUserByUserName(@Param("userName") String userName);
}3.2 認証プロセス
上記のプロセスの最初のステップは、ユーザー名を通じてユーザーを検索することです。これは Service サービスを通じて実装する必要があり、この Service サービスは SpringSecurity の UserDetailsService インターフェイスを継承する必要があります。このインターフェイスは SpringSecurity User オブジェクトを返します。
<?xml  version="1.0" encoding="UTF-8" ?>
nbsp;mapper PUBLIC "-//mybatis.org//DTD Mapper 3.0//EN" "http://mybatis.org/dtd/mybatis-3-mapper.dtd">
<mapper>
    <resultmap>
        <id></id>
        <result></result>
        <result></result>
        <collection>
            <result></result>
        </collection>
    </resultmap>
    <select>
        select sysuser.*,roles.rolename
        from sysuser
        LEFT JOIN user_role on sysuser.id= user_role.user_id
        LEFT JOIN roles on user_role.role_id=roles.id
        where username= #{userName}
    </select>
</mapper>3.3 セキュリティ インターセプトの構成
@Service
public class UserService implements UserDetailsService {

    @Resource
    private UserMapper userMapper;
    //根据用户名找到对应的用户信息
    @Override
    public UserDetails loadUserByUsername(String s) throws UsernameNotFoundException {
        SysUser sysUser = userMapper.getUserByUserName(s);
        if (sysUser!=null){
            List<grantedauthority> roles=new ArrayList();
            sysUser.getRoles().stream().forEach(x->{
                roles.add(new SimpleGrantedAuthority(x.getRoleName()));
            });
            return new User(sysUser.getUserName(),sysUser.getPassword(),roles);
        }
        throw new UsernameNotFoundException("用户未找到");
    }
}</grantedauthority>3.4 その他の注意点
@EnableWebSecurity
public class SecurityConfig extends WebSecurityConfigurerAdapter {

    @Autowired
    private UserService userService;
    //授权
    @Override
    protected void configure(HttpSecurity http) throws Exception {
        //首页所有人都能访问,level页面只有有权限的人才能访问
        http.authorizeRequests()
                .antMatchers("/").permitAll()
                .antMatchers("/level1/**").hasRole("vip1")
                .antMatchers("/level2/**").hasRole("vip2")
                .antMatchers("/level3/**").hasRole("vip3");
        //没有权限默认跳到登陆页,默认会重定向到/login
        http.formLogin();
    }

    //认证
    @Override
    protected void configure(AuthenticationManagerBuilder auth) throws Exception {
        auth.userDetailsService(userService).passwordEncoder(new BCryptPasswordEncoder());

    }
}以上がSpringBoot+SpringSecurityを使って実データに基づく認可認証を実装する方法の詳細内容です。詳細については、PHP 中国語 Web サイトの他の関連記事を参照してください。