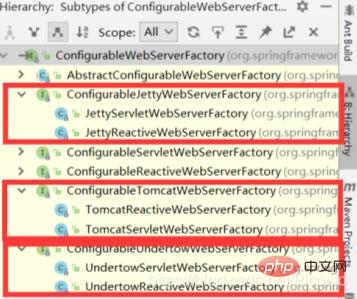
ただし、SpringBoot は他のサーブレット コンテナもサポートしています。デフォルトの Tomcat はそのうちの 1 つです
Jettyチャットなどの長いリンク アプリケーションに適しています
Undertow は、非常に優れた同時実行パフォーマンスを備えた高性能のノンブロッキング サーブレット コンテナですが、jsp
 をサポートしていません
#切り替えするには、pom ファイル内の組み込み Tomcat スターターを除外し、他のサーブレット コンテナーのスターターを導入するだけです
spring-boot -starter-web は spring-boot を導入します -starter-tomcat したがって、Tomcat がデフォルトで使用されます
したがって、元の Tomcat を除外して、追加するサーブレット コンテナの依存関係を導入するだけです:
Jetty に切り替えます:
<!-- 引入Web模块 -->
<dependency>
    <groupId>org.springframework.boot</groupId>
    <artifactId>spring-boot-starter-web</artifactId>
    <exclusions>
        <!-- 排除tomcat容器 -->
        <exclusion>
            <artifactId>spring-boot-starter-tomcat</artifactId>
            <groupId>org.springframework.boot</groupId>
        </exclusion>
    </exclusions>
</dependency>
<!-- 引入其它的Servlet容器 -->
<dependency>
    <artifactId>spring-boot-starter-jetty</artifactId>
    <groupId>org.springframework.boot</groupId>
</dependency>
Jetty が正常に開始されました
同様に undertow に切り替えます:
<!-- 引入Web模块 -->
<dependency>
    <groupId>org.springframework.boot</groupId>
    <artifactId>spring-boot-starter-web</artifactId>
    <exclusions>
        <!-- 排除tomcat容器 -->
        <exclusion>
            <artifactId>spring-boot-starter-tomcat</artifactId>
            <groupId>org.springframework.boot</groupId>
        </exclusion>
    </exclusions>
</dependency>
<!-- 引入其它的Servlet容器 -->
<dependency>
    <artifactId>spring-boot-starter-undertow</artifactId>
    <groupId>org.springframework.boot</groupId>
</dependency>
Undertow が正常に開始されました
1.1.SpringBoot でサポートされるサーブレットの種類と切り替え#1) デフォルトでサポートされる Web サーバー: Tomcat、Jrtty、Undertow
2) サーバーの切り替え
<dependency>
    <groupId>org.springframework.boot</groupId>
    <artifactId>spring-boot-starter-web</artifactId>
    <exclusions>
        <exclusion>
            <groupId>org.springframework.boot</groupId>
            <artifactId>spring-boot-starter-tomcat</artifactId>
        </exclusion>
    </exclusions>
</dependency> 1.2. 原則
1) SpringBoot アプリケーションが起動すると、現在 Web アプリケーションであることがわかります。 Web シナリオ パッケージ - import tomcat
2) Web アプリケーションは、ioc コンテナの Web バージョンを作成します。ServletWebServerApplicationContext
3) ServletWebServerApplicationContext 開始時に、ServletWebServerFactory (サーブレットの Web サーバー ファクトリ---) を探します。 > サーブレット Web サーバー)
4) SpringBoot にはデフォルトで最下層に多くの Web サーバー ファクトリがあります;
#application.properties 設定ファイルを設定してサーブレット コンテナをカスタマイズします#修改servlet容器
server.port=8000
#server.undertow.accesslog.dir=/tmp
Customizer
: カスタマイザー、xxxサーブレット コンテナの応答ポート番号を変更するデフォルト ルールを変更できます。 WebServerFactoryCustomizer :import org.springframework.boot.web.server.WebServerFactoryCustomizer;
import org.springframework.boot.web.servlet.server.ConfigurableServletWebServerFactory;
import org.springframework.stereotype.Component;
@Component
public class CustomizationBean implements WebServerFactoryCustomizer<ConfigurableServletWebServerFactory> {
@Override
public void customize(ConfigurableServletWebServerFactory server) {
server.setPort(9000);
}
}
ConfigurableServletWebServerFactory
ConfigurableServletWebServerFactory の実装クラスをカスタマイズすることにより インターフェイスでは、サーブレット コンテナをカスタマイズできます 以上がSpringBoot を他の組み込みサーブレット コンテナに切り替える方法の詳細内容です。詳細については、PHP 中国語 Web サイトの他の関連記事を参照してください。public interface ConfigurableWebServerFactory extends WebServerFactory, ErrorPageRegistry {
void setPort(int port);
void setAddress(InetAddress address);
void setErrorPages(Set<? extends ErrorPage> errorPages);
void setSsl(Ssl ssl);
void setSslStoreProvider(SslStoreProvider sslStoreProvider);
void setHttp2(Http2 http2);
void setCompression(Compression compression);
void setServerHeader(String serverHeader);
default void setShutdown(Shutdown shutdown) {
}
}