

Canary パブリッシングに nginx シミュレーションを使用する方法

カナリア リリース/グレースケール リリース
カナリア リリースの焦点は、試行錯誤です。カナリアの放鳥自体の起源は、人間の産業の発展における美しい自然の生き物たちの悲劇的な物語です。カナリアは、鉱山労働者の安全のために自らの命をかけて試行錯誤します。全体的なセキュリティのための交換には、少額のコストが使用されます。継続的デプロイメントの実践では、カナリアはトラフィック制御です。1 パーセントや 10 分の 1 などの非常に少量のトラフィックが、特定のバージョンが正常かどうかを確認するために使用されます。異常であれば、その機能は最小限のコストで達成され、リスクは軽減されます。正常であれば、100% に達するまで徐々に重みを増やし、すべてのトラフィックを新しいバージョンにスムーズに切り替えることができます。グレースケール パブリッシングも一般に同様の概念です。グレーは黒と白の間の移行です。青か緑のどちらかであるブルー アンド グリーン デプロイメントとは異なります。グレースケール リリース/カナリア リリースには両方が同時に存在する期間がありますが、この 2 つの対応するトラフィックはカナリア リリースとグレースケール リリースが異なる場合、その違いが目的である必要があります。カナリア リリースの目的は試行錯誤ですが、グレースケール リリースは安定リリースについてであり、カナリア リリースには問題はありません。スムーズな移行です。グレースケール出版の状況下で。
カナリア リリースのシミュレーション
次に、nginx のアップストリームを使用して、カナリア リリース シナリオを単純にシミュレートします。具体的なシナリオとしては、現在メインバージョンがアクティブになっており、nginx の設定を調整し、常に Canary バージョンのウェイトを調整することで、最終的にスムーズなリリースが実現されます。

#事前準備
2 つのポート 7001/7002 で 2 つのサービスを事前に起動し、異なる情報を表示します。便利です tornadoを使って画像を作成しました Dockerコンテナ起動時に渡される各種パラメータはサービスの違いを表示するために使用されます。docker run -d -p 7001:8080 liumiaocn/tornado:latest python /usr/local/bin/daemon.py "hello main service: v1 in 7001" docker run -d -p 7002:8080 liumiaocn/tornado:latest python /usr/local/bin/daemon.py "hello canary deploy service: v2 in 7002"
実行ログ
[root@kong ~]# docker run -d -p 7001:8080 liumiaocn/tornado:latest python /usr/local/bin/daemon.py "hello main service: v1 in 7001"
28f42bbd21146c520b05ff2226514e62445b4cdd5d82f372b3791fdd47cd602a
[root@kong ~]# docker run -d -p 7002:8080 liumiaocn/tornado:latest python /usr/local/bin/daemon.py "hello canary deploy service: v2 in 7002"
b86c4b83048d782fadc3edbacc19b73af20dc87f5f4cf37cf348d17c45f0215d
[root@kong ~]# curl http://192.168.163.117:7001
hello, service :hello main service: v1 in 7001
[root@kong ~]# curl http://192.168.163.117:7002
hello, service :hello canary deploy service: v2 in 7002
[root@kong ~]#
nginxの開始
[root@kong ~]# docker run -p 9080:80 --name nginx-canary -d nginx
659f15c4d006df6fcd1fab1efe39e25a85c31f3cab1cda67838ddd282669195c
[root@kong ~]# docker ps |grep nginx-canary
659f15c4d006    nginx           "nginx -g 'daemon ..."  7 seconds ago    up 7 seconds    0.0.0.0:9080->80/tcp   nginx-canary
[root@kong ~]#
nginxコードセグメント
以下の nginx コード スニペットを用意し、nginx の /etc/nginx/conf.d/default.conf に追加します。シミュレーション方法は非常に簡単です。トラフィックがゼロであることを示すには、down を使用します (重みをゼロに設定することはできません)。 nginx 内) 最初は、トラフィックの 100% がメイン バージョンに送信されます。http {
upstream nginx_canary {
server 192.168.163.117:7001 weight=100;
server 192.168.163.117:7002 down;
}
server {
listen 80;
server_name www.liumiao.cn 192.168.163.117;
location / {
proxy_pass http://nginx_canary;
}
}default.conf を変更する方法
vim をコンテナにインストールすることで効果を実現できます。また、ローカルで変更して docker cp 経由で渡すこともできます。 、または直接 sed 変更が可能です。 vim をコンテナにインストールする場合は、次の方法を使用します。[root@kong ~]# docker exec -it nginx-lb sh # apt-get update ...省略 # apt-get install vim ...省略
変更前
# cat default.conf
server {
  listen    80;
  server_name localhost;
  #charset koi8-r;
  #access_log /var/log/nginx/host.access.log main;
  location / {
    root  /usr/share/nginx/html;
    index index.html index.htm;
  }
  #error_page 404       /404.html;
  # redirect server error pages to the static page /50x.html
  #
  error_page  500 502 503 504 /50x.html;
  location = /50x.html {
    root  /usr/share/nginx/html;
  }
  # proxy the php scripts to apache listening on 127.0.0.1:80
  #
  #location ~ \.php$ {
  #  proxy_pass  http://127.0.0.1;
  #}
  # pass the php scripts to fastcgi server listening on 127.0.0.1:9000
  #
  #location ~ \.php$ {
  #  root      html;
  #  fastcgi_pass  127.0.0.1:9000;
  #  fastcgi_index index.php;
  #  fastcgi_param script_filename /scripts$fastcgi_script_name;
  #  include    fastcgi_params;
  #}
  # deny access to .htaccess files, if apache's document root
  # concurs with nginx's one
  #
  #location ~ /\.ht {
  #  deny all;
  #}
}
#変更後
# cat default.conf
upstream nginx_canary {
  server 192.168.163.117:7001 weight=100;
  server 192.168.163.117:7002 down;
}
server {
  listen    80;
  server_name www.liumiao.cn 192.168.163.117;
  #charset koi8-r;
  #access_log /var/log/nginx/host.access.log main;
  location / {
    #root  /usr/share/nginx/html;
    #index index.html index.htm;
    proxy_pass http://nginx_canary;
  }
  #error_page 404       /404.html;
  # redirect server error pages to the static page /50x.html
  #
  error_page  500 502 503 504 /50x.html;
  location = /50x.html {
    root  /usr/share/nginx/html;
  }
  # proxy the php scripts to apache listening on 127.0.0.1:80
  #
  #location ~ \.php$ {
  #  proxy_pass  http://127.0.0.1;
  #}
  # pass the php scripts to fastcgi server listening on 127.0.0.1:9000
  #
  #location ~ \.php$ {
  #  root      html;
  #  fastcgi_pass  127.0.0.1:9000;
  #  fastcgi_index index.php;
  #  fastcgi_param script_filename /scripts$fastcgi_script_name;
  #  include    fastcgi_params;
  #}
  # deny access to .htaccess files, if apache's document root
  # concurs with nginx's one
  #
  #location ~ /\.ht {
  #  deny all;
  #}
}
#nginx 設定をリロードします
# nginx -s reload
2018/05/28 05:16:20 [notice] 319#319: signal process started
#
##10 回の呼び出しすべての出力は 7001 の v1 です
[ root@kong ~]# cnt=0; while [ $cnt -lt 10 ]; docurl ; let cnt ; 完了hello, サービス :hello メイン サービス: v1 in 7001
hello, サービス :hello メイン サービス: v1 in 7001hello, サービス :hello メイン サービス: v1 in 7001##default.conf の重みを調整してから nginx -s reload を実行することで、カナリア バージョンの重みを 10% に調整すると、トラフィックの 10% が新しいサービスを実行しますhello, サービス :hello メイン サービス: v1 in 7001
hello, サービス :hello メイン サービス: v1 in 7001
hello 、サービス :hello メイン サービス: 7001 の v1
hello、サービス :hello メイン サービス: 7001 の v1
hello、サービス :hello メイン サービス: 7001 の v1
hello、サービス :hello メイン サービス : v1 in 7001
hello, service :hello main service: v1 in 7001
[root@kong ~]
# カナリア リリース: カナリア バージョン トラフィックの重み 10%
default.conf を変更する方法
次のようにアップストリームのサーバーの重みを調整するだけです:upstream nginx_canary {
server 192.168.163.117:7001 weight=10;
server 192.168.163.117:7002 weight=90;
}# nginx -s reload 2018/05/28 05:20:14 [notice] 330#330: signal process started #
結果を確認
[root@kong ~]# cnt=0; while [ $cnt -lt 10 ]; docurl ; let cnt ; 完了hello、サービス :hello カナリア デプロイ サービス: 7002 年の v2 hello、サービス :hello カナリア デプロイ サービス: 7002 の v2
hello、サービス :hello カナリア デプロイ サービス: 7002 の v2こんにちは、サービス :hello Canary デプロイ サービス: v2 で 7002調整により、default.conf の重み、次に、nginx -s reload を実行し、カナリア バージョンの重みを 50% に調整すると、トラフィックの 50% が新しいサービスを実行しますhello、サービス :hello メイン サービス: v1 で 7001
hello、サービス :hello Canary デプロイ サービス: v2 で 7002
hello、サービス :hello Canaryデプロイ サービス: v2 で 7002
hello, サービス :hello Canary デプロイ サービス: v2 で 7002
hello, サービス :hello Canary デプロイ サービス: v2 で 7002
hello, サービス :hello Canary デプロイ サービス : v2 で7002
[root@kong ~]
#Canary リリース: Canary バージョンのトラフィックの重み 50%
##default.conf を変更する方法
次のようにアップストリームのサーバーの重みを調整するだけです:
upstream nginx_canary {
server 192.168.163.117:7001 weight=50;
server 192.168.163.117:7002 weight=50;
}nginx 設定をリロード
# nginx -s reload 2018/05/28 05:22:26 [notice] 339#339: signal process started #
确认结果
[root@kong ~]# cnt=0; while [ $cnt -lt 10 ]; do curl ; let cnt++; done
hello, service :hello main service: v1 in 7001
hello, service :hello canary deploy service: v2 in 7002
hello, service :hello main service: v1 in 7001
hello, service :hello canary deploy service: v2 in 7002
hello, service :hello main service: v1 in 7001
hello, service :hello canary deploy service: v2 in 7002
hello, service :hello main service: v1 in 7001
hello, service :hello canary deploy service: v2 in 7002
hello, service :hello main service: v1 in 7001
hello, service :hello canary deploy service: v2 in 7002
[root@kong ~]#
金丝雀发布: 金丝雀版本流量权重90%
通过调整default.conf的weight,然后执行nginx -s reload的方式,调节金丝雀版本的权重为90%,流量的90%会执行新的服务
修改default.conf的方法
只需要将upstream中的server的权重做如下调整:
upstream nginx_canary {
  server 192.168.163.117:7001 weight=10;
  server 192.168.163.117:7002 weight=90;
}重新加载nginx设定
# nginx -s reload
2018/05/28 05:24:29 [notice] 346#346: signal process started
#
确认结果
[root@kong ~]# cnt=0; while [ $cnt -lt 10 ]; do curl ; let cnt++; done
hello, service :hello canary deploy service: v2 in 7002
hello, service :hello canary deploy service: v2 in 7002
hello, service :hello canary deploy service: v2 in 7002
hello, service :hello canary deploy service: v2 in 7002
hello, service :hello main service: v1 in 7001
hello, service :hello canary deploy service: v2 in 7002
hello, service :hello canary deploy service: v2 in 7002
hello, service :hello canary deploy service: v2 in 7002
hello, service :hello canary deploy service: v2 in 7002
hello, service :hello canary deploy service: v2 in 7002
[root@kong ~]#
金丝雀发布: 金丝雀版本流量权重100%
通过调整default.conf的weight,然后执行nginx -s reload的方式,调节金丝雀版本的权重为100%,流量的100%会执行新的服务
修改default.conf的方法
只需要将upstream中的server的权重做如下调整:
upstream nginx_canary {
  server 192.168.163.117:7001 down;
  server 192.168.163.117:7002 weight=100;
}重新加载nginx设定
# nginx -s reload
2018/05/28 05:26:37 [notice] 353#353: signal process started
确认结果
[root@kong ~]# cnt=0; while [ $cnt -lt 10 ]; do curl ; let cnt++; done
hello, service :hello canary deploy service: v2 in 7002
hello, service :hello canary deploy service: v2 in 7002
hello, service :hello canary deploy service: v2 in 7002
hello, service :hello canary deploy service: v2 in 7002
hello, service :hello canary deploy service: v2 in 7002
hello, service :hello canary deploy service: v2 in 7002
hello, service :hello canary deploy service: v2 in 7002
hello, service :hello canary deploy service: v2 in 7002
hello, service :hello canary deploy service: v2 in 7002
hello, service :hello canary deploy service: v2 in 7002
[root@kong ~]#
以上がCanary パブリッシングに nginx シミュレーションを使用する方法の詳細内容です。詳細については、PHP 中国語 Web サイトの他の関連記事を参照してください。

ホットAIツール

Undresser.AI Undress
リアルなヌード写真を作成する AI 搭載アプリ

AI Clothes Remover
写真から衣服を削除するオンライン AI ツール。

Undress AI Tool
脱衣画像を無料で

Clothoff.io
AI衣類リムーバー

AI Hentai Generator
AIヘンタイを無料で生成します。

人気の記事
ホットツール

メモ帳++7.3.1
使いやすく無料のコードエディター

SublimeText3 中国語版
中国語版、とても使いやすい

ゼンドスタジオ 13.0.1
強力な PHP 統合開発環境

ドリームウィーバー CS6
ビジュアル Web 開発ツール

SublimeText3 Mac版
神レベルのコード編集ソフト(SublimeText3)
ホットトピック
 7480
7480
 15
1377
52
77
11
19
33
15
1377
52
77
11
19
33

 Tomcat サーバーへの外部ネットワーク アクセスを許可する方法
Apr 21, 2024 am 07:22 AM
Tomcat サーバーへの外部ネットワーク アクセスを許可する方法
Apr 21, 2024 am 07:22 AM
Tomcat サーバーが外部ネットワークにアクセスできるようにするには、以下を行う必要があります。 外部接続を許可するように Tomcat 構成ファイルを変更します。 Tomcat サーバー ポートへのアクセスを許可するファイアウォール ルールを追加します。 Tomcat サーバーのパブリック IP を指すドメイン名を指す DNS レコードを作成します。オプション: リバース プロキシを使用して、セキュリティとパフォーマンスを向上させます。オプション: セキュリティを強化するために HTTPS を設定します。
 nginx へようこそ!それを解決するにはどうすればよいですか?
Apr 17, 2024 am 05:12 AM
nginx へようこそ!それを解決するにはどうすればよいですか?
Apr 17, 2024 am 05:12 AM
「nginx へようこそ!」エラーを解決するには、仮想ホスト構成を確認し、仮想ホストを有効にし、Nginx をリロードする必要があります。仮想ホスト構成ファイルが見つからない場合は、デフォルト ページを作成して Nginx をリロードすると、エラー メッセージが表示されます。が消え、ウェブサイトは通常のショーになります。
 HTMLファイルからURLを生成する方法
Apr 21, 2024 pm 12:57 PM
HTMLファイルからURLを生成する方法
Apr 21, 2024 pm 12:57 PM
HTML ファイルを URL に変換するには Web サーバーが必要です。これには次の手順が含まれます。 Web サーバーを取得します。 Webサーバーをセットアップします。 HTMLファイルをアップロードします。ドメイン名を作成します。リクエストをルーティングします。
 Nodejsプロジェクトをサーバーにデプロイする方法
Apr 21, 2024 am 04:40 AM
Nodejsプロジェクトをサーバーにデプロイする方法
Apr 21, 2024 am 04:40 AM
Node.js プロジェクトのサーバー デプロイメント手順: デプロイメント環境を準備します。サーバー アクセスの取得、Node.js のインストール、Git リポジトリのセットアップ。アプリケーションをビルドする: npm run build を使用して、デプロイ可能なコードと依存関係を生成します。コードをサーバーにアップロードします: Git またはファイル転送プロトコル経由。依存関係をインストールする: サーバーに SSH で接続し、npm install を使用してアプリケーションの依存関係をインストールします。アプリケーションを開始します。node Index.js などのコマンドを使用してアプリケーションを開始するか、pm2 などのプロセス マネージャーを使用します。リバース プロキシの構成 (オプション): Nginx や Apache などのリバース プロキシを使用して、トラフィックをアプリケーションにルーティングします。
 外部からnodejsにアクセスできますか?
Apr 21, 2024 am 04:43 AM
外部からnodejsにアクセスできますか?
Apr 21, 2024 am 04:43 AM
はい、Node.js には外部からアクセスできます。次の方法を使用できます。 Cloud Functions を使用して関数をデプロイし、一般にアクセスできるようにします。 Express フレームワークを使用してルートを作成し、エンドポイントを定義します。 Nginx を使用して、Node.js アプリケーションへのリバース プロキシ リクエストを実行します。 Docker コンテナを使用して Node.js アプリケーションを実行し、ポート マッピングを通じて公開します。
 PHP を使用して Web サイトを展開および維持する方法
May 03, 2024 am 08:54 AM
PHP を使用して Web サイトを展開および維持する方法
May 03, 2024 am 08:54 AM
PHP Web サイトを正常に展開して維持するには、次の手順を実行する必要があります。 Web サーバー (Apache や Nginx など) を選択する PHP をインストールする データベースを作成して PHP に接続する コードをサーバーにアップロードする ドメイン名と DNS を設定する Web サイトのメンテナンスを監視する手順には、PHP および Web サーバーの更新、Web サイトのバックアップ、エラー ログの監視、コンテンツの更新が含まれます。
 Fail2Ban を使用してサーバーをブルート フォース攻撃から保護する方法
Apr 27, 2024 am 08:34 AM
Fail2Ban を使用してサーバーをブルート フォース攻撃から保護する方法
Apr 27, 2024 am 08:34 AM
Linux 管理者にとっての重要なタスクは、サーバーを違法な攻撃やアクセスから保護することです。デフォルトでは、Linux システムには、iptables、Uncomplicated Firewall (UFW)、ConfigServerSecurityFirewall (CSF) などの適切に構成されたファイアウォールが付属しており、さまざまな攻撃を防ぐことができます。インターネットに接続されているマシンはすべて、悪意のある攻撃のターゲットになる可能性があります。サーバーへの不正アクセスを軽減するために使用できる Fail2Ban と呼ばれるツールがあります。 Fail2Ban とは何ですか? Fail2Ban[1] は、ブルート フォース攻撃からサーバーを保護する侵入防止ソフトウェアです。 Python プログラミング言語で書かれています
 Linux を学び、Nginx をインストールするために私と一緒に来てください
Apr 28, 2024 pm 03:10 PM
Linux を学び、Nginx をインストールするために私と一緒に来てください
Apr 28, 2024 pm 03:10 PM
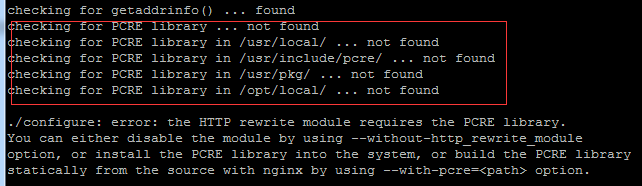
今回は、Linux 環境に Nginx をインストールする方法を説明します。 ここで使用する Linux システムは CentOS7.2 です。 インストール ツールを準備します。 1. Nginx 公式 Web サイトから Nginx をダウンロードします。ここで使用するバージョンは 1.13.6.2. ダウンロードした Nginx を Linux にアップロードする ここでは例として /opt/nginx ディレクトリを使用します。 「tar-zxvfnginx-1.13.6.tar.gz」を実行して解凍します。 3. /opt/nginx/nginx-1.13.6 ディレクトリに切り替え、./configure を実行して初期設定を行います。次のプロンプトが表示された場合は、マシンに PCRE がインストールされていないため、Nginx がインストールする必要があることを意味します。
