CentOS7.3でNginx仮想ホストを設定する方法
実験環境
最小限にインストールされた centos 7.3 仮想マシン
基本環境の構成
1. nginx をインストールします。
yum install -y epel-*
yum isntall -y nginx vim
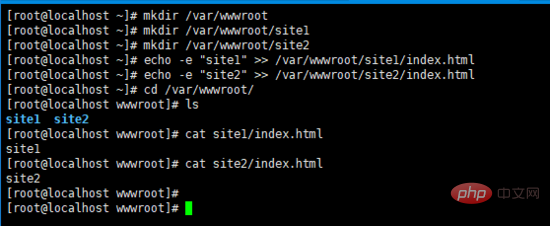
2. 仮想マシン ホストのサイト ルート ディレクトリを確立します
mkdir /var/wwwroot
mkdir /var/wwwroot/site1
mkdir /var/wwwroot/site2
echo -e "site1" >> /var/wwwroot/site1/index.html
echo -e "site2" >> /var/wwwroot/site2/index.html
3. Centos ファイアウォールをオフにします
setenforce 0
systemctl stop firewalld
systemctl disable firewalld

ポートベースの仮想ホストを構成します
1. nginx 構成ファイルを編集します
vim /etc/nginx/conf.d/vhosts.conf
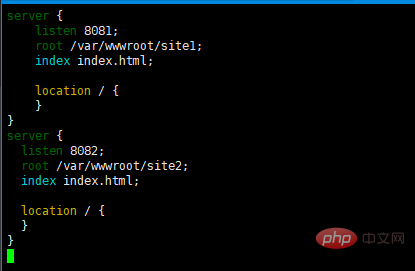
2. 次の内容を追加します
server {
  listen 8081;
  root /var/wwwroot/site1;
  index index.html;

  location / {
  }
}
server {
 listen 8082;
 root /var/wwwroot/site2;
 index index.html;

 location / {
 }
} 
3. nginx サービスを開始します
systemctl start nginx
4. ホスト マシン上の 2 つのサイトにアクセスします
http ://192.168 .204.135:8081/http://192.168.204.135:8082/


1. nginx 構成ファイルを再編集します
vim /etc/nginx/conf.d/vhosts.conf
2. 元のコンテンツを削除し、次のコンテンツを再度追加します
server {
  listen 80;
  server_name site1.test.com;
  root /var/wwwroot/site1;
  index index.html;

  location / {
  }
}
server {
 listen 80;
 server_name site2.test.com;
 root /var/wwwroot/site2;
 index index.html;

 location / {
 }
}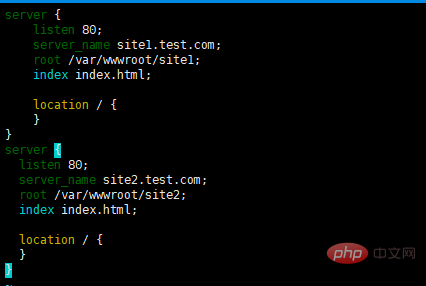 3.
3.
サービスを再起動します<div class="code" style="position:relative; padding:0px; margin:0px;"><div class="code" style="position:relative; padding:0px; margin:0px;"><pre class='brush:php;toolbar:false;'>systemctl restart nginx</pre><div class="contentsignin">ログイン後にコピー</div></div><div class="contentsignin">ログイン後にコピー</div></div>4.
c:\windows\system32\drivers\etc\hosts
次の内容を追加します (実際の内容に応じて変更します)状況)
192.168.204.135 site1 .test.com
192.168.204.135 site2.test.com
5. ホスト マシンのサイト 
#http://site1.test.com/
http://site2 の両方にアクセスします。 test.com/

 IP ベースの仮想ホストの構成
1. 2 つの IP アドレスを仮想マシンに追加します
ifconfig ens33:1 192.168.204.151
ifconfig ens33:2 192.168.204.152
vim /etc/nginx/conf.d/vhosts.conf
server {
  listen 192.168.204.151:80;
  root /var/wwwroot/site1;
  index index.html;

  location / {
  }
}
server {
 listen 192.168.204.152:80;
 root /var/wwwroot/site2;
 index index.html;

 location / {
 }
}4. 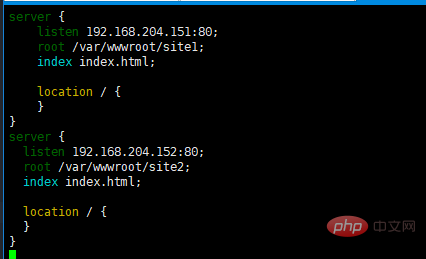 nginx
nginx
<div class="code" style="position:relative; padding:0px; margin:0px;"><div class="code" style="position:relative; padding:0px; margin:0px;"><pre class='brush:php;toolbar:false;'>systemctl restart nginx</pre><div class="contentsignin">ログイン後にコピー</div></div><div class="contentsignin">ログイン後にコピー</div></div>5. ホスト マシン上の 2 つのサイトにアクセスします
http: //192.168.204.151/
http://192.168.204.152/
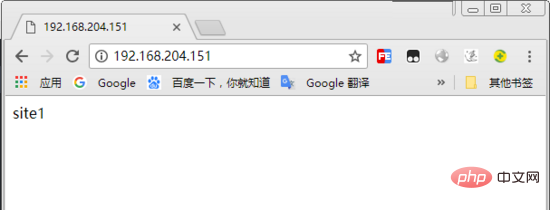
以上がCentOS7.3でNginx仮想ホストを設定する方法の詳細内容です。詳細については、PHP 中国語 Web サイトの他の関連記事を参照してください。

ホットAIツール

Undresser.AI Undress
リアルなヌード写真を作成する AI 搭載アプリ

AI Clothes Remover
写真から衣服を削除するオンライン AI ツール。

Undress AI Tool
脱衣画像を無料で

Clothoff.io
AI衣類リムーバー

AI Hentai Generator
AIヘンタイを無料で生成します。

人気の記事

ホットツール

メモ帳++7.3.1
使いやすく無料のコードエディター

SublimeText3 中国語版
中国語版、とても使いやすい

ゼンドスタジオ 13.0.1
強力な PHP 統合開発環境

ドリームウィーバー CS6
ビジュアル Web 開発ツール

SublimeText3 Mac版
神レベルのコード編集ソフト(SublimeText3)

ホットトピック
 7517
7517
 15
15
 1378
1378
 52
52
 79
79
 11
11
 21
21
 66
66
 CentOS HDFS構成を最適化する方法
Apr 14, 2025 pm 07:15 PM
CENTOSのHDFSパフォーマンスの向上:CENTOSのHDFS(Hadoop分散ファイルシステム)を最適化するための包括的な最適化ガイドには、ハードウェア、システム構成、ネットワーク設定を包括的に検討する必要があります。この記事では、HDFSパフォーマンスを改善するのに役立つ一連の最適化戦略を提供します。 1.ハードウェアのアップグレードと選択リソースの拡張:サーバーのCPU、メモリ、ストレージ容量を可能な限り増やします。高性能ハードウェア:高性能ネットワークカードとスイッチを採用して、ネットワークスループットを改善します。 2。システム構成微調整カーネルパラメーター調整:/etc/sysctl.confファイルを変更して、TCP接続番号、ファイルハンドル番号、メモリ管理などのカーネルパラメーターを最適化します。たとえば、TCP接続ステータスとバッファサイズを調整します
 CentosとUbuntuの違い
Apr 14, 2025 pm 09:09 PM
Centosとubuntuの重要な違いは次のとおりです。起源(CentosはRed Hat、for Enterprises、UbuntuはDebianに由来します。個人用のDebianに由来します)、パッケージ管理(CentosはYumを使用し、安定性に焦点を当てます。チュートリアルとドキュメント)、使用(Centosはサーバーに偏っています。Ubuntuはサーバーやデスクトップに適しています)、その他の違いにはインストールのシンプルさが含まれます(Centos is Thin)
 Centosシャットダウンコマンドライン
Apr 14, 2025 pm 09:12 PM
Centos Shutdownコマンドはシャットダウンし、構文はシャットダウン[オプション]時間[情報]です。オプションは次のとおりです。-hシステムをすぐに停止します。 -pシャットダウン後に電源をオフにします。 -r再起動; -t待機時間。時間は、即時(現在)、数分(分)、または特定の時間(HH:mm)として指定できます。追加の情報をシステムメッセージに表示できます。
 CentOS構成IPアドレス
Apr 14, 2025 pm 09:06 PM
CentosでIPアドレスを構成する手順:現在のネットワーク構成を表示します:IP ADDRネットワーク構成ファイルを編集するファイル:Sudo VI/etc/sysconfig/network-scripts/ifcfg-eth0変更IPアドレス:iPaddr =編集マスクとゲートウェイの変更(オプション):Netmask = and edit edit gatewway = neters rettart rettart the sudo system system systemctrat
 HDFS Configuration Centosで変更するには、どのファイルが必要ですか?
Apr 14, 2025 pm 07:27 PM
Hadoop分散ファイルシステム(HDFS)をCentOSに構成する場合、次のキー構成ファイルを変更する必要があります。Core-Site.xml:Fs.DefaultFS:HDFS:// LocalHost:9000などのHDFSのデフォルトファイルシステムアドレスを指定します。 hadoop.tmp.dir:Hadoop一時ファイルのストレージディレクトリを指定します。 hadoop.proxyuser.root.hosts and hadoop.proxyuser.ro
 Centos HDFSパフォーマンスのチューニングのヒント
Apr 14, 2025 pm 06:00 PM
CENTOSプラットフォームHadoop分散ファイルシステム(HDFS)パフォーマンス最適化ガイドHDFSパフォーマンスの最適化は、多面的な問題であり、特定の状況に合わせて複数のパラメーターを調整する必要があります。以下は、いくつかの重要な最適化戦略です。1。メモリ管理は、NAMENODEおよびDATANODEメモリ構成を調整します。HADOOP_NAMENODE_OPTSとHADOOP_DATANODE_OPTS環境変数を合理的に構成して、サーバーの実際のメモリサイズに従ってメモリの使用率を最適化します。大規模なページメモリを有効にする:高メモリ消費アプリケーション(HDFSなど)の場合、大きなページメモリを有効にすると、メモリページの割り当てと管理オーバーヘッドを削減し、効率を向上させることができます。 2。ディスクI/O最適化は高速ストレージを使用します
 CentosのPytorchのGPUサポートはどのようにサポートされていますか
Apr 14, 2025 pm 06:48 PM
Pytorch GPUアクセラレーションを有効にすることで、CentOSシステムでは、PytorchのCUDA、CUDNN、およびGPUバージョンのインストールが必要です。次の手順では、プロセスをガイドします。CUDAおよびCUDNNのインストールでは、CUDAバージョンの互換性が決定されます。NVIDIA-SMIコマンドを使用して、NVIDIAグラフィックスカードでサポートされているCUDAバージョンを表示します。たとえば、MX450グラフィックカードはCUDA11.1以上をサポートする場合があります。 cudatoolkitのダウンロードとインストール:nvidiacudatoolkitの公式Webサイトにアクセスし、グラフィックカードでサポートされている最高のCUDAバージョンに従って、対応するバージョンをダウンロードしてインストールします。 cudnnライブラリをインストールする:
 Centosはメンテナンスを停止します2024
Apr 14, 2025 pm 08:39 PM
Centosは、上流の分布であるRhel 8が閉鎖されたため、2024年に閉鎖されます。このシャットダウンはCentos 8システムに影響を与え、更新を継続し続けることができません。ユーザーは移行を計画する必要があり、提案されたオプションには、Centos Stream、Almalinux、およびRocky Linuxが含まれ、システムを安全で安定させます。


