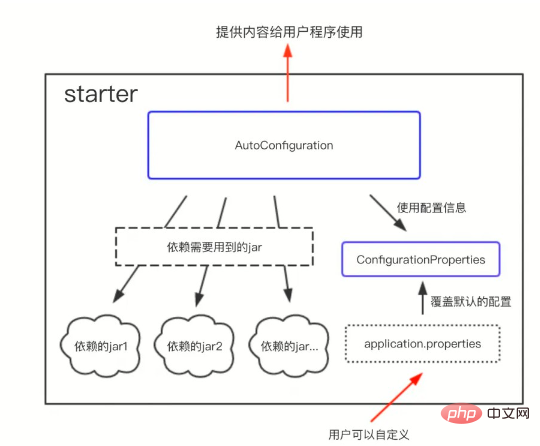
Spring Boot Starter は SpringBoot コンポーネントで提案されている概念であり、多くの面倒な構成を簡素化するため、さまざまな Spring Boot Starter パッケージを導入することで、プロジェクトの足場を迅速に構築できます。
たとえば、よく使用するもののいくつか:
spring-boot-starter-web:
spring-boot-starter-data -redis:
spring-boot-starter-data-mongodb:
spring-boot-starter-data-jpa:
spring-boot-starter-activemq:
一般に、スターターは依存関係の合成です。
スターターがなかった以前、従来の SSM プロジェクトの場合、Spring で jpa を使用したい場合は、次のことを行う必要があるかもしれません。
最初に特に、Maven で使用されるデータベースの依存関係を導入します>>次に、jpa の依存関係を導入します>>xml でいくつかの属性情報を構成します>>正常に実行できるようになるまで呼び出しをデバッグします。
上記の操作には、次のようないくつかの問題があります。
プロセスが複雑な場合、このような段階的な操作ではエラーが発生する可能性が高くなります。
また、設定時に多くの時間がかかり、初心者や初心者にとってはあまり親切ではありません。

application.properties ファイルが存在するため、カスタマイズされた構成が必要な場合でも、すべての構成を 1 つのファイルで実行するだけで済み、非常に便利です。採用されたスターターはすべて上記に記載されています。

<?xml version="1.0" encoding="UTF-8"?>
<project xmlns="http://maven.apache.org/POM/4.0.0"
         xmlns:xsi="http://www.w3.org/2001/XMLSchema-instance"
         xsi:schemaLocation="http://maven.apache.org/POM/4.0.0 http://maven.apache.org/xsd/maven-4.0.0.xsd">
    <modelVersion>4.0.0</modelVersion>
    <artifactId>http-starter</artifactId>
    <version>0.0.1-SNAPSHOT</version>

    <!-- 自定义starter都应该继承自该依赖 -->
    <!-- 如果自定义starter本身需要继承其它的依赖,可以参考 https://stackoverflow.com/a/21318359 解决 -->
    <parent>
        <groupId>org.springframework.boot</groupId>
        <artifactId>spring-boot-starters</artifactId>
        <version>1.5.2.RELEASE</version>
    </parent>

    <dependencies>
        <!-- 自定义starter依赖此jar包 -->
        <dependency>
            <groupId>org.springframework.boot</groupId>
            <artifactId>spring-boot-starter</artifactId>
        </dependency>
        <!-- lombok用于自动生成get、set方法 -->
        <dependency>
            <groupId>org.projectlombok</groupId>
            <artifactId>lombok</artifactId>
            <version>1.16.10</version>
        </dependency>
    </dependencies>

</project>@ConfigurationProperties(prefix = "http")
@Getter
public class HttpProperties {
// 如果配置文件中配置了http.url属性,则该默认属性会被覆盖
private String url = "https://blog.csdn.net/weixin_39709134?type=blog";
}@Setter
@Getter
public class HttpClient {
private String url;
// 根据url获取网页数据
public String getHtml() {
try {
URL url = new URL(this.url);
URLConnection urlConnection = url.openConnection();
BufferedReader br = new BufferedReader(new InputStreamReader(urlConnection.getInputStream(), "utf-8"));
String line = null;
StringBuilder sb = new StringBuilder();
while ((line = br.readLine()) != null) {
sb.append(line).append("\n");
}
return sb.toString();
} catch (Exception e) {
e.printStackTrace();
}
return "error";
}
}url 属性と getHtml メソッドが含まれています。
@Configuration
@EnableConfigurationProperties(HttpProperties.class)
public class HttpAutoConfiguration {

    @Resource
    private HttpProperties properties; // 使用配置

    // 在Spring上下文中创建一个对象
    @Bean
    @ConditionalOnMissingBean
    public HttpClient init() {
        HttpClient client = new HttpClient();

        String url = properties.getUrl();
        client.setUrl(url);
        return client;
    }

}resources フォルダーの下に新しいディレクトリ META-INF を作成し、そのディレクトリ内に新しい spring.factories ファイルを作成します。および spring.factories: での AutoConfiguration の構成
org.springframework.boot.autoconfigure.EnableAutoConfiguration=\
com.nosuchfield.httpstarter.HttpAutoConfiguration
最后使用 Maven 打包该项目。之后创建一个 SpringBoot 项目,在项目中添加我们之前打包的 starter 作为依赖,然后使用 SringBoot 来运行我们的 starter
@Component
public class RunIt {

    @Resource
    private HttpClient httpClient;

    public void hello() {
        System.out.println(httpClient.getHtml());
    }

}
之后可以在 application.properties中修改配置来进行测试证明 properties 中的数据确实被覆盖
以上がSpringCloud-Spring Boot Starter の使用テスト インスタンスの分析の詳細内容です。詳細については、PHP 中国語 Web サイトの他の関連記事を参照してください。