Nginx サーバーの下にインデックス ディレクトリを設定して使用する方法

nginx 設定
  location ~ ^/2589(/.*)
  {
    autoindex on; //开启
    autoindex_localtime on;//开启显示功能
}auto_index ディレクティブ
構文: autoindex on | off;
設定セクション: autoindex off;
設定セクション: http, server, location
nginx ディレクトリ インデックス機能を有効にする/使用するだけです。
構文: autoindex_exact_size on | off;
設定セクション: autoindex_exact_size on;
設定セクション: http、server、location
ファイルのサイズをバイト、mb、gb などの単位でさらに表示するかどうかを決定します。デフォルトでは、
syntax: autoindex_localtime on | off;
Configuration セクションが開きます: autoindex_localtime off;
Configuration セクション: http,server,location
ディレクトリまたはファイルの時刻を表示するかどうかを指定します。デフォルトは表示されません。
nginx fancy は美しいインデックス ディレクトリを実装します
nginx インデックス ディレクトリには、非常にシンプルで見栄えの悪い独自の機能があります。次に見てみましょう。
インストール環境
システム: centos 6.3nginx:1.4.2
fancy: http://wiki.nginx.org/ngxfancyindex
fancy をダウンロードしてインストールします
構築されたものを比較しますnginx の -in インデックス効果 (前の記事に投稿した画像)、以下に示すように
# wget http://gitorious.org/ngx-fancyindex/ngx-fancyindex/archive-tarball/master
# tar -xzvf master
# wget http://nginx.org/download/nginx-1.4.2.tar.gz
# tar -xzvf nginx-1.4.2.tar.gz
# cd nginx-1.4.2
# ./configure --prefix=/usr/local/nginx-1.4.2 --add-module=../ngx-fancyindex-ngx-fancyindex
# make
# make install
派手なインデックス構成
server {
listen  80;
 server_name test.jb51.net;
 access_log /data/logs/nginx/test.jb51.net.access.log main;
index index.html index.php index.html;
 root /data/site/test.jb51.net;
location / {
}
 location ~ ^/2589(/.*)
 {
 fancyindex on;
 fancyindex_exact_size off;
 fancyindex_localtime on;
 fancyindex_footer "myfooter.shtml";
 }
 }
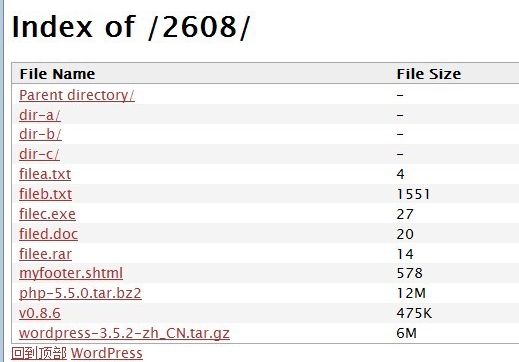
追加の効果を見てください。以下に示すように、nginx を使用してください。

付属のものよりも見た目がどれだけ優れているかを言うのは難しいです... とにかく、見た目が良くなります~
パラメータの説明:
fancyindex on: ファンシーインデックスをオンにします
fancyindex_exact_size off: 正確なサイズを使用せず、四捨五入を使用します。1.9m は 2m として表示されます。がオンになっている場合、単位はバイトです
fancyindex_localtime on: ローカル時間を使用します
fancyindex_footer "myfooter.shtml": 現在のパスの myfooter.shtml の内容を下部として使用します ファイルが存在しない場合、404
myfooter.shtml の内容は次のとおりです:
<!-- footer start --> <div id="footer"> <a id="gotop" href="#" onclick="mgjs.gotop();return false;">回到顶部</a> <a id="powered" href="http://wordpress.org/">wordpress</a> <div id="copyright"> 版权所有 © 2006-2015 本站 </div> <div id="themeinfo"> <a href="//www.jb51.net/about/">关于我们</a> | <a href="//www.jb51.net/sitemap.html">网站导航</a> | <a href="//www.jb51.net/sitemap.xml">网站地图</a> |<a rel="nofollow" href="http://www.miibeian.gov.cn/">苏icp备14036222号</a> </div> </div> <!-- footer end --> fancy指令使用:
fancyindex
構文:
*fancyindex* [*on* | *off*]
デフォルト値: fancyindex off
構成ブロック: http,server,location
説明:ディレクトリインデックス機能のオン/オフを切り替えます
fancyindex_css_href
構文:
*fancyindex_css_href uri*
デフォルト値:fancyindex_css_href ""
構成ブロック:http,server, location
説明: 外部 CSS パス。この CSS は既存の CSS スタイルを置き換えます。 CSS を知っていれば、インデックス リストをより美しくすることができます。ttlsa には Web デザイナーがいないので、付属のものしか使用できません ^^
fancyindex_exact_size
Syntax:
*fancyindex_exact_size* [*on* | *off*]
デフォルト値: fancyindex_exact_size on
構成ブロック: http、server、location
説明: ファイル サイズの表示方法を定義します。デフォルトはオンです。オン: ファイル サイズの正確な値を使用します。 、単位はバイトです。 off: 単位はkb、mb、gbで、小数点が含まれる場合は四捨五入されます。たとえば、1.9mb は 2mb として表示されます。
fancyindex_footer
構文:
*fancyindex_footer path*
デフォルト値:fancyindex_footer ""
構成ブロック:http、server、location
説明:インデックス ページの下部に埋め込むファイルを指定します、効果をご覧ください。 この記事の最初の画像を参照してください。
fancyindex_header
構文:
*fancyindex_header path*
デフォルト値:fancyindex_header ""
構成ブロック:http、server、location
説明:インデックス ページのヘッダーに埋め込むファイルを指定します。使用法は fancyindex_footer
fancyindex_ignore
に似ています。構文:
*fancyindex_ignore string1 [string2 [... stringn]]*
デフォルト値:デフォルトなし。
構成ブロック:http、server、location
説明: どのファイル/ディレクトリが非表示になっているか nginx が正規表現をサポートしている場合、正規表現を使用してフィルタリングできます
たとえば、dir とファイル filea.txt で始まるファイルまたはディレクトリを非表示にしたいとします。構成は次のとおりです:
#
fancyindex_ignore "dir*" "filea.txt"
構文:
*fancyindex_localtime* [*on* | *off*]
構成ブロック:http、server、location
以上がNginx サーバーの下にインデックス ディレクトリを設定して使用する方法の詳細内容です。詳細については、PHP 中国語 Web サイトの他の関連記事を参照してください。

ホットAIツール

Undresser.AI Undress
リアルなヌード写真を作成する AI 搭載アプリ

AI Clothes Remover
写真から衣服を削除するオンライン AI ツール。

Undress AI Tool
脱衣画像を無料で

Clothoff.io
AI衣類リムーバー

AI Hentai Generator
AIヘンタイを無料で生成します。

人気の記事

ホットツール

メモ帳++7.3.1
使いやすく無料のコードエディター

SublimeText3 中国語版
中国語版、とても使いやすい

ゼンドスタジオ 13.0.1
強力な PHP 統合開発環境

ドリームウィーバー CS6
ビジュアル Web 開発ツール

SublimeText3 Mac版
神レベルのコード編集ソフト(SublimeText3)

ホットトピック
 7328
7328
 9
9
 1626
1626
 14
14
 1350
1350
 46
46
 1262
1262
 25
25
 1209
1209
 29
29
 Tomcat サーバーへの外部ネットワーク アクセスを許可する方法
Apr 21, 2024 am 07:22 AM
Tomcat サーバーが外部ネットワークにアクセスできるようにするには、以下を行う必要があります。 外部接続を許可するように Tomcat 構成ファイルを変更します。 Tomcat サーバー ポートへのアクセスを許可するファイアウォール ルールを追加します。 Tomcat サーバーのパブリック IP を指すドメイン名を指す DNS レコードを作成します。オプション: リバース プロキシを使用して、セキュリティとパフォーマンスを向上させます。オプション: セキュリティを強化するために HTTPS を設定します。
 nginxの起動コマンドと停止コマンドとは何ですか?
Apr 02, 2024 pm 08:45 PM
Nginx の開始コマンドと停止コマンドは、それぞれ nginx と nginx -s quit です。 start コマンドはサーバーを直接起動し、stop コマンドはサーバーを正常にシャットダウンして、現在のすべてのリクエストを処理できるようにします。その他の使用可能な停止信号には、停止およびリロードがあります。
 thinkphpの実行方法
Apr 09, 2024 pm 05:39 PM
ThinkPHP フレームワークをローカルで実行する手順: ThinkPHP フレームワークをローカル ディレクトリにダウンロードして解凍します。 ThinkPHP ルート ディレクトリを指す仮想ホスト (オプション) を作成します。データベース接続パラメータを構成します。 Webサーバーを起動します。 ThinkPHP アプリケーションを初期化します。 ThinkPHP アプリケーションの URL にアクセスして実行します。
 nginx へようこそ!それを解決するにはどうすればよいですか?
Apr 17, 2024 am 05:12 AM
「nginx へようこそ!」エラーを解決するには、仮想ホスト構成を確認し、仮想ホストを有効にし、Nginx をリロードする必要があります。仮想ホスト構成ファイルが見つからない場合は、デフォルト ページを作成して Nginx をリロードすると、エラー メッセージが表示されます。が消え、ウェブサイトは通常のショーになります。
 phpmyadminの登録方法
Apr 07, 2024 pm 02:45 PM
phpMyAdmin に登録するには、まず MySQL ユーザーを作成して権限を付与し、次に phpMyAdmin をダウンロード、インストール、構成し、最後に phpMyAdmin にログインしてデータベースを管理する必要があります。
 Nodejsプロジェクトをサーバーにデプロイする方法
Apr 21, 2024 am 04:40 AM
Node.js プロジェクトのサーバー デプロイメント手順: デプロイメント環境を準備します。サーバー アクセスの取得、Node.js のインストール、Git リポジトリのセットアップ。アプリケーションをビルドする: npm run build を使用して、デプロイ可能なコードと依存関係を生成します。コードをサーバーにアップロードします: Git またはファイル転送プロトコル経由。依存関係をインストールする: サーバーに SSH で接続し、npm install を使用してアプリケーションの依存関係をインストールします。アプリケーションを開始します。node Index.js などのコマンドを使用してアプリケーションを開始するか、pm2 などのプロセス マネージャーを使用します。リバース プロキシの構成 (オプション): Nginx や Apache などのリバース プロキシを使用して、トラフィックをアプリケーションにルーティングします。
 ウェブサイトにアクセスする際のnginxの問題を解決する方法
Apr 02, 2024 pm 08:39 PM
Web サイトにアクセスすると nginx が表示されます。その理由としては、サーバーのメンテナンス、サーバーのビジー状態、ブラウザーのキャッシュ、DNS の問題、ファイアウォールのブロック、Web サイトの構成ミス、ネットワーク接続の問題、Web サイトのダウンなどが考えられます。次の解決策を試してください: メンテナンスが終了するまで待つ、オフピーク時間にアクセスする、ブラウザのキャッシュをクリアする、DNS キャッシュをフラッシュする、ファイアウォールまたはウイルス対策ソフトウェアを無効にする、サイト管理者に連絡する、ネットワーク接続を確認する、または検索エンジンを使用するWeb アーカイブを使用して、サイトの別のコピーを見つけます。問題が解決しない場合は、サイト管理者にお問い合わせください。
 Dockerコンテナ間で通信する方法
Apr 07, 2024 pm 06:24 PM
Docker 環境でのコンテナ通信には、共有ネットワーク、Docker Compose、ネットワーク プロキシ、共有ボリューム、メッセージ キューの 5 つの方法があります。分離とセキュリティのニーズに応じて、Docker Compose を利用して接続を簡素化するか、ネットワーク プロキシを使用して分離を強化するなど、最も適切な通信方法を選択します。


