

cPanel を使用して CentOS 7 で Nginx リバース プロキシを構成する方法

cPanel は、世界で最も強力で使いやすく、最も人気のある仮想ホスト コントロール システムであり、多くの外国ホストがこのコントロール パネルを使用しています。

まず、このプロセスを開始するには EPEL ライブラリをインストールする必要があります
ステップ 1: EPEL ライブラリをインストールする
root@server1 [/usr]# yum -y install epel-releaseLoaded plugins: fastestmirror, tsflags, universal-hooks
Loading mirror speeds from cached hostfile
* EA4: 66.23.237.210
* base: mirrors.linode.com
* extras: mirrors.linode.com
* updates: mirrors.linode.com
Resolving Dependencies
--> Running transaction check
---> Package epel-release.noarch 0:7-5 will be installed
--> Finished Dependency Resolution

Dependencies Resolved

========================================================================================
   Package Arch Version Repository Size
========================================================================================
Installing:
epel-release noarch 7-5 extras 14 k
ステップ 2: nDeploy の CentOS RPM ライブラリをインストールする
nDeploy の CentOS RPM ライブラリをインストールして、必要な nDeploy Web クラス ソフトウェアと Nginx プラグインをインストールできます
root@server1 [/usr]# yum -y install http://rpm.piserve.com/nDeploy-release-centos-1.0-1.noarch.rpmLoaded plugins: fastestmirror, tsflags, universal-hooks
nDeploy-release-centos-1.0-1.noarch.rpm | 1.7 kB 00:00:00
Examining /var/tmp/yum-root-ei5tWJ/nDeploy-release-centos-1.0-1.noarch.rpm: nDeploy-release-centos-1.0-1.noarch
Marking /var/tmp/yum-root-ei5tWJ/nDeploy-release-centos-1.0-1.noarch.rpm to be installed
Resolving Dependencies
--> Running transaction check
---> Package nDeploy-release-centos.noarch 0:1.0-1 will be installed
--> Finished Dependency Resolution

Dependencies Resolved

========================================================================================
Package Arch Version Repository Size
========================================================================================
Installing:
nDeploy-release-centos noarch 1.0-1 /nDeploy-release-centos-1.0-1.noarch 110
3 番目ステップ: nDeploy と Nginx nDeploy プラグインをインストールする
root@server1 [/usr]# yum --enablerepo=ndeploy install nginx-nDeploy nDeployLoaded plugins: fastestmirror, tsflags, universal-hooks
epel/x86_64/metalink | 9.9 kB 00:00:00
epel | 4.3 kB 00:00:00
ndeploy | 2.9 kB 00:00:00
(1/4): ndeploy/7/x86_64/primary_db | 14 kB 00:00:00
(2/4): epel/x86_64/group_gz | 169 kB 00:00:00
(3/4): epel/x86_64/primary_db | 3.7 MB 00:00:02

Dependencies Resolved

========================================================================================
Package Arch Version Repository Size
========================================================================================
Installing:
nDeploy noarch 2.0-11.el7 ndeploy 80 k
nginx-nDeploy x86_64 1.8.0-34.el7 ndeploy 36 M
Installing for dependencies:
PyYAML x86_64 3.10-11.el7 base 153 k
libevent x86_64 2.0.21-4.el7 base 214 k
memcached x86_64 1.4.15-9.el7 base 84 k
python-inotify noarch 0.9.4-4.el7 base 49 k
python-lxml x86_64 3.2.1-4.el7 base 758 k

Transaction Summary
========================================================================================
Install 2 Packages (+5 Dependent packages)
Nginx プラグインをサーバーにインストールし、上記の手順に従ってインストールを完了しました。これで、Nginx をリバース プロキシとして構成し、既存の cPanel ユーザー アカウントの仮想ホストを作成して、次のスクリプトを実行できるようになりました。
ステップ 4: Nginx をデフォルトのフロントエンド Web サーバーとして起動し、デフォルトの構成ファイルを作成します
root@server1 [/usr]# /opt/nDeploy/scripts/cpanel-nDeploy-setup.sh enableModifying apache http and https port in cpanel

httpd restarted successfully.
Created symlink from /etc/systemd/system/multi-user.target.wants/nginx.service to /usr/lib/systemd/system/nginx.service.
Created symlink from /etc/systemd/system/multi-user.target.wants/ndeploy_watcher.service to /usr/lib/systemd/system/ndeploy_watcher.service.
Created symlink from /etc/systemd/system/multi-user.target.wants/ndeploy_backends.service to /usr/lib/systemd/system/ndeploy_backends.service.
ConfGen:: saheetha
ConfGen:: satest
このスクリプトにより、Apache ポートが変更されることがわかります。 80 を別のポートに接続して、Nginx をフロントエンド Web サーバーとして使用し、既存の cPanel ユーザー用の仮想ホスト プロファイルを作成します。完了したら、ApacheとNginxのステータスを確認します。
Apache ステータス:
root@server1 [/var/run/httpd]# systemctl status httpd● httpd.service - Apache Web Server
Loaded: loaded (/usr/lib/systemd/system/httpd.service; enabled; vendor preset: disabled)
Active: active (running) since Mon 2016-01-18 06:34:23 UTC; 12s ago
Process: 25606 ExecStart=/usr/sbin/apachectl start (code=exited, status=0/SUCCESS)
Main PID: 24760 (httpd)
CGroup: /system.slice/httpd.service
‣ 24760 /usr/local/apache/bin/httpd -k start

Jan 18 06:34:23 server1.centos7-test.com systemd[1]: Starting Apache Web Server...
Jan 18 06:34:23 server1.centos7-test.com apachectl[25606]: httpd (pid 24760) already running
Jan 18 06:34:23 server1.centos7-test.com systemd[1]: Started Apache Web Server.
Nginx ステータス:
root@server1 [~]# systemctl status nginx● nginx.service - nginx-nDeploy - high performance web server
Loaded: loaded (/usr/lib/systemd/system/nginx.service; enabled; vendor preset: disabled)
Active: active (running) since Sun 2016-01-17 17:18:29 UTC; 13h ago
Docs: http://nginx.org/en/docs/
Main PID: 3833 (nginx)
CGroup: /system.slice/nginx.service
├─ 3833 nginx: master process /usr/sbin/nginx -c /etc/nginx/nginx.conf
├─25473 nginx: worker process
├─25474 nginx: worker process
└─25475 nginx: cache manager process

Jan 17 17:18:29 server1.centos7-test.com systemd[1]: Starting nginx-nDeploy - high performance web server...
Jan 17 17:18:29 server1.centos7-test.com nginx[3804]: nginx: the configuration file /etc/nginx/nginx.conf syntax is ok
Jan 17 17:18:29 server1.centos7-test.com nginx[3804]: nginx: configuration file /etc/nginx/nginx.conf test is successful
Jan 17 17:18:29 server1.centos7-test.com systemd[1]: Started nginx-nDeploy - high performance web server.
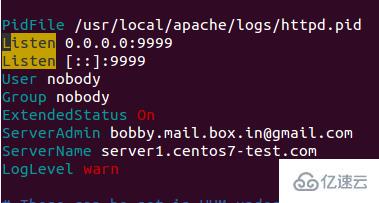
Nginx はポート 80 でフロントエンド サーバーとして実行されます。また、Apache 構成は http ポート 9999 と https ポート 4430 でリッスンするように変更されます。状況を見てください:
root@server1 [/usr/local/src]# netstat -plan | grep httpdtcp 0 0 0.0.0.0:4430 0.0.0.0:* LISTEN 17270/httpd
tcp 0 0 0.0.0.0:9999 0.0.0.0:* LISTEN 17270/httpd
tcp6 0 0 :::4430 :::* LISTEN 17270/httpd
tcp6 0 0 :::9999 :::* LISTEN 17270/httpd
root@server1 [/usr/local/src]# netstat -plan | grep nginxtcp 0 0 127.0.0.1:80 0.0.0.0:* LISTEN 17802/nginx: master
tcp 0 0 45.79.183.73:80 0.0.0.0:* LISTEN 17802/nginx: master
既存のユーザー用に作成された仮想ホストの構成ファイルは、「/etc/nginx/sites-」にあります。有効"。このファイル パスには、メインの Nginx 構成ファイルが含まれています。
root@server1 [/etc/nginx/sites-enabled]# ll | grep .conf-rw-r--r-- 1 root root 311 Jan 17 09:02 saheetha.com.conf-rw-r--r-- 1 root root 336 Jan 17 09:02 saheethastest.com.conf
ドメイン名の仮想ホストの例:
server {

listen 45.79.183.73:80;#CPIPVSIX:80;# ServerNamesserver_name saheetha.com www.saheetha.com;
access_log /usr/local/apache/domlogs/saheetha.com main;
access_log /usr/local/apache/domlogs/saheetha.com-bytes_log bytes_log;

include /etc/nginx/sites-enabled/saheetha.com.include;
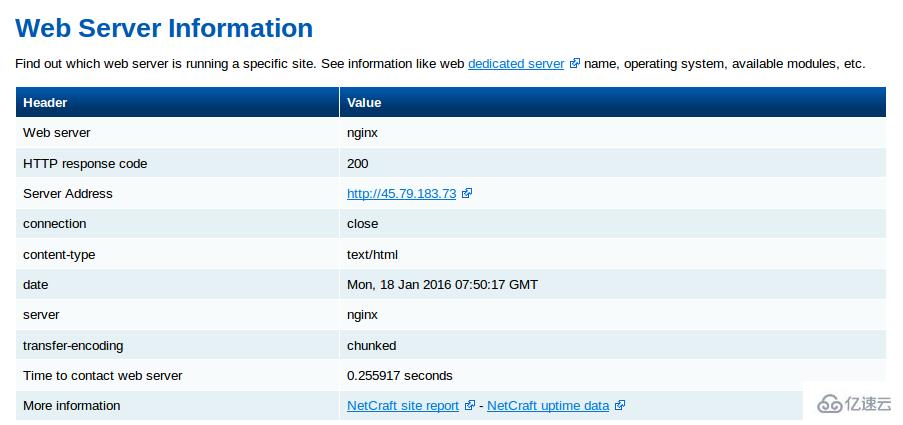
}ブラウザを起動して Web サイトを表示し、Web サーバーの動作ステータスを確認できます。インストール後、サーバー上の Web サービス情報を読み取ります。
root@server1 [/home]# ip a | grep -i eth03: eth0:  mtu 1500 qdisc pfifo_fast state UP qlen 1000
inet 45.79.183.73/24 brd 45.79.183.255 scope global dynamic eth0
root@server1 [/home]# nginx -vnginx version: nginx/1.8.0
この文を次のように書き換えます: cPanel で新しく作成されたすべてのアカウントについて、Nginx はそれらの仮想ホストを作成します。これらの簡単な手順で、Nginx を CentOS 7 / cPanel サーバー上のリバース プロキシとして構成できます。
リバース プロキシとしての Nginx の利点
インストールと構成が簡単です。
高効率と優れたパフォーマンス。
Ddos 攻撃を防ぎます。
PHP の書き換えルールとして .htaccess の使用をサポートします。
以上がcPanel を使用して CentOS 7 で Nginx リバース プロキシを構成する方法の詳細内容です。詳細については、PHP 中国語 Web サイトの他の関連記事を参照してください。

ホットAIツール

Undresser.AI Undress
リアルなヌード写真を作成する AI 搭載アプリ

AI Clothes Remover
写真から衣服を削除するオンライン AI ツール。

Undress AI Tool
脱衣画像を無料で

Clothoff.io
AI衣類リムーバー

AI Hentai Generator
AIヘンタイを無料で生成します。

人気の記事
ホットツール

メモ帳++7.3.1
使いやすく無料のコードエディター

SublimeText3 中国語版
中国語版、とても使いやすい

ゼンドスタジオ 13.0.1
強力な PHP 統合開発環境

ドリームウィーバー CS6
ビジュアル Web 開発ツール

SublimeText3 Mac版
神レベルのコード編集ソフト(SublimeText3)
ホットトピック


 Tomcat サーバーへの外部ネットワーク アクセスを許可する方法
Apr 21, 2024 am 07:22 AM
Tomcat サーバーへの外部ネットワーク アクセスを許可する方法
Apr 21, 2024 am 07:22 AM
Tomcat サーバーが外部ネットワークにアクセスできるようにするには、以下を行う必要があります。 外部接続を許可するように Tomcat 構成ファイルを変更します。 Tomcat サーバー ポートへのアクセスを許可するファイアウォール ルールを追加します。 Tomcat サーバーのパブリック IP を指すドメイン名を指す DNS レコードを作成します。オプション: リバース プロキシを使用して、セキュリティとパフォーマンスを向上させます。オプション: セキュリティを強化するために HTTPS を設定します。
 SCP 使用法のヒント - ファイルを再帰的に除外する
Apr 22, 2024 am 09:04 AM
SCP 使用法のヒント - ファイルを再帰的に除外する
Apr 22, 2024 am 09:04 AM
scp コマンドを使用すると、ネットワーク ホスト間でファイルを安全にコピーできます。データ転送と認証には ssh を使用します。一般的な構文は次のとおりです: scpfile1user@host:/path/to/dest/scp -r/path/to/source/user@host:/path/to/dest/scp ファイルを除外する scp コマンドを使用する場合はできないと思いますファイルをフィルタリングまたは除外します。ただし、ファイルを除外し、ssh を使用して安全にコピーするという良い回避策があります。このページでは、scp を使用してディレクトリを再帰的にコピーするときにファイルをフィルタリングまたは除外する方法について説明します。 rsync コマンドを使用してファイルを除外する方法 構文は次のとおりです。 rsyncav-essh-
 nginx へようこそ!それを解決するにはどうすればよいですか?
Apr 17, 2024 am 05:12 AM
nginx へようこそ!それを解決するにはどうすればよいですか?
Apr 17, 2024 am 05:12 AM
「nginx へようこそ!」エラーを解決するには、仮想ホスト構成を確認し、仮想ホストを有効にし、Nginx をリロードする必要があります。仮想ホスト構成ファイルが見つからない場合は、デフォルト ページを作成して Nginx をリロードすると、エラー メッセージが表示されます。が消え、ウェブサイトは通常のショーになります。
 Nodejsプロジェクトをサーバーにデプロイする方法
Apr 21, 2024 am 04:40 AM
Nodejsプロジェクトをサーバーにデプロイする方法
Apr 21, 2024 am 04:40 AM
Node.js プロジェクトのサーバー デプロイメント手順: デプロイメント環境を準備します。サーバー アクセスの取得、Node.js のインストール、Git リポジトリのセットアップ。アプリケーションをビルドする: npm run build を使用して、デプロイ可能なコードと依存関係を生成します。コードをサーバーにアップロードします: Git またはファイル転送プロトコル経由。依存関係をインストールする: サーバーに SSH で接続し、npm install を使用してアプリケーションの依存関係をインストールします。アプリケーションを開始します。node Index.js などのコマンドを使用してアプリケーションを開始するか、pm2 などのプロセス マネージャーを使用します。リバース プロキシの構成 (オプション): Nginx や Apache などのリバース プロキシを使用して、トラフィックをアプリケーションにルーティングします。
 HTMLファイルからURLを生成する方法
Apr 21, 2024 pm 12:57 PM
HTMLファイルからURLを生成する方法
Apr 21, 2024 pm 12:57 PM
HTML ファイルを URL に変換するには Web サーバーが必要です。これには次の手順が含まれます。 Web サーバーを取得します。 Webサーバーをセットアップします。 HTMLファイルをアップロードします。ドメイン名を作成します。リクエストをルーティングします。
 外部からnodejsにアクセスできますか?
Apr 21, 2024 am 04:43 AM
外部からnodejsにアクセスできますか?
Apr 21, 2024 am 04:43 AM
はい、Node.js には外部からアクセスできます。次の方法を使用できます。 Cloud Functions を使用して関数をデプロイし、一般にアクセスできるようにします。 Express フレームワークを使用してルートを作成し、エンドポイントを定義します。 Nginx を使用して、Node.js アプリケーションへのリバース プロキシ リクエストを実行します。 Docker コンテナを使用して Node.js アプリケーションを実行し、ポート マッピングを通じて公開します。
 PHP を使用して Web サイトを展開および維持する方法
May 03, 2024 am 08:54 AM
PHP を使用して Web サイトを展開および維持する方法
May 03, 2024 am 08:54 AM
PHP Web サイトを正常に展開して維持するには、次の手順を実行する必要があります。 Web サーバー (Apache や Nginx など) を選択する PHP をインストールする データベースを作成して PHP に接続する コードをサーバーにアップロードする ドメイン名と DNS を設定する Web サイトのメンテナンスを監視する手順には、PHP および Web サーバーの更新、Web サイトのバックアップ、エラー ログの監視、コンテンツの更新が含まれます。
 Fail2Ban を使用してサーバーをブルート フォース攻撃から保護する方法
Apr 27, 2024 am 08:34 AM
Fail2Ban を使用してサーバーをブルート フォース攻撃から保護する方法
Apr 27, 2024 am 08:34 AM
Linux 管理者にとっての重要なタスクは、サーバーを違法な攻撃やアクセスから保護することです。デフォルトでは、Linux システムには、iptables、Uncomplicated Firewall (UFW)、ConfigServerSecurityFirewall (CSF) などの適切に構成されたファイアウォールが付属しており、さまざまな攻撃を防ぐことができます。インターネットに接続されているマシンはすべて、悪意のある攻撃のターゲットになる可能性があります。サーバーへの不正アクセスを軽減するために使用できる Fail2Ban と呼ばれるツールがあります。 Fail2Ban とは何ですか? Fail2Ban[1] は、ブルート フォース攻撃からサーバーを保護する侵入防止ソフトウェアです。 Python プログラミング言語で書かれています
