

CentOS7 Docker Nginx をデプロイして実行する方法

1. リソースの準備
dockerfile
# "ported" by adam miller <maxamillion@fedoraproject.org> from # https://github.com/fedora-cloud/fedora-dockerfiles # # originally written for fedora-dockerfiles by # scollier <scollier@redhat.com> from centos:centos7 maintainer the centos project <cloud-ops@centos.org> run yum -y update; yum clean all run yum -y install epel-release tar ; yum clean all run yum -y install nginx ; yum clean all add nginx.conf /opt/deploy/nginx/nginx.conf run echo "daemon off;" >> /opt/deploy/nginx/nginx.conf #run curl https://git.centos.org/sources/httpd/c7/acf5cccf4afaecf3afeb18c50ae59fd5c6504910 \ # | tar -xz -c /usr/local/nginx/html \ # --strip-components=1 #run sed -i -e 's/apache/nginx/g' -e '/apache_pb.gif/d' \ # /usr/local/nginx/html/index.html expose 80 #cmd [ "/usr/local/nginx/sbin" ]
注: パスはシステム上に存在し、
nginx.conf ファイルに対応する必要があります
# for more information on configuration, see:
#  * official english documentation: http://nginx.org/en/docs/
#  * official russian documentation: http://nginx.org/ru/docs/

user nginx;
worker_processes 1;

error_log /usr/logs/nginx/error.log;
#error_log /var/log/nginx/error.log notice;
#error_log /var/log/nginx/error.log info;

pid    /run/nginx.pid;


events {
  worker_connections 1024;
}


http {
  include    mime.types;
  default_type application/octet-stream;

  log_format main '$remote_addr - $remote_user [$time_local] "$request" '
           '$status $body_bytes_sent "$http_referer" '
           '"$http_user_agent" "$http_x_forwarded_for"';

  access_log /usr/logs/nginx/access.log main;

  sendfile    on;
  #tcp_nopush   on;

  #keepalive_timeout 0;
  keepalive_timeout 65;

  #gzip on;

  # load modular configuration files from the /etc/nginx/conf.d directory.
  # see http://nginx.org/en/docs/ngx_core_module.html#include
  # for more information.
  #include /etc/nginx/conf.d/*.conf;

  index  index.html index.htm;

  server {
    listen    80;
    server_name localhost;
    root     /usr/share/nginx/html;

    #charset koi8-r;

    #access_log /var/log/nginx/host.access.log main;

    location / {
      autoindex on;
    }

    # redirect server error pages to the static page /40x.html
    #
    error_page 404       /404.html;
    location = /40x.html {
    }

    # redirect server error pages to the static page /50x.html
    #
    error_page  500 502 503 504 /50x.html;
    location = /50x.html {
    }

    # proxy the php scripts to apache listening on 127.0.0.1:80
    #
    #location ~ \.php$ {
    #  proxy_pass  http://127.0.0.1;
    #}

    # pass the php scripts to fastcgi server listening on 127.0.0.1:9000
    #
    #location ~ \.php$ {
    #  root      html;
    #  fastcgi_pass  127.0.0.1:9000;
    #  fastcgi_index index.php;
    #  fastcgi_param script_filename /scripts$fastcgi_script_name;
    #  include    fastcgi_params;
    #}

    # deny access to .htaccess files, if apache's document root
    # concurs with nginx's one
    #
    #location ~ /\.ht {
    #  deny all;
    #}
  }


  # another virtual host using mix of ip-, name-, and port-based configuration
  #
  #server {
  #  listen    8000;
  #  listen    somename:8080;
  #  server_name somename alias another.alias;
  #  root     html;

  #  location / {
  #  }
  #}


  # https server
  #
  #server {
  #  listen    443;
  #  server_name localhost;
  #  root     html;

  #  ssl         on;
  #  ssl_certificate   cert.pem;
  #  ssl_certificate_key cert.key;

  #  ssl_session_timeout 5m;

  #  ssl_protocols sslv2 sslv3 tlsv1;
  #  ssl_ciphers high:!anull:!md5;
  #  ssl_prefer_server_ciphers  on;

  #  location / {
  #  }
  #}

}注: パスはシステム上に存在し、それに対応している必要があります
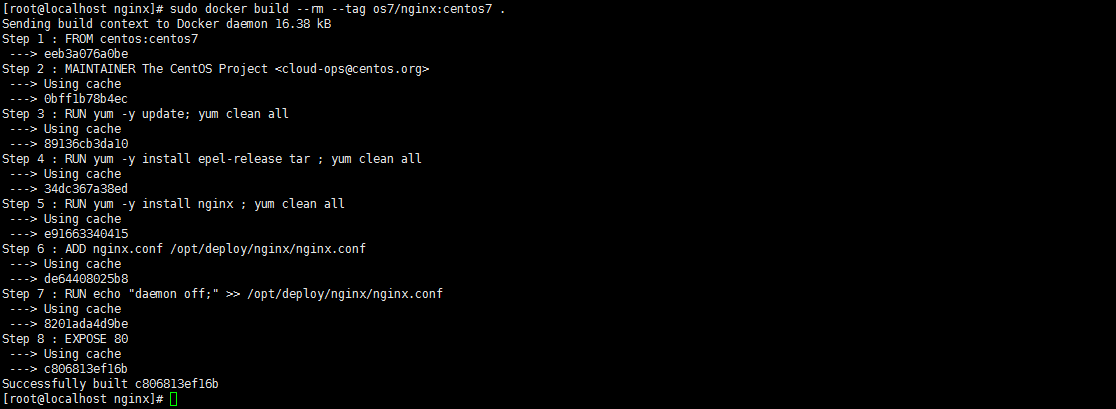
2. ビルド イメージ コマンドを実行します
コードをコピーしますコードは次のとおりです。次のように:
[root@localhost nginx]# sudo docker build --rm --tag os7/nginx:centos7 .
実行結果のスクリーンショット:
3. イメージがインストールされ、正常にビルドされたかどうかを確認します docker イメージ

#4. コンテナー docker run を作成します - i -t -d -p 192.168.32.129:81:80 os7/nginx / bin/bash
注: IP アドレスが 192.168.32.129 の場合は、
## を追加する必要があります。
# in /etc/hosts ##5. コンテナーが正常に作成されたかどうかを確認し、docker ps
 を起動します6.curl http://192.168.32.129:81
に正常にアクセスできるかどうかをテストします。
 「この接続は拒否されました」と表示されます。解決方法がありますので、まずはコンテナに入りましょう
7. コンテナに入ります docker exec -i -t small_hodgkin /bin/sh
 #8. 次にコンテナ内で実行します (直接入力するだけです)
nginx
9.curl http://192.168.32.129:81
#成功しました。 
以上がCentOS7 Docker Nginx をデプロイして実行する方法の詳細内容です。詳細については、PHP 中国語 Web サイトの他の関連記事を参照してください。

ホットAIツール

Undresser.AI Undress
リアルなヌード写真を作成する AI 搭載アプリ

AI Clothes Remover
写真から衣服を削除するオンライン AI ツール。

Undress AI Tool
脱衣画像を無料で

Clothoff.io
AI衣類リムーバー

AI Hentai Generator
AIヘンタイを無料で生成します。

人気の記事
ホットツール

メモ帳++7.3.1
使いやすく無料のコードエディター

SublimeText3 中国語版
中国語版、とても使いやすい

ゼンドスタジオ 13.0.1
強力な PHP 統合開発環境

ドリームウィーバー CS6
ビジュアル Web 開発ツール

SublimeText3 Mac版
神レベルのコード編集ソフト(SublimeText3)
ホットトピック
 7476
7476
 15
1377
52
77
11
19
31
15
1377
52
77
11
19
31

 PIノードティーチング:PIノードとは何ですか? PIノードをインストールしてセットアップする方法は?
Mar 05, 2025 pm 05:57 PM
PIノードティーチング:PIノードとは何ですか? PIノードをインストールしてセットアップする方法は?
Mar 05, 2025 pm 05:57 PM
ピン張りのノードの詳細な説明とインストールガイドこの記事では、ピネットワークのエコシステムを詳細に紹介します - PIノードは、ピン系生態系における重要な役割であり、設置と構成の完全な手順を提供します。 Pinetworkブロックチェーンテストネットワークの発売後、PIノードは多くの先駆者の重要な部分になり、テストに積極的に参加し、今後のメインネットワークリリースの準備をしています。まだピン張りのものがわからない場合は、ピコインとは何かを参照してください。リストの価格はいくらですか? PIの使用、マイニング、セキュリティ分析。パインワークとは何ですか?ピン競技プロジェクトは2019年に開始され、独占的な暗号通貨PIコインを所有しています。このプロジェクトは、誰もが参加できるものを作成することを目指しています
 DeepSeekをインストールする方法
Feb 19, 2025 pm 05:48 PM
DeepSeekをインストールする方法
Feb 19, 2025 pm 05:48 PM
DeepSeekをインストールするには、Dockerコンテナ(最も便利な場合は、互換性について心配する必要はありません)を使用して、事前コンパイルパッケージ(Windowsユーザー向け)を使用してソースからコンパイル(経験豊富な開発者向け)を含む多くの方法があります。公式文書は慎重に文書化され、不必要なトラブルを避けるために完全に準備します。
 Dockerコンテナを使用したJavaEEアプリケーションのデプロイ
Jun 05, 2024 pm 08:29 PM
Dockerコンテナを使用したJavaEEアプリケーションのデプロイ
Jun 05, 2024 pm 08:29 PM
Docker コンテナを使用した Java EE アプリケーションのデプロイ: Dockerfile を作成してイメージを定義し、イメージを構築し、コンテナを実行してポートをマップし、ブラウザでアプリケーションにアクセスします。サンプル JavaEE アプリケーション: REST API はデータベースと対話し、Docker 経由でデプロイ後にローカルホストでアクセスできます。
 PHP CI/CD を使用して迅速に反復するにはどうすればよいですか?
May 08, 2024 pm 10:15 PM
PHP CI/CD を使用して迅速に反復するにはどうすればよいですか?
May 08, 2024 pm 10:15 PM
回答: PHPCI/CD を使用して、CI/CD パイプラインの設定、自動化されたテストおよび展開プロセスなどの迅速な反復を実現します。 CI/CD パイプラインのセットアップ: CI/CD ツールを選択し、コード リポジトリを構成し、ビルド パイプラインを定義します。自動テスト: 単体テストと統合テストを作成し、テスト フレームワークを使用してテストを簡素化します。実際のケース: TravisCI の使用: TravisCI をインストールし、パイプラインを定義し、パイプラインを有効にして、結果を表示します。継続的デリバリーを実装します。展開ツールを選択し、展開パイプラインを定義し、展開を自動化します。利点: 開発効率が向上し、エラーが減少し、納期が短縮されます。
 vscode に Docker 拡張機能をインストールする方法 vscode に Docker 拡張機能をインストールする手順
May 09, 2024 pm 03:25 PM
vscode に Docker 拡張機能をインストールする方法 vscode に Docker 拡張機能をインストールする手順
May 09, 2024 pm 03:25 PM
1. まず、インターフェイスを開いた後、左側の拡張機能アイコン ボタンをクリックします。 2. 次に、開いた拡張機能ページで検索バーの場所を見つけます。 3. 次に、マウスで「Docker」という単語を入力して拡張機能プラグインを見つけます。 4最後に、対象のプラグインを選択して右をクリックし、下隅にあるインストールボタンをクリックします。
 WordPressサイトファイルアクセスは制限されています:なぜ私の.txtファイルがドメイン名からアクセスできないのですか?
Apr 01, 2025 pm 03:00 PM
WordPressサイトファイルアクセスは制限されています:なぜ私の.txtファイルがドメイン名からアクセスできないのですか?
Apr 01, 2025 pm 03:00 PM
WordPressサイトファイルアクセスが制限されています:最近.txtファイルにアクセスできない理由のトラブルシューティング。一部のユーザーは、ミニプログラムのビジネスドメイン名を構成する際に問題に遭遇しました:�...
 Docker環境にPECLを使用して拡張機能をインストールするときにエラーが発生するのはなぜですか?それを解決する方法は?
Apr 01, 2025 pm 03:06 PM
Docker環境にPECLを使用して拡張機能をインストールするときにエラーが発生するのはなぜですか?それを解決する方法は?
Apr 01, 2025 pm 03:06 PM
エラーの原因とソリューションPECLを使用してDocker環境に拡張機能をインストールする場合、Docker環境を使用するときに、いくつかの頭痛に遭遇します...
 同じサーバー上のnginx構成を介してphp5.6とphp7を共存する方法は?
Apr 01, 2025 pm 03:15 PM
同じサーバー上のnginx構成を介してphp5.6とphp7を共存する方法は?
Apr 01, 2025 pm 03:15 PM
同じシステムで複数のPHPバージョンを同時に実行することは、特に異なるプロジェクトがPHPの異なるバージョンに依存する場合、一般的な要件です。同じようになる方法...
