

Docker で nginx を実行し、ローカル ディレクトリをイメージにマウントする方法

1 hup からイメージをプルします
docker pull nginx
2 マウントするディレクトリを作成します
mkdir -p /data/nginx/{conf,conf.d,html,logs}3 コンテナを開始する前に構成ファイルが必要です
3.1 vim /data/ conf/nginx.conf
user nginx;
worker_processes 1;

error_log /var/log/nginx/error.log warn;
pid    /var/run/nginx.pid;


events {
  worker_connections 1024;
}


http {
  include    /etc/nginx/mime.types;
  default_type application/octet-stream;

  log_format main '$remote_addr - $remote_user [$time_local] "$request" '
           '$status $body_bytes_sent "$http_referer" '
           '"$http_user_agent" "$http_x_forwarded_for"';

  access_log /var/log/nginx/access.log main;

  sendfile    on;
  #tcp_nopush   on;

  keepalive_timeout 65;

  #gzip on;

  include /etc/nginx/conf.d/*.conf;
}3.2 vim /data/nginx/conf.d/default.conf
server {
  listen    80;
  server_name localhost;

  #charset koi8-r;
  #access_log /var/log/nginx/log/host.access.log main;

  location / {
    root  /data/nginx/html;
    # root  /usr/nginx/html;
    index index.html index.htm;
    autoindex on;
  try_files $uri /index/index/page.html;
    #try_files $uri /index/map/page.html;
  }

  #error_page 404       /404.html;

  # redirect server error pages to the static page /50x.html
  #
  error_page  500 502 503 504 /50x.html;
  location = /50x.html {
    root  /usr/share/nginx/html;
  }

  # proxy the php scripts to apache listening on 127.0.0.1:80
  #
  #location ~ \.php$ {
  #  proxy_pass  http://127.0.0.1;
  #}

  # pass the php scripts to fastcgi server listening on 127.0.0.1:9000
  #
  #location ~ \.php$ {
  #  root      html;
  #  fastcgi_pass  127.0.0.1:9000;
  #  fastcgi_index index.php;
  #  fastcgi_param script_filename /scripts$fastcgi_script_name;
  #  include    fastcgi_params;
  #}

  # deny access to .htaccess files, if apache's document root
  # concurs with nginx's one
  #
  #location ~ /\.ht {
  #  deny all;
  #}
}4 コンテナを開始します
#将容器中nginx的80端口映射到本地的81端口
docker run --name nginx81 -d -p 81:80 -v /data/nginx/html:/usr/share/nginx/html -v /data/nginx/conf/nginx.conf:/etc/nginx/nginx.conf -v /data/nginx/logs:/var/log/nginx -v /data/nginx/conf.d:/etc/nginx/conf.d -d nginx:latest
5 開始されたコンテナを表示します
[root@dc01 ~]# docker ps
container id image command created status ports names
fa56f865bd26 nginx:latest "nginx -g 'daemon of…" 4 weeks ago up 3 seconds 0.0.0.0:80->80/tcp vigilant_swirles
[root@dc01 ~]#
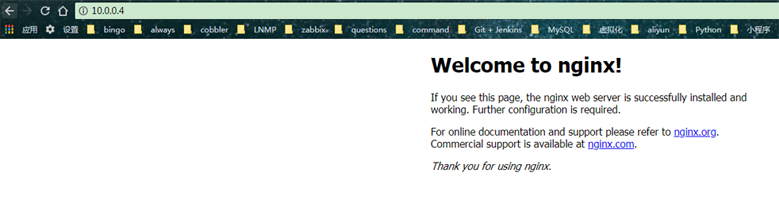
6 Web ページにアクセスします nginx
以上がDocker で nginx を実行し、ローカル ディレクトリをイメージにマウントする方法の詳細内容です。詳細については、PHP 中国語 Web サイトの他の関連記事を参照してください。

ホットAIツール

Undresser.AI Undress
リアルなヌード写真を作成する AI 搭載アプリ

AI Clothes Remover
写真から衣服を削除するオンライン AI ツール。

Undress AI Tool
脱衣画像を無料で

Clothoff.io
AI衣類リムーバー

Video Face Swap
完全無料の AI 顔交換ツールを使用して、あらゆるビデオの顔を簡単に交換できます。

人気の記事
ホットツール

メモ帳++7.3.1
使いやすく無料のコードエディター

SublimeText3 中国語版
中国語版、とても使いやすい

ゼンドスタジオ 13.0.1
強力な PHP 統合開発環境

ドリームウィーバー CS6
ビジュアル Web 開発ツール

SublimeText3 Mac版
神レベルのコード編集ソフト(SublimeText3)
ホットトピック
 7663
7663
 15
1393
52
1205
24
91
11
15
1393
52
1205
24
91
11

 Dockerの画像を更新する方法
Apr 15, 2025 pm 12:03 PM
Dockerの画像を更新する方法
Apr 15, 2025 pm 12:03 PM
Docker画像を更新する手順は次のとおりです。最新の画像タグ新しい画像をプルする新しい画像は、特定のタグのために古い画像を削除します(オプション)コンテナを再起動します(必要に応じて)
 Dockerによってコンテナを出る方法
Apr 15, 2025 pm 12:15 PM
Dockerによってコンテナを出る方法
Apr 15, 2025 pm 12:15 PM
Dockerコンテナを終了する4つの方法:コンテナ端子でCtrl Dを使用するコンテナターミナルに出口コマンドを入力しますDocker stop< container_name>コマンドを使用するDocker Kill< container_name>ホストターミナルのコマンド(フォース出口)
 Dockerのファイルを外部にコピーする方法
Apr 15, 2025 pm 12:12 PM
Dockerのファイルを外部にコピーする方法
Apr 15, 2025 pm 12:12 PM
Dockerの外部ホストにファイルをコピーする方法:Docker CPコマンドを使用:Docker CP [Options]< Container Path> <ホストパス>。データボリュームの使用:ホストにディレクトリを作成し、-vパラメーターを使用してコンテナを作成するときにディレクトリをコンテナにマウントして、双方向ファイルの同期を実現します。
 Dockerを再起動する方法
Apr 15, 2025 pm 12:06 PM
Dockerを再起動する方法
Apr 15, 2025 pm 12:06 PM
Dockerコンテナを再起動する方法:コンテナID(Docker PS)を取得します。コンテナを停止します(docker stop< container_id>);コンテナを起動します(docker start< container_id>);再起動が成功していることを確認します(Docker PS)。その他の方法:Docker Compose(Docker-Compose Restart)またはDocker API(Dockerドキュメントを参照)。
 Dockerコンテナの名前を確認する方法
Apr 15, 2025 pm 12:21 PM
Dockerコンテナの名前を確認する方法
Apr 15, 2025 pm 12:21 PM
すべてのコンテナ(Docker PS)をリストする手順に従って、Dockerコンテナ名を照会できます。コンテナリストをフィルタリングします(GREPコマンドを使用)。コンテナ名(「名前」列にあります)を取得します。
 Dockerデスクトップの使用方法
Apr 15, 2025 am 11:45 AM
Dockerデスクトップの使用方法
Apr 15, 2025 am 11:45 AM
Dockerデスクトップの使用方法は? Dockerデスクトップは、ローカルマシンでDockerコンテナを実行するためのツールです。使用する手順には次のものがあります。1。Dockerデスクトップをインストールします。 2。Dockerデスクトップを開始します。 3。Docker Imageを作成します(DockerFileを使用); 4. Docker画像をビルド(Docker Buildを使用); 5。Dockerコンテナを実行します(Docker Runを使用)。
 Dockerプロセスを表示する方法
Apr 15, 2025 am 11:48 AM
Dockerプロセスを表示する方法
Apr 15, 2025 am 11:48 AM
Dockerプロセス表示方法:1。DockerCLIコマンド:Docker PS; 2。SystemDCLIコマンド:SystemCTL Status Docker; 3。CLIコマンドを作成するDocker:Docker-Compose PS。 4。プロセスエクスプローラー(Windows); 5。 /procディレクトリ(Linux)。
 Docker画像が失敗した場合はどうすればよいですか
Apr 15, 2025 am 11:21 AM
Docker画像が失敗した場合はどうすればよいですか
Apr 15, 2025 am 11:21 AM
障害のあるDocker画像ビルドのトラブルシューティング手順:DockerFileの構文と依存関係バージョンを確認します。ビルドコンテキストに必要なソースコードと依存関係が含まれているかどうかを確認します。エラーの詳細については、ビルドログを表示します。 -targetオプションを使用して、階層フェーズを構築して障害点を識別します。 Dockerエンジンの最新バージョンを使用してください。 -t [image-name]:デバッグモードで画像を作成して、問題をデバッグします。ディスクスペースを確認し、十分であることを確認してください。 Selinuxを無効にして、ビルドプロセスへの干渉を防ぎます。コミュニティプラットフォームに助けを求め、DockerFilesを提供し、より具体的な提案のためにログの説明を作成します。
