Linux で nginx をインストール、デプロイ、使用する方法
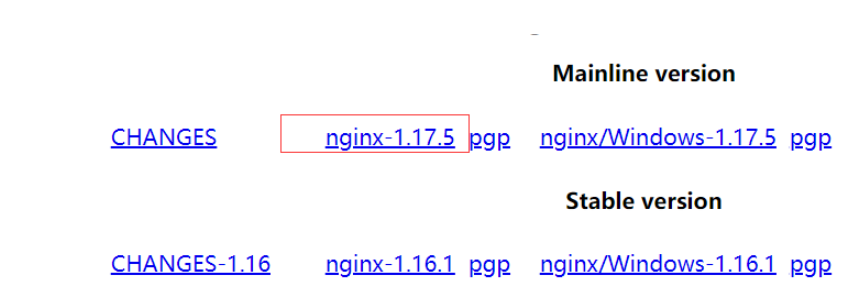
1. ダウンロード

2. 導入
#2.1 インストールの前提条件Linux でのインストールには、いくつかのコンポーネントのインストールが必要です1. gcc && g++ yum install gcc-c++ 2. pcre yum install -y pcre pcre-devel 3. zlib yum install -y zlib zlib-devel 4. openssl yum install -y openssl openssl-devel
1. 解压nginx文件
tar -zxvf nginx-1.17.5.tar.gz
2. 安装
## 创建一个nginx安装目录
mkdir nginx
cd nginx-1.12.2
## 指定文件安装路径
./configure --prefix=/home/lege/nginx
make
make install
#安装完成后内容会安装到指定的路径 /home/lege/nginx下,否则会在默认目录/usr/local/nginx
## 修改配置文件
cd /home/lege/nginx/conf
vim nginx.conf
## 设置端口为8080,也可设置成其他
listen    8080;
## 进入到启动目录
cd /home/lege/nginx/sbin
## 检查配置文件是否有问题
./nginx -t
##没有问题的结果如下所示:
[soa@testsoa04 sbin]$ ./nginx -t
nginx: the configuration file /home/lege/nginx/conf/nginx.conf syntax is ok
nginx: configuration file /home/lege/nginx/conf/nginx.conf test is successful
[soa@testsoa04 sbin]$

## 查询配置参数
./nginx -v
## 对于已安装的nginx需要修改配置参数
./configure --prefix=/home/lege/nginx ...配置参数
make
make install
然后重新启动nginx即可
## 启动
./nginx
## 停止
./nginx -s stop
## 重启
./nginx -s reload
## 输入网址验证是否启动成功
http://ip:port/
日志定义的格式:
语法格式:  access_log path [format [buffer=size] [gzip[=level]] [flush=time] [if=condition]];
           access_log off;
默认值  : access_log logs/access.log combined;
作用域  : http, server, location, if in location, limit_except

1. 定义日志格式
语法格式:  log_format name [escape=default|json] string ...;
默认值  :  log_format combined "...";
作用域  :  http

常见的日志变量
$remote_addr, $http_x_forwarded_for 记录客户端ip地址
$remote_user记录客户端用户名称
$request记录请求的url和http协议(get,post,del,等)
$status记录请求状态
$body_bytes_sent发送给客户端的字节数,不包括响应头的大小; 该变量与apache模块mod_log_config里的“%b”参数兼容。
$bytes_sent发送给客户端的总字节数。
$connection连接的序列号。
$connection_requests 当前通过一个连接获得的请求数量。
$msec 日志写入时间。单位为秒,精度是毫秒。
$pipe如果请求是通过http流水线(pipelined)发送,pipe值为“p”,否则为“.”。
$http_referer 记录从哪个页面链接访问过来的
$http_user_agent记录客户端浏览器相关信息
$request_length请求的长度(包括请求行,请求头和请求正文)。
$request_time 请求处理时间,单位为秒,精度毫秒; 从读入客户端的第一个字节开始,直到把最后一个字符发送给客户端后进行日志写入为止。
$time_iso8601 iso8601标准格式下的本地时间。
$time_local通用日志格式下的本地时间。

示例:
log_format main '$remote_addr - $remote_user [$time_local] "$request" '
           '$status $body_bytes_sent "$http_referer" "$request_time" '
           '"$http_user_agent" "$http_x_forwarded_for"
ログイン後にコピー
Forログ関連のクリーンアップは、Linux のスケジュールされたタスクを使用して処理できます。例は次のとおりです: clear.sh スクリプトは次のとおりです: 日志定义的格式:
语法格式: access_log path [format [buffer=size] [gzip[=level]] [flush=time] [if=condition]];
access_log off;
默认值 : access_log logs/access.log combined;
作用域 : http, server, location, if in location, limit_except
1. 定义日志格式
语法格式: log_format name [escape=default|json] string ...;
默认值 : log_format combined "...";
作用域 : http
常见的日志变量
$remote_addr, $http_x_forwarded_for 记录客户端ip地址
$remote_user记录客户端用户名称
$request记录请求的url和http协议(get,post,del,等)
$status记录请求状态
$body_bytes_sent发送给客户端的字节数,不包括响应头的大小; 该变量与apache模块mod_log_config里的“%b”参数兼容。
$bytes_sent发送给客户端的总字节数。
$connection连接的序列号。
$connection_requests 当前通过一个连接获得的请求数量。
$msec 日志写入时间。单位为秒,精度是毫秒。
$pipe如果请求是通过http流水线(pipelined)发送,pipe值为“p”,否则为“.”。
$http_referer 记录从哪个页面链接访问过来的
$http_user_agent记录客户端浏览器相关信息
$request_length请求的长度(包括请求行,请求头和请求正文)。
$request_time 请求处理时间,单位为秒,精度毫秒; 从读入客户端的第一个字节开始,直到把最后一个字符发送给客户端后进行日志写入为止。
$time_iso8601 iso8601标准格式下的本地时间。
$time_local通用日志格式下的本地时间。
示例:
log_format main '$remote_addr - $remote_user [$time_local] "$request" '
'$status $body_bytes_sent "$http_referer" "$request_time" '
'"$http_user_agent" "$http_x_forwarded_for"#!/bin/bash
#logs_path为日志存放路径
logs_path=/home/lege/data/nginx/logs
yesterday=$(date -d "yesterday" +%y-%m-%d)
keeptime=$(date -d "-3 days" +%y-%m-%d)
#切分日志文件
mv ${logs_path}/access.log ${logs_path}/access_${yesterday}.log
mv ${logs_path}/error.log ${logs_path}/error_${yesterday}.log
#通过nginx信号量控制重读日志,/web/nginx/为nginx安装目录
kill -usr1 $(cat /home/lege/data/nginx/logs/nginx.pid)
#删除3天前的日志文件
rm -f ${logs_path}/access_{keeptime}.log
rm -f ${logs_path}/error_{keeptime}.log
echo 0
crontab -e 添加如下:
0 0 * * * /bin/sh /home/lege/data/nginx/logs/clear.sh
crontab -l 查看是否添加成功 http {
server_tokens off;
client_header_buffer_size 8k;
client_max_body_size 130m;
proxy_buffer_size 64k;
proxy_buffers 8 64k;
log_format access '$remote_addr $host $remote_user [$time_local] $status $request_length $body_bytes_sent $request_time 0 0 0 - "-" "$request" "$http_referer" "$http_user_agent" $http_cookie $bytes_sent';
access_log logs/access.log access;
keepalive_requests 16;
keepalive_timeout 5;
server {
listen 8080;
server_name localhost;
charset utf-8;
location / {
default_type 'application/octet-stream';
add_header content-disposition "attachment";
## 配置可以下载的文件路径,下面是在windows下测试使用的路径,linux也可换成对应的路径
root d://tools//nginx-1.17.4//conf;
}
}
}ログイン後にコピー 設定完了後、nginxを再起動し、ブラウザに入力したファイル名を入力して該当ファイルをダウンロードします。 ps: ディレクトリはダウンロードできません。ダウンロードできるのはファイルのみです。
http {
  server_tokens off;
  client_header_buffer_size 8k;
  client_max_body_size 130m;
  proxy_buffer_size  64k;
  proxy_buffers  8 64k;
  log_format access '$remote_addr $host $remote_user [$time_local] $status $request_length $body_bytes_sent $request_time 0 0 0 - "-" "$request" "$http_referer" "$http_user_agent" $http_cookie $bytes_sent';
  access_log logs/access.log access;
  keepalive_requests 16;
  keepalive_timeout 5;
  server {
    listen 8080;
    server_name localhost;
    charset utf-8;
    location / {
      default_type 'application/octet-stream';
      add_header content-disposition "attachment";
      ## 配置可以下载的文件路径,下面是在windows下测试使用的路径,linux也可换成对应的路径
      root  d://tools//nginx-1.17.4//conf;
     }
   }
}以上がLinux で nginx をインストール、デプロイ、使用する方法の詳細内容です。詳細については、PHP 中国語 Web サイトの他の関連記事を参照してください。

ホットAIツール

Undresser.AI Undress
リアルなヌード写真を作成する AI 搭載アプリ

AI Clothes Remover
写真から衣服を削除するオンライン AI ツール。

Undress AI Tool
脱衣画像を無料で

Clothoff.io
AI衣類リムーバー

Video Face Swap
完全無料の AI 顔交換ツールを使用して、あらゆるビデオの顔を簡単に交換できます。

人気の記事

ホットツール

メモ帳++7.3.1
使いやすく無料のコードエディター

SublimeText3 中国語版
中国語版、とても使いやすい

ゼンドスタジオ 13.0.1
強力な PHP 統合開発環境

ドリームウィーバー CS6
ビジュアル Web 開発ツール

SublimeText3 Mac版
神レベルのコード編集ソフト(SublimeText3)

ホットトピック
 7695
7695
 15
15
 1640
1640
 14
14
 1393
1393
 52
52
 1287
1287
 25
25
 1229
1229
 29
29
 VSCODEに必要なコンピューター構成
Apr 15, 2025 pm 09:48 PM
VSコードシステムの要件:オペレーティングシステム:オペレーティングシステム:Windows 10以降、MACOS 10.12以上、Linux Distributionプロセッサ:最小1.6 GHz、推奨2.0 GHz以上のメモリ:最小512 MB、推奨4 GB以上のストレージスペース:最低250 MB以上:その他の要件を推奨:安定ネットワーク接続、XORG/WAYLAND(Linux)
 Apr 16, 2025 pm 07:39 PM
NotePadはJavaコードを直接実行することはできませんが、他のツールを使用することで実現できます。コマンドラインコンパイラ(Javac)を使用してByteCodeファイル(filename.class)を生成します。 Javaインタープリター(Java)を使用して、バイトコードを解釈し、コードを実行し、結果を出力します。
 vscodeはMacに使用できますか
Apr 15, 2025 pm 07:36 PM
VSコードはMacで利用できます。強力な拡張機能、GIT統合、ターミナル、デバッガーがあり、豊富なセットアップオプションも提供しています。ただし、特に大規模なプロジェクトまたは非常に専門的な開発の場合、コードと機能的な制限がある場合があります。
 vscodeの使用方法
Apr 15, 2025 pm 11:21 PM
Visual Studio Code(VSCODE)は、Microsoftが開発したクロスプラットフォーム、オープンソース、および無料のコードエディターです。軽量、スケーラビリティ、および幅広いプログラミング言語のサポートで知られています。 VSCODEをインストールするには、公式Webサイトにアクセスして、インストーラーをダウンロードして実行してください。 VSCODEを使用する場合、新しいプロジェクトを作成し、コードを編集し、コードをデバッグし、プロジェクトをナビゲートし、VSCODEを展開し、設定を管理できます。 VSCODEは、Windows、MacOS、Linuxで利用でき、複数のプログラミング言語をサポートし、マーケットプレイスを通じてさまざまな拡張機能を提供します。その利点には、軽量、スケーラビリティ、広範な言語サポート、豊富な機能とバージョンが含まれます
 Linuxの主な目的は何ですか?
Apr 16, 2025 am 12:19 AM
Linuxの主な用途には、1。Serverオペレーティングシステム、2。EmbeddedSystem、3。Desktopオペレーティングシステム、4。開発およびテスト環境。 Linuxはこれらの分野で優れており、安定性、セキュリティ、効率的な開発ツールを提供します。
 GITの倉庫アドレスを確認する方法
Apr 17, 2025 pm 01:54 PM
gitリポジトリアドレスを表示するには、次の手順を実行します。1。コマンドラインを開き、リポジトリディレクトリに移動します。 2。「git remote -v」コマンドを実行します。 3.出力と対応するアドレスでリポジトリ名を表示します。
 vscode端子使用チュートリアル
Apr 15, 2025 pm 10:09 PM
VSCODEビルトインターミナルは、エディター内でコマンドとスクリプトを実行して開発プロセスを簡素化できるようにする開発ツールです。 VSCODE端子の使用方法:ショートカットキー(CTRL/CMD)で端子を開きます。コマンドを入力するか、スクリプトを実行します。 Hotkeys(Ctrl Lなどの端子をクリアするなど)を使用します。作業ディレクトリ(CDコマンドなど)を変更します。高度な機能には、デバッグモード、自動コードスニペット完了、およびインタラクティブコマンド履歴が含まれます。
 Laravelインストールコード
Apr 18, 2025 pm 12:30 PM
Laravelをインストールするには、これらの手順を順番に進みます。コンポーザー(MacOS/LinuxとWindows用)インストールLaravelインストーラーをインストールします。


