Nginx ホット デプロイメントを実装する方法
ファイアウォールを閉じて、ブラウザ経由で Nginx サービスにローカルにアクセスできるようにします。
[root@localhost ~]# systemctl stop firewalld

セマフォ
セマフォの表示:
[root@localhost ~]# kill -l
 1) SIGHUP	 2) SIGINT	 3) SIGQUIT	 4) SIGILL	 5) SIGTRAP
 6) SIGABRT	 7) SIGBUS	 8) SIGFPE	 9) SIGKILL	10) SIGUSR1
11) SIGSEGV	12) SIGUSR2	13) SIGPIPE	14) SIGALRM	15) SIGTERM
16) SIGSTKFLT	17) SIGCHLD	18) SIGCONT	19) SIGSTOP	20) SIGTSTP
21) SIGTTIN	22) SIGTTOU	23) SIGURG	24) SIGXCPU	25) SIGXFSZ
26) SIGVTALRM	27) SIGPROF	28) SIGWINCH	29) SIGIO	30) SIGPWR
31) SIGSYS	34) SIGRTMIN	35) SIGRTMIN+1	36) SIGRTMIN+2	37) SIGRTMIN+3
38) SIGRTMIN+4	39) SIGRTMIN+5	40) SIGRTMIN+6	41) SIGRTMIN+7	42) SIGRTMIN+8
43) SIGRTMIN+9	44) SIGRTMIN+10	45) SIGRTMIN+11	46) SIGRTMIN+12	47) SIGRTMIN+13
48) SIGRTMIN+14	49) SIGRTMIN+15	50) SIGRTMAX-14	51) SIGRTMAX-13	52) SIGRTMAX-12
53) SIGRTMAX-11	54) SIGRTMAX-10	55) SIGRTMAX-9	56) SIGRTMAX-8	57) SIGRTMAX-7
58) SIGRTMAX-6	59) SIGRTMAX-5	60) SIGRTMAX-4	61) SIGRTMAX-3	62) SIGRTMAX-2
63) SIGRTMAX-1	64) SIGRTMAX
セマフォには 64 種類があり、以下にいくつか挙げます。一般的に使用されるセマフォ:
SIGINT、SIGTERM: すぐに閉じます。SIGQUIT: 正常なシャットダウン (プロセスを正常にシャットダウンします。つまり、リクエストが完了するまで待ってからシャットダウンします)。SIGHUP: スムーズな再起動、構成ファイルの再読み込み (スムーズな再起動、構成ファイルの変更後にサーバーを再起動する必要はありません)。SIGUSR1: ログ ファイルを再読み取りします。これは、ログ ファイルを切り取るときに便利です。SIGUSR2:nginxのアップグレード時に使用される実行可能プログラムをスムーズにアップグレードします。SIGWINCH: ワーカー プロセスを正常にシャットダウンします。
Nginx ホット デプロイメント
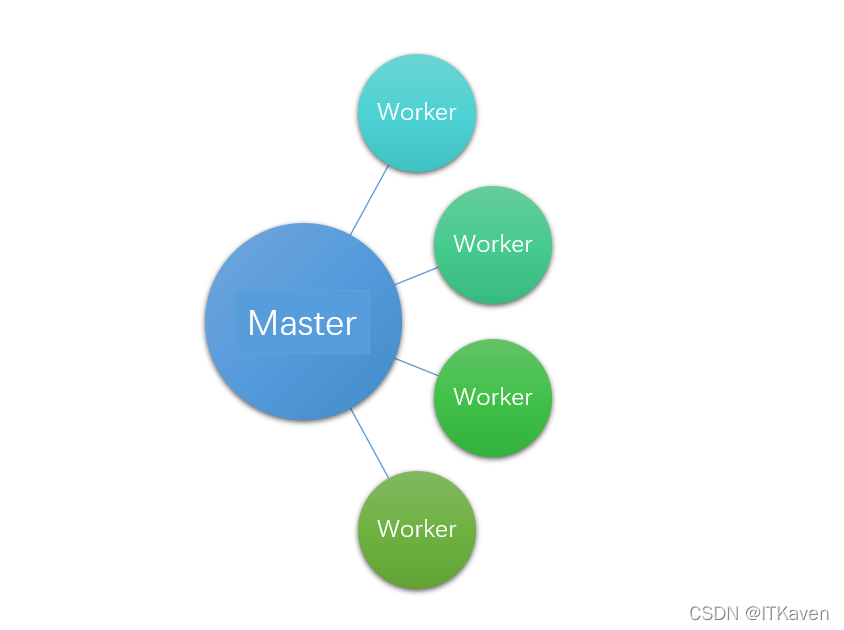
Nginx は、master を含む、マルチプロセスの高性能リバース プロキシ サーバーです。プロセスおよび複数の worker プロセス (worker プロセスの数は、nginx.conf 構成ファイルの worker_processes パラメーターを通じて設定できます。デフォルト1)、マルチコアプロセッサを最大限に活用できます。

デフォルトの 1 worker プロセス。

そして、master プロセスと worker プロセスには親子プロセス関係があります。

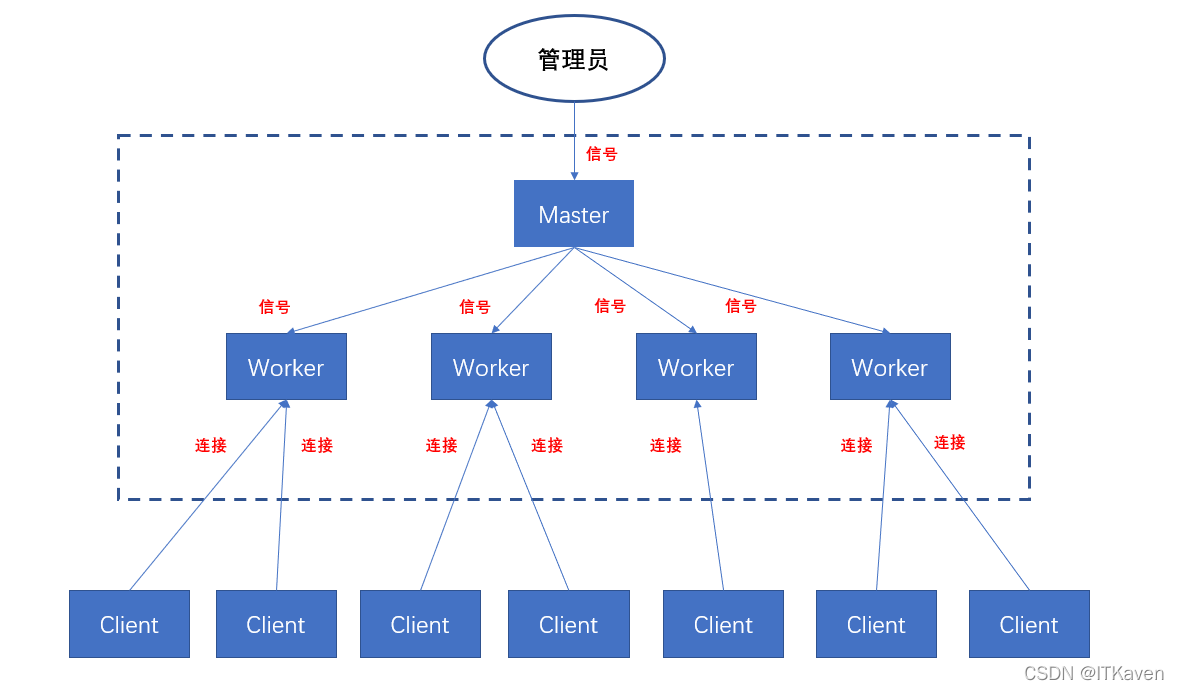
Nginx作業モードはマルチプロセスです。Nginxマスター##が存在します。 #Processes と複数の worker プロセス (デフォルト 1) を起動した後、複数の worker 子プロセスが master 親プロセスのリスニング ポートをリッスンします。 (親プロセスと子プロセスの関係を参照)、リクエストを並行して処理します。 master親プロセスは主に worker 子プロセスを管理するために使用されます (実際にサービスを提供する worker プロセスを管理し、worker# にシグナルを送信します) ## プロセス、監視 worker プロセスの実行ステータス。worker プロセスが異常終了すると、新しい worker プロセスが再起動されます) を読み取って確認します。構成情報、 マスター プロセスはユーザー要求を処理しませんが、ユーザー要求は worker プロセスによって処理されます。
は、Nginx の停止と再起動など、セマフォを通じて制御されます。セマフォはプロセス間通信のメカニズムであり、メイン プロセスはセマフォを介して複数の worker サブプロセスを制御します。
さあ、 Nginx
Nginx
がホット デプロイメントを実装する方法を示しましょう。ブロガーは、シミュレートするために
構成ファイルを変更しました。 Nginx のアップグレード (最初の copy コピー)。 <div class="code" style="position:relative; padding:0px; margin:0px;"><pre class='brush:php;toolbar:false;'>[root@localhost ~]# cd /usr/local/nginx/conf/
[root@localhost conf]# ll
总用量 68
-rw-r--r--. 1 root root 1077 12月 20 20:24 fastcgi.conf
-rw-r--r--. 1 root root 1077 12月 20 20:24 fastcgi.conf.default
-rw-r--r--. 1 root root 1007 12月 20 20:24 fastcgi_params
-rw-r--r--. 1 root root 1007 12月 20 20:24 fastcgi_params.default
-rw-r--r--. 1 root root 2837 12月 20 20:24 koi-utf
-rw-r--r--. 1 root root 2223 12月 20 20:24 koi-win
-rw-r--r--. 1 root root 5231 12月 20 20:24 mime.types
-rw-r--r--. 1 root root 5231 12月 20 20:24 mime.types.default
-rw-r--r--. 1 root root 2656 12月 20 21:26 nginx.conf
-rw-r--r--. 1 root root 2656 12月 20 20:24 nginx.conf.default
-rw-r--r--. 1 root root 636 12月 20 20:24 scgi_params
-rw-r--r--. 1 root root 636 12月 20 20:24 scgi_params.default
-rw-r--r--. 1 root root 664 12月 20 20:24 uwsgi_params
-rw-r--r--. 1 root root 664 12月 20 20:24 uwsgi_params.default
-rw-r--r--. 1 root root 3610 12月 20 20:24 win-utf
[root@localhost conf]# cp nginx.conf nginx_old.conf
[root@localhost conf]# vim nginx.conf</pre><div class="contentsignin">ログイン後にコピー</div></div>
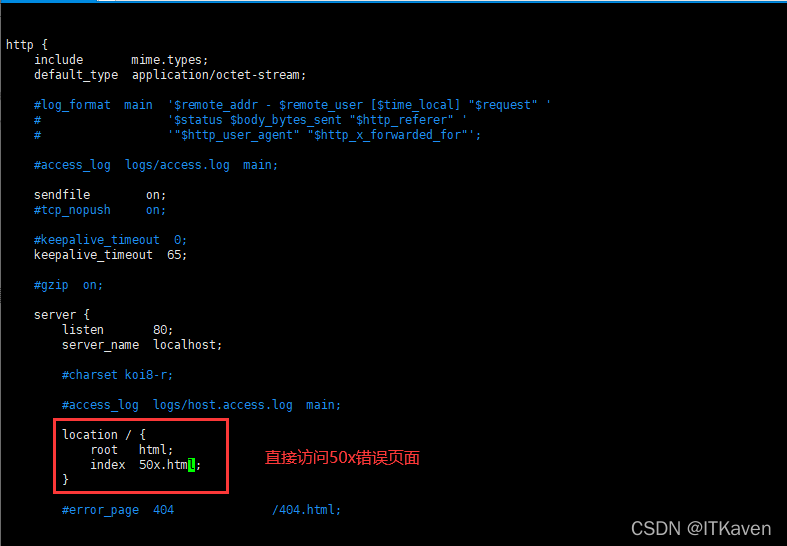
Nginx はまだホットデプロイされていないため、
にアクセスしてください。元の Nginx ページ。
 Nginx
Nginx
のプロセスを表示します:
[root@localhost conf]# ps -ef | grep nginx
root     14964     1  0 22:25 ?        00:00:00 nginx: master process ./nginx
nobody   14965 14964  0 22:25 ?        00:00:00 nginx: worker process
root     15016  1521  0 23:07 pts/0    00:00:00 grep --color=auto nginx
Send# を master process ##SIGUSR2
Nginx は実行可能プログラムをスムーズにアップグレードできます。 Nginx が一連の master プロセスと worker プロセスを再起動し、新しい master プロセスが古い ## であることがわかります。 #master プロセスの子プロセス (親プロセスと子プロセス間の継承関係により、新しい master プロセスは古い master プロセスの関連リソースを簡単に継承できます) 。 <div class="code" style="position:relative; padding:0px; margin:0px;"><pre class='brush:php;toolbar:false;'>[root@localhost conf]# kill -s SIGUSR2 14964
[root@localhost conf]# ps -ef | grep nginx
root 14964 1 0 22:25 ? 00:00:00 nginx: master process ./nginx
nobody 14965 14964 0 22:25 ? 00:00:00 nginx: worker process
root 15019 14964 0 23:18 ? 00:00:00 nginx: master process ./nginx
nobody 15020 15019 0 23:18 ? 00:00:00 nginx: worker process
root 15022 1521 0 23:19 pts/0 00:00:00 grep --color=auto nginx</pre><div class="contentsignin">ログイン後にコピー</div></div>そして Nginx は、新旧の pid ファイルをログ ディレクトリに保存します (新旧の
を保存します)マスタープロセス))。
[root@localhost conf]# ll ../logs
总用量 16
-rw-r--r--. 1 root root 2729 12月 20 23:20 access.log
-rw-r--r--. 1 root root  708 12月 20 23:18 error.log
-rw-r--r--. 1 root root    6 12月 20 23:18 nginx.pid
-rw-r--r--. 1 root root    6 12月 20 22:25 nginx.pid.oldbin
[root@localhost conf]# cat ../logs/nginx.pid
15019
[root@localhost conf]# cat ../logs/nginx.pid.oldbin
14964
シグナルを古い master プロセスに送信し、古い master プロセスが古い worker## を閉じることができるようにします。 # プロセス。 <div class="code" style="position:relative; padding:0px; margin:0px;"><pre class='brush:php;toolbar:false;'>[root@localhost conf]# kill -s SIGWINCH 14964
[root@localhost conf]# ps -ef | grep nginx
root 14964 1 0 22:25 ? 00:00:00 nginx: master process ./nginx
root 15019 14964 0 23:18 ? 00:00:00 nginx: master process ./nginx
nobody 15020 15019 0 23:18 ? 00:00:00 nginx: worker process
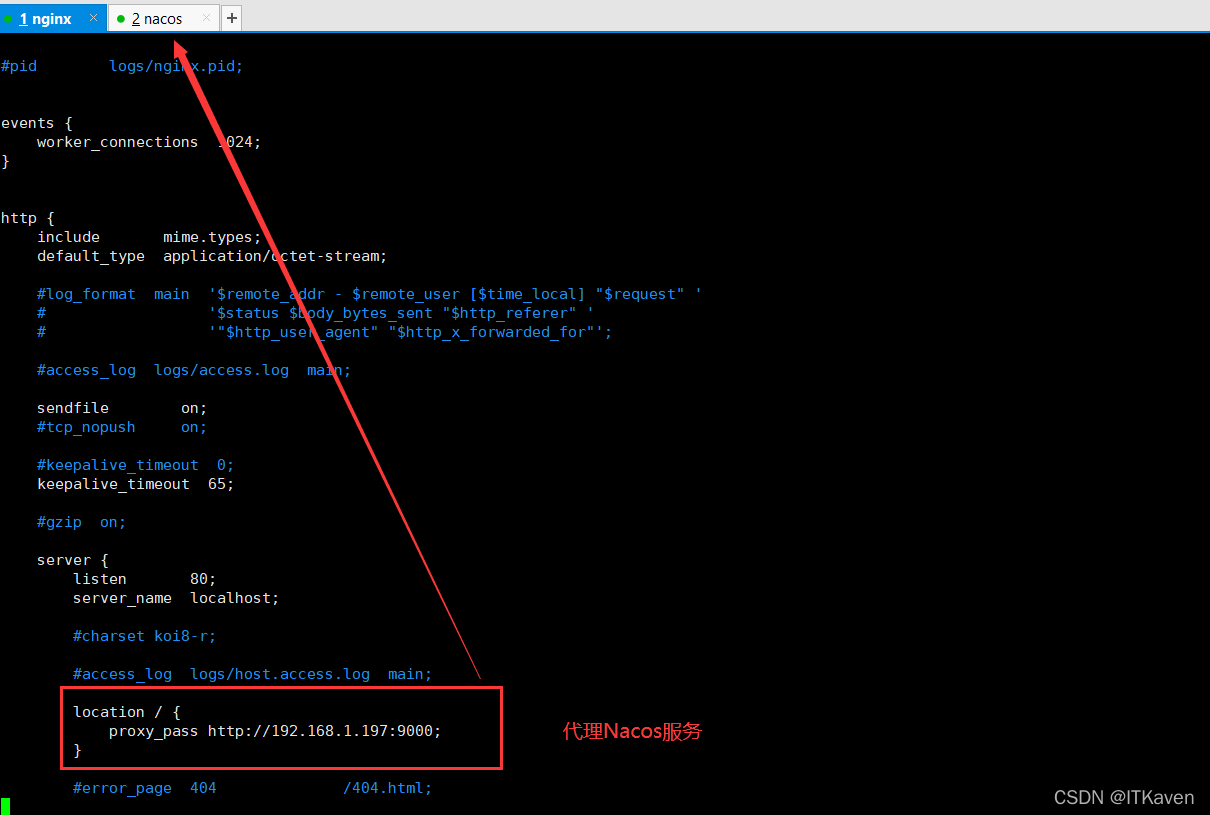
root 15030 1521 0 23:27 pts/0 00:00:00 grep --color=auto nginx</pre><div class="contentsignin">ログイン後にコピー</div></div>次に http://192.168.1.199/ にアクセスすると、404 が応答します。
http://192.168.1.199/nacos
にアクセスすると、
にアクセスします。サービス 。 
如果升级版本没有问题,就可以给旧master进程发送SIGQUIT信号,让旧master进程关闭,这样就只剩下新master进程和新worker进程,实现了Nginx的热部署。
[root@localhost conf]# kill -s SIGQUIT 14964
[root@localhost conf]# ps -ef | grep nginx
root     15019     1  0 23:18 ?        00:00:00 nginx: master process ./nginx
nobody   15020 15019  0 23:18 ?        00:00:00 nginx: worker process
root     15034  1521  0 23:31 pts/0    00:00:00 grep --color=auto nginx
如果升级版本有问题,需要回滚到之前的版本,就可以给旧master进程发送SIGHUP信号,因为博主重新进行了测试,所以进程号都变了,但很显然旧master进程重新创建了旧worker进程,并且进行版本升级的master和worker进程没有被关闭。
[root@localhost conf]# kill -s SIGHUP 15084
[root@localhost conf]# ps -ef | grep nginx
root     15084     1  0 12月20 ?      00:00:00 nginx: master process ./nginx
root     15106 15084  0 12月20 ?      00:00:00 nginx: master process ./nginx
nobody   15107 15106  0 12月20 ?      00:00:00 nginx: worker process
nobody   15131 15084  0 00:02 ?        00:00:00 nginx: worker process
root     15141  1521  0 00:09 pts/0    00:00:00 grep --color=auto nginx
给新master进程发送SIGQUIT信号,让新master进程关闭,这样就只剩下旧master进程和新创建的旧worker进程,实现了回滚。
[root@localhost conf]# kill -s SIGQUIT 15106
[root@localhost conf]# ps -ef | grep nginx
root     15084     1  0 12月20 ?      00:00:00 nginx: master process ./nginx
nobody   15131 15084  0 00:02 ?        00:00:00 nginx: worker process
root     15159  1521  0 00:25 pts/0    00:00:00 grep --color=auto nginx
回滚成功。

还需要对版本回滚(即博主这里的配置文件回滚,不然下次重启就会出问题)。
[root@localhost conf]# cp -f nginx_old.conf nginx.conf
cp:是否覆盖"nginx.conf"? y
为什么给旧master进程发送SIGHUP信号,旧master进程重新创建的worker进程没有重新读取配置文件?下面是官方的说明:
Send the HUP signal to the old master process. The old master process will start new worker processes without re-reading the configuration. After that, all new processes can be shut down gracefully, by sending the QUIT signal to the new master process.
向旧
master进程发送SIGHUP信号。旧master进程将启动新worker进程,而无需重新读取配置。之后,通过向新master进程发送SIGQUIT信号,所有新进程都可以正常关闭。
如果不存在新进程的情况下(只有一组master、worker进程),修改配置文件,再向master进程发送SIGHUP信号,看是否会重新加载配置文件。

[root@localhost conf]# kill -s SIGHUP 15084
很显然配置文件被重新加载了,由于博主还没有看源码,只能猜测Nginx的实现(如果说错了,请大家评论补充),Nginx应该是根据当前是否在进行热部署(存在新master进程),来决定SIGHUP信号是否需要重新加载配置文件。

以上がNginx ホット デプロイメントを実装する方法の詳細内容です。詳細については、PHP 中国語 Web サイトの他の関連記事を参照してください。

ホットAIツール

Undresser.AI Undress
リアルなヌード写真を作成する AI 搭載アプリ

AI Clothes Remover
写真から衣服を削除するオンライン AI ツール。

Undress AI Tool
脱衣画像を無料で

Clothoff.io
AI衣類リムーバー

Video Face Swap
完全無料の AI 顔交換ツールを使用して、あらゆるビデオの顔を簡単に交換できます。

人気の記事

ホットツール

メモ帳++7.3.1
使いやすく無料のコードエディター

SublimeText3 中国語版
中国語版、とても使いやすい

ゼンドスタジオ 13.0.1
強力な PHP 統合開発環境

ドリームウィーバー CS6
ビジュアル Web 開発ツール

SublimeText3 Mac版
神レベルのコード編集ソフト(SublimeText3)

ホットトピック
 1662
1662
 14
14
 1419
1419
 52
52
 1313
1313
 25
25
 1262
1262
 29
29
 1235
1235
 24
24
 Windowsでnginxを構成する方法
Apr 14, 2025 pm 12:57 PM
Windowsでnginxを構成する方法は? nginxをインストールし、仮想ホスト構成を作成します。メイン構成ファイルを変更し、仮想ホスト構成を含めます。 nginxを起動またはリロードします。構成をテストし、Webサイトを表示します。 SSLを選択的に有効にし、SSL証明書を構成します。ファイアウォールを選択的に設定して、ポート80および443のトラフィックを許可します。
 Dockerによってコンテナを起動する方法
Apr 15, 2025 pm 12:27 PM
Docker Containerの起動手順:コンテナ画像を引く:「Docker Pull [Mirror Name]」を実行します。コンテナの作成:「docker create [options] [mirror name] [コマンドとパラメーター]」を使用します。コンテナを起動します:「docker start [container name or id]」を実行します。コンテナのステータスを確認してください:コンテナが「Docker PS」で実行されていることを確認します。
 Dockerコンテナの名前を確認する方法
Apr 15, 2025 pm 12:21 PM
すべてのコンテナ(Docker PS)をリストする手順に従って、Dockerコンテナ名を照会できます。コンテナリストをフィルタリングします(GREPコマンドを使用)。コンテナ名(「名前」列にあります)を取得します。
 Nginxが開始されるかどうかを確認する方法
Apr 14, 2025 pm 01:03 PM
nginxが開始されるかどうかを確認する方法:1。コマンドラインを使用します:SystemCTLステータスnginx(Linux/unix)、netstat -ano | FindStr 80(Windows); 2。ポート80が開いているかどうかを確認します。 3.システムログのnginx起動メッセージを確認します。 4. Nagios、Zabbix、Icingaなどのサードパーティツールを使用します。
 Docker用のコンテナを作成する方法
Apr 15, 2025 pm 12:18 PM
Dockerでコンテナを作成します。1。画像を引く:Docker Pull [ミラー名]2。コンテナを作成:Docker Run [Options] [Mirror Name] [コマンド]3。コンテナを起動:Docker Start [Container Name]
 Nginxバージョンを確認する方法
Apr 14, 2025 am 11:57 AM
nginxバージョンを照会できるメソッドは次のとおりです。nginx-vコマンドを使用します。 nginx.confファイルでバージョンディレクティブを表示します。 nginxエラーページを開き、ページタイトルを表示します。
 nginxでクラウドサーバードメイン名を構成する方法
Apr 14, 2025 pm 12:18 PM
クラウドサーバーでnginxドメイン名を構成する方法:クラウドサーバーのパブリックIPアドレスを指すレコードを作成します。 NGINX構成ファイルに仮想ホストブロックを追加し、リスニングポート、ドメイン名、およびWebサイトルートディレクトリを指定します。 nginxを再起動して変更を適用します。ドメイン名のテスト構成にアクセスします。その他のメモ:SSL証明書をインストールしてHTTPSを有効にし、ファイアウォールがポート80トラフィックを許可し、DNS解像度が有効になることを確認します。
 nginxサーバーがハングした場合はどうすればよいですか
Apr 14, 2025 am 11:42 AM
NGINXサーバーがダウンすると、次のトラブルシューティング手順を実行できます。NGINXプロセスが実行されていることを確認します。エラーメッセージのエラーログを表示します。 nginx構成の構文を確認します。 nginxには、ファイルにアクセスするために必要な権限があることを確認してください。ファイル記述子をチェックして制限を開いてください。 Nginxが正しいポートで聴いていることを確認してください。 nginxトラフィックを許可するために、ファイアウォールルールを追加します。バックエンドサーバーの可用性を含む逆プロキシ設定を確認します。さらなる支援については、テクニカルサポートにお問い合わせください。


