nginx+redis がセッション共有を実現する仕組み
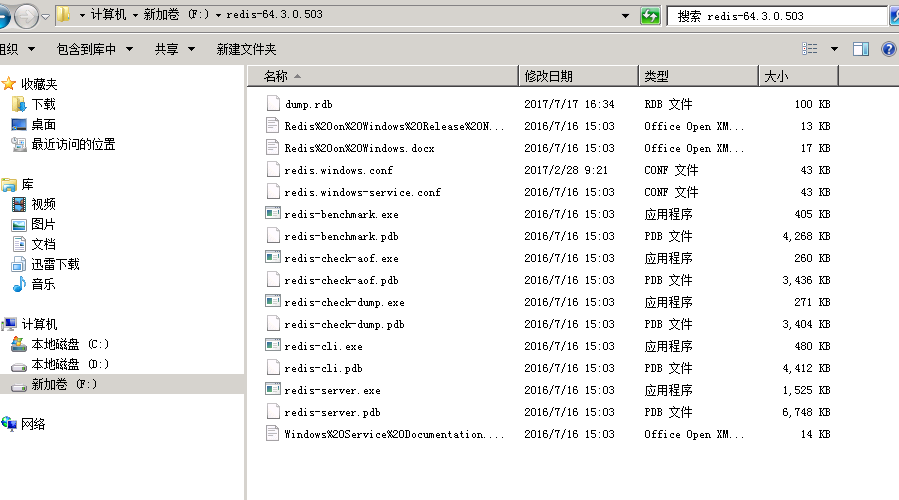
1. 最初のステップは、redis をインストールすることです。私のサーバーは Windows です。インストール不要のバージョンをダウンロードしました。解凍するだけです。ディレクトリは次のとおりです。最初、redis はデフォルトでパスワードを必要としませんが、パスワードを設定したい場合は、redis.windows.conf ファイルに移動して requirepass を見つけ、先頭の # 記号を削除し、その後にパスワードを設定します。

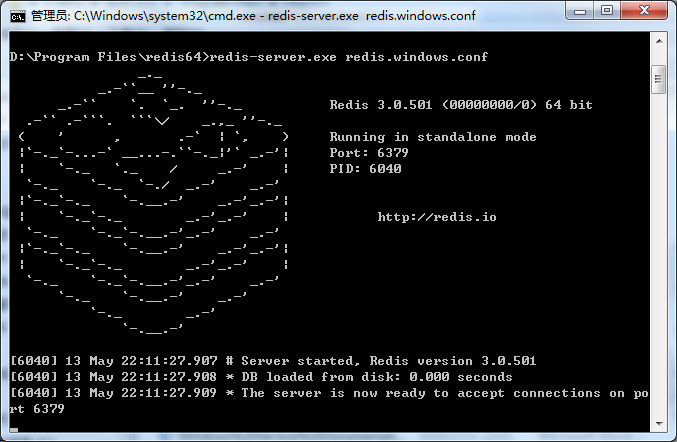
2. cmd から redis のルート ディレクトリを入力し、コマンド redis-server.exeredis.windows.conf を入力します。このようにしてredisが起動できるようになり、起動に成功すると以下の画面が表示されます。もちろん、conf ファイルを変更してパスワードを追加することもできます。 requirepass xxxxx

#3. 次に、セッション データのグローバル キャッシュを実現するための設定作業を行うことができます。
1) まず、jar パッケージを追加します。Maven プロジェクトの場合は、次のコードを pom.xml に追加する必要があります。
<!-- redis -->
 <dependency>
  <groupid>org.springframework.session</groupid>
  <artifactid>spring-session-data-redis</artifactid>
  <version>1.3.1.release</version>
  <type>pom</type>
 </dependency>
Maven プロジェクトでない場合は、次のコードを追加する必要があります。次の jar パッケージを追加します。

2) redis.properties を記述します。コードは次のとおりです。
redis_isopen:yes
#主机地址
redis_hostname=xxx.xxx.xxx.xxx
#端口
redis_port=6379
#密码
redis_password=xxxxxxxx
#连接超时时间
redis_timeout=200000
redis_maxidle:300
redis_maxactive:600
redis_maxwait:100000
redis_testonborrow:true
は基本的に構成データベースの接続ステートメントと似ています。
3) spring-redis.xml 構成ファイルを作成します。このファイルは、redis に関するいくつかの基本情報を構成します。
<?xml version="1.0" encoding="utf-8" standalone="no"?>
<beans xmlns="http://www.springframework.org/schema/beans"
 xmlns:context="http://www.springframework.org/schema/context" xmlns:tx="http://www.springframework.org/schema/tx"
 xmlns:util="http://www.springframework.org/schema/util" xmlns:xsi="http://www.w3.org/2001/xmlschema-instance"
 xsi:schemalocation="http://www.springframework.org/schema/beans http://www.springframework.org/schema/beans/spring-beans.xsd http://www.springframework.org/schema/context http://www.springframework.org/schema/context/spring-context.xsd http://www.springframework.org/schema/tx http://www.springframework.org/schema/tx/spring-tx.xsd http://www.springframework.org/schema/util http://www.springframework.org/schema/util/spring-util.xsd ">
 <!-- session设置 maxinactiveintervalinseconds为session的失效时间,单位为秒-->
 <bean
 class="org.springframework.session.data.redis.config.annotation.web.http.redishttpsessionconfiguration">
 <property name="maxinactiveintervalinseconds" value="3600"></property>
 </bean>
 <!-- redis连接池 -->
 <bean id="poolconfig" class="redis.clients.jedis.jedispoolconfig">
 <property name="maxidle" value="${redis_maxidle}" />
 <property name="testonborrow" value="${redis_testonborrow}" />
 </bean>
 <!-- redis连接工厂 -->
 <bean id="connectionfactory"
 class="org.springframework.data.redis.connection.jedis.jedisconnectionfactory">
 <property name="hostname" value="${redis_hostname}" />
 <property name="port" value="${redis_port}" />
 <property name="password" value="${redis_password}" />
 <property name="timeout" value="${redis_timeout}" />
 <property name="poolconfig" ref="poolconfig"></property>
 </bean>
</beans>4) application.xml (Spring のメイン設定ファイル) に、次のように redis.properties 設定ファイルのスキャンを追加する必要があります。
<!-- 读取redis参数配置 -->
 <bean id="propertyconfigurer"
 class="org.springframework.beans.factory.config.propertyplaceholderconfigurer">
 <property name="locations">
  <list>
  <value>/web-inf/classes/redis.properties</value>
  </list>
 </property>
 </bean>
5) 次のように、spring-redis.xml をメイン設定ファイルに導入します。
<import resource="spring-redis.xml" />
6) web.xml にセッションに関するフィルターを追加します。この方法でのみ、セッションは Redis によって操作されます。
<filter>
 <filter-name>springsessionrepositoryfilter</filter-name>
 <filter-class>org.springframework.web.filter.delegatingfilterproxy</filter-class>
 </filter>
 <filter-mapping>
 <filter-name>springsessionrepositoryfilter</filter-name>
 <url-pattern>/*</url-pattern>
 </filter-mapping>
この後、redisによるセッション管理を実現していきます。
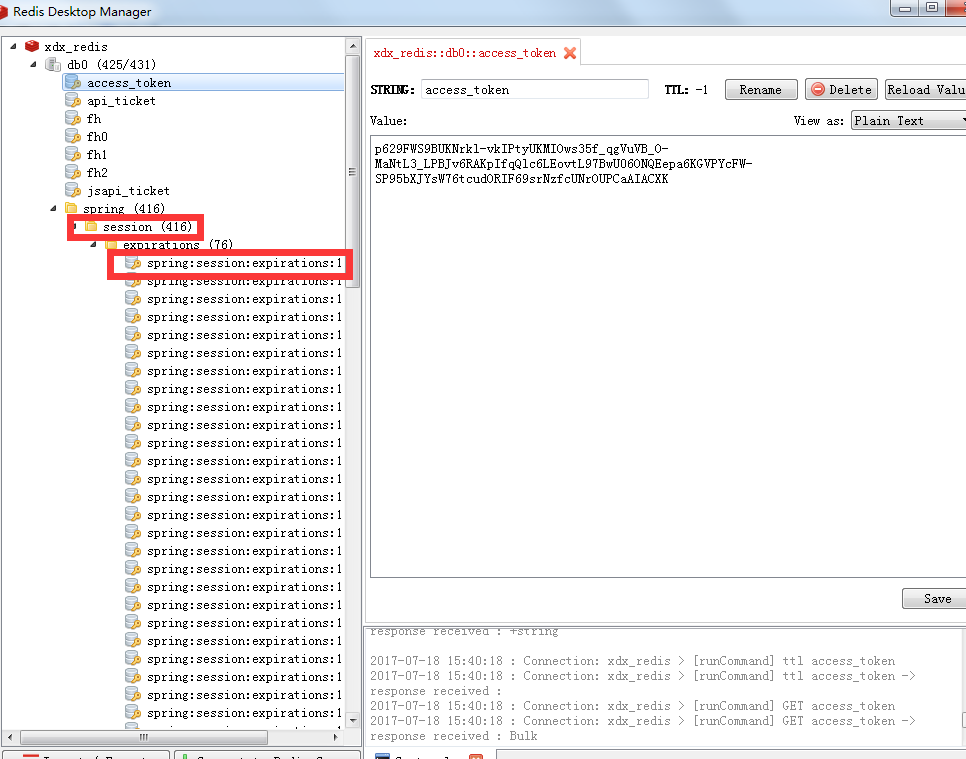
7) Redis デスクトップ マネージャーと呼ばれる、内部のデータを表示するための Redis クライアントをインストールできます。以下に示すように、redis データベース内のデータを確認することができ、非常に便利です。

#ps. 再度終了するときは、エラーを避けるために次のように記述する必要があります。 (ssh プロジェクト)
public string yipinexit(){
 iterator<string>keys=session.keyset().iterator();
 while(keys.hasnext()){
  string key=keys.next();
  session.remove(key);
 }
 return "yipinexit";
}以上がnginx+redis がセッション共有を実現する仕組みの詳細内容です。詳細については、PHP 中国語 Web サイトの他の関連記事を参照してください。

ホットAIツール

Undresser.AI Undress
リアルなヌード写真を作成する AI 搭載アプリ

AI Clothes Remover
写真から衣服を削除するオンライン AI ツール。

Undress AI Tool
脱衣画像を無料で

Clothoff.io
AI衣類リムーバー

Video Face Swap
完全無料の AI 顔交換ツールを使用して、あらゆるビデオの顔を簡単に交換できます。

人気の記事

ホットツール

メモ帳++7.3.1
使いやすく無料のコードエディター

SublimeText3 中国語版
中国語版、とても使いやすい

ゼンドスタジオ 13.0.1
強力な PHP 統合開発環境

ドリームウィーバー CS6
ビジュアル Web 開発ツール

SublimeText3 Mac版
神レベルのコード編集ソフト(SublimeText3)

ホットトピック
 1660
1660
 14
14
 1416
1416
 52
52
 1310
1310
 25
25
 1260
1260
 29
29
 1233
1233
 24
24
 Dockerによってコンテナを起動する方法
Apr 15, 2025 pm 12:27 PM
Docker Containerの起動手順:コンテナ画像を引く:「Docker Pull [Mirror Name]」を実行します。コンテナの作成:「docker create [options] [mirror name] [コマンドとパラメーター]」を使用します。コンテナを起動します:「docker start [container name or id]」を実行します。コンテナのステータスを確認してください:コンテナが「Docker PS」で実行されていることを確認します。
 Dockerコンテナの名前を確認する方法
Apr 15, 2025 pm 12:21 PM
すべてのコンテナ(Docker PS)をリストする手順に従って、Dockerコンテナ名を照会できます。コンテナリストをフィルタリングします(GREPコマンドを使用)。コンテナ名(「名前」列にあります)を取得します。
 Docker用のコンテナを作成する方法
Apr 15, 2025 pm 12:18 PM
Dockerでコンテナを作成します。1。画像を引く:Docker Pull [ミラー名]2。コンテナを作成:Docker Run [Options] [Mirror Name] [コマンド]3。コンテナを起動:Docker Start [Container Name]
 Redisキャッシュソリューションを使用して、製品ランキングリストの要件を効率的に実現する方法は?
Apr 19, 2025 pm 11:36 PM
Redisキャッシュソリューションは、製品ランキングリストの要件をどのように実現しますか?開発プロセス中に、多くの場合、ランキングの要件に対処する必要があります。
 スロークエリログを設定する方法Centos Redis
Apr 14, 2025 pm 04:54 PM
CENTOSシステムのRedisスロークエリログを有効にして、パフォーマンスの診断効率を改善します。次の手順では、構成をガイドします。ステップ1:最初にRedis構成ファイルを見つけて編集し、通常は/etc/redis/redis.confにあるRedis構成ファイルを見つけます。次のコマンドで構成ファイルを開きます:sudovi/etc/redis/redis.confステップ2:構成ファイルでスロークエリログパラメーターを調整し、次のパラメーターを見つけて変更します:#slow query-log-log-slower-slower-than10000#スロークエリのエントリの最大数
 Centos7にRedisをインストールする方法
Apr 14, 2025 pm 08:21 PM
公式Redisソースからソースコードパッケージをダウンロードして、コンパイルしてインストールして、最新の安定したバージョンを確保し、パーソナライズされた方法でカスタマイズできます。特定の手順は次のとおりです。ソフトウェアパッケージリストを更新してRedisディレクトリを作成するRedisソースコードパッケージをダウンロードしてソースコードパッケージを解凍し、インストール構成をコンパイルし、Redis構成を変更してRedisの起動ステータスを確認します
 nginxとapacheを選択する:あなたのニーズに合った適切
Apr 15, 2025 am 12:04 AM
NginxとApacheには独自の利点と短所があり、さまざまなシナリオに適しています。 1.Nginxは、高い並行性と低リソース消費シナリオに適しています。 2。Apacheは、複雑な構成とリッチモジュールが必要なシナリオに適しています。コア機能、パフォーマンスの違い、ベストプラクティスを比較することで、ニーズに最適なサーバーソフトウェアを選択するのに役立ちます。
 Dockerにミラーオフラインをインストールする方法
Apr 15, 2025 am 11:36 AM
Docker画像をオフラインでインストールするには、次の手順が必要です。1。ミラータールファイルを取得します。 2。ミラーファイルをエクスポートします。 3.ミラーファイルを転送します。 4.ミラーファイルをインポートします。 5.ミラーのインストールを確認します。


