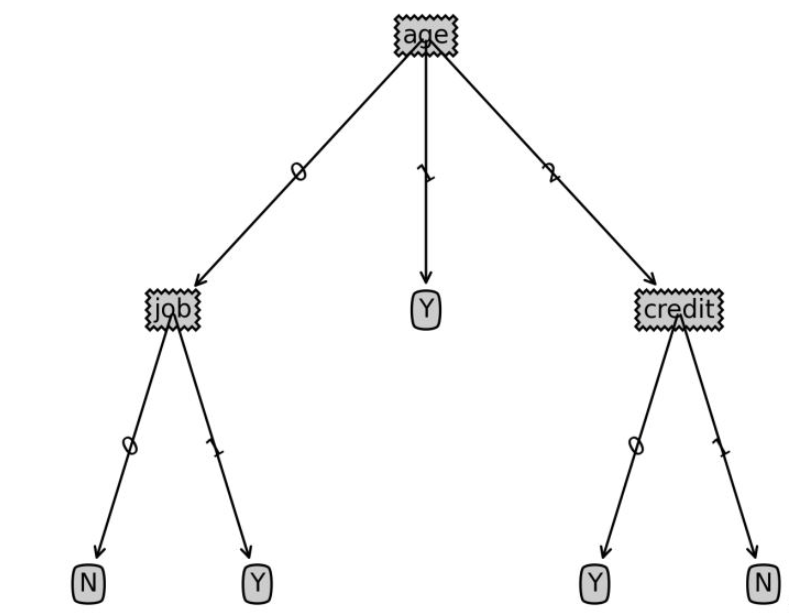
Pythonでデシジョンツリー分類アルゴリズムを実装する方法
事前情報
1. デシジョンツリー
書き換えられた文: 教師あり学習では、一般的に使用される分類アルゴリズムは決定木です。これはサンプルのバッチに基づいており、各サンプルには一連の属性と対応する分類結果が含まれています。これらのサンプルを学習に使用すると、アルゴリズムは新しいデータを正しく分類できるデシジョン ツリーを生成できます
2. サンプル データ
14 人の既存ユーザーとその個人属性があると仮定します。特定の商品を購入するかどうかは次のとおりです。
| 年齢 | 収入範囲 | 職種 | 信用格付け | 購入決定 | |||||||||||
|---|---|---|---|---|---|---|---|---|---|---|---|---|---|---|---|
| 高い | 不安定 | 悪い | No | ||||||||||||
| ##高 | 不安定 | 良好 | なし | ||||||||||||
| 30-40 | 高い | 不安定 | 悪い | は | |||||||||||
| >40 | 中 | 不安定 | 悪い | はい | #05 | ||||||||||
| 低 | 安定 | 悪い | はい | 06 | |||||||||||
| 低 | 安定 | 良好 | なし | 07 | |||||||||||
| 低 | 安定 | 良い | はい | 08 | |||||||||||
| 不安定 | 悪い | No | 09 | ||||||||||||
| 安定 | 悪い | は | 10 | ||||||||||||
| 中 | 安定 | 悪い | はい | ##11 | 中 | 安定 | 良い | はい | ##12 | 30-40 | |||||
| 不安定 | 良い | はい | 13 | 30-40 | |||||||||||
| 安定 | 悪い | #は | 14 | >40 | |||||||||||
| 不安定 | 良い | いいえ | ## |
| 仕事の内容 | 信用格付け | ##<30 | |
|---|---|---|---|
| #<30 | 高 | 不安定 | |
def classify(inputtree,featlabels,testvec):
    firststr = list(inputtree.keys())[0]
    seconddict = inputtree[firststr]
    featindex = featlabels.index(firststr)
    for key in seconddict.keys():
        if testvec[featindex]==key:
            if type(seconddict[key]).__name__=='dict':
                classlabel=classify(seconddict[key],featlabels,testvec)
            else:
                classlabel=seconddict[key]
    return classlabel
ログイン後にコピー labels=['age','income','job','credit'] tsvec=[0,0,1,1] print('result:',classify(Tree,labels,tsvec)) tsvec1=[0,2,0,1] print('result1:',classify(Tree,labels,tsvec1)) ログイン後にコピー | result: Y | result1: N
import matplotlib.pyplot as plt

decisionNode = dict(box, fc="0.8")
leafNode = dict(box, fc="0.8")
arrow_args = dict(arrow)

#获取叶节点的数目
def getNumLeafs(myTree):
    numLeafs = 0
    firstStr = list(myTree.keys())[0]
    secondDict = myTree[firstStr]
    for key in secondDict.keys():
        if type(secondDict[key]).__name__=='dict':#测试节点的数据是否为字典,以此判断是否为叶节点
            numLeafs += getNumLeafs(secondDict[key])
        else:   numLeafs +=1
    return numLeafs

#获取树的层数
def getTreeDepth(myTree):
    maxDepth = 0
    firstStr = list(myTree.keys())[0]
    secondDict = myTree[firstStr]
    for key in secondDict.keys():
        if type(secondDict[key]).__name__=='dict':#测试节点的数据是否为字典,以此判断是否为叶节点
            thisDepth = 1 + getTreeDepth(secondDict[key])
        else:   thisDepth = 1
        if thisDepth > maxDepth: maxDepth = thisDepth
    return maxDepth

#绘制节点
def plotNode(nodeTxt, centerPt, parentPt, nodeType):
    createPlot.ax1.annotate(nodeTxt, xy=parentPt,  xycoords='axes fraction',
             xytext=centerPt, textcoords='axes fraction',
             va="center", ha="center", bbox=nodeType, arrowprops=arrow_args )

#绘制连接线
def plotMidText(cntrPt, parentPt, txtString):
    xMid = (parentPt[0]-cntrPt[0])/2.0 + cntrPt[0]
    yMid = (parentPt[1]-cntrPt[1])/2.0 + cntrPt[1]
    createPlot.ax1.text(xMid, yMid, txtString, va="center", ha="center", rotation=30)

#绘制树结构
def plotTree(myTree, parentPt, nodeTxt):#if the first key tells you what feat was split on
    numLeafs = getNumLeafs(myTree)  #this determines the x width of this tree
    depth = getTreeDepth(myTree)
    firstStr = list(myTree.keys())[0]     #the text label for this node should be this
    cntrPt = (plotTree.xOff + (1.0 + float(numLeafs))/2.0/plotTree.totalW, plotTree.yOff)
    plotMidText(cntrPt, parentPt, nodeTxt)
    plotNode(firstStr, cntrPt, parentPt, decisionNode)
    secondDict = myTree[firstStr]
    plotTree.yOff = plotTree.yOff - 1.0/plotTree.totalD
    for key in secondDict.keys():
        if type(secondDict[key]).__name__=='dict':#test to see if the nodes are dictonaires, if not they are leaf nodes
            plotTree(secondDict[key],cntrPt,str(key))        #recursion
        else:   #it's a leaf node print the leaf node
            plotTree.xOff = plotTree.xOff + 1.0/plotTree.totalW
            plotNode(secondDict[key], (plotTree.xOff, plotTree.yOff), cntrPt, leafNode)
            plotMidText((plotTree.xOff, plotTree.yOff), cntrPt, str(key))
    plotTree.yOff = plotTree.yOff + 1.0/plotTree.totalD

#创建决策树图形
def createPlot(inTree):
    fig = plt.figure(1, facecolor='white')
    fig.clf()
    axprops = dict(xticks=[], yticks=[])
    createPlot.ax1 = plt.subplot(111, frameon=False, **axprops)    #no ticks
    #createPlot.ax1 = plt.subplot(111, frameon=False) #ticks for demo puropses
    plotTree.totalW = float(getNumLeafs(inTree))
    plotTree.totalD = float(getTreeDepth(inTree))
    plotTree.xOff = -0.5/plotTree.totalW; plotTree.yOff = 1.0;
    plotTree(inTree, (0.5,1.0), '')
    plt.savefig('决策树.png',dpi=300,bbox_inches='tight')
    plt.show()
ログイン後にコピー
以上がPythonでデシジョンツリー分類アルゴリズムを実装する方法の詳細内容です。詳細については、PHP 中国語 Web サイトの他の関連記事を参照してください。

ホットAIツール

Undresser.AI Undress
リアルなヌード写真を作成する AI 搭載アプリ

AI Clothes Remover
写真から衣服を削除するオンライン AI ツール。

Undress AI Tool
脱衣画像を無料で

Clothoff.io
AI衣類リムーバー

AI Hentai Generator
AIヘンタイを無料で生成します。

人気の記事

ホットツール

メモ帳++7.3.1
使いやすく無料のコードエディター

SublimeText3 中国語版
中国語版、とても使いやすい

ゼンドスタジオ 13.0.1
強力な PHP 統合開発環境

ドリームウィーバー CS6
ビジュアル Web 開発ツール

SublimeText3 Mac版
神レベルのコード編集ソフト(SublimeText3)

ホットトピック
 7461
7461
 15
15
 1376
1376
 52
52
 77
77
 11
11
 17
17
 17
17
 インストール後にMySQLの使用方法
Apr 08, 2025 am 11:48 AM
この記事では、MySQLデータベースの操作を紹介します。まず、MySQLWorkBenchやコマンドラインクライアントなど、MySQLクライアントをインストールする必要があります。 1. mysql-uroot-pコマンドを使用してサーバーに接続し、ルートアカウントパスワードでログインします。 2。CreatedAtaBaseを使用してデータベースを作成し、データベースを選択します。 3. createTableを使用してテーブルを作成し、フィールドとデータ型を定義します。 4. INSERTINTOを使用してデータを挿入し、データをクエリし、更新することでデータを更新し、削除してデータを削除します。これらの手順を習得することによってのみ、一般的な問題に対処することを学び、データベースのパフォーマンスを最適化することでMySQLを効率的に使用できます。
 PSフェザーリングは、遷移の柔らかさをどのように制御しますか?
Apr 06, 2025 pm 07:33 PM
羽毛の鍵は、その漸進的な性質を理解することです。 PS自体は、勾配曲線を直接制御するオプションを提供しませんが、複数の羽毛、マッチングマスク、および細かい選択により、半径と勾配の柔らかさを柔軟に調整して、自然な遷移効果を実現できます。
 mysqlは支払う必要がありますか
Apr 08, 2025 pm 05:36 PM
MySQLには、無料のコミュニティバージョンと有料エンタープライズバージョンがあります。コミュニティバージョンは無料で使用および変更できますが、サポートは制限されており、安定性要件が低く、技術的な能力が強いアプリケーションに適しています。 Enterprise Editionは、安定した信頼性の高い高性能データベースを必要とするアプリケーションに対する包括的な商業サポートを提供し、サポートの支払いを喜んでいます。バージョンを選択する際に考慮される要因には、アプリケーションの重要性、予算編成、技術スキルが含まれます。完璧なオプションはなく、最も適切なオプションのみであり、特定の状況に応じて慎重に選択する必要があります。
 PSフェザーリングをセットアップする方法は?
Apr 06, 2025 pm 07:36 PM
PSフェザーリングは、イメージエッジブラー効果であり、エッジエリアのピクセルの加重平均によって達成されます。羽の半径を設定すると、ぼやけの程度を制御でき、値が大きいほどぼやけます。半径の柔軟な調整は、画像とニーズに応じて効果を最適化できます。たとえば、キャラクターの写真を処理する際に詳細を維持するためにより小さな半径を使用し、より大きな半径を使用してアートを処理するときにかすんだ感覚を作成します。ただし、半径が大きすぎるとエッジの詳細を簡単に失う可能性があり、効果が小さすぎると明らかになりません。羽毛効果は画像解像度の影響を受け、画像の理解と効果の把握に従って調整する必要があります。
 PSカードがロードインターフェイスにある場合はどうすればよいですか?
Apr 06, 2025 pm 06:54 PM
PSカードの読み込みインターフェイスは、ソフトウェア自体(ファイルの破損またはプラグインの競合)、システム環境(ドライバーまたはシステムファイルの破損)、またはハードウェア(ハードディスクの破損またはメモリスティックの障害)によって引き起こされる場合があります。まず、コンピューターリソースで十分かどうかを確認し、バックグラウンドプログラムを閉じ、メモリとCPUリソースをリリースします。 PSのインストールを修正するか、プラグインの互換性の問題を確認してください。 PSバージョンを更新またはフォールバックします。グラフィックカードドライバーをチェックして更新し、システムファイルチェックを実行します。上記の問題をトラブルシューティングする場合は、ハードディスク検出とメモリテストを試すことができます。
 MySQLインストール後にデータベースのパフォーマンスを最適化する方法
Apr 08, 2025 am 11:36 AM
MySQLパフォーマンスの最適化は、インストール構成、インデックス作成、クエリの最適化、監視、チューニングの3つの側面から開始する必要があります。 1。インストール後、INNODB_BUFFER_POOL_SIZEパラメーターやclose query_cache_sizeなど、サーバーの構成に従ってmy.cnfファイルを調整する必要があります。 2。過度のインデックスを回避するための適切なインデックスを作成し、説明コマンドを使用して実行計画を分析するなど、クエリステートメントを最適化します。 3. MySQL独自の監視ツール(ShowProcessList、ShowStatus)を使用して、データベースの健康を監視し、定期的にデータベースをバックアップして整理します。これらの手順を継続的に最適化することによってのみ、MySQLデータベースのパフォーマンスを改善できます。
 PS Featheringは画質にどのような影響を与えますか?
Apr 06, 2025 pm 07:21 PM
PSフェザーリングは、画像の詳細の喪失、色の飽和の減少、およびノイズの増加につながる可能性があります。影響を減らすために、小さな羽の半径を使用し、レイヤーをコピーしてから羽毛をコピーし、羽毛の前後に画質を慎重に比較することをお勧めします。さらに、フェザーリングはすべてのケースに適しておらず、マスクなどのツールが画像エッジの処理に適している場合があります。
 高負荷アプリケーションのMySQLパフォーマンスを最適化する方法は?
Apr 08, 2025 pm 06:03 PM
MySQLデータベースパフォーマンス最適化ガイドリソース集約型アプリケーションでは、MySQLデータベースが重要な役割を果たし、大規模なトランザクションの管理を担当しています。ただし、アプリケーションのスケールが拡大すると、データベースパフォーマンスのボトルネックが制約になることがよくあります。この記事では、一連の効果的なMySQLパフォーマンス最適化戦略を検討して、アプリケーションが高負荷の下で効率的で応答性の高いままであることを保証します。実際のケースを組み合わせて、インデックス作成、クエリ最適化、データベース設計、キャッシュなどの詳細な主要なテクノロジーを説明します。 1.データベースアーキテクチャの設計と最適化されたデータベースアーキテクチャは、MySQLパフォーマンスの最適化の基礎です。いくつかのコア原則は次のとおりです。適切なデータ型を選択し、ニーズを満たす最小のデータ型を選択すると、ストレージスペースを節約するだけでなく、データ処理速度を向上させることもできます。


