

Spring Boot + Vue を使用してソケット通知プッシュを実装する方法

Spring Boot 側
最初のステップは依存関係を導入することです
最初に、WebSocket に必要な依存関係と出力形式を処理するための依存関係を導入する必要があります
<!--格式转换-->
<!-- https://mvnrepository.com/artifact/com.alibaba/fastjson -->
<dependency>
   <groupId>com.alibaba</groupId>
   <artifactId>fastjson</artifactId>
   <version>1.2.73</version>
</dependency>
<!--WebSocket依赖-->
<dependency>
    <groupId>org.springframework.boot</groupId>
    <artifactId>spring-boot-starter-websocket</artifactId>
</dependency>2 番目のステップでは、WebSocket 構成クラスを作成します。
import org.springframework.context.annotation.Bean;
import org.springframework.context.annotation.Configuration;
import org.springframework.web.socket.server.standard.ServerEndpointExporter;

/**
 * @author: tjp
 * @create: 2023-04-03 09:58
 * @Description: WebSocket配置
 */
@Configuration
public class WebSocketConfig {
    @Bean
    public ServerEndpointExporter serverEndpointExporter() {
        return new ServerEndpointExporter();
    }

}3 番目のステップでは、WebSocket サービスを作成します。
このステップでは、システム内の対応するユーザーを区別するための識別子として userId を使用します。将来的には、これに基づいて他の操作を実行することもできます。
import com.alibaba.fastjson.JSON;
import com.alibaba.fastjson.JSONObject;
import com.alibaba.excel.util.StringUtils;
import lombok.extern.slf4j.Slf4j;
import org.springframework.stereotype.Component;

import javax.websocket.*;
import javax.websocket.server.PathParam;
import javax.websocket.server.ServerEndpoint;
import java.io.IOException;
import java.util.HashMap;
import java.util.Iterator;
import java.util.concurrent.ConcurrentHashMap;

/**
 * @author: tjp
 * @create: 2023-04-03 13:55
 * @Description: WebSocket服务
 */

@ServerEndpoint("/websocket/{userId}")
@Slf4j
@Component
public class WebSocketServer {
    /**
     * 静态变量,用来记录当前在线连接数。应该把它设计成线程安全的。
     */
    private static int onlineCount = 0;
    /**
     * concurrent包的线程安全Set,用来存放每个客户端对应的MyWebSocket对象。
     */
    private static ConcurrentHashMap<String, WebSocketServer> webSocketMap = new ConcurrentHashMap<>();
    /**
     * 与某个客户端的连接会话,需要通过它来给客户端发送数据
     */
    private Session session;
    /**
     * 接收userId
     */
    private String userId = "";

    /**
     * 连接建立成功调用的方法
     */
    @OnOpen
    public void onOpen(Session session, @PathParam("userId") String userId) {
        this.session = session;
        this.userId = userId;
        if (webSocketMap.containsKey(userId)) {
            webSocketMap.remove(userId);
            //加入set中
        } else {
            webSocketMap.put(userId, this);
            //加入set中
            addOnlineCount();
            //在线数加1
        }

        log.info("用户连接:" + userId + ",当前在线人数为:" + getOnlineCount());

        try {
            HashMap<Object, Object> map = new HashMap<>();
            map.put("key", "连接成功");
            sendMessage(JSON.toJSONString(map));
        } catch (IOException e) {
            log.error("用户:" + userId + ",网络异常!!!!!!");
        }
    }


    /**
     * 连接关闭调用的方法
     */
    @OnClose
    public void onClose() {
        if (webSocketMap.containsKey(userId)) {
            webSocketMap.remove(userId);
            //从set中删除
            subOnlineCount();
        }
        log.info("用户退出:" + userId + ",当前在线人数为:" + getOnlineCount());
    }

    /**
     * 收到客户端消息后调用的方法
     *
     * @param message 客户端发送过来的消息
     */
    @OnMessage
    public void onMessage(String message, Session session) {
        log.info("用户消息:" + userId + ",报文:" + message);
        //可以群发消息
        //消息保存到数据库、redis
        if (StringUtils.isNotBlank(message)) {
            try {
                //解析发送的报文
                JSONObject jsonObject = JSONObject.parseObject(message);
                //追加发送人(防止串改)
                jsonObject.put("fromUserId", this.userId);
                String fromUserId = jsonObject.getString("fromUserId");
                //传送给对应toUserId用户的websocket
                if (StringUtils.isNotBlank(fromUserId) && webSocketMap.containsKey(fromUserId)) {
                    webSocketMap.get(fromUserId).sendMessage(jsonObject.toJSONString());
                    //自定义-业务处理

//                    DeviceLocalThread.paramData.put(jsonObject.getString("group"),jsonObject.toJSONString());
                } else {
                    log.error("请求的userId:" + fromUserId + "不在该服务器上");
                    //否则不在这个服务器上,发送到mysql或者redis
                }
            } catch (Exception e) {
                e.printStackTrace();
            }
        }
    }

    /**
     * 发生错误时候
     *
     * @param session
     * @param error
     */
    @OnError
    public void onError(Session session, Throwable error) {
        log.error("用户错误:" + this.userId + ",原因:" + error.getMessage());
        error.printStackTrace();
    }

    /**
     * 实现服务器主动推送
     */
    public void sendMessage(String message) throws IOException {
        //加入线程锁
        synchronized (session) {
            try {
                //同步发送信息
                this.session.getBasicRemote().sendText(message);
            } catch (IOException e) {
                log.error("服务器推送失败:" + e.getMessage());
            }
        }
    }


    /**
     * 发送自定义消息
     * */
    /**
     * 发送自定义消息
     *
     * @param message  发送的信息
     * @param toUserId 如果为null默认发送所有
     * @throws IOException
     */
    public static void sendInfo(String message, String toUserId) throws IOException {
        //如果userId为空,向所有群体发送
        if (StringUtils.isEmpty(toUserId)) {
            //向所有用户发送信息
            Iterator<String> itera = webSocketMap.keySet().iterator();
            while (itera.hasNext()) {
                String keys = itera.next();
                WebSocketServer item = webSocketMap.get(keys);
                item.sendMessage(message);
            }
        }
        //如果不为空,则发送指定用户信息
        else if (webSocketMap.containsKey(toUserId)) {
            WebSocketServer item = webSocketMap.get(toUserId);
            item.sendMessage(message);
        } else {
            log.error("请求的userId:" + toUserId + "不在该服务器上");
        }
    }

    public static synchronized int getOnlineCount() {
        return onlineCount;
    }

    public static synchronized void addOnlineCount() {
        WebSocketServer.onlineCount++;
    }

    public static synchronized void subOnlineCount() {
        WebSocketServer.onlineCount--;
    }

    public static synchronized ConcurrentHashMap<String, WebSocketServer> getWebSocketMap() {
        return WebSocketServer.webSocketMap;
    }

}4 番目のステップは、テストを送信するためのコントローラーを作成することです
現在のオンライン人数を取得します
import com.......WebSocketServer;

@ApiOperation(value = "获取当前在线人数")
@GetMapping("/getOnlineCount")
public Integer getOnlineCount() {
    return WebSocketServer.getOnlineCount();
}インターフェイスを通じてフロントエンド ユーザーにメッセージをプッシュします
import com.......WebSocketServer;
import org.springframework.web.bind.annotation.GetMapping;
import org.springframework.web.bind.annotation.RequestMapping;
import org.springframework.web.bind.annotation.RestController;

import java.io.IOException;

/**
 * @author: tjp
 * @create: 2023-04-03 13:57
 * @Description: 测试
 */
@RestController
@RequestMapping("/news")
public class NewsController {
    @GetMapping("/send")
    public String send() {
        try {
            WebSocketServer.sendInfo("这是websocket发送过来的消息!", "需要推送的用户的编号");
        } catch (IOException e) {
            throw new RuntimeException(e);
        }
        return "发送消息成功";
    }

}Vue 側
最初のステップは、接続ツール クラスを作成することです
ツール クラス websocket.js を作成します。ここでの userId は、識別子として使用される userId です。
/**
 * @author: tjp
 * @create: 2023-04-03 11:22
 * @Description: Socket客户端
 */
export class WebSocketClient {
  constructor(userId) {
    this.userId = userId;
    this.websocket = null;
    this.timeout = 10000; // 心跳超时时间,单位ms
    this.timeoutObj = null; // 心跳定时器
    this.serverTimeoutObj = null; // 服务器超时定时器
    this.lockReconnect = false; // 避免重复连接
    this.timeoutnum = null; // 重连延迟定时器
  }

  // 初始化WebSocket连接
  initWebSocket() {
    let wsUrl = `ws://127.0.0.1:8080/websocket/${this.userId}`;
    this.websocket = new WebSocket(wsUrl);
    this.websocket.onopen = this.websocketonopen.bind(this);
    this.websocket.onerror = this.websocketonerror.bind(this);
    this.websocket.onmessage = this.setOnmessageMessage.bind(this);
    this.websocket.onclose = this.websocketclose.bind(this);
    // 监听窗口关闭事件,当窗口关闭时,主动去关闭websocket连接,防止连接还没断开就关闭窗口,server端会抛异常。
    window.onbeforeunload = this.websocketclose.bind(this);
  }

  // 启动心跳
  start() {
    console.log('start');
    // 清除延时器
    this.timeoutObj && clearTimeout(this.timeoutObj);
    this.serverTimeoutObj && clearTimeout(this.serverTimeoutObj);
    /*// 向服务器发送心跳消息
    let actions = { "test": "12345" };
    this.websocket && this.websocket.readyState == 1 && this.websocket.send(JSON.stringify(actions));
    // 启动心跳定时器
    this.timeoutObj = setTimeout(() => {
      this.start();
      // 定义一个延时器等待服务器响应,若超时,则关闭连接,重新请求server建立socket连接
      this.serverTimeoutObj = setTimeout(() => {
        this.websocket.close();
      }, this.timeout)
    }, this.timeout)*/
  }

  // 重置心跳
  reset() {
    // 清除时间
    clearTimeout(this.timeoutObj);
    clearTimeout(this.serverTimeoutObj);
    // 重启心跳
    this.start();
  }

  // 重新连接
  reconnect() {
    if (this.lockReconnect) return;
    this.lockReconnect = true;
    // 没连接上会一直重连,设置延迟避免请求过多
    this.timeoutnum && clearTimeout(this.timeoutnum);
    this.timeoutnum = setTimeout(() => {
      this.initWebSocket();
      this.lockReconnect = false;
    }, 5000)
  }

  // 处理收到的消息
  async setOnmessageMessage(event) {
    console.log(event.data, '获得消息');
    // 重置心跳
    // this.reset();
    // 自定义全局监听事件
    window.dispatchEvent(new CustomEvent('onmessageWS', {
      detail: {
        data: event.data
      }
    }))
    // //发现消息进入    开始处理前端触发逻辑
    // if (event.data === 'success' || event.data === 'heartBath') return
  }

  // WebSocket连接成功回调
  websocketonopen() {
    // 开启心跳
    this.start();
    console.log("WebSocket连接成功!!!" + new Date() + "----" + this.websocket.readyState);
    clearInterval(this.otimer);//停止
  }

  // WebSocket连接错误回调
  websocketonerror(e) {
    console.log("WebSocket连接发生错误" + e);
  }

  // WebSocket连接关闭回调
  websocketclose(e) {
    this.websocket.close();
    clearTimeout(this.timeoutObj);
    clearTimeout(this.serverTimeoutObj);
    console.log("websocketcloe关闭连接")
  }

  // 关闭WebSocket连接
  closeWebSocket() {
    this.websocket.close();
    console.log("closeWebSocket关闭连接")
  }

  // 监听窗口关闭事件
  onbeforeunload() {
    this.closeWebSocket();
  }
}2 番目のステップは、接続を作成することです
#接続を確立したいページでソケット接続を確立します#たとえば、ユーザーがログイン ボタンをクリックした後
ここでプロトタイプを使用して接続オブジェクトを作成し、接続を開始できます
<script>
import Vue from "vue";
import {WebSocketClient} from "@/utils/websocket";
......
......
methods:{
handleLogin() {
this.$refs.loginForm.validate(valid => {
if (valid) {
this.loading = true
this.$store.dispatch('user/login', this.loginForm).then(() => {
this.$router.push({path: this.redirect || '/'})
this.loading = false
/*-----------在此处放入原型中------------*/
Vue.prototype.$WebSocketClientInstance = new WebSocketClient('t');
Vue.prototype.$WebSocketClientInstance.initWebSocket()
/*-----------------end------------*/
}).catch(() => {
this.loading = false
})
} else {
this.$message({message: '请填写正确格式的用户名或密码', type: 'error'})
return false
}
})
}
}
.....
.....
</script>#3 番目のステップは、サーバーによって送信されたメッセージをリッスンすることです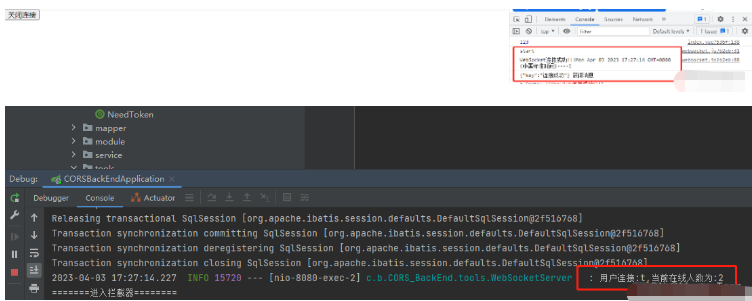
<script>
....
....
mounted() {
// 添加socket通知监听
window.addEventListener('onmessageWS', this.getSocketData)
},
methods: {
// 收到消息处理
getSocketData(res) {
console.log(res.detail)
console.log("llll")
},
}
....
....
</script>ログイン後にコピー
現時点では、バックエンド インターフェイス経由で送信できます テストを実行します<script>
....
....
mounted() {
// 添加socket通知监听
window.addEventListener('onmessageWS', this.getSocketData)
},
methods: {
// 收到消息处理
getSocketData(res) {
console.log(res.detail)
console.log("llll")
},
}
....
....
</script>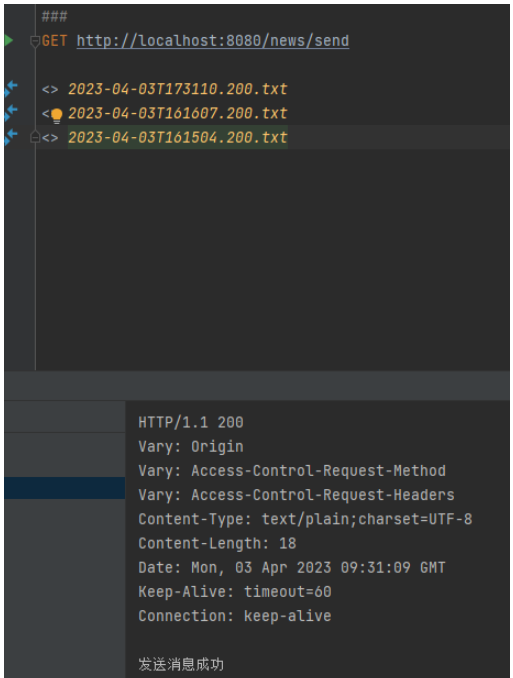
4 つのステップ、接続を閉じる 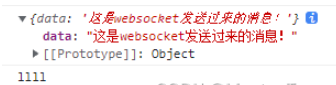
<template>
  <div>
    <button @click="closeConnect">关闭连接</button>
  </div>
</template>

<script>
import {WebSocketClient} from "@/utils/websocket";
import Vue from "vue";

export default {
  methods: {
    closeConnect() {
      console.dir(Vue.prototype)
      Vue.prototype.$WebSocketClientInstance.closeWebSocket();
    },
  }
}
</script>
ログイン後にコピー
<template>
<div>
<button @click="closeConnect">关闭连接</button>
</div>
</template>
<script>
import {WebSocketClient} from "@/utils/websocket";
import Vue from "vue";
export default {
methods: {
closeConnect() {
console.dir(Vue.prototype)
Vue.prototype.$WebSocketClientInstance.closeWebSocket();
},
}
}
</script>以上がSpring Boot + Vue を使用してソケット通知プッシュを実装する方法の詳細内容です。詳細については、PHP 中国語 Web サイトの他の関連記事を参照してください。

ホットAIツール

Undresser.AI Undress
リアルなヌード写真を作成する AI 搭載アプリ

AI Clothes Remover
写真から衣服を削除するオンライン AI ツール。

Undress AI Tool
脱衣画像を無料で

Clothoff.io
AI衣類リムーバー

AI Hentai Generator
AIヘンタイを無料で生成します。

人気の記事
ホットツール

メモ帳++7.3.1
使いやすく無料のコードエディター

SublimeText3 中国語版
中国語版、とても使いやすい

ゼンドスタジオ 13.0.1
強力な PHP 統合開発環境

ドリームウィーバー CS6
ビジュアル Web 開発ツール

SublimeText3 Mac版
神レベルのコード編集ソフト(SublimeText3)
ホットトピック
 7486
7486
 15
1377
52
77
11
19
38
15
1377
52
77
11
19
38

 vue.jsでJSファイルを参照する方法
Apr 07, 2025 pm 11:27 PM
vue.jsでJSファイルを参照する方法
Apr 07, 2025 pm 11:27 PM
vue.jsでJSファイルを参照するには3つの方法があります。タグ;; mounted()ライフサイクルフックを使用した動的インポート。 Vuex State Management Libraryを介してインポートします。
 VueでWatchの使用方法
Apr 07, 2025 pm 11:36 PM
VueでWatchの使用方法
Apr 07, 2025 pm 11:36 PM
Vue.jsの監視オプションにより、開発者は特定のデータの変更をリッスンできます。データが変更されたら、Watchはコールバック関数をトリガーして更新ビューまたはその他のタスクを実行します。その構成オプションには、すぐにコールバックを実行するかどうかを指定する即時と、オブジェクトまたは配列の変更を再帰的に聴くかどうかを指定するDEEPが含まれます。
 VUEのボタンに関数を追加する方法
Apr 08, 2025 am 08:51 AM
VUEのボタンに関数を追加する方法
Apr 08, 2025 am 08:51 AM
HTMLテンプレートのボタンをメソッドにバインドすることにより、VUEボタンに関数を追加できます。 VUEインスタンスでメソッドを定義し、関数ロジックを書き込みます。
 VueでBootstrapの使用方法
Apr 07, 2025 pm 11:33 PM
VueでBootstrapの使用方法
Apr 07, 2025 pm 11:33 PM
vue.jsでBootstrapを使用すると、5つのステップに分かれています。ブートストラップをインストールします。 main.jsにブートストラップをインポートしますブートストラップコンポーネントをテンプレートで直接使用します。オプション:カスタムスタイル。オプション:プラグインを使用します。
 Vueによる前のページに戻る方法
Apr 07, 2025 pm 11:30 PM
Vueによる前のページに戻る方法
Apr 07, 2025 pm 11:30 PM
vue.jsには、前のページに戻る4つの方法があります。$ router.go(-1)$ router.back()outes&lt; router-link to =&quot;/&quot; Component Window.history.back()、およびメソッド選択はシーンに依存します。
 Vueはマーキー/テキストスクロール効果を実現します
Apr 07, 2025 pm 10:51 PM
Vueはマーキー/テキストスクロール効果を実現します
Apr 07, 2025 pm 10:51 PM
CSSアニメーションまたはサードパーティライブラリを使用して、VUEでマーキー/テキストスクロール効果を実装します。この記事では、CSSアニメーションの使用方法を紹介します。スクロールテキストを作成し、テキストを&lt; div&gt;をラップします。 CSSアニメーションを定義し、オーバーフローを設定します:非表示、幅、アニメーション。キーフレームを定義し、アニメーションの開始と終了時にtranslatex()を設定します。期間、スクロール速度、方向などのアニメーションプロパティを調整します。
 怠zyなロードVUEとはどういう意味ですか?
Apr 07, 2025 pm 11:54 PM
怠zyなロードVUEとはどういう意味ですか?
Apr 07, 2025 pm 11:54 PM
Vue.jsでは、Lazy Loadingを使用すると、コンポーネントまたはリソースを必要に応じて動的にロードすることができ、初期ページの読み込み時間を短縮し、パフォーマンスを改善できます。特定の実装方法には、&lt; Keep-Alive&gt;および&lt;コンポーネントは&gt;コンポーネント。怠zyなロードは、FOUC(スプラッシュ画面)の問題を引き起こす可能性があり、不必要なパフォーマンスのオーバーヘッドを避けるために怠zyなロードが必要なコンポーネントにのみ使用する必要があることに注意してください。
 Vueのバージョンを照会する方法
Apr 07, 2025 pm 11:24 PM
Vueのバージョンを照会する方法
Apr 07, 2025 pm 11:24 PM
Vue Devtoolsを使用してブラウザのコンソールでVueタブを表示することにより、Vueバージョンを照会できます。 NPMを使用して、「NPM List -G Vue」コマンドを実行します。 package.jsonファイルの「依存関係」オブジェクトでVueアイテムを見つけます。 Vue CLIプロジェクトの場合、「Vue -Version」コマンドを実行します。 &lt; script&gt;でバージョン情報を確認してくださいVueファイルを参照するHTMLファイルにタグを付けます。
