MySQL のインストール中の一般的なエラーに対処する方法

1. 処理を開始できません、エラー 1053
Windows は Mysql サービスを開始できません エラー 1053: サービスは開始要求または制御要求に適時に応答しませんでした方法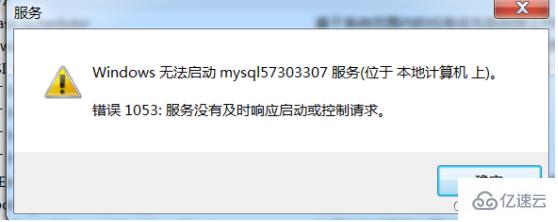
1.1 プロセスを終了します
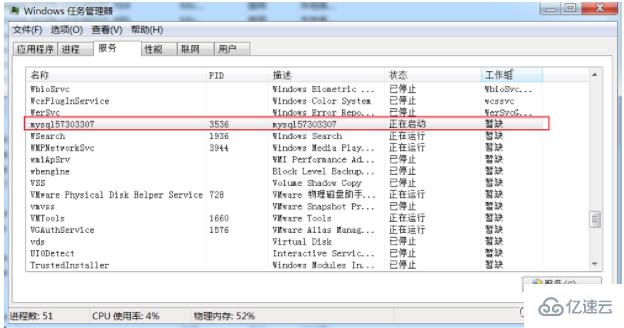
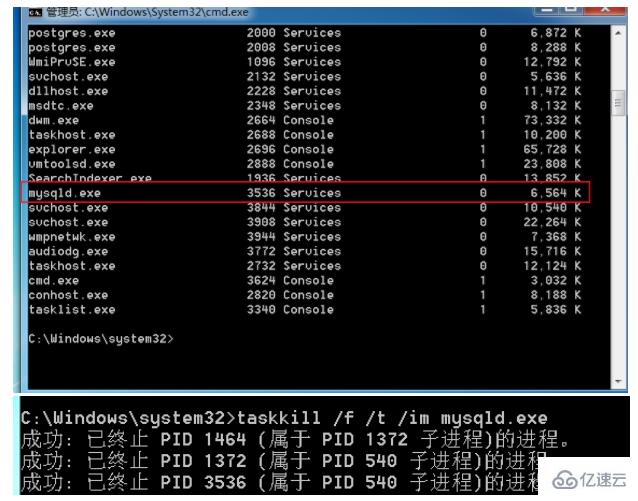
##処理方法:1. コマンドラインに tasklist と入力してプロセスを表示します
2. Killプロセス名によるプロセス
taskkill /f /t /im プロセス名
Server2012 の場所
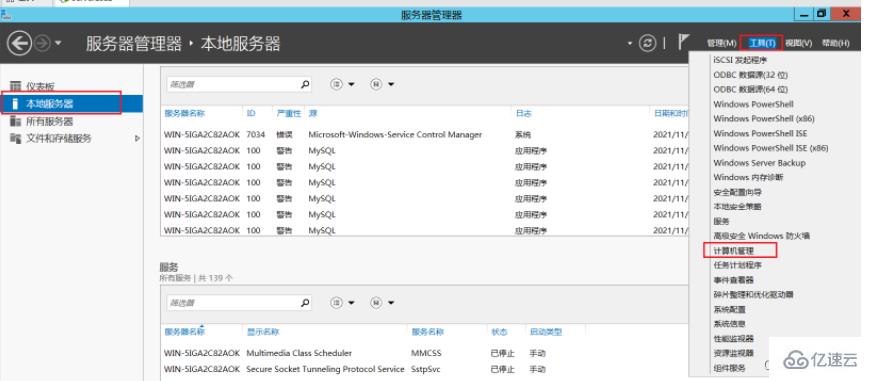 その他の win7 および win10 オペレーティング システム
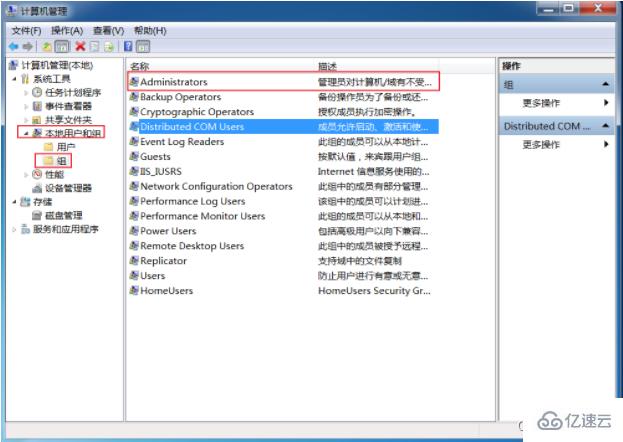 (2) [Administrators] をダブルクリックし、[追加] をクリックして、[詳細設定] をクリックします。
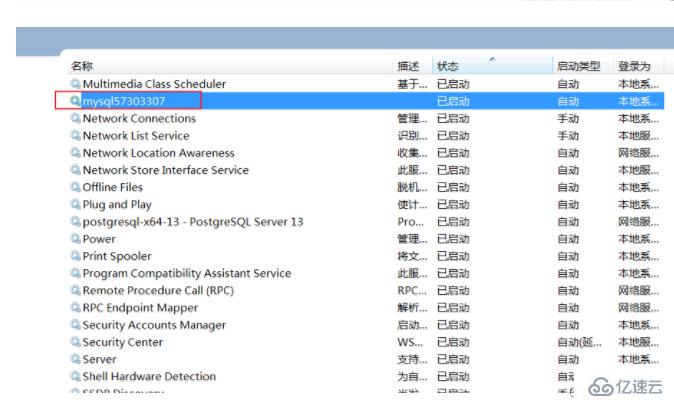
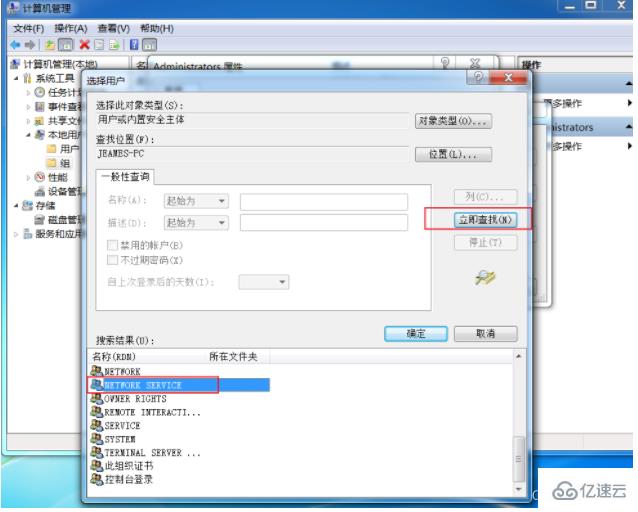 ##1.3 サービスの削除
sc delete mysql57303307

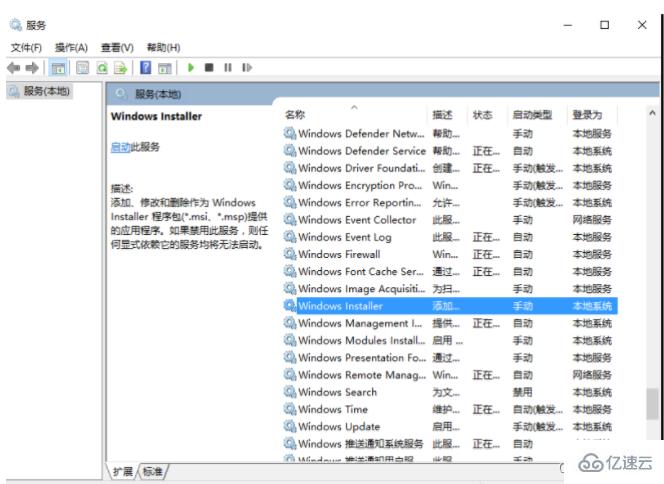
もう 1 つの落とし穴は、それでも開始できない場合は、忘れずに Windows インストーラー サービスをオンにしてください。Windows インストーラーはソフトウェアをインストールするために使用される一般的なソフトウェア配布方法。
デフォルトでは、サービスは手動で開始され、サービス管理で開く必要があります。
[スタート] を右クリック - [ファイル名を指定して実行] - 「services.msc」と入力 - Windows インストーラー - [開始]
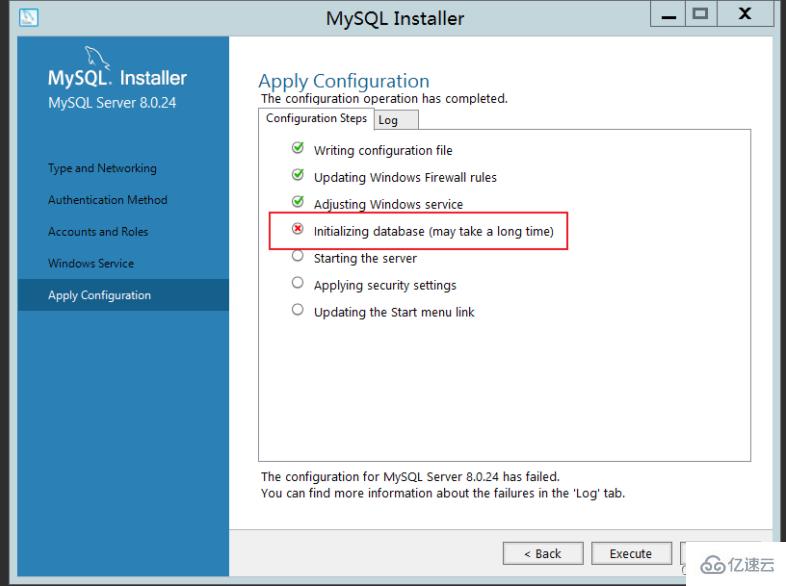
Beginning configuration step: Writing configuration fileSaving my.ini configuration file...
Saved my.ini configuration file.
Ended configuration step: Writing configuration fileBeginning configuration step: Updating Windows Firewall rules

Adding a Windows Firewall rule for MySQL80 on port 3306.
Attempting to add a Windows Firewall rule with command: netsh.exe advfirewall firewall add rule name="Port 3306" protocol=TCP localport=3306 dir=in action=allow
确定。

Successfully added the Windows Firewall rule.
Adding a Windows Firewall rule for MySQL80 on port 33060.
Attempting to add a Windows Firewall rule with command: netsh.exe advfirewall firewall add rule name="Port 33060" protocol=TCP localport=33060 dir=in action=allow
确定。

Successfully added the Windows Firewall rule.
Ended configuration step: Updating Windows Firewall rules

Beginning configuration step: Adjusting Windows serviceAttempting to grant Network Service require filesystem permissions.
Granted permissions.
Adding new serviceNew service added
Ended configuration step: Adjusting Windows serviceBeginning configuration step: Initializing database (may take a long time)Attempting to run MySQL Server with --initialize-insecure option...
Starting process for MySQL Server 8.0.24...
Starting process with command: C:\Program Files\MySQL\MySQL Server 8.0\bin\mysqld.exe --defaults-file="C:\ProgramData\MySQL\MySQL Server 8.0\my.ini" --console --initialize-insecure=on --lower-case-table-names=1...
Process for mysqld, with ID 2572, was run successfully and exited with code -1073741515.
Failed to start process for MySQL Server 8.0.24.
Database initialization failed.
Ended configuration step: Initializing database (may take a long time)
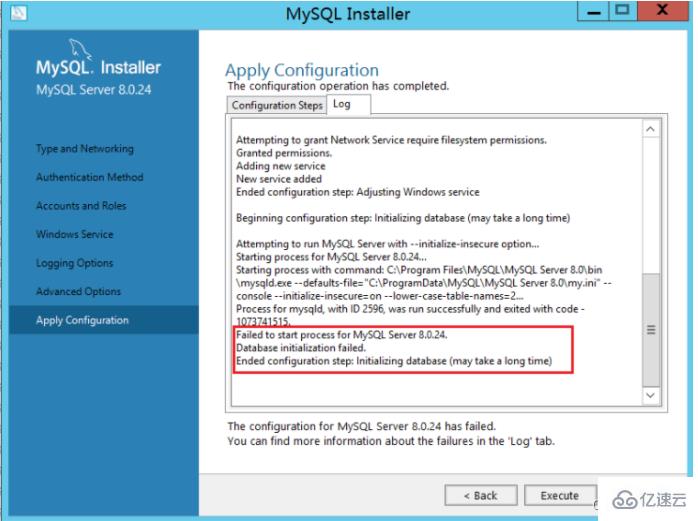 VC_redist.x86 をインストールして OK
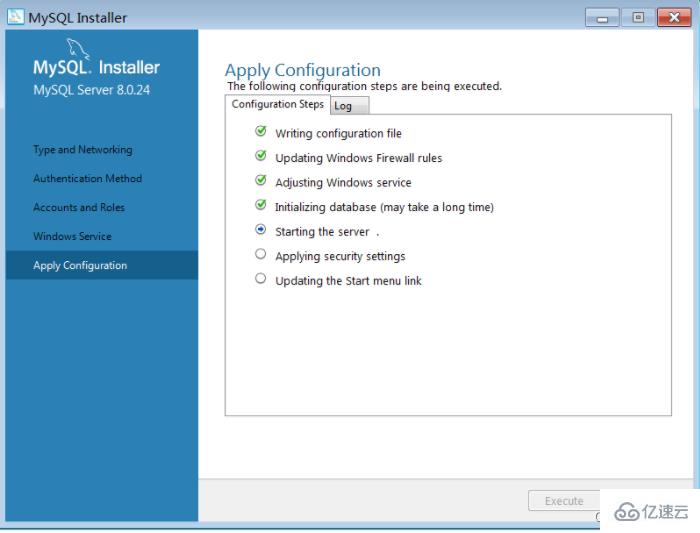 gpedit.msc と入力し、ポリシー管理を開きます
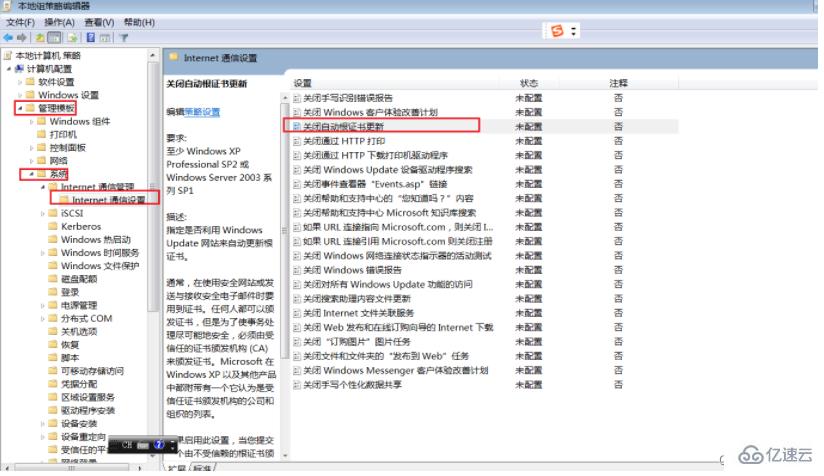 証明書の更新を有効にすると正常に動作します
Centos7 がデフォルトで提供する openssl のバージョンは 1.0.2 です。一部の php 拡張機能やその他のソフトウェアはバージョン 1.1 以降に依存します。値が低い場合は、エラーが報告されますlibssl.so.1.1: 共有オブジェクト ファイルを開けません: そのようなファイルまたはディレクトリはありません
openssl バージョンを実行すると、上記と一致するエラーもあります。 openssl ライブラリの場所が間違っているか、インストールされていないためです。バージョン 1.1 以降の問題
openssl バージョンをアップグレードしたい場合は、手動でコンパイルする必要があります。エラーの解決策は非常に簡単で、正しくインストールするだけです。
Centos7 を例として、具体的なコンパイルとインストールの手順について説明します
–openssl バージョンの確認[root@jeames ~]# openssl バージョン
OpenSSL 1.0 .1e-fips 2013 年 2 月 11 日
–openssl
tar のコンパイル - xvf openssl-1.1.1g.tar.gz
cd openssl-1.1.1g
./config 共有 --openssldir=/usr /local/openssl --prefix=/usr/local/openssl
make && make install

–設定
コンパイルが完了したら、openssl バージョンを使用して現在の openssl バージョン番号を確認します。
まだ 1.0.2 であることがわかり、追加の設定作業が必要です。ここで完了しました。
[root@jeames openssl-1.1.1g]# more /etc/ld.so.conf
include ld.so.conf.d/*.conf
[root@jeames openssl-1.1.1g] ]# echo “/usr/local/lib64/” >> /etc/ld.so.conf
[root@jeames openssl-1.1.1g]# ldconfig
openssl バージョンを再度使用してバージョンを確認します,
うまくいかない場合は、次の方法を試してください。
順番に実行します (最初に古いバージョンをバックアップし、次に新しいバージョンのインストール場所からソフト接続を作成します)
mv /usr/bin/openssl /usr/bin/openssl .old
ln -s /usr/local/openssl/bin/openssl /usr/bin/openssl
ln -s /usr/local/openssl/ include/openssl /usr/include/openssl
echo "/usr/local/openssl/lib" >> /etc/ld.so.conf
ldconfig -v
4. MySQL8 のインストール後にログインできない
最初の方法:
1. コマンドを使用して /etc/my.cnf 構成ファイルを編集します。つまり、vim / etc/my.cnf または vi /etc/my.cnf
2. 「[mysqld] の下に Skip-grant-tables を追加します」で、保存して終了します。
3. mysql サービスを再起動します。service mysqld restart
4. root ユーザー名を変更します
再起動後、mysql コマンドを実行して mysql コマンド ラインに入ります
5. root ユーザーのパスワードを変更します。変更が許可されていないと報告される場合があることに注意してください。権限をフラッシュするだけです。
update mysql.user setauthentication_string=password('root') where user='root' ; --5.7 version
flash権限;
6. Skip-grant-をコメントアウトします。 /etc/my.cnf 内のテーブルを削除し、mysql を再起動します。つまり、service mysqld restart
さて、これが問題です。新しい root パスワードを使用してログインできます。
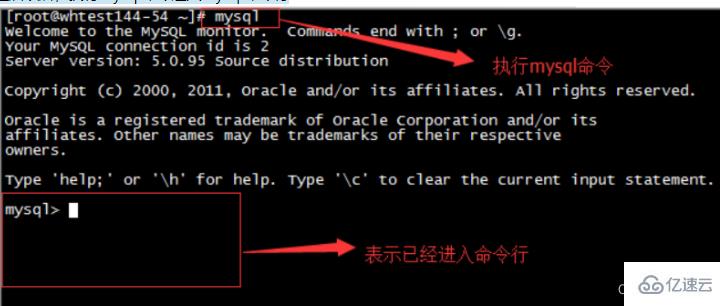
2 番目の方法:
mysql8 システムでは、次の方法が適用されます (フルパス)
G:\mysql-8.0 .23-winx64\bin\mysqld --datadir=G:\mysql-8.0.23-winx64\data80323308 --console --skip-grant-tables --shared-memory

#次に、別のウィンドウを開いて次のコマンドを実行しますcd G:\mysql-8.0.23-winx64\bin
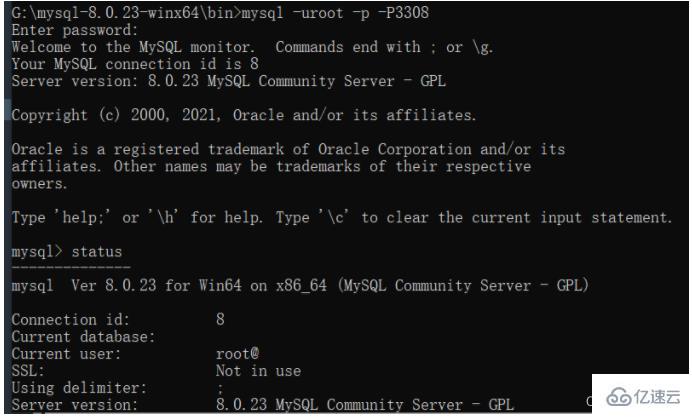
mysql> select user,host,authentication_string from mysql.user;mysql> delete from mysql.user where user='root' ;
mysql> 権限をフラッシュ; --必ず更新してください。プロンプトを作成できない場合は、
mysql> ユーザー root@'%' を作成し、'root' によって mysql_native_password で識別されます;
mysql>
. のすべてを root@'%' に付与オプションで付与します; mysql> フラッシュ権限;
mysql> ユーザー 'root'@'localhost' を削除;
mysql> フラッシュ権限;
mysql> ユーザー root@'localhost' を作成し、'root によって mysql_native_password で識別されました';
mysql>
. のすべてを root@'localhost' に付与オプションで付与します; mysql> フラッシュ権限;
以上がMySQL のインストール中の一般的なエラーに対処する方法の詳細内容です。詳細については、PHP 中国語 Web サイトの他の関連記事を参照してください。

ホットAIツール

Undresser.AI Undress
リアルなヌード写真を作成する AI 搭載アプリ

AI Clothes Remover
写真から衣服を削除するオンライン AI ツール。

Undress AI Tool
脱衣画像を無料で

Clothoff.io
AI衣類リムーバー

AI Hentai Generator
AIヘンタイを無料で生成します。

人気の記事

ホットツール

メモ帳++7.3.1
使いやすく無料のコードエディター

SublimeText3 中国語版
中国語版、とても使いやすい

ゼンドスタジオ 13.0.1
強力な PHP 統合開発環境

ドリームウィーバー CS6
ビジュアル Web 開発ツール

SublimeText3 Mac版
神レベルのコード編集ソフト(SublimeText3)

ホットトピック
 7333
7333
 9
9
 1627
1627
 14
14
 1351
1351
 46
46
 1262
1262
 25
25
 1209
1209
 29
29
 PHPのビッグデータ構造処理スキル
May 08, 2024 am 10:24 AM
ビッグ データ構造の処理スキル: チャンキング: データ セットを分割してチャンクに処理し、メモリ消費を削減します。ジェネレーター: データ セット全体をロードせずにデータ項目を 1 つずつ生成します。無制限のデータ セットに適しています。ストリーミング: ファイルやクエリ結果を 1 行ずつ読み取ります。大きなファイルやリモート データに適しています。外部ストレージ: 非常に大規模なデータ セットの場合は、データをデータベースまたは NoSQL に保存します。
 PHP で MySQL クエリのパフォーマンスを最適化するにはどうすればよいですか?
Jun 03, 2024 pm 08:11 PM
MySQL クエリのパフォーマンスは、検索時間を線形の複雑さから対数の複雑さまで短縮するインデックスを構築することで最適化できます。 PreparedStatement を使用して SQL インジェクションを防止し、クエリのパフォーマンスを向上させます。クエリ結果を制限し、サーバーによって処理されるデータ量を削減します。適切な結合タイプの使用、インデックスの作成、サブクエリの使用の検討など、結合クエリを最適化します。クエリを分析してボトルネックを特定し、キャッシュを使用してデータベースの負荷を軽減し、オーバーヘッドを最小限に抑えます。
 PHP で MySQL のバックアップと復元を使用するにはどうすればよいですか?
Jun 03, 2024 pm 12:19 PM
PHP で MySQL データベースをバックアップおよび復元するには、次の手順を実行します。 データベースをバックアップします。 mysqldump コマンドを使用して、データベースを SQL ファイルにダンプします。データベースの復元: mysql コマンドを使用して、SQL ファイルからデータベースを復元します。
 PHP を使用して MySQL テーブルにデータを挿入するにはどうすればよいですか?
Jun 02, 2024 pm 02:26 PM
MySQLテーブルにデータを挿入するにはどうすればよいですか?データベースに接続する: mysqli を使用してデータベースへの接続を確立します。 SQL クエリを準備します。挿入する列と値を指定する INSERT ステートメントを作成します。クエリの実行: query() メソッドを使用して挿入クエリを実行します。成功すると、確認メッセージが出力されます。
 MySQL 8.4 で mysql_native_password がロードされていないエラーを修正する方法
Dec 09, 2024 am 11:42 AM
MySQL 8.4 (2024 年時点の最新の LTS リリース) で導入された主な変更の 1 つは、「MySQL Native Password」プラグインがデフォルトで有効ではなくなったことです。さらに、MySQL 9.0 ではこのプラグインが完全に削除されています。 この変更は PHP および他のアプリに影響します
 PHP で MySQL ストアド プロシージャを使用するにはどうすればよいですか?
Jun 02, 2024 pm 02:13 PM
PHP で MySQL ストアド プロシージャを使用するには: PDO または MySQLi 拡張機能を使用して、MySQL データベースに接続します。ストアド プロシージャを呼び出すステートメントを準備します。ストアド プロシージャを実行します。結果セットを処理します (ストアド プロシージャが結果を返す場合)。データベース接続を閉じます。
 PHP を使用して MySQL テーブルを作成するにはどうすればよいですか?
Jun 04, 2024 pm 01:57 PM
PHP を使用して MySQL テーブルを作成するには、次の手順が必要です。 データベースに接続します。データベースが存在しない場合は作成します。データベースを選択します。テーブルを作成します。クエリを実行します。接続を閉じます。
 Oracleデータベースとmysqlの違い
May 10, 2024 am 01:54 AM
Oracle データベースと MySQL はどちらもリレーショナル モデルに基づいたデータベースですが、Oracle は互換性、スケーラビリティ、データ型、セキュリティの点で優れており、MySQL は速度と柔軟性に重点を置いており、小規模から中規模のデータ セットに適しています。 ① Oracle は幅広いデータ型を提供し、② 高度なセキュリティ機能を提供し、③ エンタープライズレベルのアプリケーションに適しています。① MySQL は NoSQL データ型をサポートし、② セキュリティ対策が少なく、③ 小規模から中規模のアプリケーションに適しています。


