
tar xzvf redis-4.0.8.tar.gz
vim /usr/local/redis/etc/redis.conf
vim /etc/rc.d/rc.local
/usr/local/redis/bin/redis-server /usr/local/redis/etc/redis.conf
redis-cli

fastdfs サービスとスタンドアロン redis サービスを構築する方法

fastdfs サービスの確立
最初に gcc コンパイラをインストールする必要があります:
yum -y install gcc-c++

lib 依存関係パッケージをインストールします
tar -zxvf V1.0.43.tar.gz
cd libfastcommon-1.0.43
./make.sh
./make.sh install
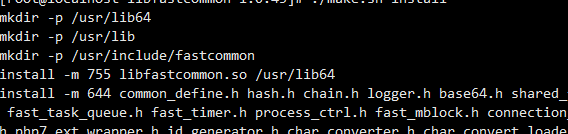
ln -s /usr/lib64/libfastcommon.so /usr/local/lib/libfastcommon.so
ln -s /usr/lib64/libfastcommon.so /usr/lib/libfastcommon.so
ln -s /usr/lib64/libfdfsclient.so /usr/local/lib/libfdfsclient.so
ln -s /usr/lib64/libfdfsclient.so /usr/lib/libfdfsclient.so
fastdfs サービスのインストール
tar -zxvf V6.06.tar.gz
cd fastdfs-6.06
./make.sh
./make.sh install
Tracker サービスの構成
mkdir -p /data/fastdfs/tracker
cd /etc/fdfs
cp tracker.conf.sample  tracker.conf
vim tracker.conf
変更する内容は
#启用配置文件(默认启用)
disabled=false
#设置tracker的端口号,通常采用22122这个默认端口
port=22122
#设置tracker的数据文件和日志目录
base_path=/data/fastdfs/tracker
#设置http端口号,默认为8080
http.server_port=80
サービスの開始
#启动
/usr/bin/fdfs_trackerd /etc/fdfs/tracker.conf start

起動されているか確認
#查看启动端口
ss -ant | grep 22122
起動ログを確認
#查看启动日志
tail -f /data/fastdfs/tracker/logs/trackerd.log

ブート スタートアップを追加
vim /etc/rc.d/rc.local
起動コマンドを追加

再起動後に自動的に起動しない場合は、コマンド
ll /etc/rc.d/rc.local
を使用して、rc.local に実行権限があるかどうかを確認してください, ; 実行権限がない場合は、コマンドを渡して承認します
chmod +x /etc/rc.d/rc.local
ストレージ サービスの構成
mkdir -p /data/fastdfs/storage
mkdir -p /data/fastdfs/storage/file
cd /etc/fdfs
cp storage.conf.sample  storage.conf
vim storage.conf
変更する内容は
#启用配置文件(默认启用)
disabled=false
#组名,根据实际情况修改
group_name=group1
#设置storage的端口号,默认是23000,同一个组的storage端口号必须一致
port=23000
#设置storage数据文件和日志目录
base_path=/data/fastdfs/storage
#存储路径个数,需要和store_path个数匹配
store_path_count=1
#实际文件存储路径
store_path0=/data/fastdfs/storage/file
#tracker 服务器的 IP地址和端口号,如果是单机搭建,IP不要写127.0.0.1,否则启动不成功(此处的ip是我的CentOS虚拟机ip)
tracker_server=172.16.6.50:22122
#设置 http 端口号
http.server_port=8888
サービスの開始
#启动
/usr/bin/fdfs_storaged /etc/fdfs/storage.conf start
起動ポートを表示します
#查看启动端口
ss -ant | grep 23000
起動ログを表示します
#查看启动日志
tail -f /data/fastdfs/storage/logs/storaged.log

[root@localhost /]# /usr/bin/fdfs_monitor /etc/fdfs/storage.conf
[2021-09-23 12:59:26] DEBUG - base_path=/opt/fastdfs_storage, connect_timeout=30, network_timeout=60, tracker_server_count=1, anti_steal_token=0, anti_steal_secret_key length=0, use_connection_pool=0, g_connection_pool_max_idle_time=3600s, use_storage_id=0, storage server id count: 0

server_count=1, server_index=0

tracker server is 172.16.8.11:22122

group count: 1

Group 1:
group name = group1
disk total space = 6818 MB
disk free space = 2169 MB
trunk free space = 0 MB
……
vim /etc/rc.d/rc.local
/usr/bin/fdfs_storaged /etc/fdfs/storage.conf start
[root@localhost ~]# ps -ef|grep fdfs
root     10335 17685  0 23:50 pts/3    00:00:00 grep --color=auto fdfs
root     13335     1  0 13:17 ?        00:00:07 /usr/bin/fdfs_storaged /etc/fdfs/storage.conf start
root     15779     1  0 12:59 ?        00:00:04 /usr/bin/fdfs_trackerd /etc/fdfs/tracker.conf
ログイン後にコピー
fdfsクライアントでテスト[root@localhost ~]# ps -ef|grep fdfs root 10335 17685 0 23:50 pts/3 00:00:00 grep --color=auto fdfs root 13335 1 0 13:17 ? 00:00:07 /usr/bin/fdfs_storaged /etc/fdfs/storage.conf start root 15779 1 0 12:59 ? 00:00:04 /usr/bin/fdfs_trackerd /etc/fdfs/tracker.conf
cp /etc/fdfs/client.conf.sample /etc/fdfs/client.conf
vim /etc/fdfs/client.conf
#tracker服务器文件路径
base_path=/data/fastdfs/tracker
#tracker服务器IP地址和端口号
tracker_server=172.16.7.50:22122
# tracker 服务器的 http 端口号,必须和tracker的设置对应起来
http.tracker_server_port=80
/usr/bin/fdfs_upload_file /etc/fdfs/client.conf /data/test.txt
tar xzvf redis-4.0.8.tar.gz
ログイン後にコピー
2. インストールtar xzvf redis-4.0.8.tar.gz
cd redis-4.0.8
make
cd src
make install PREFIX=/usr/local/redis
ログイン後にコピー
3. 構成ファイルをインストール ディレクトリに移動します cd redis-4.0.8 make cd src make install PREFIX=/usr/local/redis
cd ../
mkdir /usr/local/redis/etc
mv redis.conf /usr/local/redis/etc
ログイン後にコピー
4. バックグラウンドで起動するように redis を構成します cd ../ mkdir /usr/local/redis/etc mv redis.conf /usr/local/redis/etc
vim /usr/local/redis/etc/redis.conf
ログイン後にコピー
注記 , daemonize no を daemonize yes に変更, し、コメントバインド 127.0.0.1 を削除,リモートでアクセスできます5. ブートに redis を追加しますvim /usr/local/redis/etc/redis.conf
vim /etc/rc.d/rc.local
ログイン後にコピーログイン後にコピーログイン後にコピー
Add content inside:vim /etc/rc.d/rc.local
/usr/local/redis/bin/redis-server /usr/local/redis/etc/redis.conf
/usr/local/redis/bin/redis-server /usr/local/redis/etc/redis.conf
ログイン後にコピーログイン後にコピー
7. redis をコピーします-cli と redis-server を bin, に設定して、redis-cli コマンドが任意のディレクトリで /usr/local/redis/bin/redis-server /usr/local/redis/etc/redis.conf
cp /usr/local/redis/bin/redis-server /usr/local/bin/
cp /usr/local/redis/bin/redis-cli /usr/local/bin/
ログイン後にコピー
を直接使用できるようにします 8. Redis パスワードを設定します a. コマンドを実行します: ;cp /usr/local/redis/bin/redis-server /usr/local/bin/ cp /usr/local/redis/bin/redis-cli /usr/local/bin/
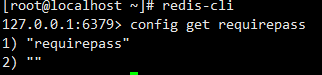
redis-cli
ログイン後にコピー
b. 既存の Redis パスワードを表示します (オプションの操作,オプション)コマンドの実行:redis-cli
config get requirepass
config set requirepass *******
//****为你设置的密码
redis-cli -h 127.0.0.1 -p 6379 -a ****
#开放6379端口
firewall-cmd --zone=public --add-port=6379/tcp --permanent
#重启防火墙以使配置即时生效
systemctl restart firewalld
#查看系统所有开放的端口
firewall-cmd --zone=public --list-ports
ログイン後にコピー
b. リモート アクセスがまだ不可能な場合:ファイアウォールは開いていますがポート 6379 では、redis が原因で外部ネットワークにはまだアクセスできません。監視されるのは 127.0.0.1:6379, であり、外部ネットワークからのリクエストは監視されません。 #开放6379端口 firewall-cmd --zone=public --add-port=6379/tcp --permanent #重启防火墙以使配置即时生效 systemctl restart firewalld #查看系统所有开放的端口 firewall-cmd --zone=public --list-ports
- フォルダー ディレクトリの redis.conf 構成ファイルのバインド 127.0.0.1 の前に # を追加し、
- コマンドをコメント アウトします&# xff1a ;redis-cli が redis に接続された後、config get daemonize と config get protected-mode の両方が no であるかどうかを確認します。そうでない場合は、config set を使用して構成名属性を no に変更します。
#停止redis
pkill redis
#删除安装目录
rm -rf /usr/local/redis
#删除所有redis相关命令脚本
rm -rf /usr/bin/redis-*
#删除redis解压文件夹
rm -rf /root/download/redis-4.0.4
ログイン後にコピー
例外を報告,再起動してみてください理由 : Redis が開始されています解決策: Redis をオフにして再起動します #停止redis pkill redis #删除安装目录 rm -rf /usr/local/redis #删除所有redis相关命令脚本 rm -rf /usr/bin/redis-* #删除redis解压文件夹 rm -rf /root/download/redis-4.0.4
redis-cli shutdown
redis-server &
客户端检测连接是否正常
使用redis-cli客户端检测连接是否正常
$redis-cli
127.0.0.1:6379> keys *
(empty list or set)
127.0.0.1:6379> set key "hello world"
OK
127.0.0.1:6379> get key
"hello world"
Redis客户端常见操作
Redis是key-value数据库,支持五种数据类型:string(字符串),hash(哈希),list(列表),set(集合)及zset(sorted set:有序集合)。
当value是string类型,命令包括set get setnx incr del 等。
> set server:name "fido"  // 设置键值
OK
> get server:name  // 获取键值
"fido"
> setnx connections 10   // set if not exists
OK
> incr connections   // 原子性增加values值
(integer) 11
> incr connections
(integer) 12
> del connections  // 删除key
(integer) 1
> incr connections
(integer) 1
当value是list类型,命令包括rpush lpush llen lrange lpop rpop del 等。
> rpush friends "Alice"   // 在末尾追加
(integer) 1
> rpush friends "Bob"
(integer) 2
> lpush friends "Sam"    // 插入到开头
(integer) 3
> lrange friends 0 -1     // 返回列表的子集,类似切片操作
1) "Sam"
2) "Alice"
3) "Bob"
> lrange friends 0 1
1) "Sam"
2) "Alice"
> lrange friends 1 2
1) "Alice"
2) "Bob"
> llen friends   // 返回列表长度
(integer) 3
> lpop friends   // 删除并返回列表第一个元素
"Sam"
> rpop friends   // 删除并返回列表最后一个元素
"Bob"
> lrange friends 0 -1
1) "Alice"
> del friends    // 删除key
(integer) 1     // 1表示成功,0表示失败
当value是set类型,命令包括sadd srem sismember smembers sunion del等。
> sadd superpowers "flight"     // 添加元素
(integer) 1
> sadd superpowers "x-ray vision"
(integer) 1
> sadd superpowers "reflexes"
(integer) 1
> srem superpowers "reflexes"   // 删除元素1

> sismember superpowers "flight"   // 测试元素是否在集合中
(integer) 1
> sismember superpowers "reflexes"
(integer) 0
> smembers superpowers    // 返回集合中所有元素
1) "x-ray vision"
2) "flight"
> sadd birdpowers "pecking"
(integer) 1
> sadd birdpowers "flight"
(integer) 1
> sunion superpowers birdpowers    // 合并多个set,返回合并后的元素列表
1) "x-ray vision"
2) "flight"
3) "pecking"
> del superpowers   // 删除key
(integer) 1
当value是zset类型,命令包括 zadd zrange del等,注意给value一个编号用于排序。
> zadd hacker 1940 "Alan Kay"     // 给value指定一个编号,比如以年份1940作为编号
(integer) 1
> zadd hacker 1906 "Grace Hopper"
(integer) 1
> zadd hacker 1953 "Richard Stallman"
(integer) 1
> zadd hacker 1965 "Yukihiro Matsumoto"
(integer) 1
> zadd hacker 1916 "Claude Shannon"
(integer) 1
> zadd hacker 1969 "Linux Torvalds"
(integer) 1
> zadd hacker 1957 "Sophie Wilson"
(integer) 1
> zadd hacker 1912 "Alan Turing"
(integer) 1

> zrange hacker 2 4    // 切片返回有序集合中元素
1) "Claude Shannon"
2) "Alan Kay"
3) "Richard Stallman"

> del hacker    // 删除key
(integer) 1
当value是hash类型,hash类型可以理解为字典,需要给value指定一个field用于映射,命令包括hset hmset hget hgetall hdel hincrby del 等。
> hset user:1000 name "John Smith"   // 给value指定一个field,比如name
(integer) 1
> hset user:1000 email "john.smith@example.com"
(integer) 1
> hset user:1000 password "s3cret"
(integer) 1
> hgetall user:1000   // 获得hash表中所有成员,包括field和value
1) "name"
2) "John Smith"
3) "email"
4) "john.smith@example.com"
5) "password"
6) "s3cret"

> hmset user:1001 name "Mary Jones" password "hidden" email
"mjones@example.com"   // 设置多个field和value
OK
> hget user:1001 name   // 根据field获取value
"Mary Jones"

> hset user:1000 visits 10    // field可以映射到数字值
(integer) 1
> hincrby user:1000 visits 1    // 原子性增加value的值,增加1
(integer) 11
> hincrby user:1000 visits 10    // 增加10
(integer) 21
> hdel user:1000 visits      // 删除field及其value
(integer) 1
> hincrby user:1000 visits 1
(integer) 1

> del user:1000     // 删除key
(integer) 1
设置和查看key的生命周期,key过期会被自动删除,命令包括expire ttl 等。
> set resource:lock "Redis Demo"
OK
> expire resource:lock 120   // 设置生命周期为120s
(integer) 1
> ttl resource:lock   // 查看当前生命周期还剩多少时间
(integer) 109
> ttl resource:lock   // 120s后查看,返回-2表示已过期或不存在
(integer) -2

> set resource:lock "Redis Demo 2"
OK
> ttl resource:lock    // 返回-1表示永不过期
(integer) -1
springboot实现h5与fastdfs之间的断点续传,大文件上传,秒传文件和批量上传
对比,只是单纯返回一个String类型?

改为upload_list8888,页面调用是失败的
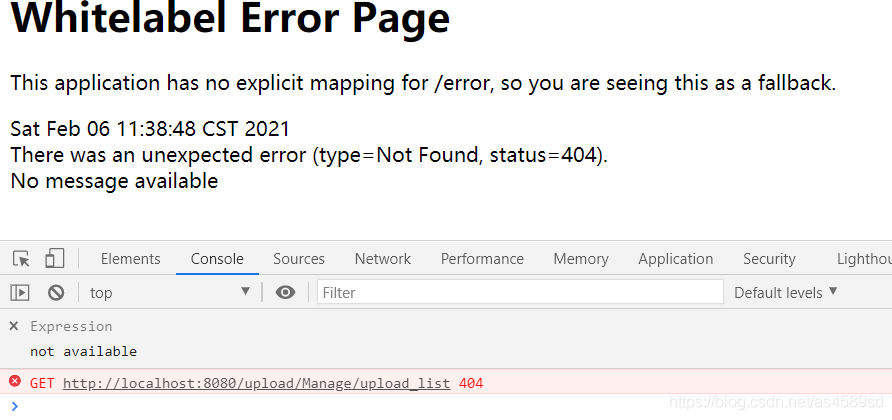
改回upload_list
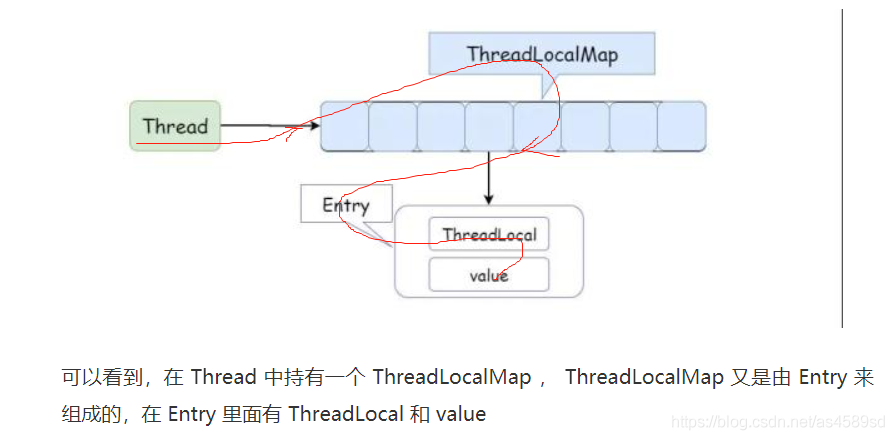
ThreadLocal与redis秒配,解决了redis线程池在被共享访问时带来的线程安全问题
打个比方,现在公司所有人都要填写一个表格,但是只有一支笔,这个时候就只能上个人用完了之后,下个人才可以使用,为了保证"笔"这个资源的可用性,只需要保证在接下来每个人的获取顺序就可以了,这就是 lock 的作用,当这支笔被别人用的时候,我就加 lock ,你来了那就进入队列排队等待获取资源(非公平方式那就另外说了),这支笔用完之后就释放 lock ,然后按照顺序给下个人使用。
但是完全可以一个人一支笔对不对,这样的话,你填写你的表格,我填写我的表格,咱俩谁都不耽搁谁。这就是 ThreadLocal 在做的事情,因为每个 Thread 都有一个副本,就不存在资源竞争,所以也就不需要加锁,这不就是拿空间去换了时间嘛!
了解决redis线程池对象(笔),不能被多线程(多个人)共享访问的问题,通过 threadLocal.set() 方法,将redis线程池对象实例保存在每个线程,自己所拥有的 threadLocalMap中(生成多个副本)。
这样的话,每个线程都使用自己的redis线程池对象实例,彼此不会影响,从而达到了隔离的作用,这样就解决了redis线程池对象在被共享访问时带来的线程安全问题。
import cn.hutool.core.util.StrUtil;
import org.slf4j.Logger;
import org.slf4j.LoggerFactory;
import redis.clients.jedis.Jedis;
import redis.clients.jedis.JedisPool;
import redis.clients.jedis.JedisPoolConfig;
import java.util.List;
public class RedisUtil {
private RedisUtil() {
}
private static Logger _logger = LoggerFactory.getLogger(RedisUtil.class);
;
protected static final ThreadLocal<Jedis> threadLocalJedis = new ThreadLocal<Jedis>();
//Redis服务器IP
private static String ADDR_ARRAY = ReadProper.getResourceValue("spring.redis.host");
//Redis的端口号
private static int PORT = Integer.parseInt(ReadProper.getResourceValue("spring.redis.port"));
//访问密码
private static String AUTH = ReadProper.getResourceValue("spring.redis.password");
//可用连接实例的最大数目,默认值为8;
//如果赋值为-1,则表示不限制;如果pool已经分配了maxActive个jedis实例,则此时pool的状态为exhausted(耗尽)。
private static int MAX_ACTIVE = -1;
//控制一个pool最多有多少个状态为idle(空闲的)的jedis实例,默认值也是8。
private static int MAX_IDLE = 16;
//等待可用连接的最大时间,单位毫秒,默认值为-1,表示永不超时。如果超过等待时间,则直接抛出JedisConnectionException;
private static int MAX_WAIT = 1000 * 5;
//超时时间
private static int TIMEOUT = 1000 * 5;
//在borrow一个jedis实例时,是否提前进行validate操作;如果为true,则得到的jedis实例均是可用的;
private static boolean TEST_ON_BORROW = true;
private static JedisPool jedisPool ;
//默认的数据库为0
/**
* redis过期时间,以秒为单位
*/
public final static int EXRP_HOUR = 60 * 60; //一小时
public final static int EXRP_DAY = 60 * 60 * 24; //一天
public final static int EXRP_MONTH = 60 * 60 * 24 * 30; //一个月
/**
* 初始化Redis连接池,注意一定要在使用前初始化一次,一般在项目启动时初始化就行了
*/
public static JedisPool initialPool() {
JedisPool jp=null;
try {
JedisPoolConfig config = new JedisPoolConfig();
config.setMaxTotal(MAX_ACTIVE);
config.setMaxIdle(MAX_IDLE);
config.setMaxWaitMillis(MAX_WAIT);
config.setTestOnBorrow(TEST_ON_BORROW);
config.setTestOnCreate(true);
config.setTestWhileIdle(true);
config.setTestOnReturn(true);
config.setNumTestsPerEvictionRun(-1);
jp = new JedisPool(config, ADDR_ARRAY, PORT, TIMEOUT, AUTH);
jedisPool=jp;
threadLocalJedis.set(getJedis());
} catch (Exception e) {
e.printStackTrace();
_logger.error("redis服务器异常",e);
}
return jp;
}
public static void close(Jedis jedis) {
if (threadLocalJedis.get() == null && jedis != null){
jedis.close();
}
}
// /**
// * 在多线程环境同步初始化
// */
// private static synchronized void poolInit() {
// if (jedisPool == null) {
// initialPool();
// }
// }
/**
* 获取Jedis实例,一定先初始化
*
* @return Jedis
*/
public static Jedis getJedis() {
boolean success = false;
Jedis jedis = null;
// if (jedisPool == null) {
// poolInit();
// }
int i=0;
while (!success) {
i++;
try {
if (jedisPool != null) {
jedis=threadLocalJedis.get();
if (jedis==null){
jedis = jedisPool.getResource();
}else {
if(! jedis.isConnected()&&!jedis.getClient().isBroken()){
threadLocalJedis.set(null);
jedis = jedisPool.getResource();
}
//System.out.println(Thread.currentThread().getName()+":第"+i+"次获取成功#@利用了本地缓存redis");
return jedis;
}
}else {
throw new RuntimeException("redis连接池初始化失败");
}
} catch (Exception e) {
System.out.println(Thread.currentThread().getName()+":第"+i+"次获取失败!!!");
success = false;
e.printStackTrace();
_logger.error("redis服务器异常",e);
}
if (jedis!=null){
success=true;
}
if (i>=10&&i<20){
try {
Thread.sleep(1000);
} catch (InterruptedException e) {
e.printStackTrace();
}
}
if (i>=20&&i<30){
try {
Thread.sleep(2000);
} catch (InterruptedException e) {
e.printStackTrace();
}
}
if (i>=30&&i<40){
try {
Thread.sleep(3000);
} catch (InterruptedException e) {
e.printStackTrace();
}
}
if (i>=40){
System.out.println("redis彻底连不上了~~~~(>_<)~~~~");
return null;
}
}
if (threadLocalJedis.get()==null){threadLocalJedis.set(jedis);}
//System.out.println(Thread.currentThread().getName()+":第"+i+"次获取成功@");
return jedis;
}
/**
* 设置 String
*
* @param key
* @param value
*/
public static void setString(String key, String value) {
Jedis jo = null;
try {
value = StrUtil.isBlank(value) ? "" : value;
jo = getJedis();
jo.set(key, value);
} catch (Exception e) {
threadLocalJedis.set(null);
_logger.error("redis服务器异常",e);
throw new RuntimeException("redis服务器异常");
} finally {
if (jo != null) {
close(jo);
}
}
}
/**
* 设置 过期时间
*
* @param key
* @param seconds 以秒为单位
* @param value
*/
public static void setString(String key, int seconds, String value) {
Jedis jo = null;
try {
value = StrUtil.isBlank(value) ? "" : value;
jo = getJedis();
jo.setex(key, seconds, value);
} catch (Exception e) {
threadLocalJedis.set(null);
e.printStackTrace();
_logger.error("redis服务器异常",e);
throw new RuntimeException("redis服务器异常");
} finally {
if (jo != null) {
close(jo);
}
}
}
/**
* 获取String值
*
* @param key
* @return value
*/
public static String getString(String key) {
Jedis jo = null;
try {
jo = getJedis();
if (jo == null || !jo.exists(key)) {
return null;
}
return jo.get(key);
} catch (Exception e) {
threadLocalJedis.set(null);
e.printStackTrace();
_logger.error("redis服务器异常",e);
throw new RuntimeException("redis操作错误");
} finally {
if (jo != null) {
close(jo);
}
}
}
public static long incrBy(String key, long integer) {
Jedis jo = null;
try {
jo = getJedis();
return jo.incrBy(key, integer);
} catch (Exception e) {
threadLocalJedis.set(null);
e.printStackTrace();
_logger.error("redis服务器异常",e);
throw new RuntimeException("redis操作错误");
} finally {
if (jo != null) {
close(jo);
}
}
}
public static long decrBy(String key, long integer) {
Jedis jo = null;
try {
jo = getJedis();
return jo.decrBy(key, integer);
} catch (Exception e) {
threadLocalJedis.set(null);
e.printStackTrace();
_logger.error("redis服务器异常",e);
throw new RuntimeException("redis操作错误");
} finally {
if (jo != null) {
close(jo);
}
}
}
//删除多个key
public static long delKeys(String [] keys){
Jedis jo = null;
try {
jo = getJedis();
return jo.del(keys);
} catch (Exception e) {
threadLocalJedis.set(null);
e.printStackTrace();
_logger.error("redis服务器异常",e);
throw new RuntimeException("redis操作错误");
} finally {
if (jo != null) {
close(jo);
}
}
}
//删除单个key
public static long delKey(String key){
Jedis jo = null;
try {
jo = getJedis();
return jo.del(key);
} catch (Exception e) {
threadLocalJedis.set(null);
e.printStackTrace();
_logger.error("redis服务器异常",e);
throw new RuntimeException("redis操作错误");
} finally {
if (jo != null) {
close(jo);
}
}
}
//添加到队列尾
public static long rpush(String key,String node){
Jedis jo = null;
try {
jo = getJedis();
return jo.rpush(key,node);
} catch (Exception e) {
threadLocalJedis.set(null);
e.printStackTrace();
_logger.error("redis服务器异常",e);
throw new RuntimeException("redis操作错误");
} finally {
if (jo != null) {
close(jo);
}
}
}
//删除list元素
public static long delListNode(String key,int count,String value){
Jedis jo = null;
try {
jo = getJedis();
return jo.lrem(key,count,value);
} catch (Exception e) {
threadLocalJedis.set(null);
e.printStackTrace();
_logger.error("redis服务器异常",e);
throw new RuntimeException("redis操作错误");
} finally {
if (jo != null) {
close(jo);
}
}
}
//获取所有list
public static List getListAll(String key){
Jedis jo = null;
List list=null;
try {
jo = getJedis();
list= jo.lrange(key,0,-1);
} catch (Exception e) {
threadLocalJedis.set(null);
e.printStackTrace();
_logger.error("redis服务器异常",e);
throw new RuntimeException("redis操作错误");
} finally {
if (jo != null) {
close(jo);
}
}
return list;
}
//清理缓存redis
public static void cleanLoacl(Jedis jo){
threadLocalJedis.set(null);
close(jo);
}
static {
initialPool();
}
}使用webuploader组件实现大文件分片上传,断点续传
webuploader:是一个以HTML5为主, Flash为辅的文件上传组件,采用大文件分片/并发上传的方式,极大地提高了文件上传的效率,同时兼容多种浏览器版本;
前端
引入百度Webuploader组件,需要注意标签的id/nama属性,这些将在后面的JavaScript中使用到进行文件切分、验证。
以上js组件,将完成文件上传、MD5验证、删除、切片、上传进度条显示、暂停、继续上传及上传成功/失败时候的回调。
后端
前端,给后端提供封装的chunk,及request
后端,主要是判断文件是否有分片,如果没有,则直接存放到目的目录;
如果存在分片,则创建临时目录,存放分片信息;
之后判断当前分片所属的文件的所有分片是否已经传输完毕,如果当前分片数==所属文件总分片数,则开始合并文件并转移完整文件到目的目录,并且删除临时目录
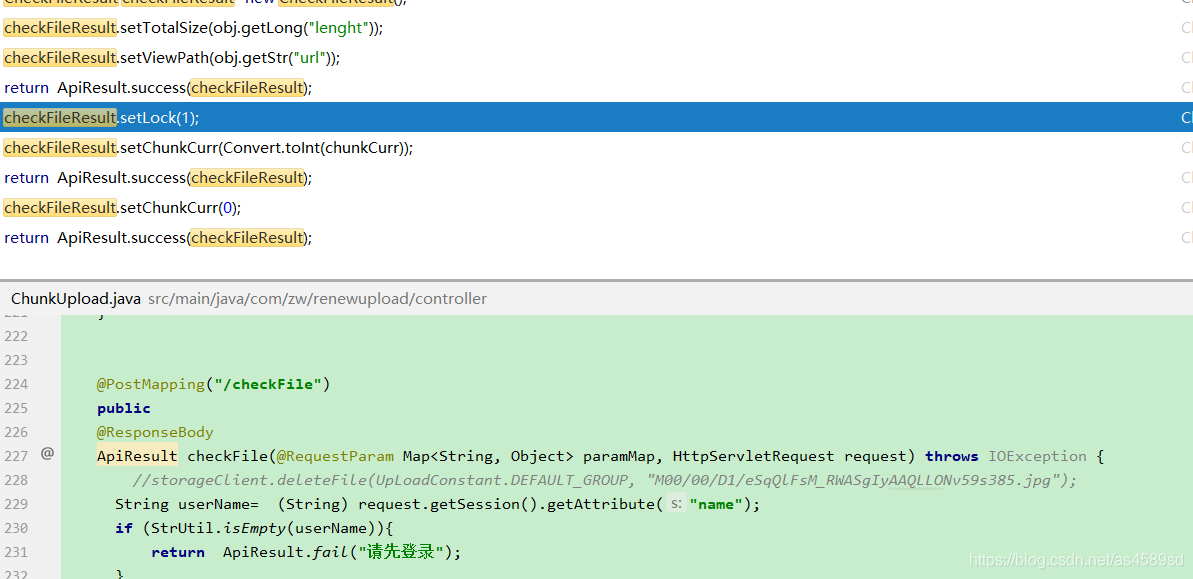
检测完文件,以后,开始上传操作
//上传操作
path = appendFileStorageClient.uploadAppenderFile(UpLoadConstant.DEFAULT_GROUP, file.getInputStream(),file.getSize(), FileUtil.extName((String) paramMap.get("name")));
//更新操作
appendFileStorageClient.modifyFile(UpLoadConstant.DEFAULT_GROUP, noGroupPath, file.getInputStream(),file.getSize(),historyUpload);hutool工具的巧妙运用
可参考hutool资料http://www.mianshigee.com/tutorial/hutool/26e24c7a37d93249.md
<dependency>
    <groupId>cn.hutool</groupId>
    <artifactId>hutool-all</artifactId>
    <version>5.0.6</version>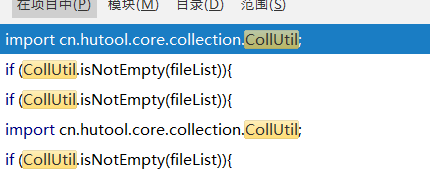
</dependency>cn.hutool.core.collection.CollUtil判断非空
cn.hutool.json.JSONObject与JSONUtil
if (CollUtil.isNotEmpty(fileList)){
            for (String e:fileList){
                JSONObject jsonObject= JSONUtil.parseObj(e);
                jsonObjects.add(jsonObject);

            }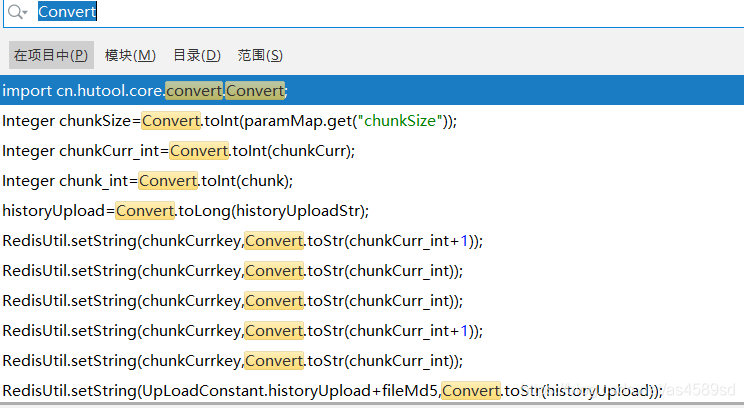
}cn.hutool.core.convert.Convert类型转换
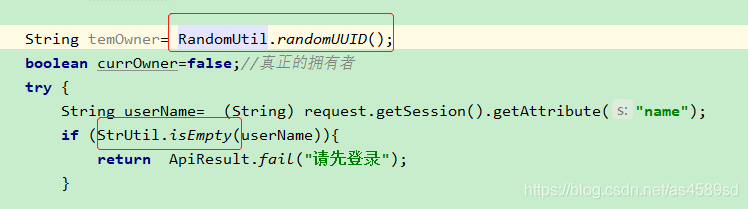
cn.hutool.core.util.RandomUtil生成随机字符串及StrUtil判断字符为空
解析文件的扩展名,来获该文件的类型
import cn.hutool.core.io.FileUtil;
FileUtil.extName((String) paramMap.get("name")));以上がfastdfs サービスとスタンドアロン redis サービスを構築する方法の詳細内容です。詳細については、PHP 中国語 Web サイトの他の関連記事を参照してください。

ホットAIツール

Undresser.AI Undress
リアルなヌード写真を作成する AI 搭載アプリ

AI Clothes Remover
写真から衣服を削除するオンライン AI ツール。

Undress AI Tool
脱衣画像を無料で

Clothoff.io
AI衣類リムーバー

AI Hentai Generator
AIヘンタイを無料で生成します。

人気の記事
ホットツール

メモ帳++7.3.1
使いやすく無料のコードエディター

SublimeText3 中国語版
中国語版、とても使いやすい

ゼンドスタジオ 13.0.1
強力な PHP 統合開発環境

ドリームウィーバー CS6
ビジュアル Web 開発ツール

SublimeText3 Mac版
神レベルのコード編集ソフト(SublimeText3)
ホットトピック
 7530
7530
 15
1378
52
82
11
21
76
15
1378
52
82
11
21
76

 Redisクラスターモードの構築方法
Apr 10, 2025 pm 10:15 PM
Redisクラスターモードの構築方法
Apr 10, 2025 pm 10:15 PM
Redisクラスターモードは、シャードを介してRedisインスタンスを複数のサーバーに展開し、スケーラビリティと可用性を向上させます。構造の手順は次のとおりです。異なるポートで奇妙なRedisインスタンスを作成します。 3つのセンチネルインスタンスを作成し、Redisインスタンスを監視し、フェールオーバーを監視します。 Sentinel構成ファイルを構成し、Redisインスタンス情報とフェールオーバー設定の監視を追加します。 Redisインスタンス構成ファイルを構成し、クラスターモードを有効にし、クラスター情報ファイルパスを指定します。各Redisインスタンスの情報を含むnodes.confファイルを作成します。クラスターを起動し、CREATEコマンドを実行してクラスターを作成し、レプリカの数を指定します。クラスターにログインしてクラスター情報コマンドを実行して、クラスターステータスを確認します。作る
 Redisコマンドの使用方法
Apr 10, 2025 pm 08:45 PM
Redisコマンドの使用方法
Apr 10, 2025 pm 08:45 PM
Redis指令を使用するには、次の手順が必要です。Redisクライアントを開きます。コマンド(動詞キー値)を入力します。必要なパラメーターを提供します(指示ごとに異なります)。 Enterを押してコマンドを実行します。 Redisは、操作の結果を示す応答を返します(通常はOKまたは-ERR)。
 Redisデータをクリアする方法
Apr 10, 2025 pm 10:06 PM
Redisデータをクリアする方法
Apr 10, 2025 pm 10:06 PM
Redisデータをクリアする方法:Flushallコマンドを使用して、すべての重要な値をクリアします。 FlushDBコマンドを使用して、現在選択されているデータベースのキー値をクリアします。 [選択]を使用してデータベースを切り替え、FlushDBを使用して複数のデータベースをクリアします。 DELコマンドを使用して、特定のキーを削除します。 Redis-CLIツールを使用してデータをクリアします。
 Redisのソースコードを読み取る方法
Apr 10, 2025 pm 08:27 PM
Redisのソースコードを読み取る方法
Apr 10, 2025 pm 08:27 PM
Redisソースコードを理解する最良の方法は、段階的に進むことです。Redisの基本に精通してください。開始点として特定のモジュールまたは機能を選択します。モジュールまたは機能のエントリポイントから始めて、行ごとにコードを表示します。関数コールチェーンを介してコードを表示します。 Redisが使用する基礎となるデータ構造に精通してください。 Redisが使用するアルゴリズムを特定します。
 単一のスレッドレディスの使用方法
Apr 10, 2025 pm 07:12 PM
単一のスレッドレディスの使用方法
Apr 10, 2025 pm 07:12 PM
Redisは、単一のスレッドアーキテクチャを使用して、高性能、シンプルさ、一貫性を提供します。 I/Oマルチプレックス、イベントループ、ノンブロッキングI/O、共有メモリを使用して同時性を向上させますが、並行性の制限、単一の障害、および書き込み集約型のワークロードには適していません。
 Redisのすべてのキーを表示する方法
Apr 10, 2025 pm 07:15 PM
Redisのすべてのキーを表示する方法
Apr 10, 2025 pm 07:15 PM
Redisのすべてのキーを表示するには、3つの方法があります。キーコマンドを使用して、指定されたパターンに一致するすべてのキーを返します。スキャンコマンドを使用してキーを繰り返し、キーのセットを返します。情報コマンドを使用して、キーの総数を取得します。
 基礎となるRedisを実装する方法
Apr 10, 2025 pm 07:21 PM
基礎となるRedisを実装する方法
Apr 10, 2025 pm 07:21 PM
Redisはハッシュテーブルを使用してデータを保存し、文字列、リスト、ハッシュテーブル、コレクション、注文コレクションなどのデータ構造をサポートします。 Redisは、スナップショット(RDB)を介してデータを維持し、書き込み専用(AOF)メカニズムを追加します。 Redisは、マスタースレーブレプリケーションを使用して、データの可用性を向上させます。 Redisは、シングルスレッドイベントループを使用して接続とコマンドを処理して、データの原子性と一貫性を確保します。 Redisは、キーの有効期限を設定し、怠zyな削除メカニズムを使用して有効期限キーを削除します。
 Redisキューの読み方
Apr 10, 2025 pm 10:12 PM
Redisキューの読み方
Apr 10, 2025 pm 10:12 PM
Redisのキューを読むには、キュー名を取得し、LPOPコマンドを使用して要素を読み、空のキューを処理する必要があります。特定の手順は次のとおりです。キュー名を取得します:「キュー:キュー」などの「キュー:」のプレフィックスで名前を付けます。 LPOPコマンドを使用します。キューのヘッドから要素を排出し、LPOP Queue:My-Queueなどの値を返します。空のキューの処理:キューが空の場合、LPOPはnilを返し、要素を読む前にキューが存在するかどうかを確認できます。
