Windows で Nginx の複数のドメイン名を構成する方法
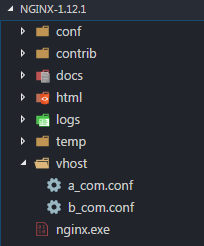
1. Windows に nginx をインストールするためのディレクトリ構造は次のとおりです:

2. nginx-1.12.1 ディレクトリの conf/nginx.conf の内容
#user nobody;
worker_processes 1;
events {
  worker_connections 1024;
}
http {
  include    mime.types;
  default_type application/octet-stream;
  sendfile    on;
  keepalive_timeout 65;
  server {
    listen    80 default_server;
    server_name localhost default_server;
    root  html;
    location / {
      index index.html index.htm;
    }
}
  include ../vhost/*.conf;
}3. vhost ディレクトリの下の a_com.conf の内容:
server {
    listen    80;
    server_name www.a.com;
    root  d:/test/;
    location / {
      index index.html index.htm;
    }
}4. vhost ディレクトリの下の b_com.conf の内容:
server {
    listen    80;
    server_name www.b.com;
    root  d:/test2/;
    location / {
      index index.html index.htm;
    }
}5. 新しいテストを作成し、ローカル ディスクの d ディスクの下に test2 ディレクトリを作成し、新しい Index.html ファイルを作成します。
6. ローカル ディスク C ドライブの c:\windows\system32\drivers\etc の下にあるホストを次のように変更します
127.0.0.1    www.a.com
127.0.0.1    www.b.com
7. cmd を使用して nginx インストール ディレクトリに移動します。
nginx.exe を実行します。 Start
nginx -t //構文を検出します。
nginx -s reload / /Restart
nginx -s stop // Stop
8. ブラウザを開いて URL
を入力します。以上がWindows で Nginx の複数のドメイン名を構成する方法の詳細内容です。詳細については、PHP 中国語 Web サイトの他の関連記事を参照してください。

ホットAIツール

Undresser.AI Undress
リアルなヌード写真を作成する AI 搭載アプリ

AI Clothes Remover
写真から衣服を削除するオンライン AI ツール。

Undress AI Tool
脱衣画像を無料で

Clothoff.io
AI衣類リムーバー

AI Hentai Generator
AIヘンタイを無料で生成します。

人気の記事

ホットツール

メモ帳++7.3.1
使いやすく無料のコードエディター

SublimeText3 中国語版
中国語版、とても使いやすい

ゼンドスタジオ 13.0.1
強力な PHP 統合開発環境

ドリームウィーバー CS6
ビジュアル Web 開発ツール

SublimeText3 Mac版
神レベルのコード編集ソフト(SublimeText3)

ホットトピック
 WordPressサイトファイルアクセスは制限されています:なぜ私の.txtファイルがドメイン名からアクセスできないのですか?
Apr 01, 2025 pm 03:00 PM
WordPressサイトファイルアクセスが制限されています:最近.txtファイルにアクセスできない理由のトラブルシューティング。一部のユーザーは、ミニプログラムのビジネスドメイン名を構成する際に問題に遭遇しました:�...
 同じサーバー上のnginx構成を介してphp5.6とphp7を共存する方法は?
Apr 01, 2025 pm 03:15 PM
同じシステムで複数のPHPバージョンを同時に実行することは、特に異なるプロジェクトがPHPの異なるバージョンに依存する場合、一般的な要件です。同じようになる方法...
 ランプアーキテクチャの下でnode.jsまたはPythonサービスを効率的に統合する方法は?
Apr 01, 2025 pm 02:48 PM
多くのウェブサイト開発者は、ランプアーキテクチャの下でnode.jsまたはPythonサービスを統合する問題に直面しています:既存のランプ(Linux Apache MySQL PHP)アーキテクチャWebサイトのニーズ...
 セレンでログインした後、404エラーをリダイレクトする理由は何ですか?それを解決する方法は?
Apr 01, 2025 pm 10:54 PM
シミュレーションログインの場合にシミュレーションログイン後に404エラーをリダイレクトするための解決策は、シミュレーションログインにSeleniumを使用すると、いくつかの困難な問題に遭遇することがよくあります。 �...
 PCとモバイル側で同じページを共有し、キャッシュの問題を処理する方法は?
Apr 01, 2025 pm 01:57 PM
PCとモバイル側で同じページを共有し、キャッシュの問題を処理する方法は? Nginxでは、Baotaの背景を使用して構築されたPHP MySQL環境、PCサイドの作成方法と...
 ノード環境で403エラーを返すサードパーティのインターフェイスを回避する方法は?
Apr 01, 2025 pm 02:03 PM
ノード環境で403エラーを返すサードパーティのインターフェイスを回避する方法。 node.jsを使用してサードパーティのWebサイトインターフェイスを呼び出すと、403エラーを返す問題が発生することがあります。 �...
 Debianログを介してシステムのパフォーマンスを監視する方法
Apr 02, 2025 am 08:00 AM
Debianシステムログ監視のマスターは、効率的な動作とメンテナンスの鍵です。システムの動作条件をタイムリーに理解し、障害をすばやく見つけ、システムのパフォーマンスを最適化するのに役立ちます。この記事では、一般的に使用されるいくつかの監視方法とツールを紹介します。 SysStat Toolkitを使用したシステムリソースの監視SysStat Toolkitは、CPUロード、メモリ使用量、ディスクI/O、ネットワークスループットなど、さまざまなシステムリソースメトリックを収集、分析、レポートするための一連の強力なコマンドラインツールを提供します。 MPSTAT:マルチコアCPUの統計。ピドスタ
 DockerFileで複数のサービスを効率的に開始する方法は?
Apr 01, 2025 pm 02:15 PM
DockerfileでのCMDコマンドの効率的な使用について多くの新しいDockerユーザーがCMDを使用しています...


