

Springboot が Redisson に基づいて Redis 分散リエントラント ロック ソース コード分析を実装する方法

1. はじめに
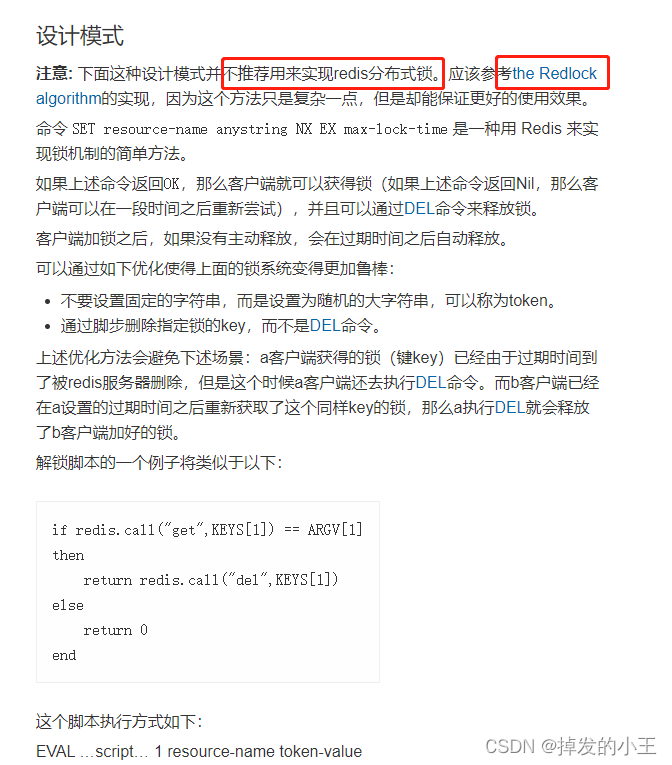
私たちは Redis を使用して分散ロックを実装しています。 use SET resource-name anystring NX EX max-lock-timeロックするには、Lua スクリプトを使用してロックを解放するアトミック性を確保します。この手動実装は面倒ですが、Redis公式サイトにもJava版ではRedissonを使用して実装していることが明記されています。編集者も公式サイトを見て徐々に把握し、接写して記録しました。公式 Web サイトから Springboot の統合、ソース コード解釈まで、単一ノードを例に挙げます。
2. Redisson を使用する理由
1. 公式 Web サイトをオープンします
redis 中国語公式 Web サイト
2. 公式が許可していることがわかります。 other
3 を使用します。公式の推奨事項を開きます
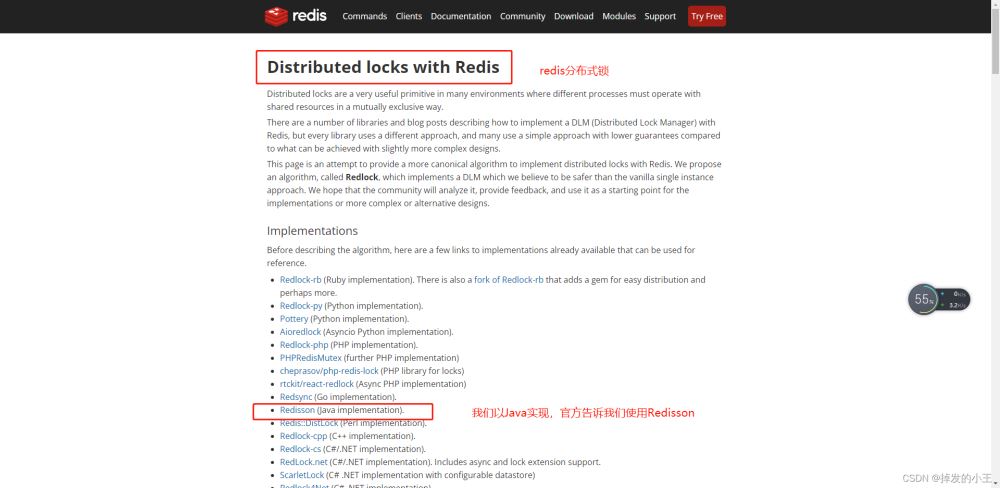
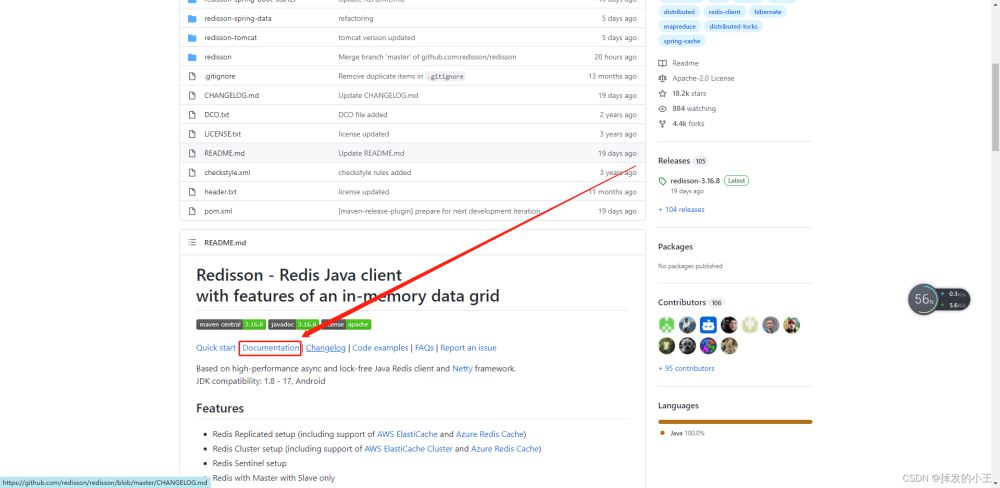
#4. ドキュメントを見つけます
Redisson アドレス
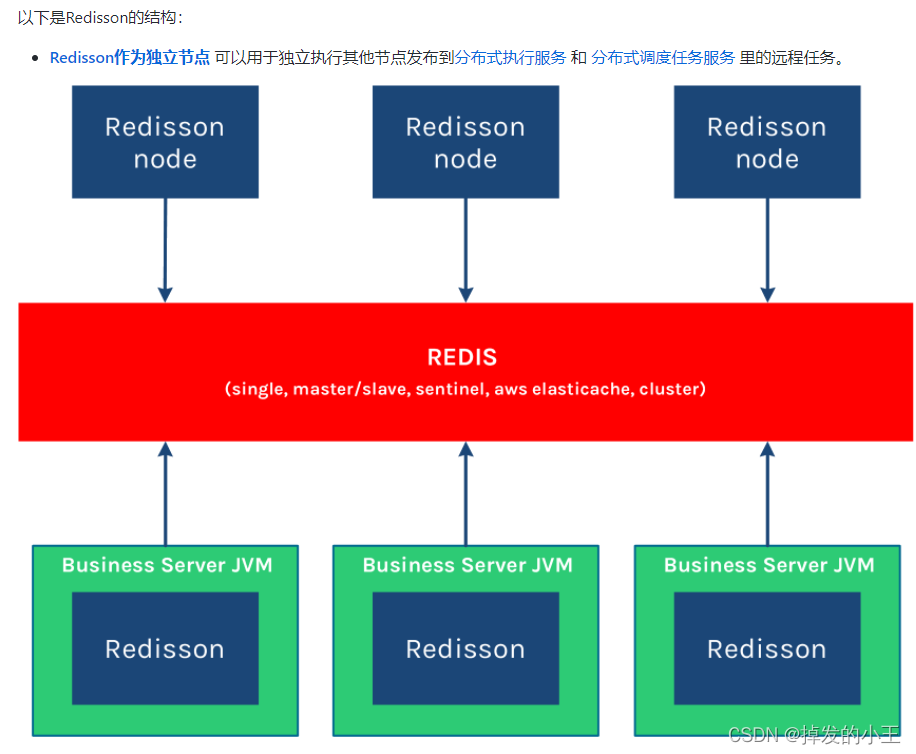
5. Redisson 構造
#3. Springboot は Redisson
1 を統合します。依存関係
<dependency>
    <groupId>org.springframework.boot</groupId>
    <artifactId>spring-boot-starter-data-redis</artifactId>
</dependency>
<dependency>
    <groupId>redis.clients</groupId>
    <artifactId>jedis</artifactId>
</dependency>
<!--redis分布式锁-->
<dependency>
    <groupId>org.redisson</groupId>
    <artifactId>redisson</artifactId>
    <version>3.12.0</version>
</dependency>2. 公式 Web サイトを例として設定方法を確認します
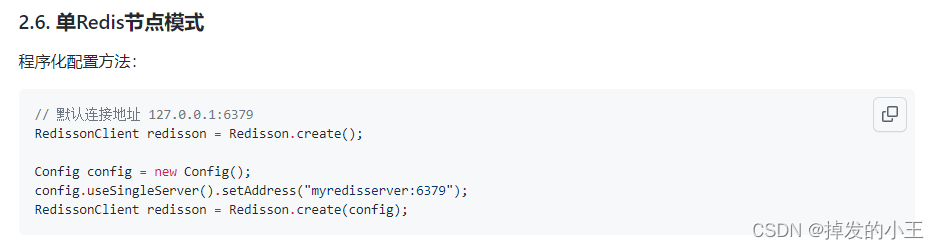
3. 設定クラス
import org.redisson.Redisson;
import org.redisson.api.RedissonClient;
import org.redisson.config.Config;
import org.springframework.context.annotation.Bean;
import org.springframework.context.annotation.Configuration;

/**
 * @author wangzhenjun
 * @date 2022/2/9 9:57
 */
@Configuration
public class MyRedissonConfig {

    /**
     * 所有对redisson的使用都是通过RedissonClient来操作的
     * @return
     */
    @Bean(destroyMethod="shutdown")
    public RedissonClient redisson(){
        // 1. 创建配置
        Config config = new Config();
        // 一定要加redis://
        config.useSingleServer().setAddress("redis://192.168.17.130:6379");
        // 2. 根据config创建出redissonClient实例
        RedissonClient redissonClient = Redisson.create(config);
        return redissonClient;
    }
}を記述します4. 公式サイトのテストロック例
5. 公式サイトの簡単なControllerインターフェースに従って記述します
@ResponseBody
@GetMapping("/hello")
public String hello(){
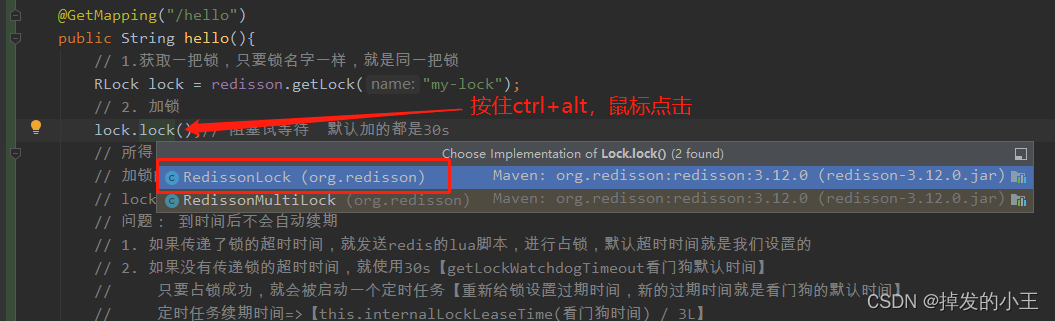
// 1.获取一把锁,只要锁名字一样,就是同一把锁
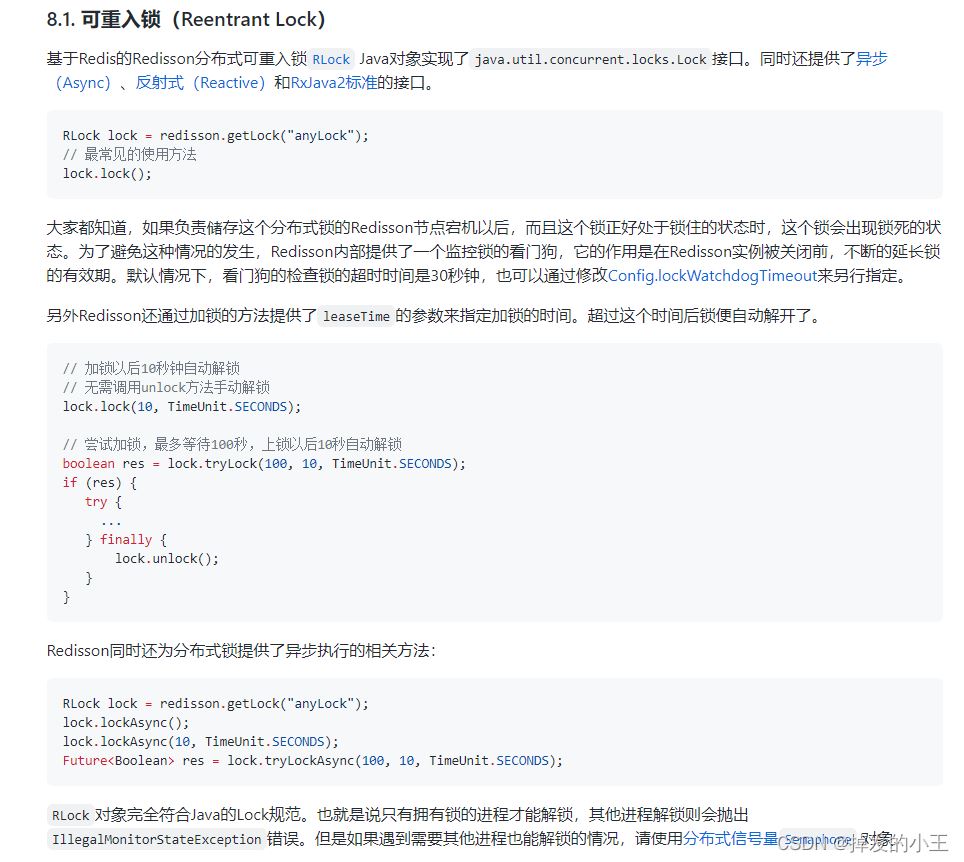
RLock lock = redisson.getLock("my-lock");
// 2. 加锁
lock.lock();// 阻塞试等待 默认加的都是30s
// 带参数情况
// lock.lock(10, TimeUnit.SECONDS);// 10s自动解锁,自动解锁时间一定要大于业务的执行时间。
try {
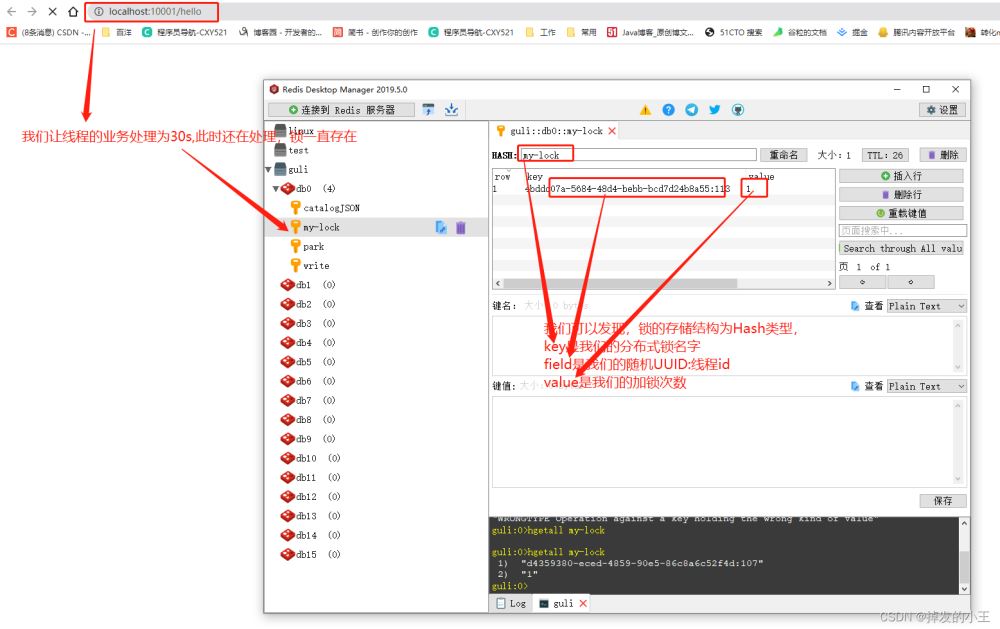
System.out.println("加锁成功" + Thread.currentThread().getId());
Thread.sleep(30000);
} catch (InterruptedException e) {
e.printStackTrace();
} finally {
// 3. 解锁
System.out.println("解锁成功:" + Thread.currentThread().getId());
lock.unlock();
}
return "hello";
}6. テスト
@Override
public void lock() {
    try {
    	// 我们发现不穿过期时间源码默认过期时间为-1
        lock(-1, null, false);
    } catch (InterruptedException e) {
        throw new IllegalStateException();
    }
}
ログイン後にコピー
3. Ctrlを押してロックメソッド@Override
public void lock() {
try {
// 我们发现不穿过期时间源码默认过期时间为-1
lock(-1, null, false);
} catch (InterruptedException e) {
throw new IllegalStateException();
}
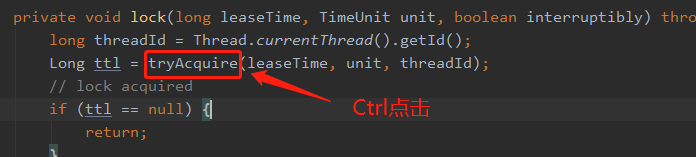
}private void lock(long leaseTime, TimeUnit unit, boolean interruptibly) throws InterruptedException {
// 获取线程的id,占有锁的时候field的值为UUID:线程号id
long threadId = Thread.currentThread().getId();
// 尝试获得锁
Long ttl = tryAcquire(leaseTime, unit, threadId);
// lock acquired 获得锁,返回
if (ttl == null) {
return;
}
// 这里说明获取锁失败,就通过线程id订阅这个锁
RFuture<RedissonLockEntry> future = subscribe(threadId);
if (interruptibly) {
commandExecutor.syncSubscriptionInterrupted(future);
} else {
commandExecutor.syncSubscription(future);
}
try {
// 这里进行自旋,不断尝试获取锁
while (true) {
// 继续尝试获取锁
ttl = tryAcquire(leaseTime, unit, threadId);
// lock acquired 获取成功
if (ttl == null) {
// 直接返回,挑出自旋
break;
}
// waiting for message 继续等待获得锁
if (ttl >= 0) {
try {
future.getNow().getLatch().tryAcquire(ttl, TimeUnit.MILLISECONDS);
} catch (InterruptedException e) {
if (interruptibly) {
throw e;
}
future.getNow().getLatch().tryAcquire(ttl, TimeUnit.MILLISECONDS);
}
} else {
if (interruptibly) {
future.getNow().getLatch().acquire();
} else {
future.getNow().getLatch().acquireUninterruptibly();
}
}
}
} finally {
// 取消订阅
unsubscribe(future, threadId);
}
// get(lockAsync(leaseTime, unit));
}ログイン後にコピー
4. に入り、ロックメソッドprivate void lock(long leaseTime, TimeUnit unit, boolean interruptibly) throws InterruptedException {
// 获取线程的id,占有锁的时候field的值为UUID:线程号id
long threadId = Thread.currentThread().getId();
// 尝试获得锁
Long ttl = tryAcquire(leaseTime, unit, threadId);
// lock acquired 获得锁,返回
if (ttl == null) {
return;
}
// 这里说明获取锁失败,就通过线程id订阅这个锁
RFuture<RedissonLockEntry> future = subscribe(threadId);
if (interruptibly) {
commandExecutor.syncSubscriptionInterrupted(future);
} else {
commandExecutor.syncSubscription(future);
}
try {
// 这里进行自旋,不断尝试获取锁
while (true) {
// 继续尝试获取锁
ttl = tryAcquire(leaseTime, unit, threadId);
// lock acquired 获取成功
if (ttl == null) {
// 直接返回,挑出自旋
break;
}
// waiting for message 继续等待获得锁
if (ttl >= 0) {
try {
future.getNow().getLatch().tryAcquire(ttl, TimeUnit.MILLISECONDS);
} catch (InterruptedException e) {
if (interruptibly) {
throw e;
}
future.getNow().getLatch().tryAcquire(ttl, TimeUnit.MILLISECONDS);
}
} else {
if (interruptibly) {
future.getNow().getLatch().acquire();
} else {
future.getNow().getLatch().acquireUninterruptibly();
}
}
}
} finally {
// 取消订阅
unsubscribe(future, threadId);
}
// get(lockAsync(leaseTime, unit));
}
private Long tryAcquire(long leaseTime, TimeUnit unit, long threadId) {
	// 直接进入异步方法
    return get(tryAcquireAsync(leaseTime, unit, threadId));
}

private <T> RFuture<Long> tryAcquireAsync(long leaseTime, TimeUnit unit, long threadId) {
    // 这里进行判断如果没有设置参数leaseTime = -1
    if (leaseTime != -1) {
        return tryLockInnerAsync(leaseTime, unit, threadId, RedisCommands.EVAL_LONG);
    }
    // 此方法进行获得锁,过期时间为看门狗的默认时间
    // private long lockWatchdogTimeout = 30 * 1000;看门狗默认过期时间为30s
    // 加锁和过期时间要保证原子性,这个方法后面肯定调用执行了Lua脚本,我们下面在看
    RFuture<Long> ttlRemainingFuture = tryLockInnerAsync(commandExecutor.getConnectionManager().getCfg().getLockWatchdogTimeout(), TimeUnit.MILLISECONDS, threadId, RedisCommands.EVAL_LONG);
    // 开启一个定时任务进行不断刷新过期时间
    ttlRemainingFuture.onComplete((ttlRemaining, e) -> {
        if (e != null) {
            return;
        }
        // lock acquired 获得锁
        if (ttlRemaining == null) {
        	// 刷新过期时间方法,我们下一步详细说一下
            scheduleExpirationRenewal(threadId);
    });
return ttlRemainingFuture;<T> RFuture<T> tryLockInnerAsync(long leaseTime, TimeUnit unit, long threadId, RedisStrictCommand<T> command) {
internalLockLeaseTime = unit.toMillis(leaseTime);
return commandExecutor.evalWriteAsync(getName(), LongCodec.INSTANCE, command,
// 首先判断锁是否存在
"if (redis.call('exists', KEYS[1]) == 0) then " +
// 存在则获取锁
"redis.call('hset', KEYS[1], ARGV[2], 1); " +
// 然后设置过期时间
"redis.call('pexpire', KEYS[1], ARGV[1]); " +
"return nil; " +
"end; " +
// hexists查看哈希表的指定字段是否存在,存在锁并且是当前线程持有锁
"if (redis.call('hexists', KEYS[1], ARGV[2]) == 1) then " +
// hincrby自增一
"redis.call('hincrby', KEYS[1], ARGV[2], 1); " +
// 锁的值大于1,说明是可重入锁,重置过期时间
"redis.call('pexpire', KEYS[1], ARGV[1]); " +
"return nil; " +
"end; " +
// 锁已存在,且不是本线程,则返回过期时间ttl
"return redis.call('pttl', KEYS[1]);",
Collections.<Object>singletonList(getName()), internalLockLeaseTime, getLockName(threadId));
}ログイン後にコピーログイン後にコピー
6. スケジュールされたタスクの 4 の ScheduleExpirationRenewal() メソッドに残っている内容を入力してください ソース コードにステップバイステップで移動します:scheduleExpirationRenewal --->renewExpiration以下のソース コードによると、スケジュールされたタスクの更新時間は、internalLockLeaseTime / 3 (ウォッチドッグ 1/3 であり、10 秒ごとに更新されます)<T> RFuture<T> tryLockInnerAsync(long leaseTime, TimeUnit unit, long threadId, RedisStrictCommand<T> command) {
internalLockLeaseTime = unit.toMillis(leaseTime);
return commandExecutor.evalWriteAsync(getName(), LongCodec.INSTANCE, command,
// 首先判断锁是否存在
"if (redis.call('exists', KEYS[1]) == 0) then " +
// 存在则获取锁
"redis.call('hset', KEYS[1], ARGV[2], 1); " +
// 然后设置过期时间
"redis.call('pexpire', KEYS[1], ARGV[1]); " +
"return nil; " +
"end; " +
// hexists查看哈希表的指定字段是否存在,存在锁并且是当前线程持有锁
"if (redis.call('hexists', KEYS[1], ARGV[2]) == 1) then " +
// hincrby自增一
"redis.call('hincrby', KEYS[1], ARGV[2], 1); " +
// 锁的值大于1,说明是可重入锁,重置过期时间
"redis.call('pexpire', KEYS[1], ARGV[1]); " +
"return nil; " +
"end; " +
// 锁已存在,且不是本线程,则返回过期时间ttl
"return redis.call('pttl', KEYS[1]);",
Collections.<Object>singletonList(getName()), internalLockLeaseTime, getLockName(threadId));
}private void renewExpiration() {
ExpirationEntry ee = EXPIRATION_RENEWAL_MAP.get(getEntryName());
if (ee == null) {
return;
}
Timeout task = commandExecutor.getConnectionManager().newTimeout(new TimerTask() {
@Override
public void run(Timeout timeout) throws Exception {
ExpirationEntry ent = EXPIRATION_RENEWAL_MAP.get(getEntryName());
if (ent == null) {
return;
}
Long threadId = ent.getFirstThreadId();
if (threadId == null) {
return;
}
RFuture<Boolean> future = renewExpirationAsync(threadId);
future.onComplete((res, e) -> {
if (e != null) {
log.error("Can't update lock " + getName() + " expiration", e);
return;
}
if (res) {
// reschedule itself
renewExpiration();
}
});
}
}, internalLockLeaseTime / 3, TimeUnit.MILLISECONDS);
ee.setTimeout(task);
}1. 実装クラス
@Override
public void lock(long leaseTime, TimeUnit unit) {
    try {
    	// 这里的过期时间为我们输入的10
        lock(leaseTime, unit, false);
    } catch (InterruptedException e) {
        throw new IllegalStateException();
    }
}2 を開き、メソッド
lock() で表示を実装します3.3 ソース コードと同じ #3. 直接アクセスしてロックを取得してみます
method<div class="code" style="position:relative; padding:0px; margin:0px;"><pre class='brush:php;toolbar:false;'>private <T> RFuture<Long> tryAcquireAsync(long leaseTime, TimeUnit unit, long threadId) {
// 这里进行判断如果没有设置参数leaseTime = -1,此时我们为10
if (leaseTime != -1) {
// 来到此方法
return tryLockInnerAsync(leaseTime, unit, threadId, RedisCommands.EVAL_LONG);
}
// 此处省略后面内容,前面以详细说明。。。。
}</pre><div class="contentsignin">ログイン後にコピー</div></div> 4.
leaseTime の値が変更されていることを除けば、有効期限を経過しないメソッドと同じであることを確認するのは難しくありません。
<T> RFuture<T> tryLockInnerAsync(long leaseTime, TimeUnit unit, long threadId, RedisStrictCommand<T> command) {
internalLockLeaseTime = unit.toMillis(leaseTime);
return commandExecutor.evalWriteAsync(getName(), LongCodec.INSTANCE, command,
// 首先判断锁是否存在
"if (redis.call('exists', KEYS[1]) == 0) then " +
// 存在则获取锁
"redis.call('hset', KEYS[1], ARGV[2], 1); " +
// 然后设置过期时间
"redis.call('pexpire', KEYS[1], ARGV[1]); " +
"return nil; " +
"end; " +
// hexists查看哈希表的指定字段是否存在,存在锁并且是当前线程持有锁
"if (redis.call('hexists', KEYS[1], ARGV[2]) == 1) then " +
// hincrby自增一
"redis.call('hincrby', KEYS[1], ARGV[2], 1); " +
// 锁的值大于1,说明是可重入锁,重置过期时间
"redis.call('pexpire', KEYS[1], ARGV[1]); " +
"return nil; " +
"end; " +
// 锁已存在,且不是本线程,则返回过期时间ttl
"return redis.call('pttl', KEYS[1]);",
Collections.<Object>singletonList(getName()), internalLockLeaseTime, getLockName(threadId));
}@Override
public void unlock() {
try {
// 点击进入释放锁方法
get(unlockAsync(Thread.currentThread().getId()));
} catch (RedisException e) {
if (e.getCause() instanceof IllegalMonitorStateException) {
throw (IllegalMonitorStateException) e.getCause();
} else {
throw e;
}
}
// Future<Void> future = unlockAsync();
// future.awaitUninterruptibly();
// if (future.isSuccess()) {
// return;
// }
// if (future.cause() instanceof IllegalMonitorStateException) {
// throw (IllegalMonitorStateException)future.cause();
// }
// throw commandExecutor.convertException(future);
}ログイン後にコピー
2. Open@Override
public void unlock() {
try {
// 点击进入释放锁方法
get(unlockAsync(Thread.currentThread().getId()));
} catch (RedisException e) {
if (e.getCause() instanceof IllegalMonitorStateException) {
throw (IllegalMonitorStateException) e.getCause();
} else {
throw e;
}
}
// Future<Void> future = unlockAsync();
// future.awaitUninterruptibly();
// if (future.isSuccess()) {
// return;
// }
// if (future.cause() instanceof IllegalMonitorStateException) {
// throw (IllegalMonitorStateException)future.cause();
// }
// throw commandExecutor.convertException(future);
}unlockAsync()
method
@Override
public RFuture<Void> unlockAsync(long threadId) {
    RPromise<Void> result = new RedissonPromise<Void>();
    // 解锁方法,后面展开说
    RFuture<Boolean> future = unlockInnerAsync(threadId);
	// 完成
    future.onComplete((opStatus, e) -> {
        if (e != null) {
        	// 取消到期续订
            cancelExpirationRenewal(threadId);
            // 将这个未来标记为失败并通知所有人
            result.tryFailure(e);
            return;
        }
		// 状态为空,说明解锁的线程和当前锁不是同一个线程
        if (opStatus == null) {
            IllegalMonitorStateException cause = new IllegalMonitorStateException("attempt to unlock lock, not locked by current thread by node id: "
                    + id + " thread-id: " + threadId);
            result.tryFailure(cause);
            return;
        }

        cancelExpirationRenewal(threadId);
        result.trySuccess(null);
    });

    return result;
}3.OpenunlockInnerAsync()methodprotected RFuture<Boolean> unlockInnerAsync(long threadId) {
return commandExecutor.evalWriteAsync(getName(), LongCodec.INSTANCE, RedisCommands.EVAL_BOOLEAN,
// 判断释放锁的线程和已存在锁的线程是不是同一个线程,不是返回空
"if (redis.call('hexists', KEYS[1], ARGV[3]) == 0) then " +
"return nil;" +
"end; " +
// 释放锁后,加锁次数减一
"local counter = redis.call('hincrby', KEYS[1], ARGV[3], -1); " +
// 判断剩余数量是否大于0
"if (counter > 0) then " +
// 大于0 ,则刷新过期时间
"redis.call('pexpire', KEYS[1], ARGV[2]); " +
"return 0; " +
"else " +
// 释放锁,删除key并发布锁释放的消息
"redis.call('del', KEYS[1]); " +
"redis.call('publish', KEYS[2], ARGV[1]); " +
"return 1; "+
"end; " +
"return nil;",
Arrays.<Object>asList(getName(), getChannelName()), LockPubSub.UNLOCK_MESSAGE, internalLockLeaseTime, getLockName(threadId));
}以上がSpringboot が Redisson に基づいて Redis 分散リエントラント ロック ソース コード分析を実装する方法の詳細内容です。詳細については、PHP 中国語 Web サイトの他の関連記事を参照してください。

ホットAIツール

Undresser.AI Undress
リアルなヌード写真を作成する AI 搭載アプリ

AI Clothes Remover
写真から衣服を削除するオンライン AI ツール。

Undress AI Tool
脱衣画像を無料で

Clothoff.io
AI衣類リムーバー

Video Face Swap
完全無料の AI 顔交換ツールを使用して、あらゆるビデオの顔を簡単に交換できます。

人気の記事
ホットツール

メモ帳++7.3.1
使いやすく無料のコードエディター

SublimeText3 中国語版
中国語版、とても使いやすい

ゼンドスタジオ 13.0.1
強力な PHP 統合開発環境

ドリームウィーバー CS6
ビジュアル Web 開発ツール

SublimeText3 Mac版
神レベルのコード編集ソフト(SublimeText3)
ホットトピック
 7694
7694
 15
1640
14
1393
52
1287
25
1229
29
15
1640
14
1393
52
1287
25
1229
29

 Redisクラスターモードの構築方法
Apr 10, 2025 pm 10:15 PM
Redisクラスターモードの構築方法
Apr 10, 2025 pm 10:15 PM
Redisクラスターモードは、シャードを介してRedisインスタンスを複数のサーバーに展開し、スケーラビリティと可用性を向上させます。構造の手順は次のとおりです。異なるポートで奇妙なRedisインスタンスを作成します。 3つのセンチネルインスタンスを作成し、Redisインスタンスを監視し、フェールオーバーを監視します。 Sentinel構成ファイルを構成し、Redisインスタンス情報とフェールオーバー設定の監視を追加します。 Redisインスタンス構成ファイルを構成し、クラスターモードを有効にし、クラスター情報ファイルパスを指定します。各Redisインスタンスの情報を含むnodes.confファイルを作成します。クラスターを起動し、CREATEコマンドを実行してクラスターを作成し、レプリカの数を指定します。クラスターにログインしてクラスター情報コマンドを実行して、クラスターステータスを確認します。作る
 Redisデータをクリアする方法
Apr 10, 2025 pm 10:06 PM
Redisデータをクリアする方法
Apr 10, 2025 pm 10:06 PM
Redisデータをクリアする方法:Flushallコマンドを使用して、すべての重要な値をクリアします。 FlushDBコマンドを使用して、現在選択されているデータベースのキー値をクリアします。 [選択]を使用してデータベースを切り替え、FlushDBを使用して複数のデータベースをクリアします。 DELコマンドを使用して、特定のキーを削除します。 Redis-CLIツールを使用してデータをクリアします。
 Redisキューの読み方
Apr 10, 2025 pm 10:12 PM
Redisキューの読み方
Apr 10, 2025 pm 10:12 PM
Redisのキューを読むには、キュー名を取得し、LPOPコマンドを使用して要素を読み、空のキューを処理する必要があります。特定の手順は次のとおりです。キュー名を取得します:「キュー:キュー」などの「キュー:」のプレフィックスで名前を付けます。 LPOPコマンドを使用します。キューのヘッドから要素を排出し、LPOP Queue:My-Queueなどの値を返します。空のキューの処理:キューが空の場合、LPOPはnilを返し、要素を読む前にキューが存在するかどうかを確認できます。
 Redisコマンドの使用方法
Apr 10, 2025 pm 08:45 PM
Redisコマンドの使用方法
Apr 10, 2025 pm 08:45 PM
Redis指令を使用するには、次の手順が必要です。Redisクライアントを開きます。コマンド(動詞キー値)を入力します。必要なパラメーターを提供します(指示ごとに異なります)。 Enterを押してコマンドを実行します。 Redisは、操作の結果を示す応答を返します(通常はOKまたは-ERR)。
 Redisロックの使用方法
Apr 10, 2025 pm 08:39 PM
Redisロックの使用方法
Apr 10, 2025 pm 08:39 PM
Redisを使用して操作をロックするには、setnxコマンドを介してロックを取得し、有効期限を設定するために有効期限コマンドを使用する必要があります。特定の手順は次のとおりです。(1)SETNXコマンドを使用して、キー価値ペアを設定しようとします。 (2)expireコマンドを使用して、ロックの有効期限を設定します。 (3)Delコマンドを使用して、ロックが不要になったときにロックを削除します。
 Redisのソースコードを読み取る方法
Apr 10, 2025 pm 08:27 PM
Redisのソースコードを読み取る方法
Apr 10, 2025 pm 08:27 PM
Redisソースコードを理解する最良の方法は、段階的に進むことです。Redisの基本に精通してください。開始点として特定のモジュールまたは機能を選択します。モジュールまたは機能のエントリポイントから始めて、行ごとにコードを表示します。関数コールチェーンを介してコードを表示します。 Redisが使用する基礎となるデータ構造に精通してください。 Redisが使用するアルゴリズムを特定します。
 Redisコマンドラインの使用方法
Apr 10, 2025 pm 10:18 PM
Redisコマンドラインの使用方法
Apr 10, 2025 pm 10:18 PM
Redisコマンドラインツール(Redis-Cli)を使用して、次の手順を使用してRedisを管理および操作します。サーバーに接続し、アドレスとポートを指定します。コマンド名とパラメーターを使用して、コマンドをサーバーに送信します。ヘルプコマンドを使用して、特定のコマンドのヘルプ情報を表示します。 QUITコマンドを使用して、コマンドラインツールを終了します。
 Centos RedisでLUAスクリプト実行時間を構成する方法
Apr 14, 2025 pm 02:12 PM
Centos RedisでLUAスクリプト実行時間を構成する方法
Apr 14, 2025 pm 02:12 PM
Centosシステムでは、Redis構成ファイルを変更するか、Redisコマンドを使用して悪意のあるスクリプトがあまりにも多くのリソースを消費しないようにすることにより、LUAスクリプトの実行時間を制限できます。方法1:Redis構成ファイルを変更し、Redis構成ファイルを見つけます:Redis構成ファイルは通常/etc/redis/redis.confにあります。構成ファイルの編集:テキストエディター(VIやNANOなど)を使用して構成ファイルを開きます:sudovi/etc/redis/redis.conf luaスクリプト実行時間制限を設定します。
