CSS ビジュアル フォーマットは、ドキュメントの各要素を処理および変換して、CSS ボックス モデルに準拠する 1 つ以上のボックスを生成するアルゴリズムに対応するモデルです。
要素の CSS ボックス生成の処理 -
ブロック レベル
インライン レベル
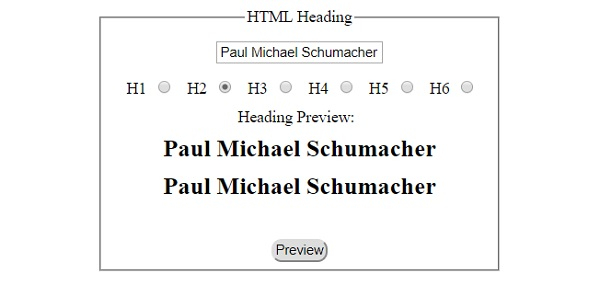
ブロックレベルのボックス生成の例を見てみましょう-
ライブ デモンストレーション
<!DOCTYPE html>
<html>
<head>
<title>HTML Heading</title>
<style>
form {
width:70%;
margin: 0 auto;
text-align: center;
}
* {
padding: 2px;
margin:5px;
}
input[type="button"] {
border-radius: 10px;
}
</style>
</head>
<body>
<form>
<fieldset>
<legend>HTML Heading</legend>
<input type="text" id="textSelect" placeholder="Type Heading Here...">
<div id="radioBut">
<label>H1</label><input class="radio" type="radio" name="heading" value="h1" checked>
<label>H2</label><input class="radio" type="radio" name="heading" value="h2">
<label>H3</label><input class="radio" type="radio" name="heading" value="h3">
<label>H4</label><input class="radio" type="radio" name="heading" value="h4">
<label>H5</label><input class="radio" type="radio" name="heading" value="h5">
<label>H6</label><input class="radio" type="radio" name="heading" value="h6">
</div>
<div>Heading Preview: <span id="headingPreview">Output will show up here</span></div>
<input type="button" onclick="changeHeading()" value="Preview">
</fieldset>
</form>
<script>
var textSelect = document.getElementById("textSelect");
var headingPreview = document.getElementById("headingPreview");
function changeHeading() {
if(textSelect.value === '')
headingPreview.innerHTML = 'Write a Heading';
else{
for(var i=0; i<6; i++){
var radInp = document.getElementsByClassName('radio')[i];
if(radInp.checked === true && textSelect.value !== ''){
headingPreview.innerHTML = '<'+radInp.value+'>'+textSelect.value+'</'+radInp.value+'>';
headingPreview.innerHTML += '<'+radInp.value+'>'+textSelect.value+'</'+radInp.value+'>';
}
}
}
}
</script>
</body>
</html>テキスト フィールドを空にして 「プレビュー」 ボタンをクリックした後 -

「プレビュー」 ボタンをクリックして をクリックし、「h2」を選択します。 ラジオ ボタン -

<!DOCTYPE html>
<html>
<head>
<title>em element</title>
<style>
form {
   width:70%;
   margin: 0 auto;
   text-align: center;
}
* {
   padding: 2px;
   margin:5px;
}
input[type="button"] {
   border-radius: 10px;
}
</style>
</head>
<body>
<form>
<fieldset>
<legend>em-element</legend>
<label for="textSelect">Formatter: </label>
<input id="textSelect" type="text" placeholder="John Doe">
<input type="button" onclick="convertItalic()" value="Check">
<div id="divDisplay"></div>
</fieldset>
</form>
<script>
var divDisplay = document.getElementById("divDisplay");
var textSelect = document.getElementById("textSelect");
function convertItalic() {
   for(i=0; i<2; i++){
      var italicObject = document.createElement("EM");
      var italicText = document.createTextNode(textSelect.value);
      italicObject.appendChild(italicText);
      divDisplay.appendChild(italicObject);
   }
}
</script>
</body>
</html>'Check' ボタンをクリックする前 -

'Check' ボタンをクリックした後-

以上がCSS ビジュアル形式について学ぶの詳細内容です。詳細については、PHP 中国語 Web サイトの他の関連記事を参照してください。