

WordPress で「アイキャッチ画像」を作成する: 添付ファイルを次のレベルに引き上げる

このシリーズでは、次のものを紹介します:
- カテゴリと分類を添付ファイルに割り当てます。
- メディア ファイルをカテゴリ別にクエリして、カスタム ループで出力できるようにします。
- 画像分類クエリを使用してアーカイブ ページに表示します。
- カテゴリまたは分類用語に、そのカテゴリまたは用語の「注目の画像」として画像を追加します
パート 1 では、添付ファイルの新しい分類を作成する方法を説明しました。パート 2 では、ドキュメントのカスタム テンプレート ファイルを作成し、各ドキュメントのメディア ファイルへのリンクを表示するループを追加する方法を説明しました。パート 3 では、ドキュメントのカスタム テンプレート ファイルを作成する方法を説明しました。 3 ドキュメント用のカスタム テンプレート ファイルを作成する方法を説明しました # 特定の用語を含むすべての画像をギャラリー スタイルのアーカイブ ページとして表示するカスタム テンプレート ファイル分類法を作成しました。
この最後のパートでは、少し異なることを説明します。画像にカテゴリを割り当て、カテゴリのアーカイブ テンプレートを編集して、その画像をそのカテゴリの「注目の画像」として表示する方法です。非常に似た手法を使用して、タグまたは分類用語でもこれを行うことができます。
このチュートリアルでは、Twenty Four の子テーマとなるテーマを作成します。テーマには、カテゴリ アーカイブの関数ファイルとカスタム テンプレート ファイルが含まれます。テーマはコード パッケージでダウンロードできます。
###あなたは何が必要ですか###このチュートリアルに従うには、次のものが必要です:
WordPressの開発インストール
FTP アクセス (ローカルで作業している場合は MAMP など)
- コードエディタ
- 1. カテゴリを添付ファイルに適用する
デフォルトでは、WordPress では添付ファイルにカテゴリとタグを割り当てることができませんが、このチュートリアルではこれを行う必要があります。幸いなことに、添付ファイルにカテゴリとタグを割り当てる以前のチュートリアルで示したように、この問題は簡単に修正できます。
注: この手法はタグとカテゴリで機能します。独自の分類法でこれを行う場合は、登録時に分類法が適用される投稿タイプとして添付ファイルを指定する必要があります。これは、このシリーズのパート 1 に従って行うことができます。テーマで、functions.php というファイルを作成し、次のコードをそれに追加します。 リーリー
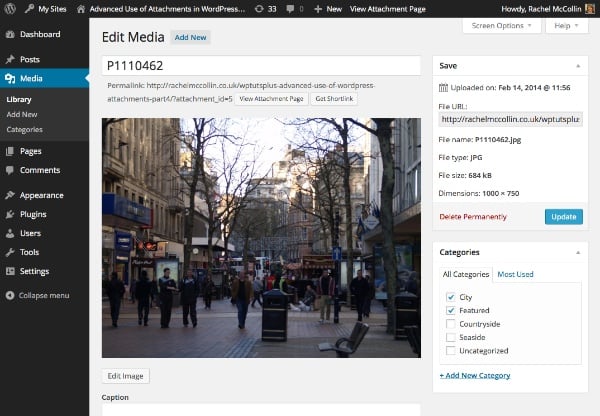
これは、register_taxonomy_for_object_type() 関数を使用して、添付ファイルにカテゴリを追加します。ここで、メディア ライブラリ画面を表示すると、カテゴリが有効になっていることがわかります。
以下に、カテゴリを示すサンプルのメディア編集画面を示します。


2.创建类别模板
下一步是创建自定义类别模板。由于我的主题是二十四的子主题,我将复制该主题的 category.php 文件并将其复制到我的子主题,并对开头注释进行一些更改:
<?php
/**
 * The template for displaying Category pages
 * Custom template which displays a featured image first.
 * Supports Part 4 of tutorial series on Advanced Use of Images in WordPress for WPTutsplus
 */ get_header();  ?>
<section class="content-area" id="primary">
  <div class="site-content" id="content" role="main"><?php if ( have_posts() ) : ?>
    <header class="archive-header">
      <h1 class="archive-title"></h1>
        <?php
          // Show an optional term description.
          $term_description = term_description();
          if ( ! empty( $term_description ) ) :
            printf( '<div class="taxonomy-description">%s</div>', $term_description );
          endif;
        ?>
    </header><!-- .archive-header -->

<?php
// Start the Loop.
while ( have_posts() ) : the_post();
      /*
       * Include the post format-specific template for the content. If you want to
       * use this in a child theme, then include a file called called content-___.php
       * (where ___ is the post format) and that will be used instead.
       */
      get_template_part( 'content', get_post_format() );
    endwhile;

    // Previous/next page navigation.
    twentyfourteen_paging_nav();
  else :
    // If no content, include the "No posts found" template.
    get_template_part( 'content', 'none' );
  endif;
  ?></div><!-- #content -->
</section><!-- #primary -->

<?php  get_sidebar( 'content' ); get_sidebar(); get_footer(); ?>
3.向类别模板添加自定义查询
在主循环上方,使用 WP_Query 添加自定义循环。在结束 </h1> 标记后插入以下内容:
<?php
// display a featured image for the category
// identify the current category
$currentcat = get_queried_object();
$currentcatname = $currentcat->slug;
?>
使用 get_queried_object() 标识当前显示的类别。
下面,使用 WP_Query 定义自定义查询的参数:
<?php
// define query arguments for the featured image
$args = array(
    'post_type' => 'attachment',
    'post_status' => 'inherit',
    'category_name' => $currentcatname,
  );
  $query = new WP_Query( $args );
?>
这标识当前类别以及“特色”类别中的所有附件。请注意,由于 WordPress 设置附件帖子状态的方式,您需要包含 'post_status' => 'inherit' 作为参数。
现在在此下方添加循环:
<?php
  // The Loop  while ( $query->have_posts() ) : $query->the_post();
  // define attributes for image display
  $imgattr = array(
		'alt'   => trim( strip_tags( get_post_meta( $attachment_id, '_wp_attachment_image_alt', true ) ) ),
	);

  // output the image ?>
  <div class="category-image"></div>
<?php
endwhile;
// reset the query so the default query can be run
wp_reset_postdata(); ?>
确保您不要错过最后的 wp_reset_postdata() ,否则类别存档的主查询将无法工作。
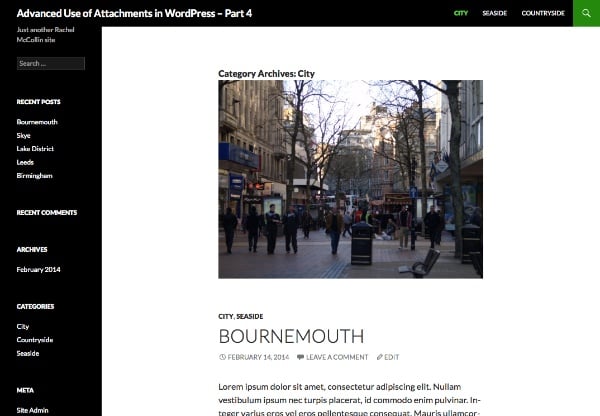
添加完所有这些后,保存您的类别模板并查看您的类别存档页面之一。它应该类似于本教程开头的屏幕截图。
摘要
在这个由四个教程组成的系列中,我演示了一些在 WordPress 中处理图像的高级技术。其中包括:
- 注册专门用于附件的分类
- 使用自定义模板创建 dosucmtn 列表页面
- 再次使用自定义模板创建图库页面以显示给定类别中的图像
- 为每个类别创建“特色图片”并将其显示在类别存档页面上。
正如您所见,您可以在 WordPress 中对图像和媒体执行更多操作,而不仅仅是将它们附加到帖子或将它们用作特色图像。只要发挥一点想象力,您就可以像任何其他帖子类型一样查询它们,并输出文档或显示图像的链接。
以上がWordPress で「アイキャッチ画像」を作成する: 添付ファイルを次のレベルに引き上げるの詳細内容です。詳細については、PHP 中国語 Web サイトの他の関連記事を参照してください。

ホットAIツール

Undresser.AI Undress
リアルなヌード写真を作成する AI 搭載アプリ

AI Clothes Remover
写真から衣服を削除するオンライン AI ツール。

Undress AI Tool
脱衣画像を無料で

Clothoff.io
AI衣類リムーバー

AI Hentai Generator
AIヘンタイを無料で生成します。

人気の記事
ホットツール

メモ帳++7.3.1
使いやすく無料のコードエディター

SublimeText3 中国語版
中国語版、とても使いやすい

ゼンドスタジオ 13.0.1
強力な PHP 統合開発環境

ドリームウィーバー CS6
ビジュアル Web 開発ツール

SublimeText3 Mac版
神レベルのコード編集ソフト(SublimeText3)
ホットトピック
 7491
7491
 15
1377
52
77
11
19
41
15
1377
52
77
11
19
41

 WordPressは初心者にとって簡単ですか?
Apr 03, 2025 am 12:02 AM
WordPressは初心者にとって簡単ですか?
Apr 03, 2025 am 12:02 AM
WordPressは、初心者が簡単に始めることができます。 1.バックグラウンドにログインした後、ユーザーインターフェイスは直感的であり、シンプルなダッシュボードは必要なすべての関数リンクを提供します。 2。基本操作には、コンテンツの作成と編集が含まれます。 WysiWygエディターは、コンテンツの作成を簡素化します。 3.初心者は、プラグインとテーマを介してウェブサイトの機能を拡張でき、学習曲線は存在しますが、練習を通じて習得できます。
 ワードプレスは何に適していますか?
Apr 07, 2025 am 12:06 AM
ワードプレスは何に適していますか?
Apr 07, 2025 am 12:06 AM
wordpressisisgoodforvirtalayanywebprojectoitsversitilityasacms.itexcelsin:1)ユーザーフレンドリー、柔軟性と柔軟性と顧客化の維持、およびプルージンの数値化; 3)seooptimization;
 WordPressを3日で学ぶことはできますか?
Apr 09, 2025 am 12:16 AM
WordPressを3日で学ぶことはできますか?
Apr 09, 2025 am 12:16 AM
3日以内にWordPressを学ぶことができます。 1.テーマ、プラグインなどのマスター基本知識。2。インストールや作業原則などのコア関数を理解します。 3.例を使用して、基本的および高度な使用法を学びます。 4.デバッグテクニックとパフォーマンスの最適化の提案を理解します。
 WixまたはWordPressを使用する必要がありますか?
Apr 06, 2025 am 12:11 AM
WixまたはWordPressを使用する必要がありますか?
Apr 06, 2025 am 12:11 AM
WIXは、プログラミングの経験がないユーザーに適しており、WordPressは、よりコントロールと拡張機能を必要とするユーザーに適しています。 1)WIXはドラッグアンドドロップエディターとリッチテンプレートを提供しているため、Webサイトをすばやく構築できます。 2)オープンソースのCMSとして、WordPressには巨大なコミュニティとプラグインエコシステムがあり、詳細なカスタマイズと拡張をサポートしています。
 WordPressの費用はいくらですか?
Apr 05, 2025 am 12:13 AM
WordPressの費用はいくらですか?
Apr 05, 2025 am 12:13 AM
WordPress自体は無料ですが、使用するには余分な費用がかかります。1。WordPress.comは、無料から支払いまでの範囲のパッケージを提供し、価格は月あたり数ドルから数十ドルまでの範囲です。 2。WordPress.orgでは、ドメイン名(年間10〜20米ドル)とホスティングサービス(月額5〜50米ドル)を購入する必要があります。 3.ほとんどのプラグインとテーマは無料で、有料価格は数十から数百ドルです。適切なホスティングサービスを選択し、プラグインとテーマを合理的に使用し、定期的に維持および最適化することにより、WordPressのコストを効果的に制御および最適化できます。
 なぜWordPressを使用するのはなぜですか?
Apr 02, 2025 pm 02:57 PM
なぜWordPressを使用するのはなぜですか?
Apr 02, 2025 pm 02:57 PM
人々は、その力と柔軟性のためにWordPressを使用することを選択します。 1)WordPressは、さまざまなWebサイトのニーズに適した、使いやすさとスケーラビリティを備えたオープンソースのCMSです。 2)豊富なテーマとプラグイン、巨大なエコシステム、強力なコミュニティサポートがあります。 3)WordPressの作業原則は、テーマ、プラグイン、コア関数に基づいており、PHPとMySQLを使用してデータを処理し、パフォーマンスの最適化をサポートします。
 WordPressはCMSですか?
Apr 08, 2025 am 12:02 AM
WordPressはCMSですか?
Apr 08, 2025 am 12:02 AM
WordPressはコンテンツ管理システム(CMS)です。コンテンツ管理、ユーザー管理、テーマ、プラグイン機能を提供して、Webサイトコンテンツの作成と管理をサポートします。その実用的な原則には、ブログから企業Webサイトまで、さまざまなニーズに適したデータベース管理、テンプレートシステム、プラグインアーキテクチャが含まれます。
 WordPressはまだ無料ですか?
Apr 04, 2025 am 12:06 AM
WordPressはまだ無料ですか?
Apr 04, 2025 am 12:06 AM
WordPressのコアバージョンは無料ですが、使用中に他の料金が発生する場合があります。 1。ドメイン名とホスティングサービスには支払いが必要です。 2。高度なテーマとプラグインが充電される場合があります。 3.プロフェッショナルサービスと高度な機能が請求される場合があります。
