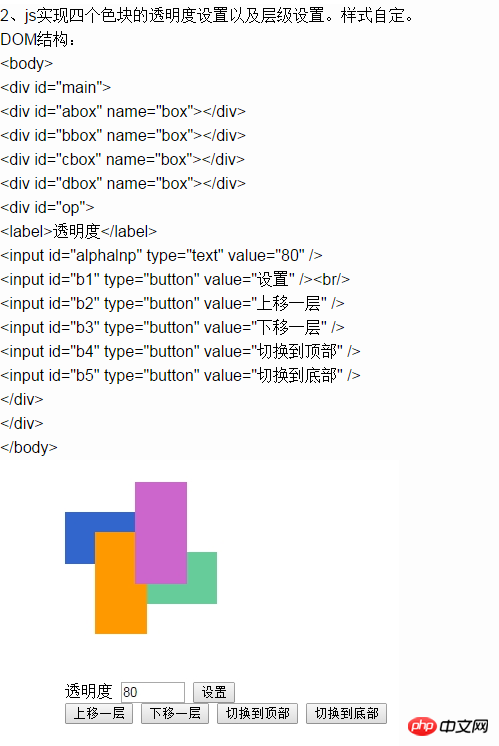
javascript - 如何用js实现四个色块的透明度设置以及层级设置呢?
ringa_lee
ringa_lee 2017-04-10 15:17:47
0
1
811

是这样的,本周接到一个任务,题目描述如下

我的JS代码是这样写的,逻辑还是挺简单的。比如上移一层就是先获取到点击的方块对象$self,再在四个方块对象里找到一个z-index刚好比它大1的,使其z-index - 1,再令$self的z-index + 1


<script type="text/javascript"> var current_index = 0; $(document).ready(function() { $("#b1").click(function() { $(".box").each(function() { alert($(this).css("z-index")); }); }); $("#cbox,#abox,#bbox,#dbox").click(function() { var $box_z = $(".box"); var box_z_length = $box_z.length; var $self = $(this); //上移一层 $("#b2").click(function() { current_index = 0; var self_current_index = parseInt($self.css("z-index")) + 1; //$self.css("z-index", self_current_index + 1); $(".box").each(function() { if (parseInt($(this).css("z-index")) == self_current_index) { current_index = parseInt($(this).css("z-index")) - 1; $(this).css("z-index", current_index); //break; $self.css("z-index", self_current_index); } }); }); //下移一层 $("#b3").click(function() { current_index = 0; var self_current_index = parseInt($self.css("z-index")) - 1; //$self.css("z-index", self_current_index + 1); $(".box").each(function() { if (parseInt($(this).css("z-index")) == self_current_index) { current_index = parseInt($(this).css("z-index")) + 1; $(this).css("z-index", current_index); //break; $self.css("z-index", self_current_index); } }); }); //切换到顶部 $("#b4").click(function() { $(".box").each(function() { if (parseInt($(this).css("z-index")) > parseInt($self.css("z-index"))) { current_index = parseInt($(this).css("z-index")) - 1; $(this).css("z-index", current_index); // alert($(this).css("z-index")); } }); $self.css("z-index", "4"); }); //切换到底部 $("#b5").click(function() { //alert($self.css("z-index")); $(".box").each(function() { if (parseInt($(this).css("z-index")) < parseInt($self.css("z-index"))) { //alert(current_index); current_index = parseInt($(this).css("z-index")) + 1; $(this).css("z-index", current_index); } }); $self.css("z-index", 1); }); }); //$("#cbox,#abox,#bbox,#dbox").click(function()) }); //document </script>

目前有一些意料之外的问题,比如:四个按钮轮流点击的时候,有时功能和预想的逻辑不符,只是使用一个按钮事件的时候,效果就好很多;上移一层,下移一层,设想是点击绿色方块,再点击上移一层,但结果却是,同时改变了两个方块的相对位置。
我不清楚是哪里出错,还请各位大虾指点!

ringa_lee
ringa_lee

ringa_lee

全員に返信(1)
伊谢尔伦

其实看到这个题非常有趣才进来答的,没仔细看题主的代码,抱歉……

其实对于脱离了文档流的元素,并不一定是非要以z-index来决定它和其他元素的z轴关系,而是相同z-index的情况下越靠后的元素z轴权重越高,所以不妨不要去管z-index,直接移动元素在节点中的位置了……

另外题主那代码,$self指向的是包含了四个节点的jquery对象,你直接对这个对象使用css()之类的方法可能欠妥。

直接放代码吧,JS是下面这段

window.onload = function() {
    var box = document.querySelectorAll('.box')

    //选中的元素添加selected类
    for (var i = 0;i < box.length;i ++) {
        box[i].addEventListener('click', function() {
            for (var i = 0;i < box.length;i ++) {
                box[i].classList.remove('selected')
            }

            this.classList.add('selected')
        }, false)
    }

    //设置透明度
    var set = document.querySelector('[value=set]')
    set.onclick = function() {
        var opacity = (document.querySelector('[type=Number]').value)/100
        document.querySelector('.selected').style.opacity = opacity
    }

    //上移
    var up = document.querySelector('[value=up]')
    up.onclick = function() {
        var selected = document.querySelector('.selected')

        if (selected.nextElementSibling != null) {
            selected.parentNode.insertBefore(selected.nextElementSibling, selected)
        }
    }

    //下移
    var down = document.querySelector('[value=down]')
    down.onclick = function() {
        var selected = document.querySelector('.selected')

        if (selected.previousElementSibling != null) {
            selected.parentNode.insertBefore(selected, selected.previousElementSibling)
        }
    }

    //置顶
    var top = document.querySelector('[value=top]')
    top.onclick = function() {
        var selected = document.querySelector('.selected')

        selected.parentNode.appendChild(selected)
    }

    //置底
    var bottom = document.querySelector('[value=bottom]')
    bottom.onclick = function() {
        var selected = document.querySelector('.selected')

        selected.parentNode.insertBefore(selected, selected.parentNode.firstElementChild)
    }
}

整个html文件在这里,直接copy了放在文件中,浏览器打开就ok

<!DOCTYPE html>
<html lang="en">
<head>
    <meta charset="UTF-8">
    <title>Document</title>
</head>
<body>
    <p class="main">
        <p class="box1 box"></p>
        <p class="box2 box"></p>
        <p class="box3 box"></p>
        <p class="box4 box"></p>
    </p>
    <lable>透明度</lable>
    <input type="number" min="0" max="100" step="1">
    <input type="button" value="set">
    <br>
    <input type="button" value="up">
    <input type="button" value="down">
    <input type="button" value="top">
    <input type="button" value="bottom">

    <script>
        window.onload = function() {
            var box = document.querySelectorAll('.box')

            //选中的元素添加selected类
            for (var i = 0;i < box.length;i ++) {
                box[i].addEventListener('click', function() {
                    for (var i = 0;i < box.length;i ++) {
                        box[i].classList.remove('selected')
                    }

                    this.classList.add('selected')
                }, false)
            }

            //设置透明度
            var set = document.querySelector('[value=set]')
            set.onclick = function() {
                var opacity = (document.querySelector('[type=Number]').value)/100
                document.querySelector('.selected').style.opacity = opacity
            }

            //上移
            var up = document.querySelector('[value=up]')
            up.onclick = function() {
                var selected = document.querySelector('.selected')

                if (selected.nextElementSibling != null) {
                    selected.parentNode.insertBefore(selected.nextElementSibling, selected)
                }
            }

            //下移
            var down = document.querySelector('[value=down]')
            down.onclick = function() {
                var selected = document.querySelector('.selected')

                if (selected.previousElementSibling != null) {
                    selected.parentNode.insertBefore(selected, selected.previousElementSibling)
                }
            }

            //置顶
            var top = document.querySelector('[value=top]')
            top.onclick = function() {
                var selected = document.querySelector('.selected')

                selected.parentNode.appendChild(selected)
            }

            //置底
            var bottom = document.querySelector('[value=bottom]')
            bottom.onclick = function() {
                var selected = document.querySelector('.selected')

                selected.parentNode.insertBefore(selected, selected.parentNode.firstElementChild)
            }
        }
    </script>

    <style>
        .main {
            position: relative;
            overflow: hidden;
            width: 200px;
            height: 200px;
        }
        .box1 {
            position: absolute;
            width: 50px;
            height: 100px;
            left: 40%;
            top: 40%;
            background-color: #9c47a3;
        }
        .box2 {
            position: absolute;
            width: 100px;
            height: 50px;
            left: 45%;
            top: 25%;
            background-color: #25b3ff;
        }
        .box3 {
            position: absolute;
            width: 50px;
            height: 100px;
            left: 35%;
            top: 5%;
            background-color: #edf51b;
        }
        .box4 {
            position: absolute;
            width: 100px;
            height: 50px;
            left: 6%;
            top: 35%;
            background-color: #20d658;
        }
        .selected::before {
            content: 'selected!';
            position: absolute;
            left: 0;
            top: 0;
        }
    </style>
</body>
</html>
いいねを押す +0
人気のチュートリアル
詳細>
最新のダウンロード
詳細>
ウェブエフェクト
公式サイト
サイト素材
フロントエンドテンプレート