1. Preface
Someone asked in my cult group some time ago, "I just learned Android and I don’t understand Gradle. I have read a lot of information and still have a vague understanding. I hope Brother Zhang can tell me about Gradle." Unexpectedly, there are many people in the group. Everyone responded and expressed the same feeling. Someone recommended a book in the group and said that reading this book would be enough. To be honest, I don’t object to reading books, but what I object to is that in order to understand a knowledge point, you need to read a book, which is too inefficient, so I had a conscience and casually said, "How about I open it in the group?" Can I give you a lecture to popularize the basic concepts of Gradle?" Unexpectedly, all the people who usually dive came out, and then responded "666..." To be honest, I regretted it as soon as I said it, mainly because I don't have so much time, but After all, I had already let go. When I got home from working overtime that night, I started popularizing the work for them in the group for more than an hour without any preparation. Afterwards, surprisingly, everyone unanimously reported that the effect was very good, and everyone who listened to the class was very happy. Seriously, there are many thoughtful people who have compiled the chat records I typed word by word in the group into notes and shared them in the group. I think this topic may be helpful to many of my readers, so I compiled it in the group. I have made some additions and improvements based on the notes. I hope this article will be helpful to you!
2. What is a build tool?
We all know that Gradle is a build tool, so what is a build tool?
I find it difficult to understand a lot of text explanations on the Internet. Here I will use our Android development as an example.
We used Eclipse for development in the past, and everyone knows that Eclipse is an IDE (Integrated Development Environment). It was originally used for Java development, and Android is based on the Java language, so initially Google still hoped that Android could be used in Develop on Eclipse. In order to meet this demand, Google developed something called ADT (Android Developer Tools). I believe that those who have come from the Eclipse era should be familiar with ADT. Precisely because of ADT, from now on we only need to code Good code, and then compile, run, sign, package and a series of processes directly on Eclipse, and the work behind this is all the credit of ADT. In a sense ADT is our build tool.
Since Google launched Android Studio, it announced the default use of Gradle as the build tool, and then gave up updating ADT. Since then, Gradle has entered the vision of Android developers, and I also started to contact and learn Gradle in the beta version of AS.
Generally speaking, in addition to the compilation, running, signing, packaging, etc. mentioned above, build tools also have dependency management functions. What is dependency management? Let’s take Eclipse as an example. We used to develop Android on Eclipse. If When you need to use a third-party library, you usually download the jar file first, then add the jar file to the libs directory, and then you can reference it in the project. But don’t you think this management method is troublesome? Assuming that the third-party library is updated, you need to download the latest Jar file and then replace the original one. It’s okay if there are few libraries that are referenced. But if there are too many third-party libraries that are referenced, it will be troublesome. Death, it can be said that this method only relies on dependence but no management.
Now everyone is familiar with the way Gradle refers to third-party libraries:
compile 'com.android.support:support-v4:24.0.1'
Similar to this dependency method, isn't it very convenient? And It is very intuitive. You can directly see the source address. If you upgrade, just change the version number. This is the so-called dependency management.
So the build tool is a collection of functions for compiling, running, signing, packaging, dependency management, etc. for your project. Traditional build tools include Make, Ant, Maven, Ivy, etc., while Gradle is a new generation of automated builds. tool.
3. What is Gradle?
As mentioned above, Gradle is a new generation of automated build tools. It is an independent project and has nothing to do with AS or Android. The official website: https://gradle.org/, similar to Ant Build tools such as Maven and Maven are all described based on xml, which is very bloated. Gradle uses a language called Groovy. The syntax is very similar to Java syntax, but it is a dynamic language and is based on Java. Many improvements have been made, making it more concise and flexible to use, and Gradle is fully compatible with Maven and Ivy. This basically declares that Maven and Ivy can be abandoned. Gradle is mainly launched for Java applications. Of course, it currently also supports Android, C, C++.
4. The relationship between Gradle and Android Studio
As mentioned above, Gradle has nothing to do with Android Studio. However, Gradle officially attaches great importance to Android development. When Google launched AS, it selected Gradle as a build tool. In order to support Gradle can be used on AS. Google has made a plug-in for AS called Android Gradle Plugin, so we can use Gradle on AS entirely because of this plug-in. There is a build.gradle file in the root directory of the project, which contains this code:
classpath 'com.android.tools.build:gradle:2.1.2'
This is the code that relies on the gradle plug-in. The version number behind represents the version of the android gradle plug-in, not the Gradle version. This is determined by Google and has nothing to do with the official Gradle. More information about the android gradle plugin can be viewed here. Here is a list of the specific changes and specific functions of each version of the android gradle plugin:
http://tools.android.com/tech-docs/new-build-system
Friendly reminder, you need to surf the Internet scientifically!
5. Gradle Wrapper
Now created by default A project, and then click Run on AS, Gradle will be installed directly for you by default. We do not need to install Gradle additionally, but in fact this Gradle is not the real Gradle. It is called Gradle Wrapper, which means Gradle packaging. What does it mean? What? Suppose we have multiple projects locally, one is an older project that still uses the Gradle 1.0 version, and the other is a relatively new project that uses the Gradle 2.0 version, but you definitely want to run both projects at the same time. , if you only have Gradle 1.0 installed, it will definitely not work, so in order to solve this problem, Google launched the concept of Gradle Wrapper, which means that it configures a specified version of Gradle in each of your projects. You can understand it for each Android The project has a small Gradle locally. Through this, each project can support building the project with different Gradle versions.
It will be easier once you understand the concept of Gradle Wrapper. All the following operations are based on Gradle Wrapper.
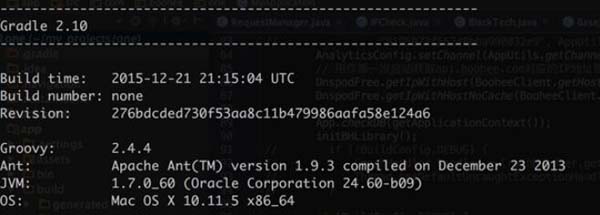
By default, Gradle will be automatically downloaded when we create a project for the first time on AS. This process is very long and surprisingly slow, but it is ok after the first time. The next step is to teach you how to use the command line to test it. Please give it a try. Switch to the directory of the project on the terminal or the terminal of AS, and then enter ./gradlew -v (win users directly enter gradlew -v), you can view the version of gradle used in the current project. gradlew is the abbreviation of gradle wrapper. If this is the first time you execute the command line, a download prompt will appear, followed by printing dots one by one. This process is very long and depends on your network speed, ranging from a few minutes to dozens of minutes.
Some people have questions. My AS can already run the project normally, which means that Gradle has been downloaded. Why do I need to download it again from the command line? I have always had this question. In theory, it should not be downloaded again. But the fact is that he has to download it again. I guess it may be a bug.
If the download is completed and you enter ./gradlew -v and the following results appear, it proves that your project is OK, otherwise there is a problem with your project configuration.

6. Gradle configuration files included in Android projects
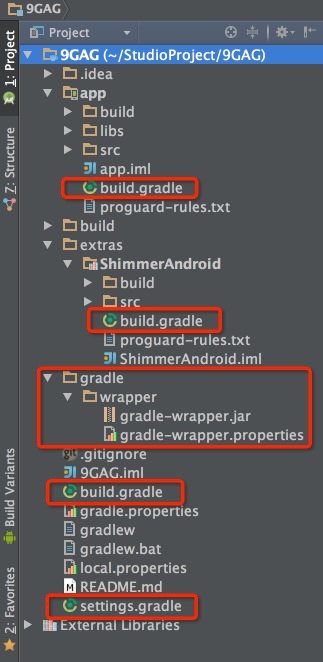
Let’s take the 9GAG project that I open sourced on GitHub very early as an example to briefly introduce the basic Gradle-related configuration files included in a complete Android project:

Let’s analyze the red marked part step by step from top to bottom:
9GAG/app/build.gradle
This file is the gradle configuration file of this Module under the app folder. It can also be regarded as the most important gradle configuration file of the entire project. The specific configuration inside More on that later.
9GAG/extras/ShimmerAndroid/build.gradle
Every Module needs to have a gradle configuration file. The syntax is the same. The only difference is that the declaration at the beginning is
apply plugin: ‘com.android.library’
9GAG/gradle
There is a wrapper folder in this directory. You can see two files in it. We mainly Take a look at the contents of the gradle-wrapper.properties file:

You can see that the gradle directory and download path are declared in it, as well as the gradle version used by the current project. We generally will not change these default paths. This file The incorrect gradle version specified here is also one of the reasons why many package imports are unsuccessful.
9GAG/build.gradle
This file is the gradle basic configuration file for the entire project. The default content declares the version of the android gradle plugin.
9GAG/settings.gradle
This file is a global project configuration file, which mainly declares some modules that need to be added to gradle. Let’s take a look at the contents of the 9GAG file:

7. How to correctly import the downloaded Open source projects?
We often find some excellent open source projects on GitHub, and then want to download them to learn. However, the first step is usually to import the source code into AS, and then run it to see the effect, but the operation often fails. Here I will tell you the correct way to import open source projects:
下载一个Demo,先打开每个 module下的 gradle 文件,即 app 目录下的 build.gradle 以及各个 library 下的 build.gradle ,首先查看 compileSdkVersion 和 buildToolsVersion,因为有些时候你本地的版本和下载的版本不一致,那么就会导致失败。
然后就是检查 gradle-wrapper ,Google 有些时候要求不同的 AS 支持不同的 gradle 版本。比如 AS 1.0 的时候要求必须使用 gradle 1.x 的版本,等到 AS 2.0 的时候,Google 不支持 gradle1.x 的版本,这个时候你必须手动更新下 android gradle plugin 的版本,然后重新同步下。
检查以上两个地方基本就可以导入并运行了,如果还有其他问题,那可能就是环境或者项目本身的问题了。
8. 认识下几个命令
上面提到了,假设我们没有 IDE ,只有类似 Sublime、Atom、Vim这种轻量编辑器怎么办?那我们就没法开发 Android 了么?然而只要有构建工具,不需要 IDE 我们一样有办法开发,这个时候我们就需要用到几个有用的 Gradle 命令了:
./gradlew -v 版本号
./gradlew clean 清除9GAG/app目录下的build文件夹
./gradlew build 检查依赖并编译打包
这里注意的是 ./gradlew build 命令把 debug、release 环境的包都打出来,如果正式发布只需要打 Release 的包,该怎么办呢,下面介绍一个很有用的命令 assemble , 如
./gradlew assembleDebug 编译并打Debug包
./gradlew assembleRelease 编译并打Release的包
 What caching mechanisms does php have?
 How to export pictures to pdf
 How to solve the problem of garbled characters when opening a web page
 What to do if there is no cursor when clicking on the input box
 How to call external js in html
 What coin is NFT?
 What are Python identifiers?
 How to export Apipost offline


