 Java
Java
 javaTutorial
 Detailed explanation of examples of OpenGL ES drawing 3D graphics in Android development
Detailed explanation of examples of OpenGL ES drawing 3D graphics in Android development
This article mainly introduces relevant information on Android development of OpenGL ES to draw 3D graphics examples. Friends in need can refer to it
OpenGL ES is a subset of the OpenGL three-dimensional graphics API, targeting mobile phones, PDAs and Designed for embedded devices such as game consoles. Ophone currently supports OpenGL ES 1.0. OpenGL ES 1.0 is based on the OpenGL 1.3 specification, and OpenGL ES 1.1 is based on the OpenGL 1.5 specification. This article mainly introduces the basic steps of drawing graphics using OpenGL ES.
The content of this article consists of three parts. First, the programming interface of OpenGL ES is obtained through EGL; secondly, the basic concepts of building 3D programs are introduced; and finally, an application example is given.
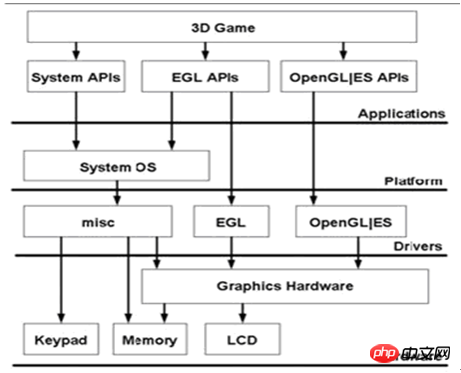
OpenGL ES is essentially a state machine for the graphics rendering pipeline, and EGL is an external layer used to monitor these states and maintain the framebuffer and other rendering surfaces. Figure 1 is a typical EGL system layout diagram. The EGL window design is based on the familiar Native interface for OpenGL on Microsoft Windows (WGL) and UNIX (GLX), and is closer to the latter. The state of the OpenGL ES graphics pipeline is stored in a context managed by EGL. Frame buffers and other drawing rendering surfaces are created, managed, and destroyed through the EGL API. EGL also controls and provides access to device display and possibly device rendering configurations.

Figure 1
OpenGL ES requires a rendering context and rendering surface. The state information of OpenGL ES is stored in the rendering context, and the rendering surface is used for drawing primitives. The operations that require EGL before writing OpenGL ES are:
Query the display handle that the device can support and initialize it.
Create a rendering surface and draw OpenGL ES graphics.
Create a rendering context. EGL needs to create an OpenGL ES rendering context to associate to a rendering surface.
EGL in Ophone includes 4 classes, namely EGLDisplay: display handle, EGLConfig: configuration class; EGLContext: rendering context; class and EGLSurface: renderable view class.
EGL can be thought of as the middle layer between OpenGL ES and the local window system. The local window system refers to the X window system on GNU/Linux, or Mac OX X's Quartz, etc. Before EGL can determine the type of rendering surface, EGL needs to communicate with the underlying window system. Because the window systems on different operating systems are different, EGL provides a transparent window type, EGLDisplay. It abstracts various window systems. So first we need to create and initialize an EGLDisplay object.
// EGLContext的静态方法getEGL获得EGL实例
EGL10 egl = (EGL10)EGLContext.getEGL();
//创建EGLDisplay, EGL_DEFAULT_DISPLAY获得缺省的本地窗口系统类型
EGLDisplay dpy = egl.eglGetDisplay(EGL10.EGL_DEFAULT_DISPLAY);
//初始化EGLDispla的同时获得版本号
int[] version = new int[2];
egl.eglInitialize(dpy, version);
Each EGLDisplay needs to be initialized before use. When initializing EGLDisplay, you can get the implementation version number of EGL in the system. Through the version number and proper use of the corresponding OpenGL ES API, you can write programs with good compatibility to adapt to more devices and provide maximum portability. Initialization function prototype:
boolean eglInitialize(EGLDisplay display, int[] major_minor)
The display is a valid EGLDisplay instance. When the function call completes, major_minor will be assigned the current EGL version number. For example, EGL1.0, major_minor[0] is 1, major_minor[1] is 0. EGLSurface contains all information related to the EGL rendering surface. There are two methods for querying EGLSurface configuration information. One is to query all configuration information and select the most suitable one; the other is to specify the configuration information and the system will give the best matching result. The second method is generally used. The user specifies the desired configuration through configSpec, and the function eglChooseConfig returns the best configuration list through the parameter Configs. Then use the obtained Configs to call eglCreateContext to create a rendering context. This function returns the EGLContext structure. The creation of the rendering surface EGLSurface is completed through the function eglCreateWindowSurface. An application can create multiple EGLContexts. eglMakeCurrent is to bind a rendering context to the rendering surface. The query functions eglGetCurrentContext, eglGetCurrentDisplay and eglGetCurrentSurface are used to obtain the rendering context, display handle and rendering surface of the current system respectively. Finally, the static method getGL of EGLContext obtains the OpenGL ES programming interface. The following program fragment summarizes the above.
EGL10 egl = (EGL10)EGLContext.getEGL();
EGLDisplay dpy = egl.eglGetDisplay(EGL10.EGL_DEFAULT_DISPLAY); int[] version = new int[2];
egl.eglInitialize(dpy, version);
int[] configSpec = {
EGL10.EGL_RED_SIZE, 5,
EGL10.EGL_GREEN_SIZE, 6,
EGL10.EGL_BLUE_SIZE, 5,
EGL10.EGL_DEPTH_SIZE, 16,
EGL10.EGL_NONE
};
EGLConfig[] configs = new EGLConfig[1];
int[] num_config = new int[1];
egl.eglChooseConfig(dpy, configSpec, configs, 1, num_config);
EGLConfig config = configs[0];
EGLContext context = egl.eglCreateContext(dpy, config,
EGL10.EGL_NO_CONTEXT, null);
EGLSurface surface = egl.eglCreateWindowSurface(dpy, config,
sHolder, null);
egl.eglMakeCurrent(dpy, surface, surface, context);
GL10 gl = (GL10)context.getGL();Points for building 3D graphics
Points are the basis for building 3D models. OpenGL ES's internal calculations are point-based. Points can also be used to represent the position of the light source and the position of the object. Generally we use a set of floating point numbers to represent points. For example, the four vertices of a square can be expressed as:
float vertices[] = {
-1.0f, 1.0f, 0.0f, //左上
-1.0f, -1.0f, 0.0f, //左下
1.0f, -1.0f, 0.0f, //右下
1.0f, 1.0f, 0.0f, //右上
};In order to improve performance, the floating point array needs to be stored in a byte buffer. So there is the following operation:
ByteBuffer vbb = ByteBuffer.allocateDirect(vertices.length * 4);
vbb.order(ByteOrder.nativeOrder());
FloatBuffer vertexBuffer = vbb.asFloatBuffer();
vertexBuffer.put(vertices);
vertexBuffer.position(0);
Where ByteOrder.nativeOrder() is to obtain the native byte order. OpenGL ES has functions for operating the graphics rendering pipeline. By default, the use of these functions is turned off. Enabling and closing these functions can be done using glEnableClientState and glDisableClientState.
//Specify that the fixed-point array needs to be enabled
gl.glEnableClientState(GL10.GL_VERTEX_ARRAY);
//Describe the type of array and byte buffering enabled, the type is GL_FLOAT
gl.glVertexPointer( 3, GL10.GL_FLOAT, 0, vertexBuffer);
//Close the vertex array when no longer needed
gl.glDisableClientState(GL10.GL_VERTEX_ARRAY);
边
边是连接两个点的一条线,是多边形面的边缘。
多边形
多边形是由边构成的单闭合环。 OpenGL ES中的多边形必须是凸多边形,即在多边形的内部任意取两点, 如果连接这两个点的线段都在多变的内部,这个多边形就是凸多边形。 绘制多边形时需要指定渲染的方向, 分为顺时针和逆时针。 因为方向决定了多边形的朝向, 即正面和背面。 避免渲染那些被遮挡的部分可以了有效提高程序性能。 函数glFrontFace定义了渲染顶点的方向。
// 设置CCW方向为“正面”,CCW即CounterClockWise,逆时针
glFrontFace(GL_CCW);
// 设置CW方向为“正面”,CW即ClockWise,顺时针
glFrontFace(GL_CW);
渲染
有了以上的概念讲解后,现在要进行最主要的工作—渲染。渲染是把物体坐标所指定的图元转化成帧缓冲区中的图像。图像和顶点坐标有着密切的关系。这个关系通过绘制模式给出。常用到得绘制模式有GL_POINTS、GL_LINE_STRIP、
GL_LINE_LOOP、GL_LINES、 GL_TRIANGLES、GL_TRIANGLE_STRIP、GL_TRIANGLE_FAN。下面分别介绍:
GL_POINTS:把每一个顶点作为一个点进行处理,顶点n即定义了点n,共绘制n个点。

GL_LINES:把每一个顶点作为一个独立的线段,顶点2n-1和2n之间共定义了n个线段,总共绘制N/2条线段。,如果N为奇数,则忽略最后一个顶点。

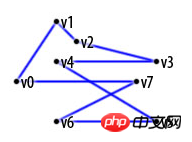
GL_LINE_STRIP:绘制从第一个顶点到最后一个顶点依次相连的一组线段,第n和n+1个顶点定义了线段n,总共绘制N-1条线段。

GL_LINE_LOOP:绘制从定义第一个顶点到最后一个顶点依次相连的一组线段,然后最后一个顶点与第一个顶点相连。第n和n+1个顶点定义了线段n,然后最后一个线段是由顶点N和1之间定义,总共绘制N条线段。

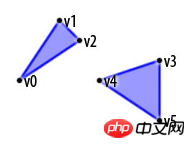
GL_TRIANGLES:把每三个顶点作为一个独立的三角形。顶点3n-2,3n-1和3n定义了第n个三角形,总共绘制N/3个三角形。

GL_TRIANGLE_STRIP:绘制一组相连的三角形。对于奇数点n,顶点n,n+1和n+2定义了第n个三角形;对于偶数n,顶点n+1,n和n+2定义了第n个三角形,总共绘制N-2个三角形。

GL_TRIANGLE_FAN:绘制一组相连的三角形。三角形是由第一个顶点及其后给定的顶点所确定。顶点1,n+1和n+2定义了第n个三角形,总共绘制N-2个三角形。

绘制函数:
void glDrawArrays(int mode, int first, int count)
void glDrawElements(int mode, int count, int type, Buffer indices)
glDrawArrays创建一个几何图元序列,使用每个被的数组中从first开始,到first + count – 1结束的数组元素, mode为绘制模式。
glDrawElements使用count个元素定义一个图元序列,type是indices数组中的数据类型,mode为绘制模式,indices数组存储顶
点的索引值。
应用举例
利用上面讲解的内容给出一个Ophone上绘制一个3D球形的程序。效果图如下:

图2 球形示例
主要的绘制程序:
static private FloatBuffer vertex;//顶点对应的字节缓冲
static private FloatBuffer normal;//法向量对应的字节缓冲
float[] lightPos = new float[] {10.0f, 10.0f, 10.0f, 1.0f };//光源的坐标
private static final int STEP = 24;//
private static final float RADIUS = 1.0f;//半径
protected void init(GL10 gl) {
gl.glClearColor(0.0f, 0.0f, 0.0f, 1.0f);//设置背景颜色
gl.glLightfv(GL10.GL_LIGHT0, GL10.GL_POSITION, lightPos, 0);
gl.glEnable(GL10.GL_LIGHTING);//启用光照
gl.glEnable(GL10.GL_LIGHT0); //打开光源
gl.glClearDepthf(1.0f);//设置深度缓存
gl.glDepthFunc(GL10.GL_LEQUAL);//设置深度缓存比较函数,GL_LEQUAL表示新的像素的深度缓存值小于等于当前像素的深度缓存值时通过深度测试
gl.glEnable(GL10.GL_DEPTH_TEST);//启用深度缓存
gl.glEnable(GL10.GL_CULL_FACE);
gl.glShadeModel(GL10.GL_SMOOTH);//设置阴影模式GL_SMOOTH
}
protected void drawFrame(GL10 gl) {
gl.glClear(GL10.GL_COLOR_BUFFER_BIT |
GL10.GL_DEPTH_BUFFER_BIT);
gl.glMatrixMode(GL10.GL_MODELVIEW);
gl.glLoadIdentity();
GLU.gluLookAt(gl, 0, 0, 7f, 0f, 0f, 0f, 0f, 1.0f, 0.0f);//
drawSphere(gl, RADIUS, STEP, STEP); //绘制球形
}
public static void gluLookAt (GL10 gl, float eyeX, float eyeY, float eyeZ, float centerX, float centerY, float centerZ, float upX, float upY, float upZ)它共接受三组坐标,分别为eye、 center和up。eye表示我们眼睛在"世界坐标系"中的位置,center表示眼睛"看"的那个点的坐标,up坐标表示观察者本身的方向,如果将观察点比喻成我们的眼睛,那么这个up则表示我们是正立还是倒立异或某一个角度在看,这里是正立方式,所以是{0,1,0}。
private static void drawSphere(GL10 gl, float radius,
int stacks, int slices) {
vertex=allocateFloatBuffer( 4* 6 * stacks * (slices+1) );
normal=allocateFloatBuffer( 4* 6 * stacks * (slices+1) );
int i, j, triangles;
float slicestep, stackstep;
stackstep = ((float)Math.PI) / stacks;
slicestep = 2.0f * ((float)Math.PI) / slices;
for (i = 0; i < stacks; ++i)
{
float a = i * stackstep;
float b = a + stackstep;
float s0 = (float)Math.sin(a);
float s1 = (float)Math.sin(b);
float c0 = (float)Math.cos(a);
float c1 = (float)Math.cos(b);
float nv;
for (j = 0; j <= slices; ++j)
{
float c = j * slicestep;
float x = (float)Math.cos(c);
float y = (float)Math.sin(c);
nv=x * s0;
normal.put(nv);
vertex.put( nv * radius);
nv=y * s0;
normal.put(nv);
vertex.put( nv * radius);
nv=c0;
normal.put(nv);
vertex.put( nv * radius);
nv=x * s1;
normal.put(nv);
vertex.put( nv * radius);
nv=y * s1;
normal.put(nv);
vertex.put( nv * radius);
nv=c1;
normal.put(nv);
vertex.put( nv * radius);
}
}
normal.position(0);
vertex.position(0);
gl.glVertexPointer(3, GL10.GL_FLOAT, 0, vertex);
gl.glNormalPointer(GL10.GL_FLOAT, 0, normal);
gl.glEnableClientState (GL10.GL_VERTEX_ARRAY);
gl.glEnableClientState (GL10.GL_NORMAL_ARRAY);
triangles = (slices + 1) * 2;
for(i = 0; i < stacks; i++)
gl.glDrawArrays(GL10.GL_TRIANGLE_STRIP,
i * triangles, triangles);
gl.glDisableClientState(GL10.GL_VERTEX_ARRAY);
gl.glDisableClientState(GL10.GL_NORMAL_ARRAY);
}
private static FloatBuffer allocateFloatBuffer(int capacity){
ByteBuffer vbb = ByteBuffer.allocateDirect(capacity);
vbb.order(ByteOrder.nativeOrder());
return vbb.asFloatBuffer();
}总结:
This article introduces the basic concepts and methods of drawing graphics using OpenGL ES in Ophone. There are many other things in OpenGL ES, such as textures, lighting and materials, blending, fog, masks, reflections, loading of 3D models, etc. OpenGL ES functions can be used to draw rich graphics applications and game interfaces.
The above is the detailed content of Detailed explanation of examples of OpenGL ES drawing 3D graphics in Android development. For more information, please follow other related articles on the PHP Chinese website!

Hot AI Tools

Undresser.AI Undress
AI-powered app for creating realistic nude photos

AI Clothes Remover
Online AI tool for removing clothes from photos.

Undress AI Tool
Undress images for free

Clothoff.io
AI clothes remover

Video Face Swap
Swap faces in any video effortlessly with our completely free AI face swap tool!

Hot Article

Hot Tools

Notepad++7.3.1
Easy-to-use and free code editor

SublimeText3 Chinese version
Chinese version, very easy to use

Zend Studio 13.0.1
Powerful PHP integrated development environment

Dreamweaver CS6
Visual web development tools

SublimeText3 Mac version
God-level code editing software (SublimeText3)

Hot Topics
 1657
1657
 14
14
 1415
1415
 52
52
 1309
1309
 25
25
 1257
1257
 29
29
 1230
1230
 24
24
 New report delivers damning assessment of rumoured Samsung Galaxy S25, Galaxy S25 Plus and Galaxy S25 Ultra camera upgrades
Sep 12, 2024 pm 12:23 PM
In recent days, Ice Universe has been steadily revealing details about the Galaxy S25 Ultra, which is widely believed to be Samsung's next flagship smartphone. Among other things, the leaker claimed that Samsung only plans to bring one camera upgrade
 Samsung Galaxy S25 Ultra leaks in first render images with rumoured design changes revealed
Sep 11, 2024 am 06:37 AM
OnLeaks has now partnered with Android Headlines to provide a first look at the Galaxy S25 Ultra, a few days after a failed attempt to generate upwards of $4,000 from his X (formerly Twitter) followers. For context, the render images embedded below h
 IFA 2024 | TCL\'s NXTPAPER 14 won\'t match the Galaxy Tab S10 Ultra in performance, but it nearly matches it in size
Sep 07, 2024 am 06:35 AM
Alongside announcing two new smartphones, TCL has also announced a new Android tablet called the NXTPAPER 14, and its massive screen size is one of its selling points. The NXTPAPER 14 features version 3.0 of TCL's signature brand of matte LCD panels
 Vivo Y300 Pro packs 6,500 mAh battery in a slim 7.69 mm body
Sep 07, 2024 am 06:39 AM
The Vivo Y300 Pro just got fully revealed, and it's one of the slimmest mid-range Android phones with a large battery. To be exact, the smartphone is only 7.69 mm thick but features a 6,500 mAh battery. This is the same capacity as the recently launc
 Samsung Galaxy S24 FE billed to launch for less than expected in four colours and two memory options
Sep 12, 2024 pm 09:21 PM
Samsung has not offered any hints yet about when it will update its Fan Edition (FE) smartphone series. As it stands, the Galaxy S23 FE remains the company's most recent edition, having been presented at the start of October 2023. However, plenty of
 Motorola Razr 50s shows itself as possible new budget foldable in early leak
Sep 07, 2024 am 09:35 AM
Motorola has released countless devices this year, although only two of them are foldables. For context, while most of the world has received the pair as the Razr 50 and Razr 50 Ultra, Motorola offers them in North America as the Razr 2024 and Razr 2
 Xiaomi Redmi Note 14 Pro Plus arrives as first Qualcomm Snapdragon 7s Gen 3 smartphone with Light Hunter 800 camera
Sep 27, 2024 am 06:23 AM
The Redmi Note 14 Pro Plus is now official as a direct successor to last year'sRedmi Note 13 Pro Plus(curr. $375 on Amazon). As expected, the Redmi Note 14 Pro Plus heads up the Redmi Note 14 series alongside theRedmi Note 14and Redmi Note 14 Pro. Li
 New report delivers damning assessment of rumoured Samsung Galaxy S25, Galaxy S25 Plus and Galaxy S25 Ultra camera upgrades
Sep 12, 2024 pm 12:22 PM
In recent days, Ice Universe has been steadily revealing details about the Galaxy S25 Ultra, which is widely believed to be Samsung's next flagship smartphone. Among other things, the leaker claimed that Samsung only plans to bring one camera upgrade


