

Detailed introduction of shiro source code

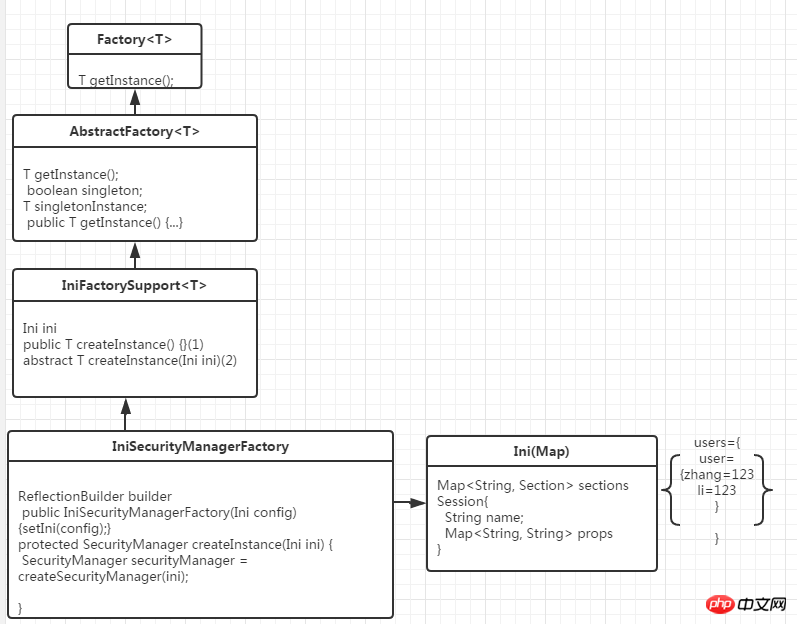
(3)The abstractFactory class mainly sets whether it is a singleton
1 |
|
1 |
|
(3) Create Securitymanager
1 |
|
1 |
|
1 |
|

The structure of simpleAccount is:

 ##(7) Set the realm attribute of DefaultSecurityManager:
 1 |
|
At this point, the properties of DefaultSecurityManager are set Complete and return the DefaultSecurityManager object
1 |
|
1 |
|
(2) Use the theme context to create a theme
1 |
|
(3) Create subject object through theme
1 2 |
|
1 |
|
The above is the detailed content of Detailed introduction of shiro source code. For more information, please follow other related articles on the PHP Chinese website!

Hot AI Tools

Undresser.AI Undress
AI-powered app for creating realistic nude photos

AI Clothes Remover
Online AI tool for removing clothes from photos.

Undress AI Tool
Undress images for free

Clothoff.io
AI clothes remover

Video Face Swap
Swap faces in any video effortlessly with our completely free AI face swap tool!
Hot Article
Hot Tools

Notepad++7.3.1
Easy-to-use and free code editor

SublimeText3 Chinese version
Chinese version, very easy to use

Zend Studio 13.0.1
Powerful PHP integrated development environment

Dreamweaver CS6
Visual web development tools

SublimeText3 Mac version
God-level code editing software (SublimeText3)
Hot Topics


 How to implement data statistics and analysis in uniapp
Oct 24, 2023 pm 12:37 PM
How to implement data statistics and analysis in uniapp
Oct 24, 2023 pm 12:37 PM
How to implement data statistics and analysis in uniapp 1. Background introduction Data statistics and analysis are a very important part of the mobile application development process. Through statistics and analysis of user behavior, developers can have an in-depth understanding of user preferences and usage habits. Thereby optimizing product design and user experience. This article will introduce how to implement data statistics and analysis functions in uniapp, and provide some specific code examples. 2. Choose appropriate data statistics and analysis tools. The first step to implement data statistics and analysis in uniapp is to choose the appropriate data statistics and analysis tools.
 How to display the source code of PHP code in the browser without being interpreted and executed?
Mar 11, 2024 am 10:54 AM
How to display the source code of PHP code in the browser without being interpreted and executed?
Mar 11, 2024 am 10:54 AM
How to display the source code of PHP code in the browser without being interpreted and executed? PHP is a server-side scripting language commonly used to develop dynamic web pages. When a PHP file is requested on the server, the server interprets and executes the PHP code in it and sends the final HTML content to the browser for display. However, sometimes we want to display the source code of the PHP file directly in the browser instead of being executed. This article will introduce how to display the source code of PHP code in the browser without being interpreted and executed. In PHP, you can use
 Analysis of the reasons why the secondary directory of DreamWeaver CMS cannot be opened
Mar 13, 2024 pm 06:24 PM
Analysis of the reasons why the secondary directory of DreamWeaver CMS cannot be opened
Mar 13, 2024 pm 06:24 PM
Title: Analysis of the reasons and solutions for why the secondary directory of DreamWeaver CMS cannot be opened. Dreamweaver CMS (DedeCMS) is a powerful open source content management system that is widely used in the construction of various websites. However, sometimes during the process of building a website, you may encounter a situation where the secondary directory cannot be opened, which brings trouble to the normal operation of the website. In this article, we will analyze the possible reasons why the secondary directory cannot be opened and provide specific code examples to solve this problem. 1. Possible cause analysis: Pseudo-static rule configuration problem: during use
 Website to view source code online
Jan 10, 2024 pm 03:31 PM
Website to view source code online
Jan 10, 2024 pm 03:31 PM
You can use the browser's developer tools to view the source code of the website. In the Google Chrome browser: 1. Open the Chrome browser and visit the website where you want to view the source code; 2. Right-click anywhere on the web page and select "Inspect" or press the shortcut key Ctrl + Shift + I to open the developer tools; 3. In the top menu bar of the developer tools, select the "Elements" tab; 4. Just see the HTML and CSS code of the website.
 Case analysis of Python application in intelligent transportation systems
Sep 08, 2023 am 08:13 AM
Case analysis of Python application in intelligent transportation systems
Sep 08, 2023 am 08:13 AM
Summary of case analysis of Python application in intelligent transportation systems: With the rapid development of intelligent transportation systems, Python, as a multifunctional, easy-to-learn and use programming language, is widely used in the development and application of intelligent transportation systems. This article demonstrates the advantages and application potential of Python in the field of intelligent transportation by analyzing application cases of Python in intelligent transportation systems and giving relevant code examples. Introduction Intelligent transportation system refers to the use of modern communication, information, sensing and other technical means to communicate through
 Analyze whether Tencent's main programming language is Go
Mar 27, 2024 pm 04:21 PM
Analyze whether Tencent's main programming language is Go
Mar 27, 2024 pm 04:21 PM
Title: Is Tencent’s main programming language Go: An in-depth analysis. As China’s leading technology company, Tencent has always attracted much attention in its choice of programming languages. In recent years, some people believe that Tencent mainly adopts Go as its main programming language. This article will conduct an in-depth analysis of whether Tencent's main programming language is Go, and give specific code examples to support this view. 1. Application of Go language in Tencent Go is an open source programming language developed by Google. Its efficiency, concurrency and simplicity are loved by many developers.
 Analyze the advantages and disadvantages of static positioning technology
Jan 18, 2024 am 11:16 AM
Analyze the advantages and disadvantages of static positioning technology
Jan 18, 2024 am 11:16 AM
Analysis of the advantages and limitations of static positioning technology With the development of modern technology, positioning technology has become an indispensable part of our lives. As one of them, static positioning technology has its unique advantages and limitations. This article will conduct an in-depth analysis of static positioning technology to better understand its current application status and future development trends. First, let’s take a look at the advantages of static positioning technology. Static positioning technology achieves the determination of position information by observing, measuring and calculating the object to be positioned. Compared with other positioning technologies,
 A comprehensive guide to learning and applying golang framework source code
Jun 01, 2024 pm 10:31 PM
A comprehensive guide to learning and applying golang framework source code
Jun 01, 2024 pm 10:31 PM
By understanding the Golang framework source code, developers can master the essence of the language and expand the framework's functions. First, get the source code and become familiar with its directory structure. Second, read the code, trace the execution flow, and understand dependencies. Practical examples show how to apply this knowledge: create custom middleware and extend the routing system. Best practices include learning step-by-step, avoiding mindless copy-pasting, utilizing tools, and referring to online resources.
