JS code needs to be written often, otherwise it will be easy to get rusty. Recently, although I have been looking at JS prototypes, behavioral delegation and other knowledge points, the amount of hands-on code writing has been slightly reduced. This article shares a drag and drop component with you for your reference. The specific content is as follows
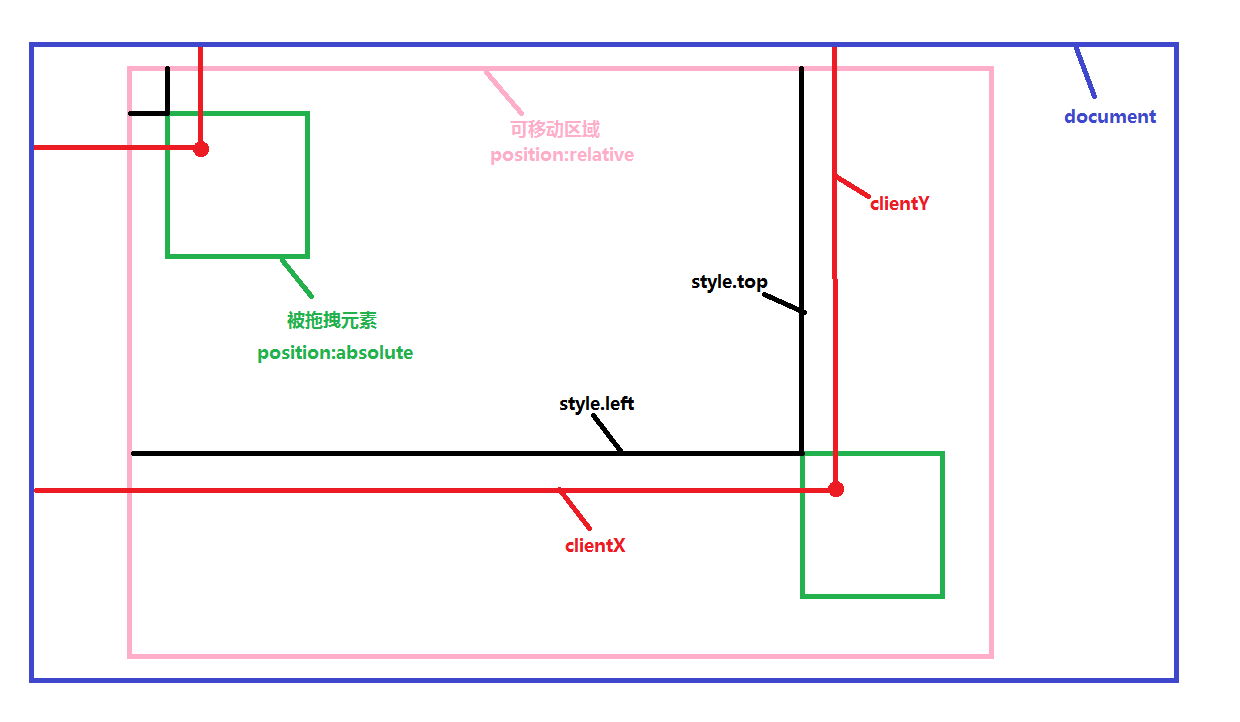
First, let’s take a look at the principle of dragging.

The change in the position of the dragged element and the left value are actually the change in the horizontal direction of the mouse position, e.clientX - e.clientX when the left mouse button is pressed.
The change in the top value is actually the change in the vertical direction of the mouse position, e.clientY - e.clientY when the left mouse button is pressed.
The other is to set the dragging range . The top, bottom, left and right should not exceed the area where the parent element is located.
  function Drag (config){
      this.moveTarget = document.getElementById(config.id);
      if(config.parentId){
        this.targetParent = document.getElementById(config.parentId);
        this.max_left = this.targetParent.clientWidth - this.moveTarget.offsetWidth;
        this.max_top = this.targetParent.clientHeight - this.moveTarget.offsetHeight;
      }else{
        console.log(document.documentElement.clientHeight + "||" + this.moveTarget.offsetHeight)
        this.max_left = document.documentElement.clientWidth - this.moveTarget.offsetWidth -
          parseInt(this.getStyle(document.body, "border-width"));
        this.max_top = document.documentElement.clientHeight - this.moveTarget.offsetHeight-
          parseInt(this.getStyle(document.body, "border-width"));
      }
      this.lock = true;
    }
    Drag.prototype.getStyle = function(element, attr){
      if(element.currentStyle){
        return element.currentStyle[attr];
      }else{
        return window.getComputedStyle(element,null).getPropertyValue(attr)
      }
    }
    Drag.prototype.moDown = function(e){
      e = e || window.event;
      this.clientX = e.clientX;
      this.clientY = e.clientY;
      //鼠标按下时,drag的left值,top值(写在style中或者是css中)
      this.startLeft = parseInt(this.moveTarget.style.left || this.getStyle(this.moveTarget, "left"));
      this.startTop = parseInt(this.moveTarget.style.top || this.getStyle(this.moveTarget, "top"));
      //鼠标按下时,鼠标的clientX值,clientY值
      this.startClientX = e.clientX;
      this.startClientY = e.clientY;
      this.lock = false;
    };
    Drag.prototype.moMove = function(e){
      e = e || window.event;
      if(e.which != 1){
        this.lock = true;
      }
      if(!this.lock){
        var realLeft = this.startLeft + e.clientX - this.startClientX;//实际的移动范围
        var realTop = this.startTop + e.clientY - this.startClientY;
          //rightLeft , rightTop; //left, top 取值(在可移动范围内)
        var rightLeft = realLeft > this.max_left ? this.max_left : ( realLeft > 0 ? realLeft : 0 );
        var rightTop = realTop > this.max_top ? this.max_top : ( realTop > 0 ? realTop : 0 );
        this.moveTarget.style.left = rightLeft + "px";
        this.moveTarget.style.top = rightTop + "px";
      }
    };
    Drag.prototype.moUp = function(e){
      e = e || window.event;
      this.lock = true;
    };
    Drag.prototype.startDrag = function(){
      console.log(this)
      this.moveTarget.onmousedown = function(e){this.moDown(e)}.bind(this);
      this.moveTarget.onmousemove = function(e){this.moMove(e)}.bind(this);
      this.moveTarget.onmouseup = function(e){this.moUp(e)}.bind(this);
}Description: moDown responds to the left mouse button press operation, moMove responds to the mouse move operation, and MoUp responds to the mouse lift operation.
Added e.which judgment in moMove, e.which ==1 means the left mouse button is pressed. This is to solve the problem that when the mouse is moved outside the draggable range, there is no need to press the left button when moving back. , there is a bug that the dragged element will move accordingly.
Instructions for use:
When used, the id of the dragged element is a required parameter, and the id of the parent element (that is, the range that can be dragged and moved) is an optional parameter. If the id of the parent element is not passed, documentElement is used by default to be draggable. The range of pulling.
If you pass a parent element, don’t forget to set the positioning of the parent element to position:relative or position:absolute.
When using it, first introduce the js file of the drag and drop plug-in.
<!doctype html>
<html lang="en">
<head>
<meta charset="UTF-8">
<meta name="Generator" content="EditPlus®">
<meta name="Author" content="刘艳">
<meta name="Keywords" content="关键字">
<meta name="Description" content="描述">
<title>Document</title>
<style>
*{
margin:0px;
padding:0px;
}
#content{
width:600px;
height:500px;
position:relative;
border:5px solid green;
}
#drag{
position:absolute;
height:100px;
width:100px;
top:50px;left:0px;
background:pink;
cursor:pointer;
}
</style>
</head>
<body>
<div id = "content">
<div id = "drag" >
</div>
</div>
</body>
</html>
<script src = "url/drag.js"></script>
<script>
window.onload = function(){
var drag = new Drag({id: "drag", parentId: "content"});
drag.startDrag();
}
</script>
If you want to drag across the entire window, please do not set the positioning of the parent element of the dragged element, that is, position it relative to the body.
If you need to position the body, but also need to set the position of its parent element to non-static, then you can extend this plug-in.
I hope this article will be helpful to everyone in learning javascript programming.


