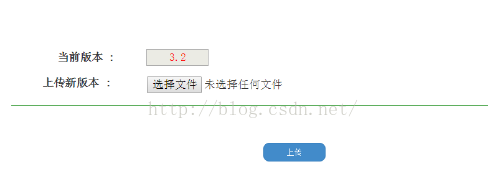
In the previous blog "JavaScript Advanced (8) JS implements image preview and import server function" (click to view details) In , JS is implemented to preview and upload local image files to the Alibaba Cloud server. This time you need to upload the locally packaged files to the Alibaba Cloud server. This operation cannot be accomplished using the previous image file upload method. The operation interface is as follows:

The format of files transferred between local and server should be the familiar Base64 format. First, you need to convert the local file into Base64 format. After transferring it to the server, the file in Base64 format is converted into the original file on the server side.
/*--------------移动APP版本管理G030 G031-------------------------*/
medModule.controller('VersionController',function($scope, $http){
$scope.queryFun = function() {
try{
appCallServer($http,"G030",{"mangid":localStorage.mangid
},
//success function
function(data){
$scope.currentVersion = data.version;
},
//fail function
function(data){
//alert("未找到记录:"+data.errtext);
});
}catch(error){
alert("G030:"+error.message);
}
};
$scope.queryFun();
// 上传文件
$scope.doTx = function() {
var appBase64 = document.getElementById("appBase64").innerHTML;	// 获取文件Base64编码内容
var sunny = document.getElementById("appName").innerHTML;	// 获取文件名称(PS:瞬间感觉自己好聪明啊~~)
var appName = sunny.substr(0, sunny.length-4); // 获取子字符串。
/*alert(appBase64);
alert(appName);*/
if(appBase64.length == 0){
alert("请选择有效文件[该文件为空]");
}
try {
appCallServer($http, "G031", {
"mangid"   : localStorage.mangid,
"appBase64": appBase64,
"appVersion"  : appName
},
// success function
function(data) {
alert("上传文件成功");
},
// fail function
function(data) {
alert("上传文件失败:" + data.errtext);
});
} catch (error) {
alert("G031:" + error.message);
}
};
});<script type="text/javascript">
function loadAppFile(source) {
var file = source.files[0];
if (window.FileReader) {
var fr = new FileReader();
// onloadend读取完成触发,无论成功或失败.如果读取失败,则 result的值为 null,否则即是读取的结果
fr.onloadend = function(e) {
var content = e.target.result;
if(content != null){
var arr = content.toString().split(",");
// 将文件Base64编码内容传至页面
document.getElementById("appBase64").innerHTML = arr[1];
// 获取图片名称(PS:瞬间感觉自己好聪明啊~~)
document.getElementById("appName").innerHTML = document.getElementById("appInput").files[0].name;
/* alert(document.getElementById("appInput").files[0].name);
alert(document.getElementById("appName").innerHTML);
alert(document.getElementById("appBase64").innerHTML); */
}
};
fr.readAsDataURL(file);
}
}
</script>/************************* 更新移动APP版本信息 *************************/
public static boolean do_G031(RequestMessage request,ResponseMessage response){
logger.info("\n\n------------Update_APP_G031 debug info-------------\n请求数据包信息:" + request.json.toString());
if(!Pubf.checkMangSession(request,response)){
return(false);
}
try{
String app,version;
app = request.getString("appBase64").trim();
version = request.getString("appVersion").trim();
/*--------------------------- 将应用存进服务端 ---------------------------*/
if(!app.equals("")){
logger.info("开始写文件.....");
FileUtil.GenerateApp(app, MyConst.APP_FILE_PATH + version + ".wgt");
logger.info("写文件完成.....");
/*-------------------------将应用版本号写进版本文件--------------------------*/
logger.info("开始写入版本号.....");
FileUtil.writeFile(MyConst.APP_VERSION_FILE_PATH, version);
logger.info("写版本号完成.....");
return(true);
}else{
return(false);
}
}catch(Exception e){
e.printStackTrace();
response.errtext = "移动APP更新失败";
response.result = MyConst.ERR_FORMAT;
return(false);
}
}Tool class
<pre name="code" class="java">/**
 *
 * @param appStr 应用内容
 * @param appFilePath 应用存放路径
 * @return
 */
public static boolean GenerateApp(String appStr, String appFilePath) { // 对字节数组字符串进行Base64解码并生成wgt更新包
if (appStr == null) // 文件数据为空
return false;
BASE64Decoder decoder = new BASE64Decoder();
try {
// Base64解码
byte[] b = decoder.decodeBuffer(appStr);
for (int i = 0; i < b.length; ++i) {
if (b[i] < 0) {// 调整异常数据
b[i] += 256;
}
}
// 生成wgt应用
OutputStream out = new FileOutputStream(appFilePath);
out.write(b);
out.flush();
out.close();
return true;
} catch (Exception e) {
return false;
}
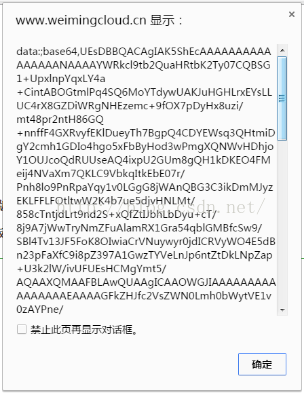
}The content of the read file is as follows:

As can be seen from the above figure, the encoding method is exactly the Base64 encoding method we mentioned before. Then the next work will be easy. Just follow the idea of previous image processing.
During this period, I also encountered some problems. For example
< /i>
Hide the position of the element. Try to place it as close to the submit button as possible, otherwise its content cannot be obtained in the controller.
After the above steps, you can upload the update package to the corresponding update folder on the server, and write the update package version number information into the corresponding version.txt file.
Comparing the above code with the image uploading done before, we found that the two methods of data acquisition are different. This article uses the FileReader method of HTML5 (click to view details). Applying this method when uploading images before can also solve the problem. The two methods of writing to the server are the same, both writing Base64 encoded content into the file. When your thinking is clear, problems will naturally be easily solved.
Happiness is never satisfied. During the above file upload process, larger files will be uploaded. For this, you may need to wait for 1 minute or even several minutes. This is unacceptable. Something to endure. In order to enhance the user experience. A progress bar beautification effect is specially added for file upload. See the next blog for details.

The above is JavaScript advanced (9) JS implementation of uploading local files to Alibaba Cloud server For more related content, please pay attention to the PHP Chinese website (www.php.cn)!
Related articles:
The mobile terminal implements the file upload function through HTML5


