

The learning of

Event Loop
JavaScript is scattered and complicated, so many times we learn something, but we can’t feel it. As soon as you progress, you will forget what you have learned. In order to solve this problem of mine, I have been trying to find a core clue during the learning process. As long as I follow this clue, I can make progress little by little.
The front-end basic advancement is slowly unfolding around this clue, and the EventLoop mechanism (Event Loop) is this The most critical knowledge points of clues. Therefore, I kept studying the event loop mechanism in depth and summarized this article to share with you.
The event loop mechanism as a whole tells us the execution sequence of the JavaScript code we write. However, in the process of my study, I found many domestic blog articles that only gave a superficial explanation of it. Many articles drew a circle in the picture to indicate a cycle. After reading it, I didn’t feel that I understood much. But it is so important that when we want to interview for mid- to senior-level positions, the event loop mechanism is always a topic that cannot be avoided. Especially after PromiseObject was officially added to ES6, understanding the event loop mechanism in the new standard has become even more important. This is very embarrassing.
There are two popular articles recently that also expressed the importance of this issue.
This front-end interview is causing trouble
80% of applicants fail JS interview questionsBut unfortunately, the masters told everyone that this knowledge point is very important, but Didn't tell everyone why this happened. So when we encounter such a question during an interview, even if you know the result, if the interviewer asks further questions, we are still confused.
Before learning the event loop mechanism, I assume that you already understand the following concepts. If you still have questions, you can go back and read my previous articles.
Execution context
QueueData structure (queue)
Promise (I will summarize the detailed use and use of Promise in the next article Custom encapsulation)
Because the event loop mechanism in the new standard in chrome browser is almost the same as nodejs, so here we integrate nodejs Let’s understand it together. We will introduce some API that are available in nodejs but not in the browser. You just need to understand them, and you don’t necessarily need to know how to use them. For example, process.nextTick, setImmediate
OK, then I will draw the conclusion first, and then demonstrate the event in detail with examples and illustrations. circulation mechanism.
We know that a major feature of JavaScript is that it is single-threaded, and this thread has only one event loop.
Of course, the web worker in the new standard involves multi-threading, and I don’t know much about it, so I won’t discuss it here.
During the execution of JavaScript code, in addition to relying on the function call stack to determine the execution sequence of functions, it also relies on the task queue (task queue) to determine the execution of other codes. .
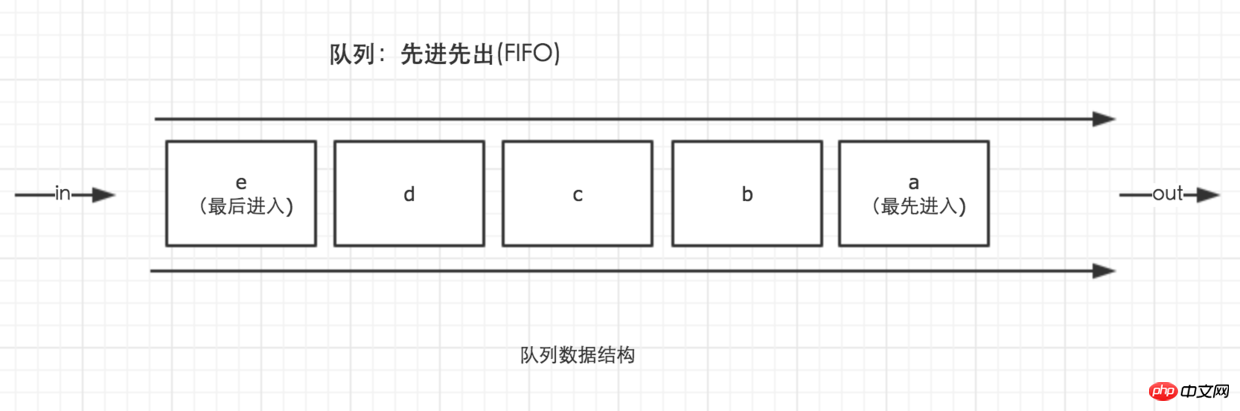
Queue data structure
In a thread, the event loop is unique, but You can have multiple task queues.
The task queue is divided into macro-task (macro task) and micro-task (micro-task). In the latest standards, they are called tasks and jobs respectively.
macro-task probably includes: script (overall code), setTimeout, setInterval, setImmediate, I/O, UI rendering.
micro-task probably includes: process.nextTick, Promise, Object.observe(obsolete), MutationObserver(html5new feature)
setTimeout/Promise, etc. are called task sources. What enters the task queue is the specific execution task they specified.
// setTimeout中的回调函数才是进入任务队列的任务
setTimeout(function() {
  console.log('xxxx');
})Tasks from different task sources will enter different task queues. Among them, setTimeout and setInterval have the same origin.
The order of the event loop determines the execution order of JavaScript code. It starts the first loop from the script (the overall code). The global context then enters the function call stack. Until the call stack is cleared (only the global one is left), then all micro-tasks are executed. After all executable micro-tasks have been executed. The loop starts from macro-task again, finds one of the task queues and then executes all micro-tasks, and the loop continues.
The execution of each task, whether macro-task or micro-task, is completed with the help of a function call stack.
Pure text expression is indeed a bit dry, so here we use 2 examples to gradually understand the specific sequence of the event loop.
// demo01 出自于上面我引用文章的一个例子,我们来根据上面的结论,一步一步分析具体的执行过程。
// 为了方便理解,我以打印出来的字符作为当前的任务名称
setTimeout(function() {
console.log('timeout1');
})
new Promise(function(resolve) {
console.log('promise1');
for(var i = 0; i < 1000; i++) {
i == 99 && resolve();
}
console.log('promise2');
}).then(function() {
console.log('then1');
})
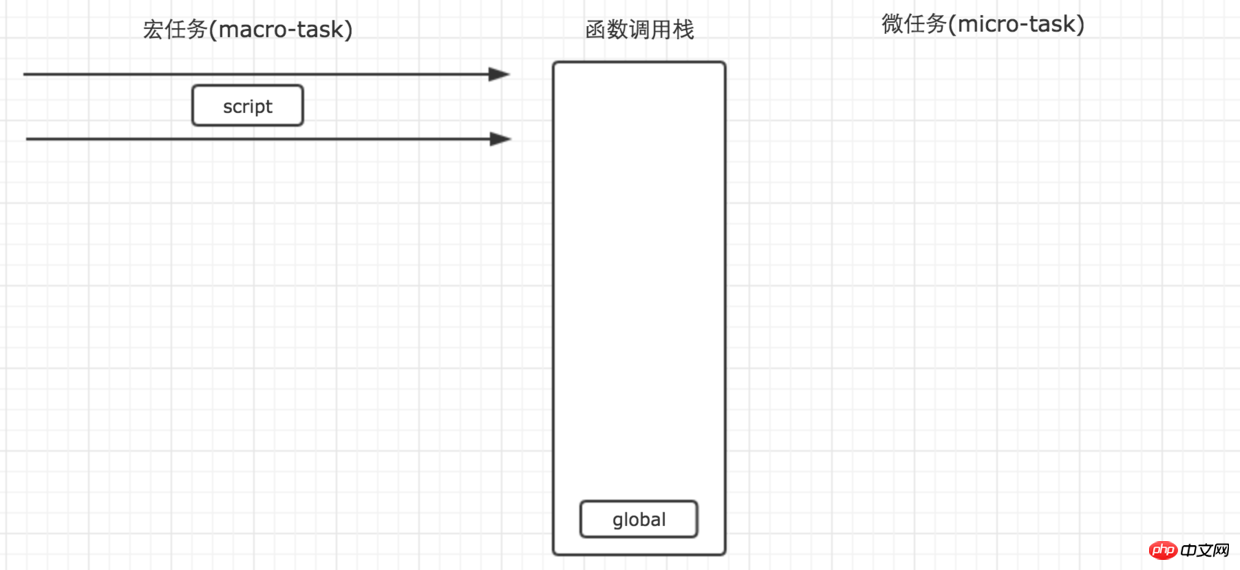
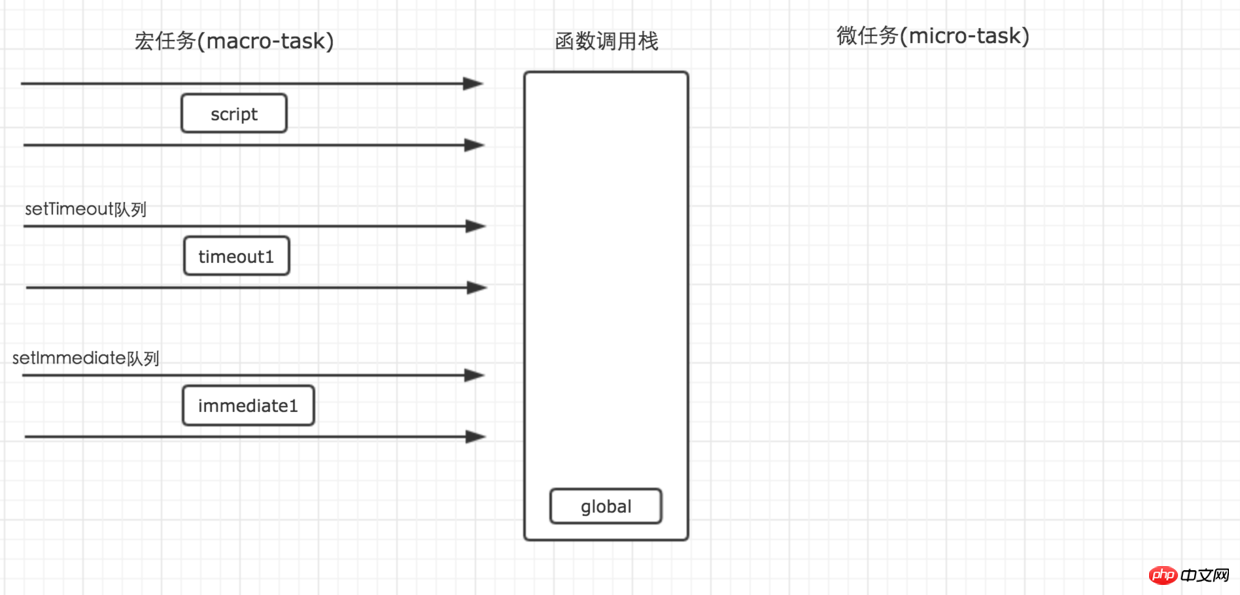
console.log('global1');First, the event loop starts from the macro task queue. At this time, there is only one script (overall code) task in the macro task queue. The execution sequence of each task is determined by the function call stack. When a task source is encountered, the task will be distributed to the corresponding queue first. Therefore, the first step of the above example is shown in the figure below.
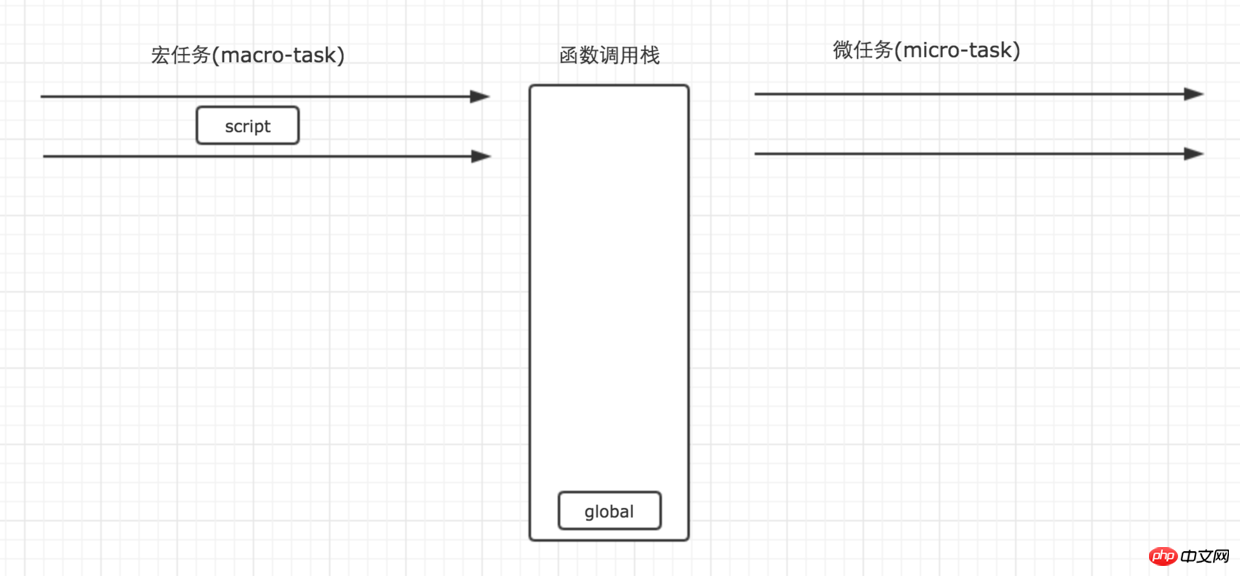
First the script task starts executing, and the global context is pushed onto the stack
The second step: When the script task is executed, it first encounters setTimeout, and setTimeout is one Macro task source, then its role is to distribute the task to its corresponding queue.
setTimeout(function() {
    console.log('timeout1');
})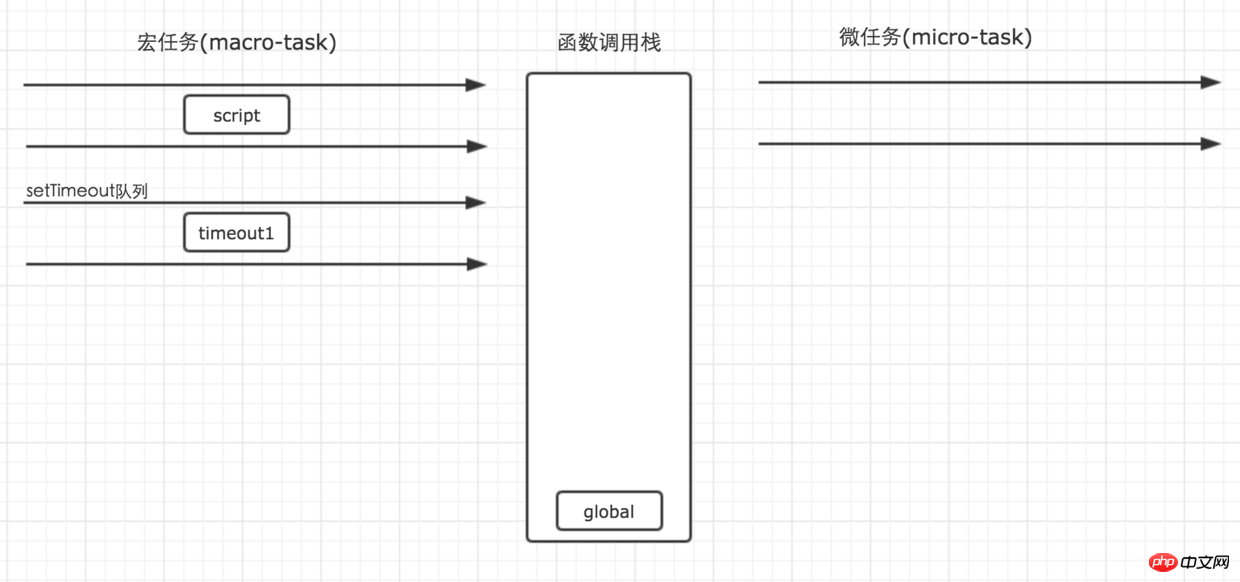
Macro task timeout1 enters the setTimeout queue
Step 3: A Promise instance is encountered during script execution. PromiseThe first parameter in the constructor is executed when new, so it will not enter any other queue, but will be executed directly on the current task, and subsequent .then will be Distribute it to the Promise queue of micro-task.
Therefore, when the constructor is executed, the parameters inside enter the function call stack for execution. for loop will not enter any queue, so the code will be executed in sequence, so promise1 and promise2 here will be output in sequence.

promise1 is pushed onto the stack for execution. At this time, promise1 is output first
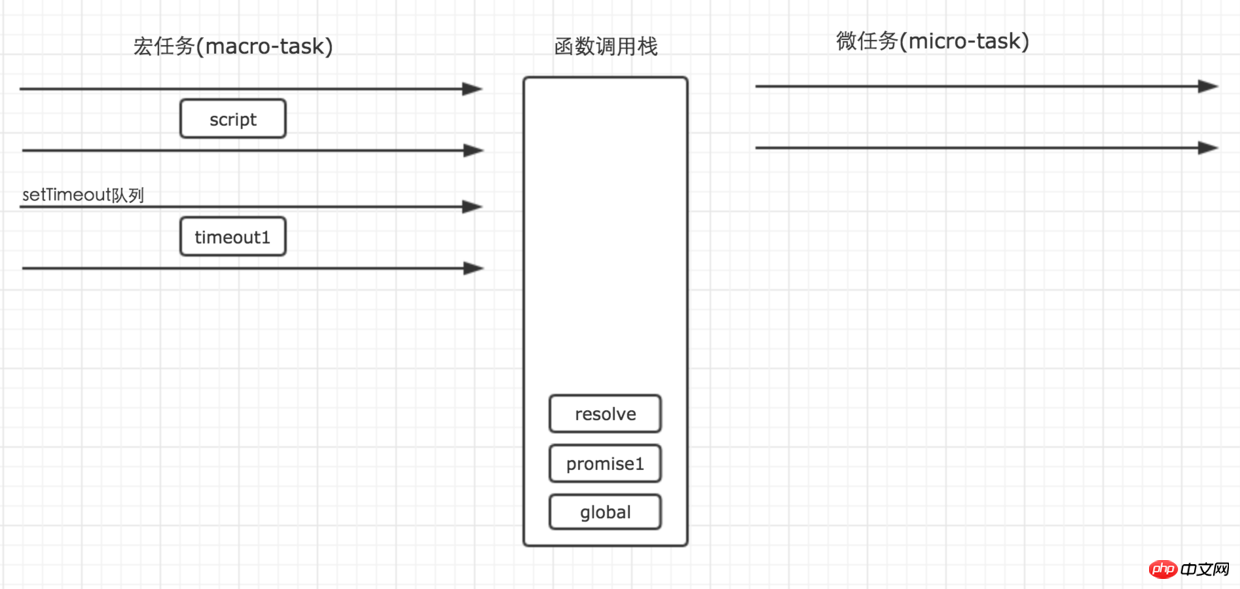
resolve is Pushing the stack in the for loop
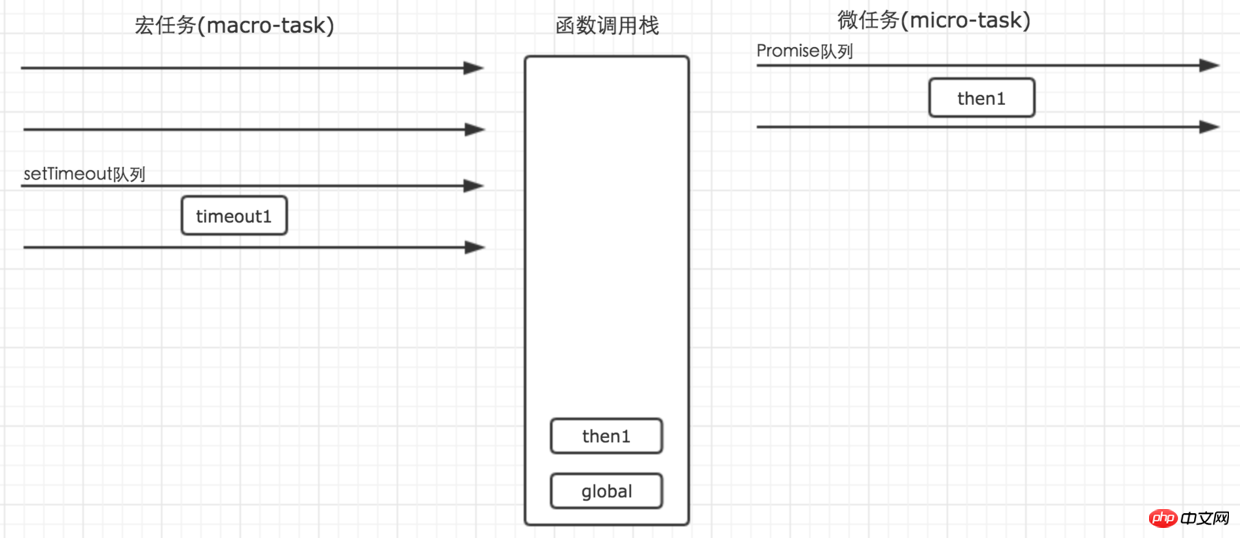
During the execution of the constructor, resolve is popped from the stack after execution, promise2 is output, promise1 page is popped from the stack, and when then is executed, Promise task then1 enters the corresponding queue
script task and continues to execute. In the end, only one sentence is output, global1, and then the global task is completed.
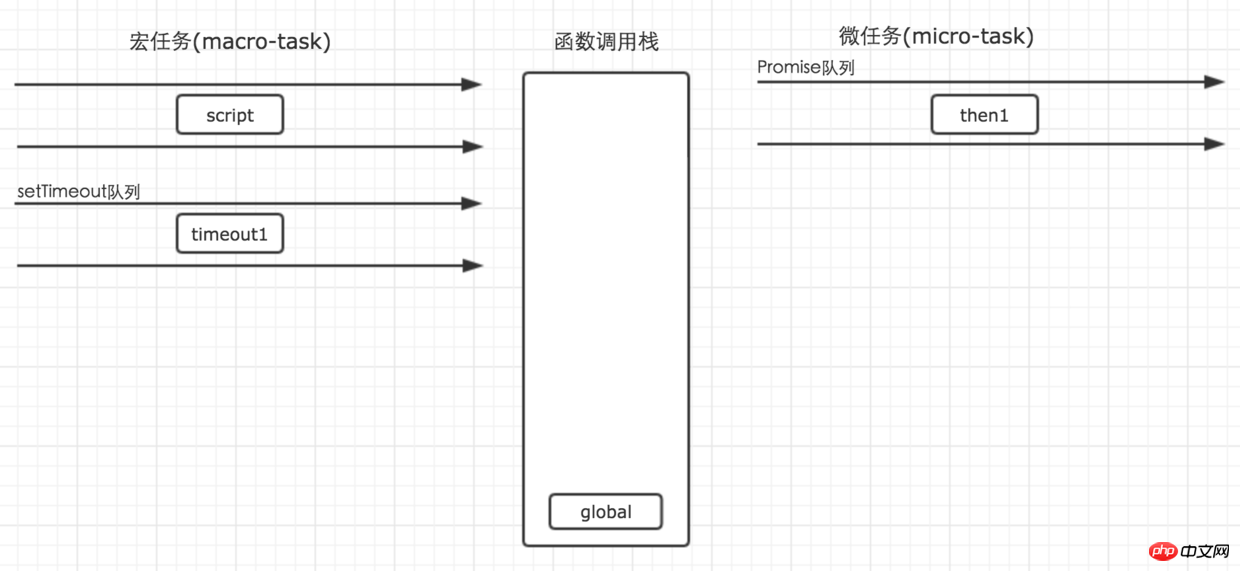
Step 4: After the first macrotask script is executed, all executable microtasks begin. At this time, there is only one task in the Promise queue, then1, in the microtask, so it can be executed directly. The execution result is output then1. Of course, its execution is also executed in the function call stack.
Execute all micro-tasks
Step 5: When all micro-tasts are executed, the first round of the cycle is it's over. At this time, the second round of the cycle must begin. The second cycle still starts from the macro-task.

The micro-task was cleared
At this time, we found that among the macro tasks, there was only one timeout1 task waiting to be executed in the setTimeout queue. . So just execute it directly.
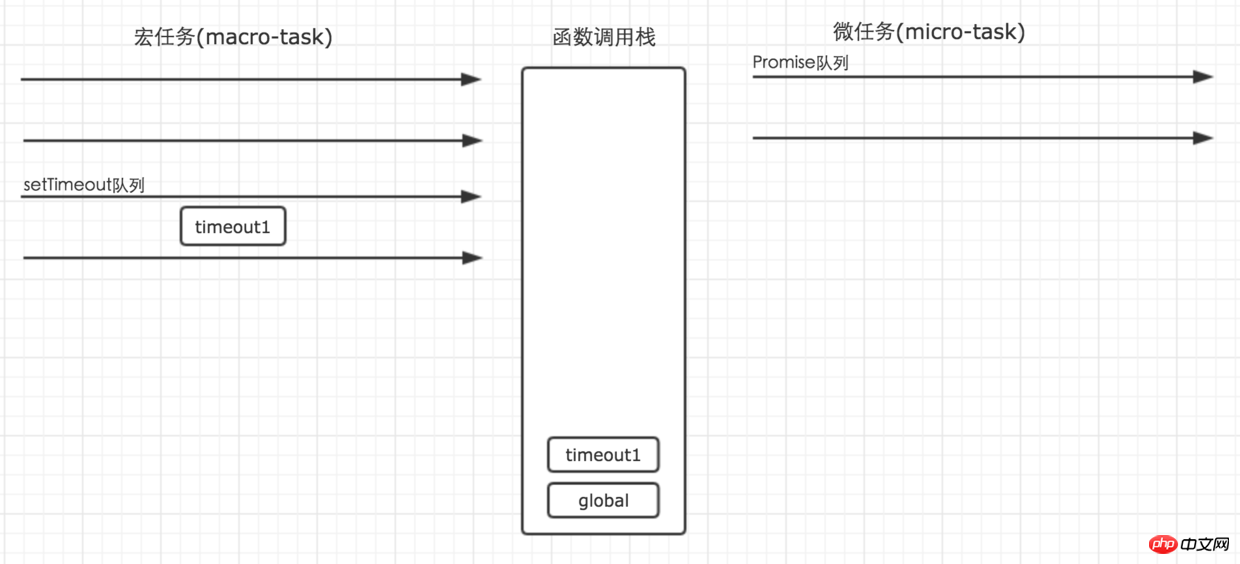
timeout1 is pushed into the stack for execution
At this time, there are no tasks in the macro task queue and micro task queue, so the code will no longer be output. Something else.
Then the output of the above example is obvious. You can try it yourself and experience it.
这个例子比较简答,涉及到的队列任务并不多,因此读懂了它还不能全面的了解到事件循环机制的全貌。所以我下面弄了一个复制一点的例子,再给大家解析一番,相信读懂之后,事件循环这个问题,再面试中再次被问到就难不倒大家了。
// demo02
console.log('golb1');

setTimeout(function() {
    console.log('timeout1');
    process.nextTick(function() {
        console.log('timeout1_nextTick');
    })
    new Promise(function(resolve) {
        console.log('timeout1_promise');
        resolve();
    }).then(function() {
        console.log('timeout1_then')
    })
})

setImmediate(function() {
    console.log('immediate1');
    process.nextTick(function() {
        console.log('immediate1_nextTick');
    })
    new Promise(function(resolve) {
        console.log('immediate1_promise');
        resolve();
    }).then(function() {
        console.log('immediate1_then')
    })
})

process.nextTick(function() {
    console.log('glob1_nextTick');
})
new Promise(function(resolve) {
    console.log('glob1_promise');
    resolve();
}).then(function() {
    console.log('glob1_then')
})

setTimeout(function() {
    console.log('timeout2');
    process.nextTick(function() {
        console.log('timeout2_nextTick');
    })
    new Promise(function(resolve) {
        console.log('timeout2_promise');
        resolve();
    }).then(function() {
        console.log('timeout2_then')
    })
})

process.nextTick(function() {
    console.log('glob2_nextTick');
})
new Promise(function(resolve) {
    console.log('glob2_promise');
    resolve();
}).then(function() {
    console.log('glob2_then')
})

setImmediate(function() {
    console.log('immediate2');
    process.nextTick(function() {
        console.log('immediate2_nextTick');
    })
    new Promise(function(resolve) {
        console.log('immediate2_promise');
        resolve();
    }).then(function() {
        console.log('immediate2_then')
    })
})这个例子看上去有点复杂,乱七八糟的代码一大堆,不过不用担心,我们一步一步来分析一下。
第一步:宏任务script首先执行。全局入栈。glob1输出。
script首先执行
第二步,执行过程遇到setTimeout。setTimeout作为任务分发器,将任务分发到对应的宏任务队列中。
setTimeout(function() {
    console.log('timeout1');
    process.nextTick(function() {
        console.log('timeout1_nextTick');
    })
    new Promise(function(resolve) {
        console.log('timeout1_promise');
        resolve();
    }).then(function() {
        console.log('timeout1_then')
    })
})
timeout1进入对应队列
第三步:执行过程遇到setImmediate。setImmediate也是一个宏任务分发器,将任务分发到对应的任务队列中。setImmediate的任务队列会在setTimeout队列的后面执行。
setImmediate(function() {
    console.log('immediate1');
    process.nextTick(function() {
        console.log('immediate1_nextTick');
    })
    new Promise(function(resolve) {
        console.log('immediate1_promise');
        resolve();
    }).then(function() {
        console.log('immediate1_then')
    })
})
进入setImmediate队列
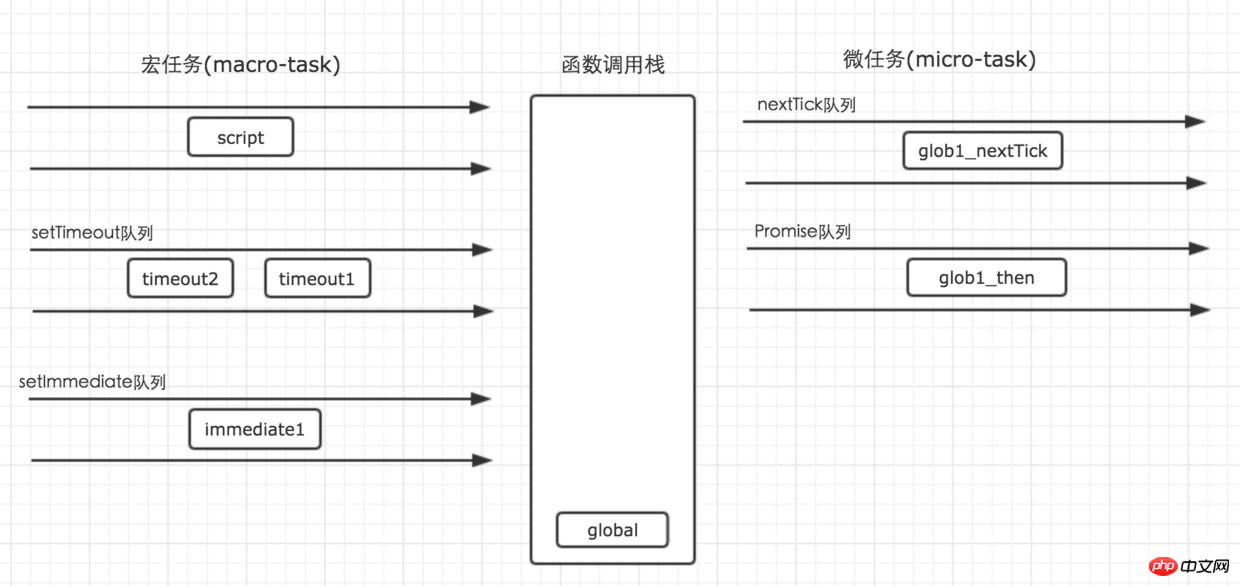
第四步:执行遇到nextTick,process.nextTick是一个微任务分发器,它会将任务分发到对应的微任务队列中去。
process.nextTick(function() {
    console.log('glob1_nextTick');
})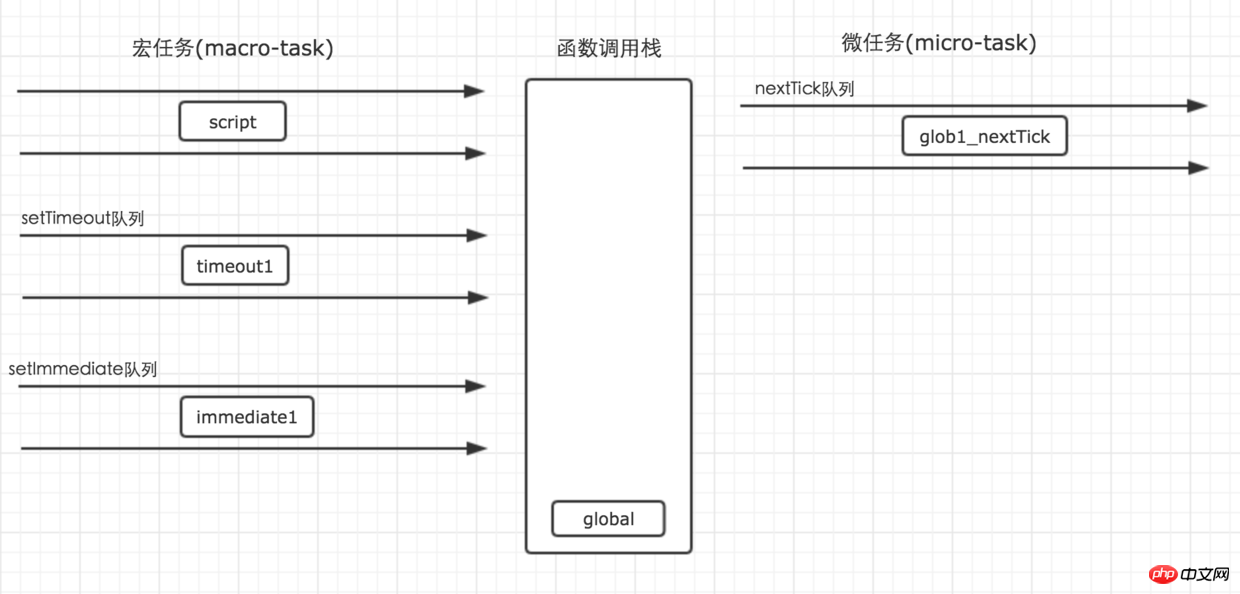
nextTick
第五步:执行遇到Promise。Promise的then方法会将任务分发到对应的微任务队列中,但是它构造函数中的方法会直接执行。因此,glob1_promise会第二个输出。
new Promise(function(resolve) {
    console.log('glob1_promise');
    resolve();
}).then(function() {
    console.log('glob1_then')
})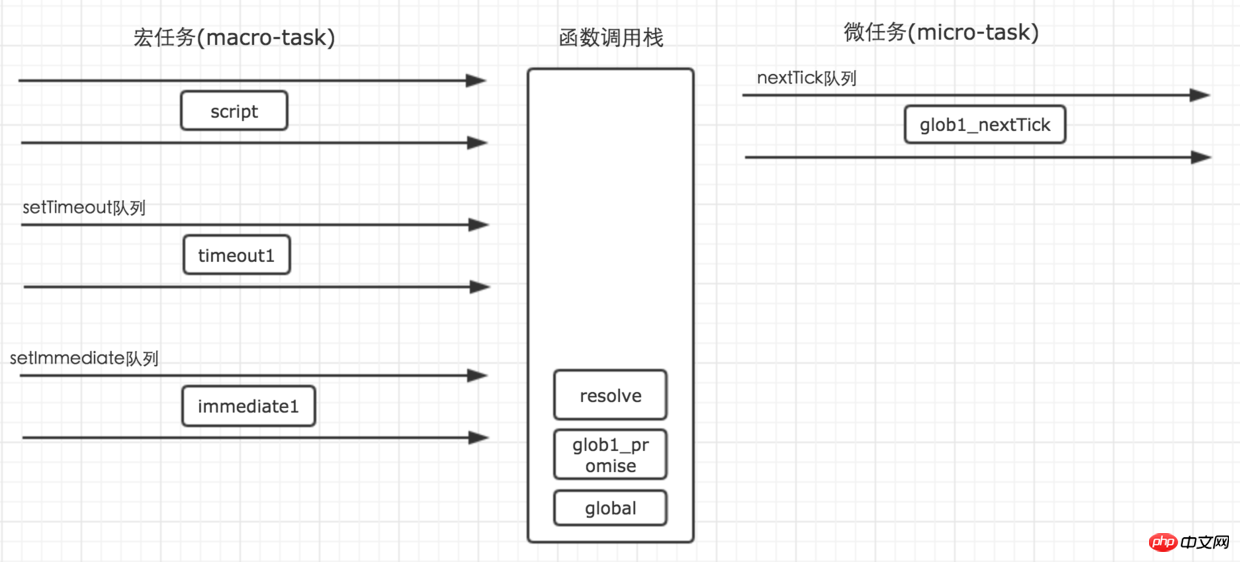
先是函数调用栈的变化
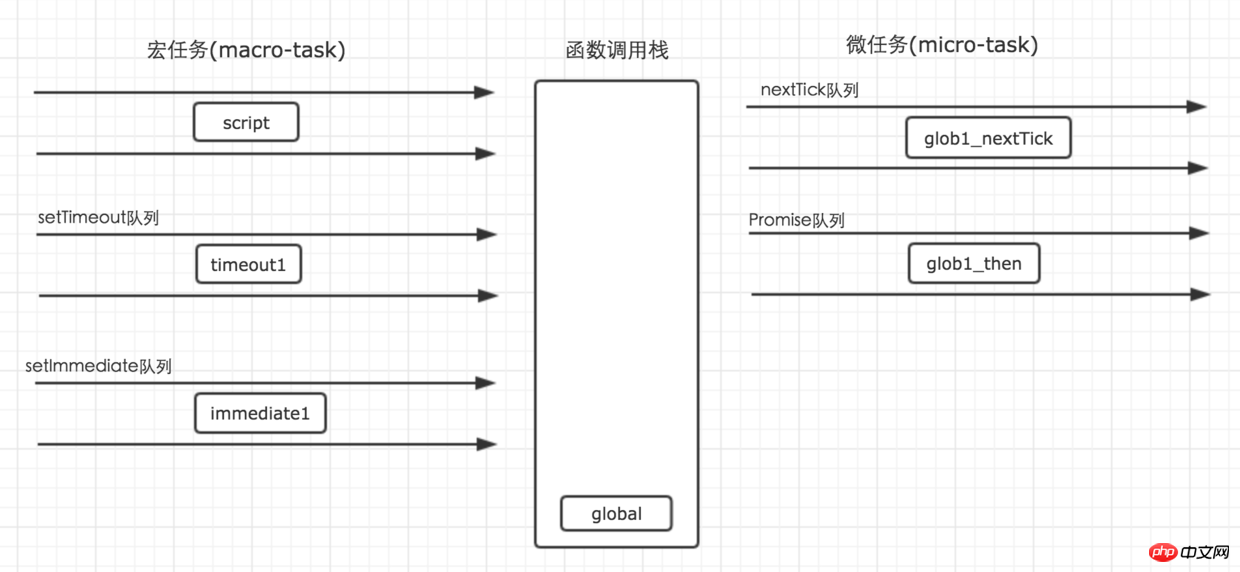
然后glob1_then任务进入队列
第六步:执行遇到第二个setTimeout。
setTimeout(function() {
    console.log('timeout2');
    process.nextTick(function() {
        console.log('timeout2_nextTick');
    })
    new Promise(function(resolve) {
        console.log('timeout2_promise');
        resolve();
    }).then(function() {
        console.log('timeout2_then')
    })
})
timeout2进入对应队列
第七步:先后遇到nextTick与Promise
process.nextTick(function() {
    console.log('glob2_nextTick');
})
new Promise(function(resolve) {
    console.log('glob2_promise');
    resolve();
}).then(function() {
    console.log('glob2_then')
})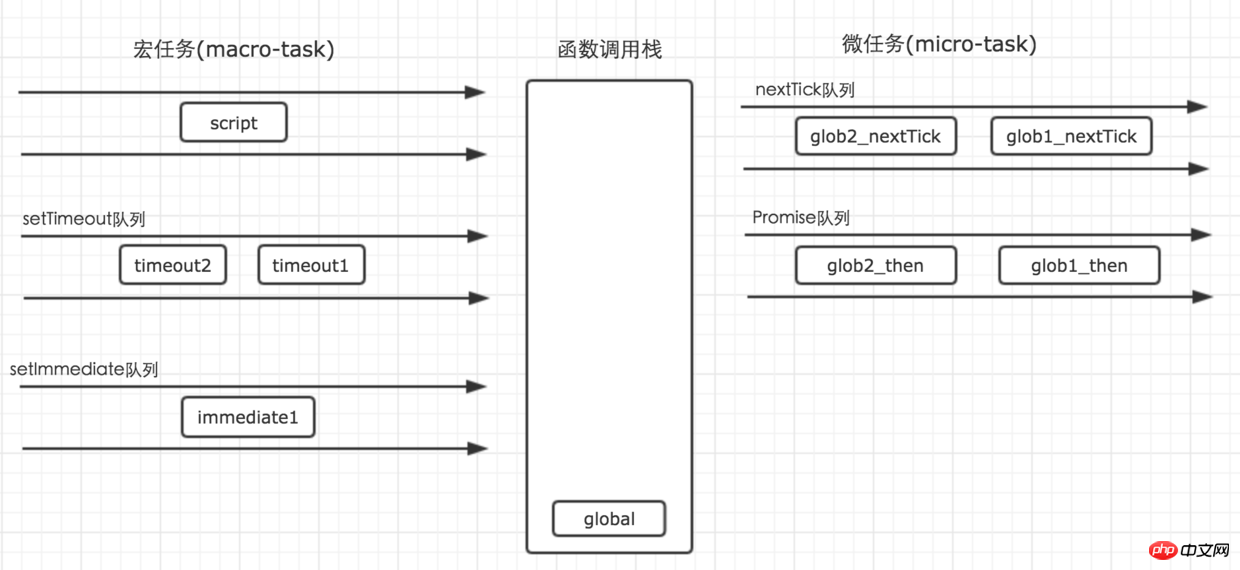
glob2_nextTick与Promise任务分别进入各自的队列
第八步:再次遇到setImmediate。
setImmediate(function() {
    console.log('immediate2');
    process.nextTick(function() {
        console.log('immediate2_nextTick');
    })
    new Promise(function(resolve) {
        console.log('immediate2_promise');
        resolve();
    }).then(function() {
        console.log('immediate2_then')
    })
})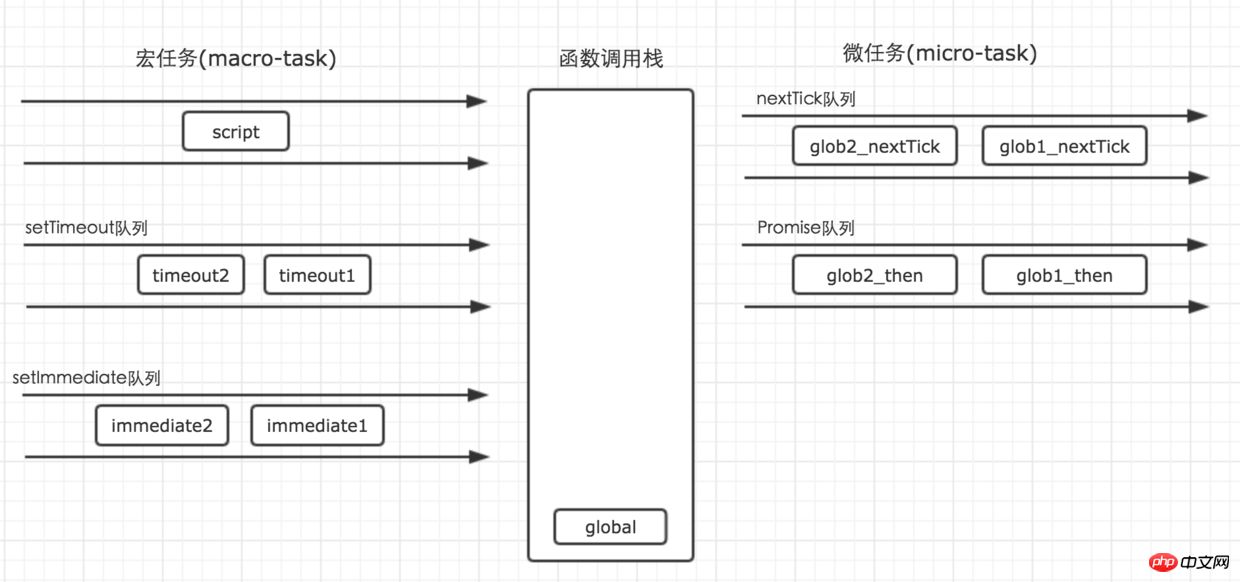
nextTick
这个时候,script中的代码就执行完毕了,执行过程中,遇到不同的任务分发器,就将任务分发到各自对应的队列中去。接下来,将会执行所有的微任务队列中的任务。
其中,nextTick队列会比Promie先执行。nextTick中的可执行任务执行完毕之后,才会开始执行Promise队列中的任务。
当所有可执行的微任务执行完毕之后,这一轮循环就表示结束了。下一轮循环继续从宏任务队列开始执行。
这个时候,script已经执行完毕,所以就从setTimeout队列开始执行。
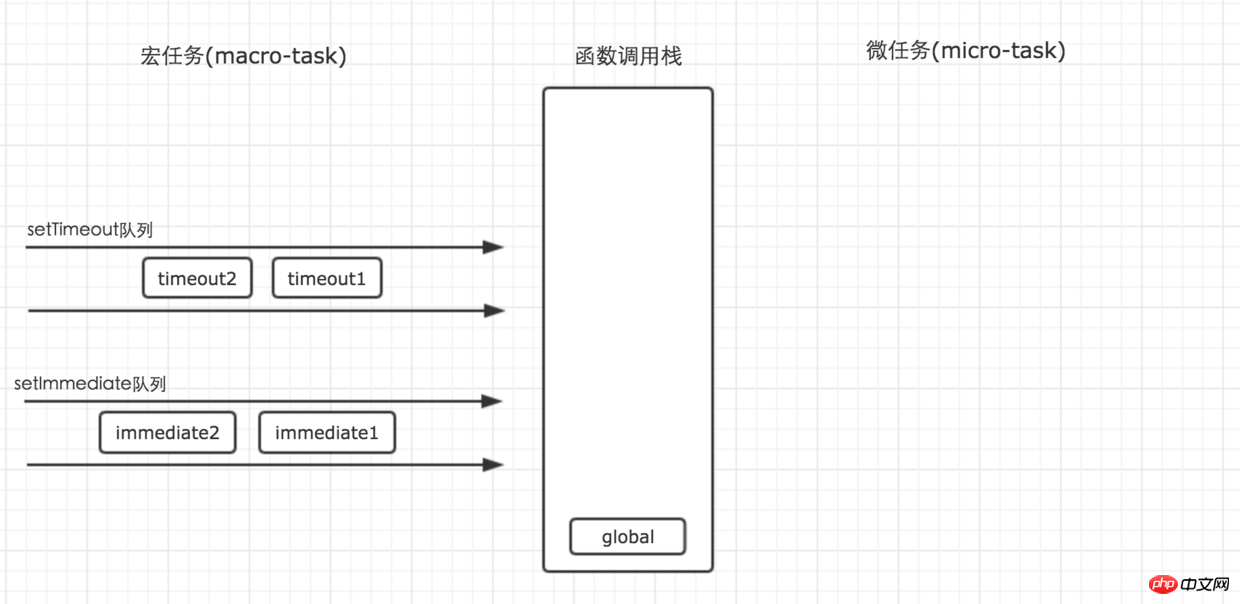
第二轮循环初始状态
setTimeout任务的执行,也依然是借助函数调用栈来完成,并且遇到任务分发器的时候也会将任务分发到对应的队列中去。
只有当setTimeout中所有的任务执行完毕之后,才会再次开始执行微任务队列。并且清空所有的可执行微任务。
setTiemout队列产生的微任务执行完毕之后,循环则回过头来开始执行setImmediate队列。仍然是先将setImmediate队列中的任务执行完毕,再执行所产生的微任务。
当setImmediate队列执行产生的微任务全部执行之后,第二轮循环也就结束了。
大家需要注意这里的循环结束的时间节点。
当我们在执行setTimeout任务中遇到setTimeout时,它仍然会将对应的任务分发到setTimeout队列中去,但是该任务就得等到下一轮事件循环执行了。例子中没有涉及到这么复杂的嵌套,大家可以动手添加或者修改他们的位置来感受一下循环的变化。
OK,到这里,事件循环我想我已经表述得很清楚了,能不能理解就看读者老爷们有没有耐心了。我估计很多人会理解不了循环结束的节点。
当然,这些顺序都是v8的一些实现。我们也可以根据上面的规则,来尝试实现一下事件循环的机制。
// 用数组模拟一个队列
var tasks = [];

// 模拟一个事件分发器
var addFn1 = function(task) {
    tasks.push(task);
}

// 执行所有的任务
var flush = function() {
    tasks.map(function(task) {
        task();
    })
}

// 最后利用setTimeout/或者其他你认为合适的方式丢入事件循环中
setTimeout(function() {
    flush();
})

// 当然,也可以不用丢进事件循环,而是我们自己手动在适当的时机去执行对应的某一个方法

var dispatch = function(name) {
    tasks.map(function(item) {
        if(item.name == name) {
            item.handler();
        }
    })
}

// 当然,我们把任务丢进去的时候,多保存一个name即可。
// 这时候,task的格式就如下
demoTask =  {
    name: 'demo',
    handler: function() {}
}

// 于是,一个订阅-通知的设计模式就这样轻松的被实现了这样,我们就模拟了一个任务队列。我们还可以定义另外一个队列,利用上面的各种方式来规定他们的优先级。
因此,在老的浏览器没有支持Promise的时候,就可以利用setTimeout等方法,来模拟实现Promise,具体如何做到的,下一篇文章我们慢慢分析。
The above is the detailed content of Front-end Advanced (12): Detailed explanation of the event loop mechanism. For more information, please follow other related articles on the PHP Chinese website!
 jquery validate
 What do e-commerce platforms include?
 How is the performance of thinkphp?
 How to register for corporate Alipay
 How to set html scroll bar style
 The difference between fprintf and printf
 What's going on with the red light on the light signal?
 Eth price today's price trend
 The difference and connection between java and javascript


![[Web front-end] Node.js quick start](https://img.php.cn/upload/course/000/000/067/662b5d34ba7c0227.png)


