This article mainly introduces the isolation scope understanding and binding strategy in the detailed explanation angularjs, which has certain reference value. Interested friends can refer to it.
Let’s first look at the following example:
<!doctype html>
<html ng-app="MyModule">
 <head>
  <meta charset="utf-8">
  <link rel="stylesheet" href="css/bootstrap-3.0.0/css/bootstrap.css" rel="external nofollow" rel="external nofollow" rel="external nofollow" rel="external nofollow" >
 </head>
 <body>
  <hello></hello>
  <hello></hello>
  <hello></hello>
  <hello></hello>
 </body>
 <script src="framework/angular-1.3.0.14/angular.js"></script>
 <script src="IsolateScope.js"></script>
</html>
We are looking at the code in IsolateScope:
var myModule = angular.module("MyModule", []);
myModule.directive("hello", function() {
return {
restrict: 'AE',
template: '<p><input type="text" ng-model="userName"/>{{userName}}</p>',
replace: true
}
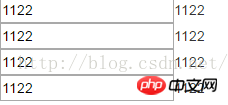
});At this time, when running the page, we find that as long as there is an input When the input changes, the contents of all nput will change:

This will face a problem: our instructions cannot be used alone, so there is an independent scope. the concept of.
var myModule = angular.module("MyModule", []);
myModule.directive("hello", function() {
return {
restrict: 'AE',
scope:{},
template: '<p><input type="text" ng-model="userName"/>{{userName}}</p>',
replace: true
}
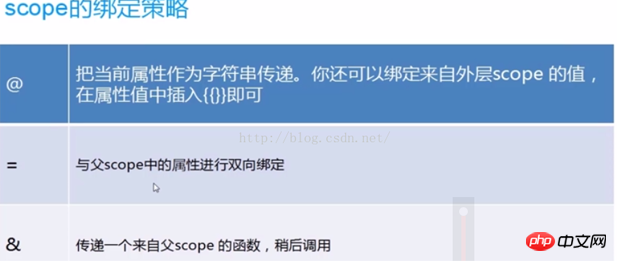
});By setting the scope to {}, each instruction has its own independent scope space, so it will not affect each other. But the most important concept in angularjs is: binding strategy. It has the following binding strategy:

Step 1: Let’s look at the original method, that is, not using the above three binding methods
<!doctype html>
<html ng-app="MyModule">
<head>
<meta charset="utf-8">
<link rel="stylesheet" href="css/bootstrap-3.0.0/css/bootstrap.css" rel="external nofollow" rel="external nofollow" rel="external nofollow" rel="external nofollow" >
</head>
<body>
<!--控制器MyCtrl下面有指令drink,同时指令drink还有自定义的属性flavor,其值为‘百威'-->
<p ng-controller="MyCtrl">
<drink flavor="{{ctrlFlavor}}"></drink>
</p>
</body>
<script src="framework/angular-1.3.0.14/angular.js"></script>
<script src="ScopeAt.js"></script>
</html>Look at the content in ScopeAt:
var myModule = angular.module("MyModule", []);
myModule.controller('MyCtrl', ['$scope', function($scope){
 $scope.ctrlFlavor="百威";
 //在控制器中$scope中设置了ctrlFlavor属性
}])
//定义了drink指令
myModule.directive("drink", function() {
 return {
  restrict:'AE',
  template:"<p>{{flavor}}</p>" ,
   link:function(scope,element,attrs){
   scope.flavor=attrs.flavor;
   //链接的时候把drink指令上的flavor属性放在scope中,然后在template中显示
   }
 }
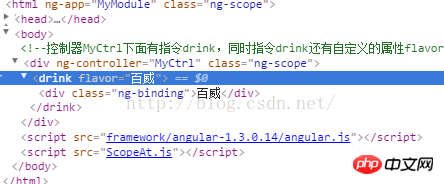
});The DOM structure at this time is as follows:

However, this method requires attrs.flavor to get the attribute value of this instruction, then you need to bind this attribute value to the scope object, and finally the value in the scope can be obtained in the template through {{}}!
Second step: We use the @ above to replace the first method, because it needs to specify the linkfunction by itself every time:
var myModule = angular.module("MyModule", []);
myModule.controller('MyCtrl', ['$scope', function($scope){
 $scope.ctrlFlavor="百威";
 //在控制器中$scope中设置了ctrlFlavor属性
}])
//定义了drink指令
myModule.directive("drink", function() {
 return {
  restrict:'AE',
  scope:{
   flavor:'@'
  },
  template:"<p>{{flavor}}</p>"
 }
});This method is to bind the flavor attribute value in the drink instruction to the scope object, and this is automatically bound by ng for us. However, @binding binds a string, not an object!
Step 3: Let’s learn about bidirectional data Binding
<!doctype html>
<html ng-app="MyModule">
 <head>
  <meta charset="utf-8">
  <link rel="stylesheet" href="css/bootstrap-3.0.0/css/bootstrap.css" rel="external nofollow" rel="external nofollow" rel="external nofollow" rel="external nofollow" >
 </head>
 <body>
 <!--指定了控制器MyCtrl-->
  <p ng-controller="MyCtrl">
   Ctrl:
   <br>
   <!--第一个输入框输入值绑定到ctrlFlavor,也就是控制器MyCtrl对应的ctrlFlavor值中-->
   <input type="text" ng-model="ctrlFlavor">
   <br>
   Directive:
   <br>
   <!--第二个输入框还是通过指令的方式来完成的-->
   <drink flavor="ctrlFlavor"></drink>
  </p>
 </body>
 <script src="framework/angular-1.3.0.14/angular.js"></script>
 <script src="ScopeEqual.js"></script>
</html>
Let’s take a look at the content in the controller
var myModule = angular.module("MyModule", []);
//指定了控制器对象
myModule.controller('MyCtrl', ['$scope', function($scope){
$scope.ctrlFlavor="百威";
}])
//指定了指令
myModule.directive("drink", function() {
return {
restrict:'AE',
scope:{
flavor:'='
//这里通过'='指定了drink指令的flavor和scope中的双向数据绑定!
},
template:'<input type="text" ng-model="flavor"/>'
}
});This is the '=' binding method. It implements a two-way data binding strategy. Let’s take a look at what the final DOM structure looks like:

Step 4:We use the & binding strategy to complete the controller parent Method call:
<!doctype html>
<html ng-app="MyModule">
 <head>
  <meta charset="utf-8">
  <link rel="stylesheet" href="css/bootstrap-3.0.0/css/bootstrap.css" rel="external nofollow" rel="external nofollow" rel="external nofollow" rel="external nofollow" >
 </head>
 <body>
  <p ng-controller="MyCtrl">
  <!--接下来是三个自定义的指令greeting指令-->
   <greeting greet="sayHello(name)"></greeting>
   <greeting greet="sayHello(name)"></greeting>
   <greeting greet="sayHello(name)"></greeting>
  </p>
 </body>
 <script src="framework/angular-1.3.0.14/angular.js"></script>
 <script src="ScopeAnd.js"></script>
</html>
var myModule = angular.module("MyModule", []);
//为控制器指定了一个sayHello方法,同时为这个方法可以传入一个参数
myModule.controller('MyCtrl', ['$scope', function($scope){
$scope.sayHello=function(name){
alert("Hello "+name);
}
}])
myModule.directive("greeting", function() {
return {
restrict:'AE',
scope:{
greet:'&'//传递一个来自父scope的函数用于稍后调用,获取greet参数,得到sayHello(name)函数
},
//在template中我们在ng-click中指定一个参数,其指定方式为调用controller中greet方法,传入的参数name值为username
//也就是ng-model='userName'中指定的参数
template:'<input type="text" ng-model="userName" /><br/>'+
'<button class="btn btn-default" ng-click="greet({name:userName})">Greeting</button><br/>'
}
});The above is the detailed content of A detailed introduction to the understanding of isolation scope and binding strategy in angularjs. For more information, please follow other related articles on the PHP Chinese website!
 IIS unexpected error 0x8ffe2740 solution
 flac format
 What are the e-commerce platforms?
 The difference between ++a and a++ in c language
 Where should I fill in my place of birth: province, city or county?
 What is the difference between 5g and 4g
 How to use btbook magnetic search
 How to configure the path environment variable in java


