This article mainly introduces the use of React Family Bucket to build a backend management system. The editor thinks it is quite good, so I will share it with you now and give it as a reference. Let’s follow the editor and take a look. I hope it can help everyone.
Introduction
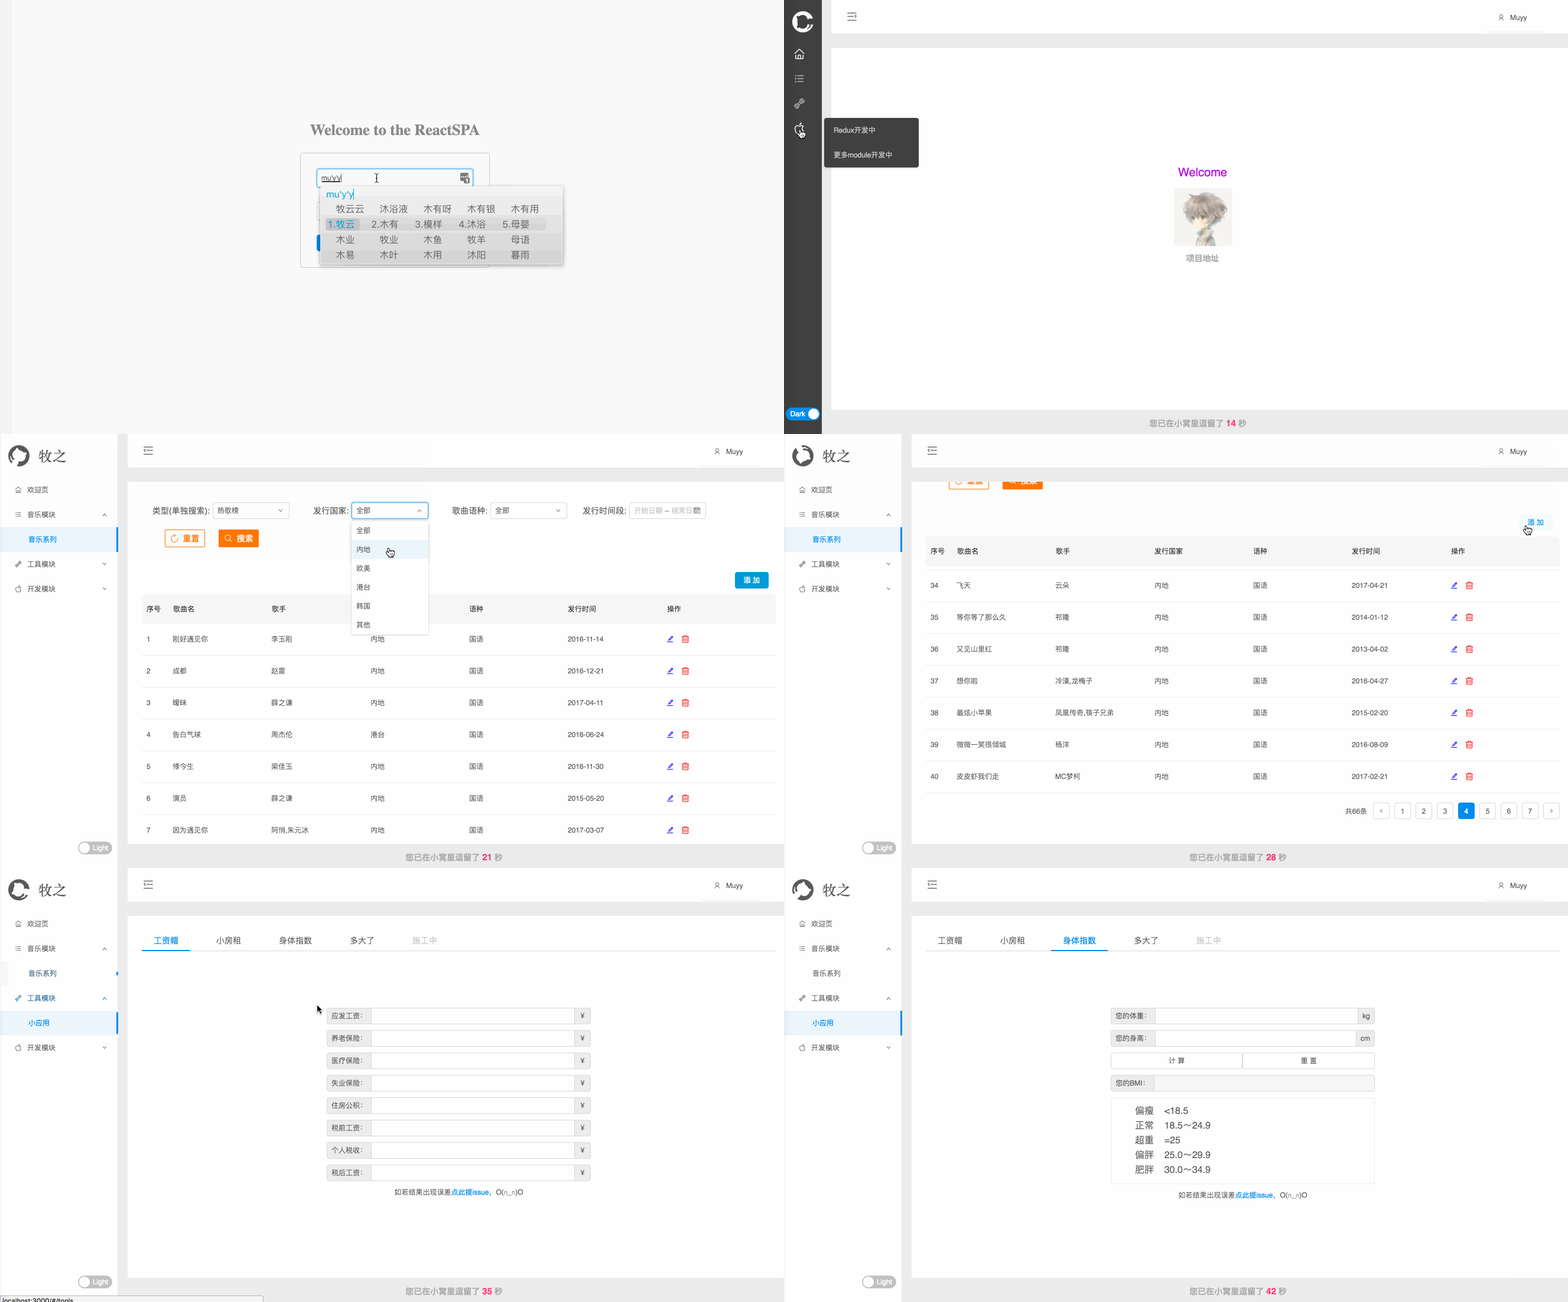
When I was a student, I would constantly do exercises and make summaries in order to master a certain knowledge point. Isn’t it the same after entering the workplace? Doing business is like doing exercises. If you sum up appropriately after class, you will definitely improve your level faster. Since the company adopts the react+node technology stack, it completed a small reactSPA project. It is planned to abstract the business encountered in daily work and interesting things encountered in study into a demo to display in the future. At present, the project is just a prototype, and the results are as follows. Based on this article, I wrote a new article using React Family Bucket to build a backend management system. Welcome to watch. (Note: Because the project is updated from time to time, the article may not be updated immediately, so the actual project shall prevail)

In fact, this interface style can not only be used as a backend management system The interface can also be modified into a blog that can display projects and be beautiful. The project address is here (local running is better). If you have good opinions, please submit an issue or PR.
Directory structure

#The initial structure and construction reasons of the project have been listed above. Since it will be confusing after some time, so The project structure will inevitably change, but it will definitely be expanded based on this basic prototype.
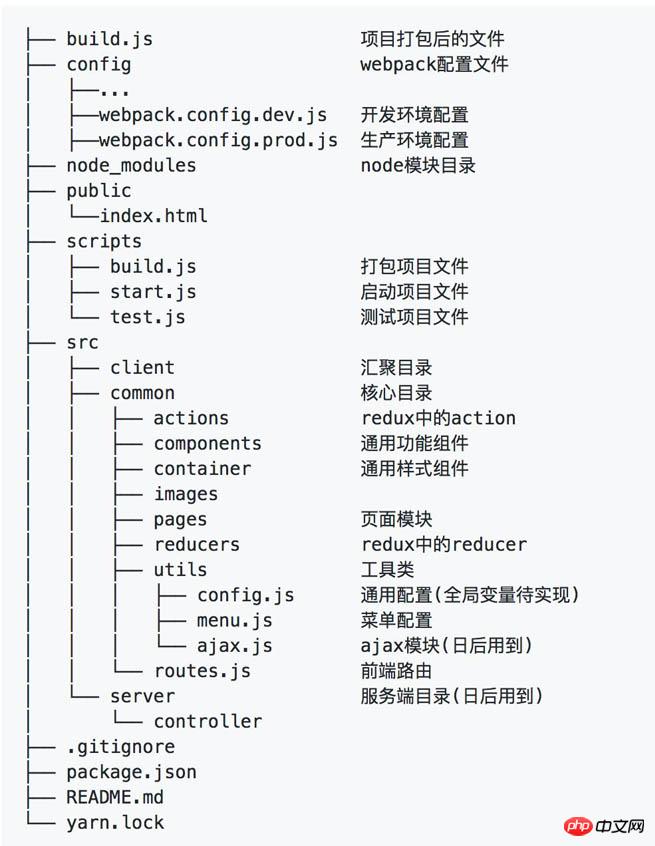
The directory structure is explained as follows
The project was initially initialized with create-react-app, which is the react officially provided by Facebook Scaffolding is also one of the best React application development tools in the industry;
The middleware directory can then introduce log middleware, etc.;
container and components store both react components. The difference is: as long as the components related to the homepage style are placed in the container, the modules related to the functions (such as the table components and pop-up input box components that I implemented) should be placed in the container. Put it in components;
Some common front-end configurations are best saved in the global (browser), so that they don’t need to be referenced when called, which is convenient;
The reason why the ajax module needs to be implemented by yourself is that if you need to have cross-domain cors and other requirements, you need to customize multiple Ajax requests (when using fetch, fetch will become more and more powerful in the future)
Technology stack related
Although there are many technology stacks used, I am not proficient in using them. I mostly use them while checking the API. , so I only list some points that I have solved with relevant technology stacks;
webpack(2.6)
①Load on demand:
babel -plugin-import is a babel plug-in (principle) for loading component code and styles on demand. Make the following modifications in the config/webpack.config.dev.js file:
{
 test: /\.(js|jsx)$/,
 include: paths.appSrc,
 loader: 'babel',
 query: {
   plugins: [
    ['import', [{ libraryName: "antd", style: 'css' }]],
   ],
  cacheDirectory: true
 }
},②Introduce less:
First introduce less-loader to load the less style, and modify config/webpack.config.dev.js File
loaders: [
 {
  exclude: [
   /\.html$/,
   /\.(js|jsx)$/,
+   /\.less$/,
   /\.css$/,
   /\.json$/,
   /\.svg$/
  ],
  loader: 'url',
 },

...

 // Process JS with Babel.
 {
  test: /\.(js|jsx)$/,
  include: paths.appSrc,
  loader: 'babel',
  query: {
   plugins: [
-    ['import', [{ libraryName: "antd", style: 'css' }]],
+    ['import', [{ libraryName: "antd", style: true }]], // 加载 less 文件
   ],
  },

...

+ // 解析 less 文件,并加入变量覆盖配置
+ {
+  test: /\.less$/,
+  loader: 'style!css!postcss!less?{modifyVars:{"@primary-color":"#1DA57A"}}'
+ },
]The modifyVars of less-loader is used here for theme configuration. For variables and other configuration methods, please refer to the configuration theme document.
③Publish to gh-pages with one click:
Use gh-pages, use npm run deploy to publish to your own gh-pages with one click, let’s treat gh-pages as a production environment Well, so when modifying the config/webpack.config.dev.js file, you must also make the same modifications to config/webpack.config.prod.js.
ps: Although I published it to gh-pages in this way, the gh-pages display address of the project is here. The image displayed on gh-pages is obviously a few pixels larger than the local one. If any friends know it, Why, don’t hesitate to teach me.
④Abbreviation of the reference path:
 resolve: {
  fallback: paths.nodePaths,
  alias: {
   'react-native': 'react-native-web',
   components: path.resolve(__dirname, '..') + '/src/common/components',
   container: path.resolve(__dirname, '..') + '/src/common/container',
   images: path.resolve(__dirname, '..') + '/src/common/images',
   pages: path.resolve(__dirname, '..') + '/src/common/pages',
   utils: path.resolve(__dirname, '..') + '/src/common/utils',
   data: path.resolve(__dirname, '..') + '/src/server/data',
  }
},After configuring the abbreviation of the reference path, you can quote it like this anywhere, such as

antd(2.10)
antd is (Ant Financial Experience Technology Department) a medium that has been precipitated through a large number of project practices and summaries. The Taiwanese design language Ant Design is used by a series of well-known companies such as Ant Financial, Alibaba, Koubei, Meituan, Didi, etc., and I also learned a lot about UI and UX from their design concepts.
This project uses the latest version of antd 2.10.0. Since the 2.x version and the 1.x version are still quite different, the previously referenced project (based on 1.x) would be too difficult to change. It was laborious, so I simply repackaged the components myself. For this part of the knowledge, I recommend reading the documentation. The documentation cannot solve the source code.
react-router(4.x)
react-router 4.x和2.x的差异又是特别的大,召唤文档,网上基本上都还是2.x的教程,看过文档之后,反正简而言之其就是要让使用者更容易上手。印象最深的是以前嵌套路由写法在4.x中写到同层了。如下示例他们的效果是相同的。
2.x:
<Route path="/" component={App}>
  <Route path="/aaaa" component={AAAA} />
  <Route path="/bbbb" component={BBBB} />
</Route>4.x:
<Route path="/" component={App} />
<Route path="/aaaa" component={AAAA} />
<Route path="/bbbb" component={BBBB} />还有更多的特性和API的出现,期待有更好的分析文章的出现,有机会我也会来总结下react-router(4.x)和(2.x)的差异。
fetch
先推荐这篇文章《传统Ajax已死,Fetch永生》,再推荐API;
fetch是个好东西,好在简单,除了promise最基本的用法,还能这样写
fetch(url).then(response => response.json())
 .then(data => console.log(data))
.catch(e => console.log("Oops, error", e))try {
let response = await fetch(url);
let data = await response.json();
console.log(data);
} catch(e) {
console.log("Oops, error", e);
}但是其简洁的特点是为了让我们可以自定义其扩展,还是其本身就还不完善呢?我在调用JSONP的请求时,发现用fetch掉不同,后来在文档上才发现其不支持JSONP的调用,所幸社区还是很给力的找到了fetch-jsonp这个模块,实现了对百度音乐接口的JSONP调用。fetch-jsonp使用也和fetch类似,代码如下
fetchJsonp(url,{method: 'GET'})
  .then((res) =>res.json())
.then((data) => {})redux
使用了redux也已经有段时日了,我对redux的定义就是更好的管理组件的状态,没有redux的时候就像现在这个应用一样,逻辑少状态变化也还不太复杂,但是一旦逻辑复杂起来,各种组件状态、界面耦合起来,就容易出岔子,那redux就是为了解决这个而生的,让我们可以更多地关注UI层,而降低对状态的关注。之前也写了些redux的文章,纸上得来终觉浅,绝知此事要躬行。
--------------------------更新---------------------------
已经在项目中加入了redux技术栈。
项目的一些待扩展计划
封装组件
不管组件封装得好不好,个人感觉其是提高水平很高效的方法,多练,继续封装出各式各样的功能组件。
typescript
公司大概会在6月份开始,新的项目就要采用ts开发了,所以我也到时会在该项目中引人ts的语法,我现在的感觉是使用ts后,前后端对接会更加轻松,不会有一些类型不匹配的低级错误,而且antd貌似和ts也能兼容得蛮好。
相关推荐:
ASP.NET MVC5+EF6+EasyUI 后台管理系统微信公众平台开发
The above is the detailed content of Detailed explanation of an example of building a backend management system using React Family Bucket. For more information, please follow other related articles on the PHP Chinese website!
 Why is my phone not turned off but when someone calls me it prompts me to turn it off?
 mysql create database
 How to solve too many logins
 How to use dc.rectangle
 Turn off win10 automatic updates
 Binary representation of negative numbers
 iPhone 4 jailbreak
 Build your own git server
 What are the advantages of SpringBoot framework?


