
 Web Front-end
JS Tutorial
Detailed explanation of React-Native global multi-language switching tool library react-native-i18n
Web Front-end
JS Tutorial
Detailed explanation of React-Native global multi-language switching tool library react-native-i18n
Detailed explanation of React-Native global multi-language switching tool library react-native-i18n

This article mainly introduces the detailed explanation of the React-Native global language switching tool library react-native-i18n. The editor thinks it is quite good, so I will share it with you now and give it as a reference. Let’s follow the editor to take a look, I hope it can help everyone.
| Attribute | Explanation |
|---|---|
| All versions | |
| iOS+Android | |
| Yes | |
| Yes | |
| No |
Usage:
1.install (omitted, it’s all written in git, just npm things) 2. Used in the project Because they are some static attribute references, you can use redux for storage and replacement, or you can drink them directly (this article takes en and zh as examples). First, build the English version of the configuration file, en/index.jsexport default {
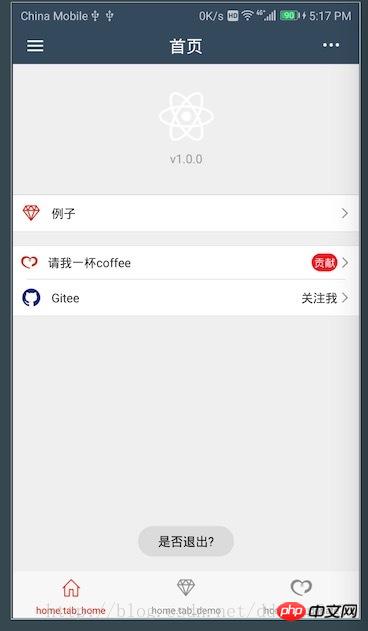
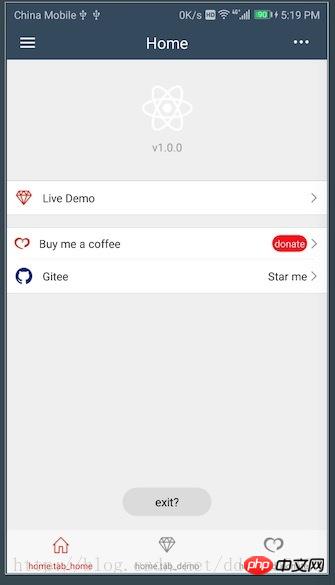
home: {
greeting: 'Greeting in en',
tab_home: 'Home',
tab_donate: 'Donate',
tab_demo: 'Demo',
language: 'language',
live_demo: 'Live Demo',
buy_me_coffee: 'Buy me a coffee',
gitee: 'Gitee',
star_me: 'Star me',
donate: 'donate',
exit: 'exit?',
},
donate: {
donate: 'donate us~~~',
donate_desc: '© 2017 Pactera Technology International Limited. All rights reserved.',
},
demo: {
dialog: 'dialog',
button: 'button',
switch: 'switch',
action_sheet: 'Action Sheet',
}
};export default {
home: {
greeting: 'Greeting in zh',
tab_home: '首页',
tab_donate: '捐赠',
tab_demo: '例子',
language: '语言',
live_demo: '例子',
buy_me_coffee: '请我一杯coffee',
gitee: 'Gitee',
star_me: '关注我',
donate: '贡献',
exit: '是否退出?',
},
donate: {
donate: '支持我们~~',
donate_desc: '© 2017 Pactera Technology International Limited. All rights reserved.',
},
demo: {
dialog: '提示框',
button: '按钮',
switch: '开关',
action_sheet: '',
}
};2.1 Default language environment
We have written 2 language configurations above, so which one is used for initialization? Before calling the business layer, we can make presets firsti18n/index.jsimport i18n from 'react-native-i18n';
import en from './en';
import zh from './zh';
i18n.defaultLocale = 'en';
i18n.fallbacks = true;
i18n.translations = {
en,
zh,
};
export {i18n};ToastAndroid.show(i18n.t('home.exit'),ToastAndroid.SHORT);
Source code analysis
The implementation of this library is divided into two parts, one part is the Native version judgment and other functions and the core implementation of the js part fnando/i18n-jsi18n-js is a lightweight js translation library that supports conversion of various formats and content and switching of language content. The address is as follows: https://github.com/fnando/i18n-jsSo the translation and conversion is done by I18n.js, so what has Native done? Let’s find out (take Android as an example, Apple can’t understand it, sorry)
public class RNI18nModule extends ReactContextBaseJavaModule {

 public RNI18nModule(ReactApplicationContext reactContext) {
 super(reactContext);
 }
 //RN调用的控件名
 @Override
 public String getName() {
 return "RNI18n";
 }

 //对取出的Locale列表进行格式化的方法
 private String toLanguageTag(Locale locale) {
 if (Build.VERSION.SDK_INT >= Build.VERSION_CODES.LOLLIPOP) {
  return locale.toLanguageTag();
 }

 StringBuilder builder = new StringBuilder();
 builder.append(locale.getLanguage());

 if (locale.getCountry() != null) {
  builder.append("-");
  builder.append(locale.getCountry());
 }

 return builder.toString();
 }

 private WritableArray getLocaleList() {
 WritableArray array = Arguments.createArray();

 if (Build.VERSION.SDK_INT >= Build.VERSION_CODES.N) {
  //获取区域设置列表。这是获取区域的首选方法。
  LocaleList locales = getReactApplicationContext()
   .getResources().getConfiguration().getLocales();

  for (int i = 0; i < locales.size(); i++) {
  array.pushString(this.toLanguageTag(locales.get(i)));
  }
 } else {
  array.pushString(this.toLanguageTag(getReactApplicationContext()
   .getResources().getConfiguration().locale));
 }

 return array;
 }

 //js端可获取属性的列表
 @Override
 public Map<String, Object> getConstants() {
 HashMap<String, Object> constants = new HashMap<String,Object>();
 constants.put("languages", this.getLocaleList());
 return constants;
 }

 //提供给js端调用的方法,用来获取默认的语言环境,回调方式用的是promise
 @ReactMethod
 public void getLanguages(Promise promise) {
 try {
  promise.resolve(this.getLocaleList());
 } catch (Exception e) {
  promise.reject(e);
 }
 }
}
Copy Code The code is as follows:
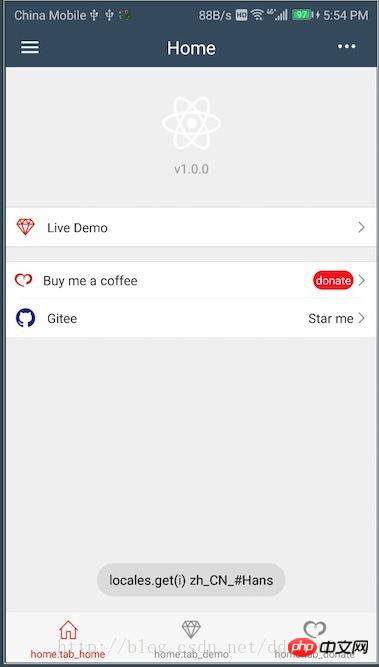
Toast.makeText(getReactApplicationContext(),"locales.get(i) "+locales.get(i),Toast.LENGTH_LONG).show();

Summary:
First, Native obtains the LocaleList of this phone, then formats it and takes the first element, which is processed by I18n.js, and then I18n.js selects a set of effective language rules based on the key, and then the process is the same as the order of use.The entire library is less difficult to integrate and easier to use. There are no big pitfalls when using it. It is more delicious when combined with redux.
React-intl implementation of multi-language examples detailed explanation
PHP - implementation of multi-language automatic switching
PHP - Automatic multi-language switching
The above is the detailed content of Detailed explanation of React-Native global multi-language switching tool library react-native-i18n. For more information, please follow other related articles on the PHP Chinese website!

Hot AI Tools

Undresser.AI Undress
AI-powered app for creating realistic nude photos

AI Clothes Remover
Online AI tool for removing clothes from photos.

Undress AI Tool
Undress images for free

Clothoff.io
AI clothes remover

Video Face Swap
Swap faces in any video effortlessly with our completely free AI face swap tool!

Hot Article
Hot Tools

Notepad++7.3.1
Easy-to-use and free code editor

SublimeText3 Chinese version
Chinese version, very easy to use

Zend Studio 13.0.1
Powerful PHP integrated development environment

Dreamweaver CS6
Visual web development tools

SublimeText3 Mac version
God-level code editing software (SublimeText3)
Hot Topics
 1677
1677
 14
1430
52
1333
25
1278
29
1257
24
14
1430
52
1333
25
1278
29
1257
24

 Best Practices for Writing JavaScript Code with VSCode
May 15, 2025 pm 09:45 PM
Best Practices for Writing JavaScript Code with VSCode
May 15, 2025 pm 09:45 PM
Best practices for writing JavaScript code in VSCode include: 1) Install Prettier, ESLint, and JavaScript (ES6) codesnippets extensions, 2) Configure launch.json files for debugging, and 3) Use modern JavaScript features and optimization loops to improve performance. With these settings and tricks, you can develop JavaScript code more efficiently in VSCode.
 Vaneck launches its first RWA tokenized fund for institutional investors
May 15, 2025 am 11:51 AM
Vaneck launches its first RWA tokenized fund for institutional investors
May 15, 2025 am 11:51 AM
The VBILL Token Fund was launched on May 13, providing institutional investors with the opportunity to tokenize U.S. fiscal bills. Vaneck's new tagged fund will enable institutional investors to invest in U.S. Treasury bills. The VBILL Token Fund was launched on May 13 as the result of a cooperation with Securities, a tokenized platform that supports the entire operation of the fund. The fund will be subscribed on four major blockchains – Ethereum, Sorana, Avalanche and BNB Chain. On three of these blockchains (Avalanche, Solana and BNB chains), the minimum subscription is $100,000. On Ethereum, the minimum investment is US$1 million. The fund is Vaneck's efforts to expand its real-life
 View Git history and changes in VSCode
May 15, 2025 pm 09:24 PM
View Git history and changes in VSCode
May 15, 2025 pm 09:24 PM
How to view Git history and changes in VSCode include: 1. Open VSCode and make sure the project has initialized the Git repository. 2. Click the "Source Code Management" icon in the left sidebar. 3. Select "...(more options)" and click "Git:ShowGitOutput". 4. View commit history and file changes. 5. Right-click the file and select "Git:ShowFileHistory" to view the file change history. Through these steps, you can efficiently view Git history and changes in VSCode to improve development efficiency.
 What are XploraDEX and $XPL tokens? An article introduction
May 15, 2025 am 11:45 AM
What are XploraDEX and $XPL tokens? An article introduction
May 15, 2025 am 11:45 AM
In the rapidly developing world of decentralized finance (DeFi), innovation never stops. The latest wave is not just about speed or safety – it is about wisdom. This is exactly when XploraDEX comes into the stage. XploraDEX, built on the XRP record, is setting new benchmarks for decentralized exchanges by introducing artificial intelligence (AI) to every level of trading. But what exactly is XploraDEX, how is it different from other platforms, and what role the $XPL token plays in its ecosystem? Let's parse step by step in an easy-to-understand way.
 XRP Futures is coming, CME Group expands institutional adoption of tokens
May 15, 2025 am 11:57 AM
XRP Futures is coming, CME Group expands institutional adoption of tokens
May 15, 2025 am 11:57 AM
May 19 will become an important day for the XRP market, as an official press conference will be held on this day. This move reflects the growing enthusiasm of major financial platforms for XRP adoption. CME Group will officially launch XRP Futures on May 19, marking an important milestone for institutional investors in the development of the XRP market. The release date was officially announced by FuturesExchange, highlighting key progress in the XRP market. This action is carried out in the context of XRP adoption by major financial platforms. CME had confirmed that it would increase XRP futures a few weeks ago. This confirmation comes after CME's recent launch of SolanaFutures, showing the exchange expanding its products to Bitcoin and Ethereum
 What is encryption jump start (blockchain jump start)?
May 15, 2025 pm 04:24 PM
What is encryption jump start (blockchain jump start)?
May 15, 2025 pm 04:24 PM
What is encryption jump? How is encryption rush to take shape? How to avoid encryption jumping? The crypto field is a rush to make profits by unconfirmed transactions, leveraging the transparency of blockchain. Learn how traders, bots, and validators manipulate transaction sorting, their impact on decentralized finance, and possible ways to protect transactions. Below, the editor of Script Home will give you a detailed introduction to encryption and rush forward! What is the rush to the encryption field? Taking the lead has long been a problem in the financial market. It originated in the traditional financial field, and refers to brokers or insiders using privileged information to trade before clients. Such behavior is considered immoral and illegal, and the regulator will investigate and punish it.
 An effective way to resolve Git commit conflicts in VSCode
May 15, 2025 pm 09:36 PM
An effective way to resolve Git commit conflicts in VSCode
May 15, 2025 pm 09:36 PM
Handling Git commit conflicts in VSCode can be effectively resolved through the following steps: 1. Identify the conflicting file, and VSCode will be highlighted in red. 2. Manually edit the code between conflict marks and decide to retain, delete or merge. 3. Keep branches small and focused to reduce conflicts. 4. Use GitLens extension to understand code history. 5. Use VSCode to build-in Git commands, such as gitmerge--abort or gitreset--hard. 6. Avoid relying on automatic merge tools and carefully check the merge results. 7. Delete all conflict marks to avoid compilation errors. With these methods and tricks, you can handle Git conflicts efficiently in VSCode.
 Use VSCode to perform version fallback operation of code
May 15, 2025 pm 09:42 PM
Use VSCode to perform version fallback operation of code
May 15, 2025 pm 09:42 PM
In VSCode, you can use Git for code version fallback. 1. Use gitreset--hardHEAD~1 to fall back to the previous version. 2. Use gitreset--hard to fall back to a specific commit. 3. Use gitrevert to safely fall back without changing history.
