
This time I will bring you the use of Mongoose to create models and APIs in Nodejs. What are the precautions for using Mongoose in Nodejs to create models and APIs? The following is a practical case, let's take a look.
MongoDB is a distributed document storage database, which is different from the relational database used in daily life. It stores BSON format (json binary), which is characterized by high Performance, easy to deploy, easy to use... (see the encyclopedia for details). The main point is that it supports JavaScript reading and writing. The biggest feature of MEAN stack development is that the front and back ends, including the database, are all written in JavaScript. Mongoose can be compared to EntityFramwork (ORM-Object Relational Mapping), and its main function is to allow developers to operate the database more conveniently. Before starting, remember to install mongodb first.
1. Preparation for MongoDB

If "computer actively rejects" appears, you need to set the dbpath, which is the path to the specified data.
mongod --dbpath=c:\mongodb\db
After success, you can visit http://localhost:28017/ and you can see the following page:

Indicates that everything is ready.
D:\mongodb\bin>mongod --dbpath=D:\mongodb --logpath=D:\mongodb\log.txt --install
Replace the above path with your own path, and then enter services.msc in the run box. When setting up the service, make sure that mongo is running, otherwise the setting will not be successful.

Open the file and find Mongo DB:

Right-click and select Start, so that every time you start mongo will run automatically.
@echo off
start "" "D:\mongodb-win32-i386-2.0.6\bin\mongo.exe"
This way you can directly enter the command box every time you click:

View db:
show dbs
Switch to a database:
switched to db dbname
或者:
use dbname
View the collection under a certain database
show collections
View the documents below the collection:
db.collections.find()

Because the focus of this section is not to introduce how to operate mongo in cmd, I won’t go into details. For more details like this, you can refer to the blog of a front-line coder: Learn mongoDB in 8 days. If the computer does not have sp1 installed, the 3.0 version on the official website cannot be run after successful installation. You can use the 2.xx installation-free version. Next, we will mainly talk about the operation of Mongoose.
2. Mongoose
You can install it directly using npm:
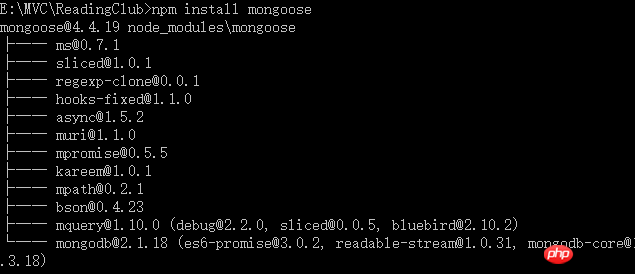
You can also use vs to install. Right-click npm on the project and select Install New npm Packages.
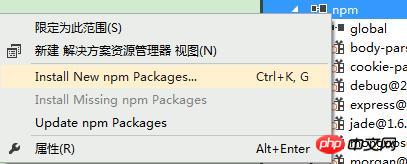
For the first time, you will download and install a tool. After the installation is completed, search for Mongoose, the following interface will appear, and install it.
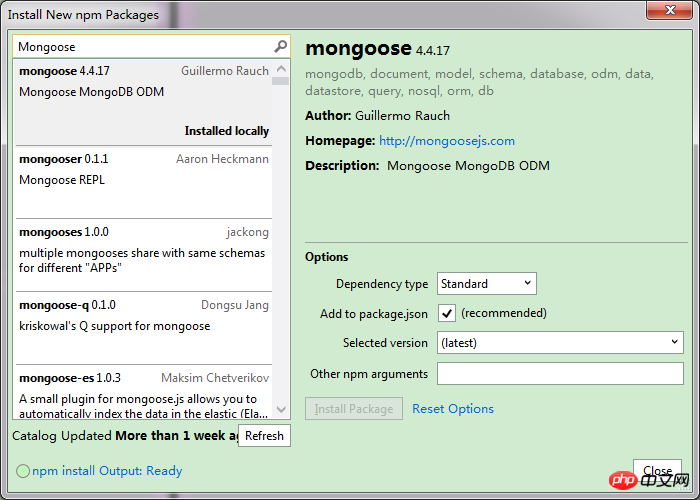
At this step, the environment is finally ready. Next, create a models directory under the app_server folder and create a new one. db.js
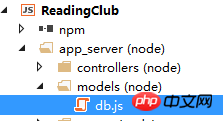
and reference Mongoose in db.js:
var mongoose = require('mongoose');mongodb不需要在连接它之前创建数据库,当第一次连接的时候,会根据链接自动创建。Mongoose在连接MongoDB的时候会创建一个有五个可重用的连接的连接池,连接数是可以配置的。这么做的原因是因为连接数据库是比较耗时的操作,特别是分布式的数据库。连接字符串的规则如下:

这里用户名、密码、端口都是可以省略的,那么在本地的时候我们的连接字符串就如下:
var dbURI = 'mongodb://localhost/RClub';
mongoose.connect(dbURI);
命名我们的数据库为RClub。Mongoose会基于连接的状态发布不同的事件:
mongoose.connection.on('connected', function () {
    console.log('Mongoose connected to ' + dbURI);
});
mongoose.connection.on('error', function (err) {
    console.log('Mongoose connection error: ' + err);
});
mongoose.connection.on('disconnected', function () {
    console.log('Mongoose disconnected');
});如此我们可以监听连接的状态。另外应用终止需要监听nodejs的进程的SIGINT事件。而如果是nodemon重启,需要监听的是SIGUSR2事件,以便关闭连接。


// 当应用重启或终止的时候 关闭连接Shutdown = function (msg, callback) {
    mongoose.connection.close(function () {
        console.log('Mongoose disconnected through ' + msg);
        callback();
    });
};// nodemon 重启 process.once('SIGUSR2', function () {
    Shutdown('nodemon restart', function () {
        process.kill(process.pid, 'SIGUSR2');
    });
});// 应用终止process.on('SIGINT', function () {
    Shutdown('app termination', function () {
        process.exit(0);
    });
});View Code
运行nodemon:

显示连接成功!
Mongoose封装了mongodb的api使之更便于调用,但作为MongoDB的对象-文档建模器,有着更强大的功能。在mongodb中,每一个条目就是一个document,相当于关系型数据库中的行,而document的集合称为collection,相当于是关系型数据库中的table。在Mongoose中定义一个document的对象称为schema,相当于用EF定义一个Model,而定义schema中每一条数据的规则称为path(约束)。path的规则和jquery.validate.js几乎是一样的。
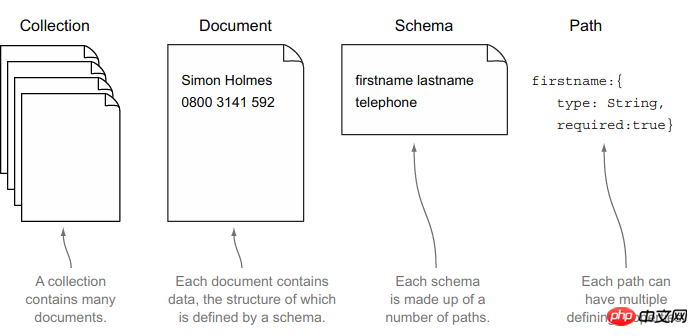
path支持的数据类型如下:
String
Number
Date
Boolean
Buffer 二进制,比如图形
Mixed 任何类型
Array 可以为数组,或者内嵌的 子文档集
ObjectId 唯一id
接下来演示下如何用Mongoose建一个数据模型,在models文件夹下创建一个books.js。然后引用Mongoose。如下,更具上一节book对象创建一个bookSchema 。
  {
id: 0"深入浅出Node.js""朴灵 / 人民邮电出版社 / 2013-12-1 / CNY 69.00"5"https://img3.doubanio.com/mpic/s27269296.jpg""node", "深入浅出"'本书从不同的视角介绍了 Node 内在的特点和结构。.....9787115335500id不用创建,mongo会为每个document生成一个唯一的id。
var mongoose = require('mongoose');var bookSchema = new mongoose.Schema({
    title: String,
    rating: {
        type: Number,
        required: true,
        min: 0,
        max: 5
    },
    info: String,
    img: String,
    tags: [String],
    brief: String,
    ISBN: String
});这种语法是不是和jquery.validate.js很像,相信不用解释就能看明白,不满足path的条件时是不能保存或者更改的。每个path还可以设置默认值,比如时间:
 createdOn: {
        type: Date,        default: Date.now
},一个Schema可以包含另外的Schema或数组,在关系型数据库中这种需求用的是外键或者是关系映射表,而Mongoose这样看起来直观多了。
var userSchema = new mongoose.Schema({
userName: String,
    email: String,
...});var commentSchema = new mongoose.Schema({
    user: userSchema,
    ...
    content: String
});var topicSchema = new mongoose.Schema({
    ....
    visitedCount: { type: Number, default: 0 },
    ...
    comments: [commentSchema],
    deleted: { type: Boolean, default: false },
    top: { type: Boolean, default: false }, // 置顶帖    ...
});这个时候的shema 还不具备数据库的操作能力,还需要注册下。
mongoose.model('Book', bookSchema);
mongoose.model('Topic', topicSchema);全部模型:
var mongoose = require('mongoose');var bookSchema = new mongoose.Schema({
    title: String,
    rating: {
        type: Number,
        required: true,
        min: 0,
        max: 5
    },
    info: String,
    img: String,
    tags: [String],
    brief: String,
    ISBN: String
});var userSchema = new mongoose.Schema({
    userName: String,
    email: String,
    password: String,
    createdOn: {
        type: Date,        default: Date.now
    },
    img: String,
    ip: String,
    mobile: String
});var commentSchema = new mongoose.Schema({
    user: userSchema,
    createdOn: {
        type: Date,        default: Date.now
    },
    content: String
});var topicSchema = new mongoose.Schema({
    title: String,
    type: String,
    visitedCount: { type: Number, default: 0 },
    commentCount: { type: Number, default: 0 },
    createdOn: {
        type: Date,        default: Date.now
    },
    img: String,
    author: String,
    content: String,
    comments: [commentSchema],
    deleted: { type: Boolean, default: false },
    top: { type: Boolean, default: false }, // 置顶帖
    good: { type: Boolean, default: false }, // 精华帖});
mongoose.model('Book', bookSchema);
mongoose.model('Topic', topicSchema);View Code
接下来就是改造controllers文件夹的中的home.js了,首先要引用db.js和Mongoose。
var db = require('../models/db.js');var mongoose = require('mongoose');1).初始化数据,查询与新建数据。
这里把上一节创建的数据books和topics存入数据库中:
module.exports.init = function (req, res) {    mongoose.model('Book').find().exec(function (err, objs) {        if (err) {
            res.render('error', {
                message: err.message,
                error: err
            });            return;
        }        if (objs.length) {
            for (var i = 0; i < books.length; i++) {                var taget = new Bookmodel(books[i]);//创建一个模型                taget.save(function (err) {//保存。
                    console.log(err);
                });
            }
            for (var i = 0; i < topics.length; i++) {                var taget = new topicmodel(topics[i]);
                console.log('topic create');
                taget.save(function (err) {
                    console.log(err);
                });
            }
            res.send('初始化完成...');
        }
        res.render('books', { title: 'Books', books: objs });
});这段代码里面有查询和新建保存,mongoose.model("Book") 相当于EF中的db.Books。而这里的find()方法并没有立即执行,这里有点像Linq的感觉,可以链式查询:
Book.find({ size: 'small' }).where('createdDate').gt(oneYearAgo).exec(callback);//例子,和上面的book没有关系这里Book相当于mongoose.model("Book") ,而{ size: 'small' }是一个条件。最终到exec方法时才正在执行。回调函数默认有两个参数,一个是err,一个是结果对象。这里偷了懒只判断了books的查询结果,集合为空的话就加上原来的数据。因为mongoose.model("Book")使用的比较多,所以干脆提出来:
var Bookmodel = mongoose.model('Book');var Topicmodel = mongoose.model('Topic');find方法是查询一个集合,常用的还有findone:
var query = Person.findOne({ 'name.last': 'Ghost' });// 选择name和occupation 字段query.select('name occupation');// 执行查询query.exec(function (err, person) {  if (err) return handleError(err);
  console.log('%s %s is a %s.', person.name.first, person.name.last, person.occupation)
})保存数据,new一个Model,传入初始化的对象,save即可。
 var taget = new Bookmodel(books[i]);
      taget.save(function (err) {
               console.log(err);
});配置下路由:
router.get('/init', homeController.init);运行:

因此数据添加成功!
三、app_api
为方便后面复用,接下来将数据调用换成api的方式。在工程里面新建一个app_api文件夹,并将原来app_server目录下的models文件移过去。并增加controllers和routes文件夹。也就是说,把数据调用分离出来。
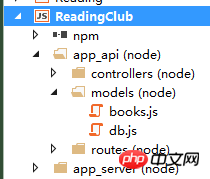
1)在app.js中增加以下代码:
var routesApi = require('./app_api/routes/index');...
app.use('/', routes);app.use('/api', routesApi);也就是说,所有以/api/xx开始的请求将由routes/index.js来路由。
2)在routes文件下新增index.js 文件,用来配置api的路由:
var express = require('express');var router = express.Router();var bookCtrl = require('../controllers/book');var topicCtrl = require('../controllers/topic');
router.get('/books', bookCtrl.books);
router.post('/book', bookCtrl.bookCreate);
router.get('/book/:bookid', bookCtrl.bookReadOne);
router.put('/books/:bookid', bookCtrl.bookUpdateOne);
router.delete('/books/:bookid', bookCtrl.bookDeleteOne);//topicsrouter.get('/topics', topicCtrl.topics);
module.exports = router;路由覆盖了增删改查,暂时先实现这部分的路由。后面根据需求再增加。
3)controller实现
一个成功的Restful API应该包含返回的数据和http的状态码,因此我们定义了一个公用方法:
var sendJSONresponse = function (res, status, content) {
    res.status(status);
    res.json(content);
};比如定义一个bookReadOne方法:
module.exports.bookReadOne = function (req, res) {    var bookid = req.params.bookid;    if (!bookid) {
        sendJSONresponse(res, 404, {            "message": "Not found, bookid is required"
        });        return;
    }
    BookModel.findById(bookid).exec(function (err, book) {        if (!book) {
            sendJSONresponse(res, 404, {                "message": "bookid not found"
            });            return;
        } else if (err) {            sendJSONresponse(res, 400, err);            return;
        }
        console.log(book);        sendJSONresponse(res, 200, book);
    });
}请求成功发送状态码200和结果,请求失败则发送404或者500及错误。
books.js:


var mongoose = require('mongoose');var BookModel = mongoose.model('Book');var sendJSONresponse = function (res, status, content) {
    res.status(status);
    res.json(content);
};

module.exports.books = function (req, res) {
    BookModel.find().exec(function (err, books) {        if (err) {
            console.log(err);
            sendJSONresponse(res, 400, err);            return;
        }
        sendJSONresponse(res, 200, books);
    });
}
module.exports.bookCreate = function (req, res) {
    BookModel.create({
        title: req.body.title,
        info: req.body.info,
        img: req.body.img,
        tags: req.body.tags,
        brief: req.body.brief,
        ISBN: req.body.ISBN
    }, function(err, book) {        if (err) {
            console.log(err);
            sendJSONresponse(res, 400, err);
        } else {
            console.log(book);
            sendJSONresponse(res, 201, book);
        }
    });
}
module.exports.bookReadOne = function (req, res) {    var bookid = req.params.bookid;    if (!bookid) {
        sendJSONresponse(res, 404, {            "message": "Not found, bookid is required"
        });        return;
    }
    BookModel.findById(bookid).exec(function (err, book) {        if (!book) {
            sendJSONresponse(res, 404, {                "message": "bookid not found"
            });            return;
        } else if (err) {
            sendJSONresponse(res, 400, err);            return;
        }
        console.log(book);
        sendJSONresponse(res, 200, book);
    });
}
module.exports.bookUpdateOne = function (req, res) {    var bookid = req.params.bookid;    if (!bookid) {
        sendJSONresponse(res, 404, {            "message": "Not found, bookid is required"
        });        return;
    }
    BookModel.findById(bookid).exec(function (err, book) {        if (!book) {
            sendJSONresponse(res, 404, {                "message": "bookid not found"
            });            return;
        } else if (err) {
            sendJSONresponse(res, 400, err);            return;
        }
        book.title = req.body.title;
        book.rating = req.body.rating;
        book.info = req.body.info;
        book.img = req.body.img;
        book.tags = req.body.tags;
        book.brief = req.body.brief;
        book.ISBN = req.body.ISBN;
        book.save(function (err, book) {            if (err) {
                sendJSONresponse(res, 404, err);
            } else {
                sendJSONresponse(res, 200, book);
            }
        });
    });
}
module.exports.bookDeleteOne = function (req, res) {    var bookid = req.params.bookid;    if (bookid) {
        BookModel.findByIdAndRemove(bookid)
            .exec(function (err) {            if (err) {
                console.log(err);
                sendJSONresponse(res, 404, err);                return;
            }
            console.log("book id :" + bookid + "deleted");
            sendJSONresponse(res, 204, null);
        });
    } else {
        sendJSONresponse(res, 404, { message: "No bookid" });
    }
}View Code
这样注意一点是,find()、findbyid和findByIdAndRemove不是立即执行,是在exec方法中执行,但是create,save是立即执行的。
5)、调用api
接下来就是在app_server下的controller中调用上面定义的api。在这里需要安装一个request模块,request让http请求变的更加简单。

在home.js中引用request:
var request = require('request');request的调用如下:
request(options, callback)
包含options和回调两部分,options结构如下,包含url,method,json和qs四部分。
var requestOptions = {
url : "http://yourapi.com/api/path",
method : "GET",
json : {}, //请求体的JavaScript对象qs : {
offset : 20 //查询字符串}
};而默认的回调格式如下:
function(err, response, body) {if (err) {
console.log(err);
} else if (response.statusCode === 200) {
console.log(body);
} else {
console.log(response.statusCode);
}
}修改index方法,先定义一个apiOptions,只想默认路径,记得在发布的时候修改为带域名的地址。
var apiOptions = {
    server : "http://localhost:3000"};
module.exports.index = function (req, res) {    var requestOptions, path;
    path = "/api/topics";
    requestOptions= {
        url: apiOptions.server + path,
        method: "GET",
        json:{},
    }
    request(requestOptions, function (err, response, body) {        if (response.statusCode == 200) {
            res.render('index', { title: 'Index', topics: body });
        } else {
            res.render('error', { message: err.message, error: err });
        }
    });
};这样就进行了分离,home.js不在需要引用Mongoose部分。
home.js:
var request = require('request');var apiOptions = {
    server : "http://localhost:3000"};//if (process.env.NODE_ENV === 'production') {//    apiOptions.server = "https://stoneniqiu-mean.herokuapp.com/ ";//}module.exports.index = function (req, res) {    var requestOptions, path;
    path = "/api/topics";
    requestOptions= {
        url: apiOptions.server + path,
        method: "GET",
        json:{},
    }
    request(requestOptions, function (err, response, body) {        if (response.statusCode == 200) {
            res.render('index', { title: 'Index', topics: body });
        } else {
            res.render('error', { message: err.message, error: err });
        }
    });
};
module.exports.books = function (req, res) {    var requestOptions, path;
    path = "/api/books";
    requestOptions = {
        url: apiOptions.server + path,
        method: "GET",
        json: {},
    }
    request(requestOptions, function (err, response, body) {        if (response.statusCode == 200) {
            res.render('books', { title: 'Books', books: body });
        } else {
            res.render('error', { message: err.message, error: err });
        }
    });
};
module.exports.detail = function (req, res) {    var requestOptions, path;
    path = "/api/book/" + req.params.id;
    requestOptions = {
        url: apiOptions.server+path ,
        method: "GET",
        json: {},
    }
    request(requestOptions, function (err, response, body) {        if (response.statusCode == 200) {
            res.render('detail', { title: body.title, book: body });
        } else {
            res.render('info', err);
        }
    });

   };
module.exports.about = function (req, res) {
    res.render('about', { title: 'About' });
};View Code
更多查询可以移步:http://mongoosejs.com/docs/queries.html
在首页,需要处理一下时间显示的问题,增加了一个mixin
mixin formatDate(dateString) -var date = new Date(dateString); -var d = date.getDate(); -var monthNames = [ "1", "2", "3", "4", "5", "6", "7", "8", "9", "10", "11", "12" ]; -var m = monthNames[date.getMonth()]; -var y = date.getFullYear(); -var output = y + '/' + m + '/' + d; =output
调用:
span.pull-right +formatDate(topic.createdOn)
页面如下:
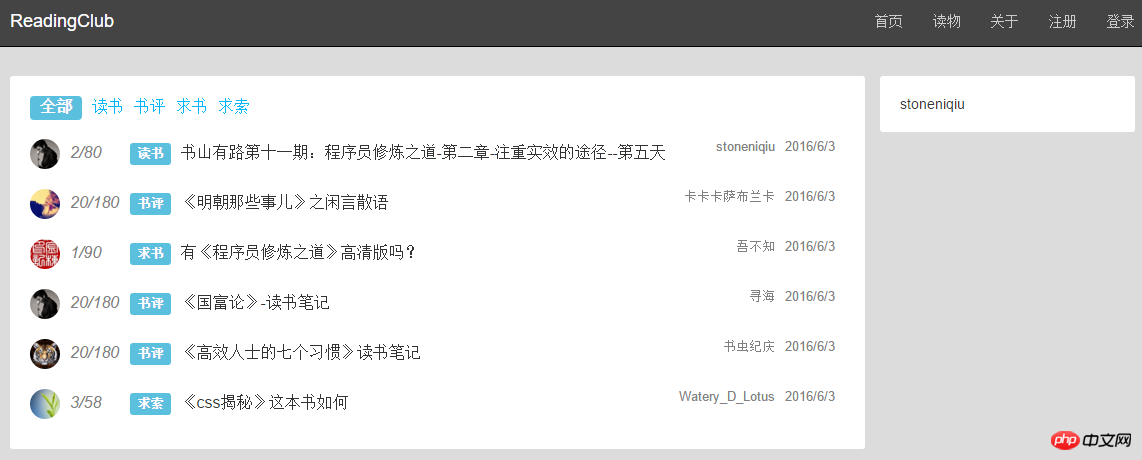
初步改造完成。之前还写了一个基于回调的service方式的controller和service,类似于C#中的分离。后来觉得还是api的方式更好,留在这里可以当一个参考。
home.js:


var bookservice = require('../services/homeService.js');

module.exports.index = function (req, res) {
    bookservice.allTopics(function (result) {
        var obj = result.content;
        console.log(obj.status);        if (result.status == 200) {
            res.render('index', { title: 'Index', topics: obj });
        }
        res.render('info', obj);
    });
};
module.exports.books = function (req, res) {
    bookservice.allBooks(function(result) {
        var obj = result.content;
        console.log(obj.status);        if (result.status == 200) {
            res.render('books', { title: 'Books', books: obj });
        }
        res.render('info', obj);
    });
};
module.exports.detail = function (req, res) {
    bookservice.bookReadOne(req.params.id, function (result) {
        var obj = result.content;        if (result.status == 200) {
            res.render('detail', { title: obj.title, book: obj });
        }
        res.render('info', obj);
    });
   };
module.exports.about = function (req, res) {
    res.render('about', { title: 'About' });
};View Code
homeService.js:
var mongoose = require('mongoose');var db = require('../models/db.js');var Bookmodel = mongoose.model('Book');var Topicmodel = mongoose.model('Topic');var jsonResult = function (status, content) {    return { status: status, content: content };
};
module.exports.bookReadOne = function (id,callback) {
    console.log('Finding book details', id);    if (!id) {
        console.log('No bookid specified');        return jsonResult(404, { "message": "No bookid specified" });
    }
    Bookmodel.findById(id).exec(function (err, book) {        if (err) {
            callback(jsonResult(404, err));            return;
        }        if (!book) {
            callback(jsonResult(404, { "message": "book not found" }));            return;
        }
       callback(jsonResult(200, book));
    });
};
module.exports.allBooks=function(callback) {
    Bookmodel.find().exec(function (err, books) {        if (err) {
            callback(jsonResult(404, err));            return;
        }        if (!books.length) {
            callback(jsonResult(404, { "message": "books not found" }));            return;
        }
        callback(jsonResult(200, books));
    });
}
module.exports.createBook = function (book, callback) {    var t = new Bookmodel(book);
    t.save(function (err) {
        callback(err);
    });
}
module.exports.allTopics=function(callback) {
    Topicmodel.find().exec(function (err, topics) {        if (err) {
            callback(jsonResult(404, err));            return;
        }        if (!topics.length) {
            callback(jsonResult(404, { "message": "topics not found" }));            return;
        }
        callback(jsonResult(200, topics));
    });
}
module.exports.createTopic=function(topic, callback) {    var t = new Topicmodel(topic);
    t.save(function(err) {
        callback(err);
    });
}var books = [
    {
        id: 0,
        title: "深入浅出Node.js",
        info: "朴灵 / 人民邮电出版社 / 2013-12-1 / CNY 69.00",
        rating: 5,
        img: "https://img3.doubanio.com/mpic/s27269296.jpg",
        tags: ["node", "深入浅出"],
        brief: '本书从不同的视角介绍了 Node 内在的特点和结构。由首章Node 介绍为索引,涉及Node 的各个方面,主要内容包含模块机制的揭示、异步I/O 实现原理的展现、异步编程的探讨、内存控制的介绍、二进制数据Buffer 的细节、Node 中的网络编程基础、Node 中的Web 开发、进程间的消息传递、Node 测试以及通过Node 构建产品需要的注意事项。最后的附录介绍了Node 的安装、调试、编码规范和NPM 仓库等事宜。本书适合想深入了解 Node 的人员阅读。'
        ,ISBN: 9787115335500
    },
    {
        id: 1,
        title: "程序员修炼之道 : 从小工到专家",
        info: "Andrew Hunt、David Thomas / 马维达 / 电子工业出版社 / 2005-1 / 48.00元",
        rating: 5,
        img: "https://img3.doubanio.com/mpic/s3957863.jpg",
        tags: ["程序人生", "软件开发"],
        brief: '《程序员修炼之道》由一系列的独立的部分组成,涵盖的主题从个人责任、职业发展,直到用于使代码保持灵活、并且易于改编和复用的各种架构技术。利用许多富有娱乐性的奇闻轶事、有思想性的例子以及有趣的类比,全面阐释了软件开发的许多不同方面的最佳实践和重大陷阱。无论你是初学者,是有经验的程序员,还是软件项目经理,本书都适合你阅读。'
        ,ISBN: 9787505397194
    },
    {
        id: 2,
        title: "Getting MEAN with Mongo, Express, Angular, and Node",
        info: "Simon Holmes / Manning Publications / 2015-11-26 / USD 44.99",
        rating: 4,
        img: "https://img3.doubanio.com/mpic/s27676844.jpg",
        tags: ["node", "web开发", "编程"],
        brief: 'MEAN栈开发,比较详尽的的应用开发书籍'
        , ISBN: 9781617292033
    }
];var topics = [
    {
        title: "书山有路第十一期:程序员修炼之道-第二章-注重实效的途径--第五天",
        type: "读书",
        visitedCount: 80,
        commentCount: 2,
        createdOn: '2016/5/15 21:32',
        author: 'stoneniqiu',
        img: 'http://upload.jianshu.io/users/upload_avatars/133630/d5370e672fd4.png?imageMogr/thumbnail/90x90/quality/100'
    },
    {
        title: "《明朝那些事儿》之闲言散语",
        type: "书评",
        visitedCount: 180,
        commentCount: 20,
        createdOn: '2016/5/15 21:32',
        author: '卡卡卡萨布兰卡 ',
        img: 'http://upload.jianshu.io/users/upload_avatars/1675188/2d0810ccc03d.jpg?imageMogr/thumbnail/90x90/quality/100'
    },
    {
        title: "有《程序员修炼之道》高清版吗?",
        type: "求书",
        visitedCount: 90,
        commentCount: 1,
        createdOn: '2016/5/15 21:32',
        author: '吾不知 ',
        img: 'http://upload.jianshu.io/users/upload_avatars/1125491/3910f3825f73.jpg?imageMogr/thumbnail/90x90/quality/100',
    },
    {
        title: "《国富论》-读书笔记",
        type: "书评",
        visitedCount: 180,
        commentCount: 20,
        createdOn: '2016/5/15 21:32',
        author: '寻海 '
        ,img: 'http://upload.jianshu.io/users/upload_avatars/133630/d5370e672fd4.png?imageMogr/thumbnail/90x90/quality/100'
    },
    {
        title: "《高效人士的七个习惯》读书笔记",
        type: "书评",
        visitedCount: 180,
        commentCount: 20,
        createdOn: '2016/5/15 21:32',
        author: '书虫纪庆 ',
        img: 'http://upload.jianshu.io/users/upload_avatars/1429280/454c495361f9.jpg?imageMogr/thumbnail/90x90/quality/100'
    },
    {
        title: "《css揭秘》这本书如何",
        type: "求索",
        visitedCount: 58,
        commentCount: 3,
        createdOn: '2016/5/15 21:32',
        author: 'Watery_D_Lotus ',
        img: 'http://upload.jianshu.io/users/upload_avatars/1449533/a2d98762484a.jpg?imageMogr/thumbnail/90x90/quality/100'
    }
];//module.exports.bookCreate = function (req, res) {// var book = {// title: "test",// info: "Simon Holmes / Manning Publications / 2015-11-26 / USD 44.99",// rating: 4,// img: "https://img3.doubanio.com/mpic/s27676844.jpg",// tags: ["node", "web开发", "编程"],// brief: 'MEAN栈开发,比较详尽的的应用开发书籍',// ISBN: 9781617292033// };// var b = new Bookmodel(book);// b.save(function (err) {// if (err) {// console.log(err);// res.render('error', {// message: err.message,// error: err// });// }// res.render('info', { message: "添加成功!", success: true });// });//};//module.exports.bookDelete = function (req, res) {// Bookmodel.findOneAndRemove({ title: "test" }, function (err) {// if (err) {// console.log(err);// res.render('error', {// message: err.message,// error: err// });// }// res.render('info', { message: "删除成功!", success: true });// });//};View Code
至此,这三个页面的数据全部都是通过api从数据库中获取。那么现在我们要发布,本地数据库显然是不行。那怎么办呢?
四、mlab,500M MongoDB免费空间!
mlab是一个提供部署在云端的mongodb数据库服务平台,可以对每个用户免费提供500M空间。
1. 先注册一个账号:https://mlab.com/,并验证邮箱:

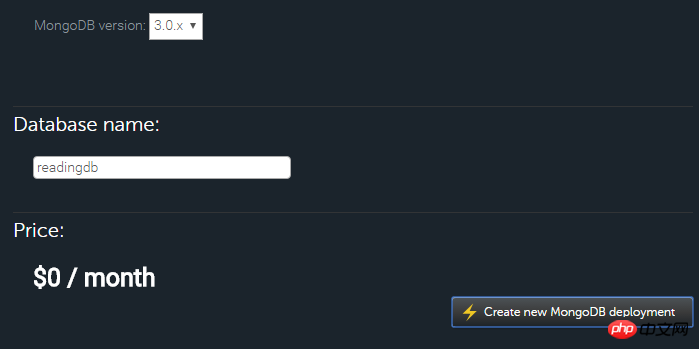
2.点击Create new创建数据库:这里选择亚马逊的单用户sanbox会有免费的500M空间。
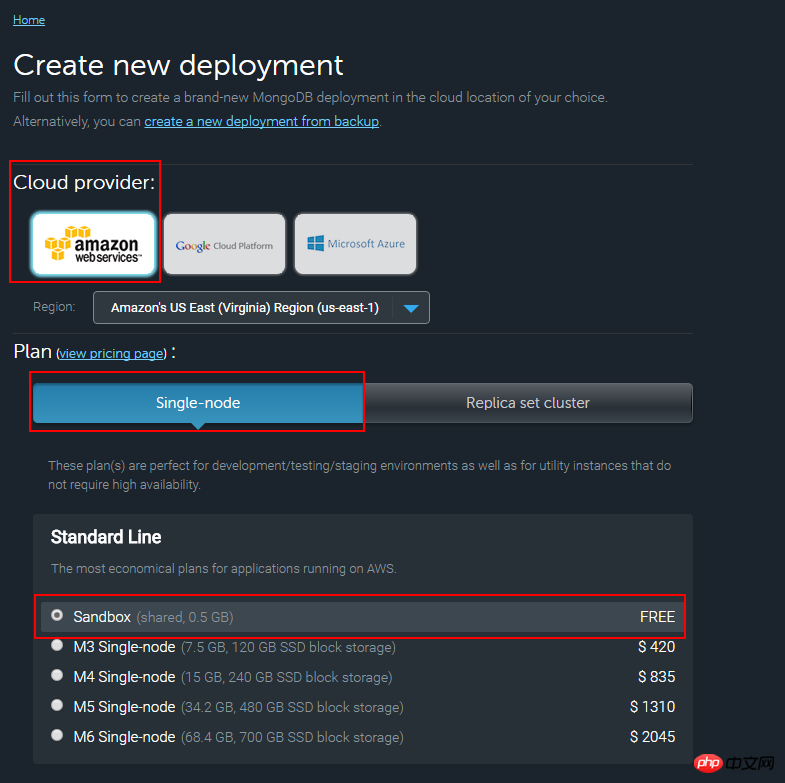
输入数据库名称,并创建
3.创建成功之后,给数据库创建一个用户

4.连接字符串:

第一个字符串是用cmd连接,第二个用于我们的程序。修改db.js 连接成功:

相信看了本文案例你已经掌握了方法,更多精彩请关注php中文网其它相关文章!
推荐阅读:
The above is the detailed content of Nodejs uses Mongoose to create models and APIs. For more information, please follow other related articles on the PHP Chinese website!


