
 Web Front-end
JS Tutorial
Detailed explanation of the basic operation methods of Python-OpenCV_python
Web Front-end
JS Tutorial
Detailed explanation of the basic operation methods of Python-OpenCV_python
Detailed explanation of the basic operation methods of Python-OpenCV_python

The editor below will share with you a detailed explanation of the basic operation methods of Python-OpenCV. It has a good reference value and I hope it will be helpful to everyone. Let’s follow the editor to take a look
Basic properties
cv2.imread (file name, properties) Read in the image
Attribute: Specify how the image is read from the file
cv2.IMREAD_COLOR: Read in color images, default parameters, Opencv reads color images in BGR mode! ! ! Note
cv2.IMREAD_GRAYSCALE: Read in grayscale images.
cv2.imshow(window name, image file) Display image
Can create multiple windows
cv2.waitKey() keyboard binding function
The function waits for a specific number of milliseconds to see if there is input from the keyboard.
cv2.namedWindow(window name, attribute) Create a window
Attribute: Specify window size mode
cv2.WINDOW_AUTOSIZE: Automatically based on image size Create size
cv2.WINDOW_NORMAL: The window size can be adjusted
cv2.destoryAllWindows(window name) Delete any created window
Code example:
import cv2
 img=cv2.imread('test.py',cv2.IMREAD_COLOR)
 cv2.namedWindow('image',cv2.WINDOW_NORMAL)
 cv2.imshow('image',img)
 cv2.waitKey(0)
 cv2.destoryAllWindows()
cv2.imwrite(save image name, need to save image) Save image
Code example:
 import cv2
 img=cv2.imread('test.png',0)
 cv2.imshow('image',img)
 k=cv2.waitKey(0)
 if k==27: #等待 ESC 键
  cv2.destoryAllWindows()
 elif k==ord('s') #等待 's' 键来保存和退出
  cv2.imwrite('messigray.png',img)
  cv2.destoryAllWindows()
Some operations on images
0x01. Get image attributes
import cv2
img=img.imread('test.png')
print img.shape
#(768,1024,3)
print img.size
#2359296 768*1024*3
print img.dtype
#uint8
0x02. Output text
When processing pictures, output some information directly in the form of text. On the picture
cv2.putText(picture name, text, coordinates, text color)
##0x03. Zoom picture
Implement scaling and saving of images, a common operation when using OpenCV. cv2.resize() supports a variety of interpolation algorithms. By default, cv2.INTER_LINEAR is used. The most suitable one for reducing is cv2.INTER_AREA. The most suitable one for enlarging is cv2.INTER_CUBIC or cv2.INTER_LINEAR.res=cv2.resize(image,(2*width,2*height),interpolation=cv2.INTER_CUBIC)
res=cv2.resize(image,None,fx=2,fy=2,interpolation=cv2.INTER_CUBIC)
0x04 is set later. The image translation is
cv2.warpAffine(src, M, dsize[, dst[, flags[, borderMode[, borderValue]]]])
For example, pan the picture (100,50)
 import cv2
 img=cv2.imread('test.png',1)
 rows,cols,channel=img.shape
 M=np.float32([[1,0,100],[0,1,50]])
 dst=cv2.warpAffine(img,M,(cols,rows))
 cv2.imshow('img',dst)
 cv2.waitKey(0)
 cv2.destoryALLWindows()
0x05. Image rotation
In OpenCV, you first need to construct a rotation matrix, which is obtained through cv2.getRotationMatrix2D.import cv2 img=cv2.imread('test.png',0) rows,cols=img.shape #第一个参数为旋转中心,第二个为旋转角度,第三个为旋转后的缩放因子 M=cv2.getRotationMatrix2D((cols/2,rows/2),45,0.6) #第三个参数为图像的尺寸中心 dst=cv2.warpAffine(img,M,(2*cols,2*rows)) cv2.imshow('img',dst) cv2.waitKey(0) cv2.destoryALLWindows()
0x06. Affine transformation
In affine transformation, the original image All parallel lines in are equally parallel in the resulting image. To create the offset matrix, you need to find three points in the original image and their positions in the output image. Then OpenCV provides cv2.getAffineTransform to create a 2*3 matrix, and finally passes the matrix to the function cv2.warpAffine.import cv2 import matplotlib.pyplot as plt import numpy as np img=cv2.imread('test.png') rows,cols,ch=img.shape pts1=np.float32([[50,50],[200,50],[50,200]]) pts2=np.float32([[10,100],[200,50],[100,250]]) M=cv2.getAffineTransform(pts1,pts2) dst=cv2.warpAffine(img,M,(cols,rows)) plt.subplot(121),plt.imshow(img),plt.title('Input') plt.subplot(122),plt.imshow(dst),plt.title('Output') plt.show()

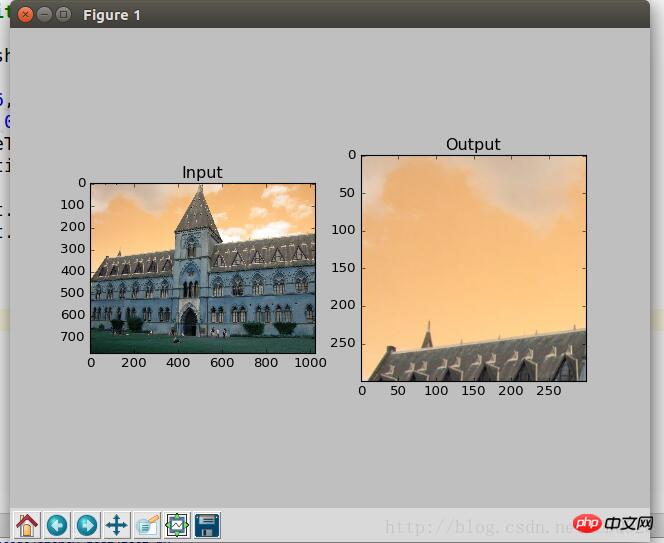
##0x07. Perspective transformation Perspective transformation requires a 3*3 transformation matrix. Make sure the straight line is still straight before and after the transformation. Constructing this matrix requires finding 4 points in the input image and their corresponding positions in the output image. Any three of these four points cannot be collinear. Transformation matrix OpenCV provides cv2.getPerspectiveTransform() construction. Then pass the matrix into the function cv2.warpPerspective.
import cv2
import numpy as np
import matplotlib.pyplot as plt
img=cv2.imread('test.png')
rows,cols,ch=img.shape
pts1=np.float32([[56,65],[368,52],[28,387],[389,390]])
pts2=np.float32([[0,0],[300,0],[0,300],[300,300]])
M=cv2.getPerspectiveTransform(pts1,pts2)
dst=cv2.warpPerspective(img,M,(300,300))
plt.subplot(121),plt.imshow(img),plt.title('Input')
plt.subplot(122),plt.imshow(dst),plt.title('Output')
plt.show()
Sometimes it is necessary to operate on a specific area of an image, and the ROI is obtained using Numpy index.
import cv2
import numpy as np
import matplotlib.pyplot as plt

image=cv2.imread('test.png')
rows,cols,ch=image.shape
tall=image[0:100,300:700]
image[0:100,600:1000]=tallall
cv2.imshow("image",image)
cv2.waitKey(0)
cv2.destoryALLWindows() ##0x10. Channel split/merge processing
Sometimes it is necessary to operate the three BGR channels separately. At this time, the BGR needs to be split into a single channel. At the same time, sometimes it is necessary to merge independent channel images into a BGR image.
Use OpenCV library function versionimport cv2
import numpy as np
import matplotlib.pyplot as plt
image=cv2.imread('pitt1.jpg')
rows,cols,ch=image.shape
#拆分通道,cv2.split()是一个比较耗时的操作。只有需要时使用,尽量Numpy
b,g,r=cv2.split(image)
print b.shape
#(768,1024)
#合并通道
image=cv2.merge(b,g,r)
The above is the detailed content of Detailed explanation of the basic operation methods of Python-OpenCV_python. For more information, please follow other related articles on the PHP Chinese website!import cv2
import numpy as np
import matplotlib.pyplot as plt
image=cv2.imread('pitt1.jpg')
rows,cols,ch=image.shape
#直接获取
b=img[:,:,0]

Hot AI Tools

Undresser.AI Undress
AI-powered app for creating realistic nude photos

AI Clothes Remover
Online AI tool for removing clothes from photos.

Undress AI Tool
Undress images for free

Clothoff.io
AI clothes remover

Video Face Swap
Swap faces in any video effortlessly with our completely free AI face swap tool!

Hot Article
Hot Tools

Notepad++7.3.1
Easy-to-use and free code editor

SublimeText3 Chinese version
Chinese version, very easy to use

Zend Studio 13.0.1
Powerful PHP integrated development environment

Dreamweaver CS6
Visual web development tools

SublimeText3 Mac version
God-level code editing software (SublimeText3)
Hot Topics
 1657
1657
 14
1415
52
1309
25
1257
29
1230
24
14
1415
52
1309
25
1257
29
1230
24

 PHP and Python: Different Paradigms Explained
Apr 18, 2025 am 12:26 AM
PHP and Python: Different Paradigms Explained
Apr 18, 2025 am 12:26 AM
PHP is mainly procedural programming, but also supports object-oriented programming (OOP); Python supports a variety of paradigms, including OOP, functional and procedural programming. PHP is suitable for web development, and Python is suitable for a variety of applications such as data analysis and machine learning.
 Choosing Between PHP and Python: A Guide
Apr 18, 2025 am 12:24 AM
Choosing Between PHP and Python: A Guide
Apr 18, 2025 am 12:24 AM
PHP is suitable for web development and rapid prototyping, and Python is suitable for data science and machine learning. 1.PHP is used for dynamic web development, with simple syntax and suitable for rapid development. 2. Python has concise syntax, is suitable for multiple fields, and has a strong library ecosystem.
 PHP and Python: A Deep Dive into Their History
Apr 18, 2025 am 12:25 AM
PHP and Python: A Deep Dive into Their History
Apr 18, 2025 am 12:25 AM
PHP originated in 1994 and was developed by RasmusLerdorf. It was originally used to track website visitors and gradually evolved into a server-side scripting language and was widely used in web development. Python was developed by Guidovan Rossum in the late 1980s and was first released in 1991. It emphasizes code readability and simplicity, and is suitable for scientific computing, data analysis and other fields.
 Python vs. JavaScript: The Learning Curve and Ease of Use
Apr 16, 2025 am 12:12 AM
Python vs. JavaScript: The Learning Curve and Ease of Use
Apr 16, 2025 am 12:12 AM
Python is more suitable for beginners, with a smooth learning curve and concise syntax; JavaScript is suitable for front-end development, with a steep learning curve and flexible syntax. 1. Python syntax is intuitive and suitable for data science and back-end development. 2. JavaScript is flexible and widely used in front-end and server-side programming.
 How to run sublime code python
Apr 16, 2025 am 08:48 AM
How to run sublime code python
Apr 16, 2025 am 08:48 AM
To run Python code in Sublime Text, you need to install the Python plug-in first, then create a .py file and write the code, and finally press Ctrl B to run the code, and the output will be displayed in the console.
 Can vs code run in Windows 8
Apr 15, 2025 pm 07:24 PM
Can vs code run in Windows 8
Apr 15, 2025 pm 07:24 PM
VS Code can run on Windows 8, but the experience may not be great. First make sure the system has been updated to the latest patch, then download the VS Code installation package that matches the system architecture and install it as prompted. After installation, be aware that some extensions may be incompatible with Windows 8 and need to look for alternative extensions or use newer Windows systems in a virtual machine. Install the necessary extensions to check whether they work properly. Although VS Code is feasible on Windows 8, it is recommended to upgrade to a newer Windows system for a better development experience and security.
 Where to write code in vscode
Apr 15, 2025 pm 09:54 PM
Where to write code in vscode
Apr 15, 2025 pm 09:54 PM
Writing code in Visual Studio Code (VSCode) is simple and easy to use. Just install VSCode, create a project, select a language, create a file, write code, save and run it. The advantages of VSCode include cross-platform, free and open source, powerful features, rich extensions, and lightweight and fast.
 How to run python with notepad
Apr 16, 2025 pm 07:33 PM
How to run python with notepad
Apr 16, 2025 pm 07:33 PM
Running Python code in Notepad requires the Python executable and NppExec plug-in to be installed. After installing Python and adding PATH to it, configure the command "python" and the parameter "{CURRENT_DIRECTORY}{FILE_NAME}" in the NppExec plug-in to run Python code in Notepad through the shortcut key "F6".
