
 Web Front-end
JS Tutorial
Detailed explanation of the steps to asynchronously upload files using the PHP+jQuery plug-in
Web Front-end
JS Tutorial
Detailed explanation of the steps to asynchronously upload files using the PHP+jQuery plug-in
Detailed explanation of the steps to asynchronously upload files using the PHP+jQuery plug-in
This time I will bring you a detailed explanation of the steps for asynchronous uploading of files by the PHP jQuery plug-in. What are the precautions for asynchronous uploading of files by the PHP jQuery plug-in? The following is a practical case, let's take a look.
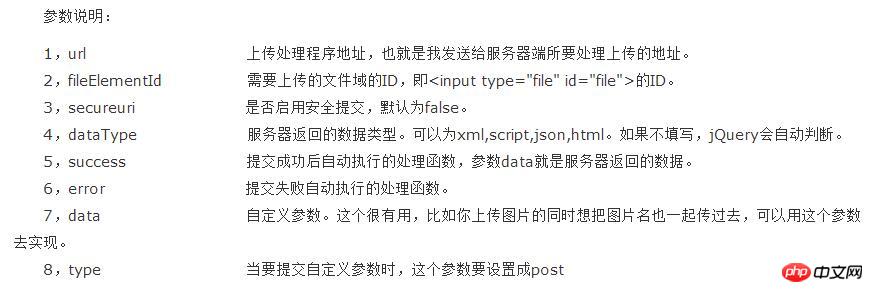
The most commonly used JQuery image upload plug-in is Uploadify, which works very well. However, since the mobile phone does not support flash, I have to find another1. Detailed explanation of the syntax parameters of the ajaxFileUpload plug-in
Principle:ajaxfileupload is implemented by monitoring the onload method of the iframe , when the processing from the server is completed, the onload event of the iframe is triggered to call its binding method, and in the binding method, the data body returned by the server in the iframe is obtained (supported ordinary text, json, xml, script, html)
Syntax:$.ajaxFileUpload([options])
2. Next, let’s see how to use it
1. First introduce the ajaxFileUpload plug-in.<script src="jquery-1.11.1.js" type="text/javascript"></script> <script src="ajaxfileupload.js" type="text/javascript"></script>
 <p data-role="fieldcontain" class="upload-box">
  <label for="id_photos"><span class="red">* </span>您的有效证件照:</label>
   <input type="file" id="id_photos" name="id_photos" value="上传" style="filter:alpha(opacity=10);-moz-opacity:10;opacity:10;" />
  <p style="margin-top:0.5em;color:#999;font-size:11pt;">说明:请上传手持证件的半身照,请确保照片内证件信息清晰可读。</p>
 </p>
 <p class="id_photos" >

 </p>
$(document).bind('pageinit', function(){
//照片异步上传
$('#id_photos').change(function(){ //此处用了change事件,当选择好图片打开,关闭窗口时触发此事件
$.ajaxFileUpload({
url:'/uploader/', //处理图片的脚本路径
type: 'post', //提交的方式
secureuri :false, //是否启用安全提交
fileElementId :'id_photos', //file控件ID
dataType : 'json', //服务器返回的数据类型
success : function (data, status){ //提交成功后自动执行的处理函数
if(1 != data.total) return; //因为此处指允许上传单张图片,所以数量如果不是1,那就是有错误了
var url = data.files[0].path;
$('.id_photos').empty();
//此处效果是:当成功上传后会返回一个json数据,里面有url,取出url赋给img标签,然后追加到.id_photos类里显示出图片
$('.id_photos').append('<img src="'+url+'" value="'+url+'" style="width:80%" >');
//$('.upload-box').remove();
},
error: function(data, status, e){ //提交失败自动执行的处理函数
alert(e);
}
})
});{
"total": 1,
"success": 1,
"files": [
{
"srcName": "3.jpg",
"error": 0,
"size": 10715,
"type": "image/jpeg",
"success": true,
"path": "http://m.kellyblog.com/upload/20150528/857f4a35664b4a665e713322306d73b2.0x124x126.jpg",
"width": 124,
"height": 126
}
]
}

class UploaderController extends XXXX_Controller {
 public function index() {
 $files = array();
 $success = 0; //用户统计有多少张图片上传成功了

 foreach ($_FILES as $item) {
  $index = count($files);
  $files[$index]['srcName'] = $item['name']; //上传图片的原名字
  $files[$index]['error'] = $item['error']; //和该文件上传相关的错误代码
  $files[$index]['size'] = $item['size']; //已上传文件的大小,单位为字节
  $files[$index]['type'] = $item['type']; //文件的 MIME 类型,需要浏览器提供该信息的支持,例如"image/gif"
  $files[$index]['success'] = false;  //这个用于标志该图片是否上传成功
  $files[$index]['path'] = '';  //存图片路径
  // 接收过程有没有错误
  if($item['error'] != 0) continue;
  //判断图片能不能上传
  if(!is_uploaded_file($item['tmp_name'])) {
  $files[$index]['error'] = 8000;
  continue;
  }
  //扩展名
  $extension = '';
  if(strcmp($item['type'], 'image/jpeg') == 0) {
  $extension = '.jpg';
  }
  else if(strcmp($item['type'], 'image/png') == 0) {
  $extension = '.png';
  }
  else if(strcmp($item['type'], 'image/gif') == 0) {
  $extension = '.gif';
  }
  else {
  //如果type不是以上三者,我们就从图片原名称里面去截取判断去取得(处于严谨性)
  $substr = strrchr($item['name'], '.');
  if(FALSE == $substr) {
   $files[$index]['error'] = 8002;
   continue;
  }
  //取得元名字的扩展名后,再通过扩展名去给type赋上对应的值
  if(strcasecmp($substr, '.jpg') == 0 || strcasecmp($substr, '.jpeg') == 0 || strcasecmp($substr, '.jfif') == 0 || strcasecmp($substr, '.jpe') == 0 ) {
   $files[$index]['type'] = 'image/jpeg';
  }
  else if(strcasecmp($substr, '.png') == 0) {
   $files[$index]['type'] = 'image/png';
  }
  else if(strcasecmp($substr, '.gif') == 0) {
   $files[$index]['type'] = 'image/gif';
  }
  else {
   $files[$index]['error'] = 8003;
   continue;
  }
  $extension = $substr;
  }
  //对临时文件名加密,用于后面生成复杂的新文件名
  $md5 = md5_file($item['tmp_name']);
  //取得图片的大小
  $imageInfo = getimagesize($item['tmp_name']);
  $rawImageWidth = $imageInfo[0];
  $rawImageHeight = $imageInfo[1];
  //设置图片上传路径,放在upload文件夹,以年月日生成文件夹分类存储,
  //rtrim(base_url(), '/')其实就是网站的根目录,大家自己处理
  $path = rtrim(base_url(), '/') . '/upload/' . date('Ymd') . '/';
  //确保目录可写
  ensure_writable_dir($path);
  //文件名
  $name = "$md5.0x{$rawImageWidth}x{$rawImageHeight}{$extension}";
  //加入图片文件没变化到,也就是存在,就不必重复上传了,不存在则上传
  $ret = file_exists($path . $name) ? true : move_uploaded_file($item['tmp_name'], $serverPath . $name);
  if($ret === false) {
  $files[$index]['error'] = 8004;
  continue;
  }
  else {
  $files[$index]['path'] = $path . $name; //存图片路径
  $files[$index]['success'] = true;  //图片上传成功标志
  $files[$index]['width'] = $rawImageWidth; //图片宽度
  $files[$index]['height'] = $rawImageHeight; //图片高度
  $success ++; //成功+1
  }
 }
 //将图片已json形式返回给js处理页面 ,这里大家可以改成自己的json返回处理代码
 echo json_encode(array(
  'total' => count($files),
  'success' => $success,
  'files' => $files,
 ));
 }
}
/*********************************分割*************************************************/
//这里我附上ensure_writable_dir()函数的代码
/**
* 确保文件夹存在并可写
*
* @param string $dir
*/
function ensure_writable_dir($dir) {
 if(!file_exists($dir)) {
 mkdir($dir, 0766, true);
 chmod($dir, 0766);
 chmod($dir, 0777);
 }
 else if(!is_writable($dir)) {
 chmod($dir, 0766);
 chmod($dir, 0777);
 if(!is_writable($dir)) {
  throw new FileSystemException("目录 $dir 不可写");
 }
 }
}How jQuery converts the url address to obtain the url directory
Detailed explanation of the steps for jquery to parse XML string XML files (With code)
The above is the detailed content of Detailed explanation of the steps to asynchronously upload files using the PHP+jQuery plug-in. For more information, please follow other related articles on the PHP Chinese website!

Hot AI Tools

Undresser.AI Undress
AI-powered app for creating realistic nude photos

AI Clothes Remover
Online AI tool for removing clothes from photos.

Undress AI Tool
Undress images for free

Clothoff.io
AI clothes remover

Video Face Swap
Swap faces in any video effortlessly with our completely free AI face swap tool!

Hot Article
Hot Tools

Notepad++7.3.1
Easy-to-use and free code editor

SublimeText3 Chinese version
Chinese version, very easy to use

Zend Studio 13.0.1
Powerful PHP integrated development environment

Dreamweaver CS6
Visual web development tools

SublimeText3 Mac version
God-level code editing software (SublimeText3)
Hot Topics


 Explain JSON Web Tokens (JWT) and their use case in PHP APIs.
Apr 05, 2025 am 12:04 AM
Explain JSON Web Tokens (JWT) and their use case in PHP APIs.
Apr 05, 2025 am 12:04 AM
JWT is an open standard based on JSON, used to securely transmit information between parties, mainly for identity authentication and information exchange. 1. JWT consists of three parts: Header, Payload and Signature. 2. The working principle of JWT includes three steps: generating JWT, verifying JWT and parsing Payload. 3. When using JWT for authentication in PHP, JWT can be generated and verified, and user role and permission information can be included in advanced usage. 4. Common errors include signature verification failure, token expiration, and payload oversized. Debugging skills include using debugging tools and logging. 5. Performance optimization and best practices include using appropriate signature algorithms, setting validity periods reasonably,
 How do you parse and process HTML/XML in PHP?
Feb 07, 2025 am 11:57 AM
How do you parse and process HTML/XML in PHP?
Feb 07, 2025 am 11:57 AM
This tutorial demonstrates how to efficiently process XML documents using PHP. XML (eXtensible Markup Language) is a versatile text-based markup language designed for both human readability and machine parsing. It's commonly used for data storage an
 Explain late static binding in PHP (static::).
Apr 03, 2025 am 12:04 AM
Explain late static binding in PHP (static::).
Apr 03, 2025 am 12:04 AM
Static binding (static::) implements late static binding (LSB) in PHP, allowing calling classes to be referenced in static contexts rather than defining classes. 1) The parsing process is performed at runtime, 2) Look up the call class in the inheritance relationship, 3) It may bring performance overhead.
 PHP Program to Count Vowels in a String
Feb 07, 2025 pm 12:12 PM
PHP Program to Count Vowels in a String
Feb 07, 2025 pm 12:12 PM
A string is a sequence of characters, including letters, numbers, and symbols. This tutorial will learn how to calculate the number of vowels in a given string in PHP using different methods. The vowels in English are a, e, i, o, u, and they can be uppercase or lowercase. What is a vowel? Vowels are alphabetic characters that represent a specific pronunciation. There are five vowels in English, including uppercase and lowercase: a, e, i, o, u Example 1 Input: String = "Tutorialspoint" Output: 6 explain The vowels in the string "Tutorialspoint" are u, o, i, a, o, i. There are 6 yuan in total
 What are PHP magic methods (__construct, __destruct, __call, __get, __set, etc.) and provide use cases?
Apr 03, 2025 am 12:03 AM
What are PHP magic methods (__construct, __destruct, __call, __get, __set, etc.) and provide use cases?
Apr 03, 2025 am 12:03 AM
What are the magic methods of PHP? PHP's magic methods include: 1.\_\_construct, used to initialize objects; 2.\_\_destruct, used to clean up resources; 3.\_\_call, handle non-existent method calls; 4.\_\_get, implement dynamic attribute access; 5.\_\_set, implement dynamic attribute settings. These methods are automatically called in certain situations, improving code flexibility and efficiency.
 PHP and Python: Comparing Two Popular Programming Languages
Apr 14, 2025 am 12:13 AM
PHP and Python: Comparing Two Popular Programming Languages
Apr 14, 2025 am 12:13 AM
PHP and Python each have their own advantages, and choose according to project requirements. 1.PHP is suitable for web development, especially for rapid development and maintenance of websites. 2. Python is suitable for data science, machine learning and artificial intelligence, with concise syntax and suitable for beginners.
 PHP: A Key Language for Web Development
Apr 13, 2025 am 12:08 AM
PHP: A Key Language for Web Development
Apr 13, 2025 am 12:08 AM
PHP is a scripting language widely used on the server side, especially suitable for web development. 1.PHP can embed HTML, process HTTP requests and responses, and supports a variety of databases. 2.PHP is used to generate dynamic web content, process form data, access databases, etc., with strong community support and open source resources. 3. PHP is an interpreted language, and the execution process includes lexical analysis, grammatical analysis, compilation and execution. 4.PHP can be combined with MySQL for advanced applications such as user registration systems. 5. When debugging PHP, you can use functions such as error_reporting() and var_dump(). 6. Optimize PHP code to use caching mechanisms, optimize database queries and use built-in functions. 7
 PHP in Action: Real-World Examples and Applications
Apr 14, 2025 am 12:19 AM
PHP in Action: Real-World Examples and Applications
Apr 14, 2025 am 12:19 AM
PHP is widely used in e-commerce, content management systems and API development. 1) E-commerce: used for shopping cart function and payment processing. 2) Content management system: used for dynamic content generation and user management. 3) API development: used for RESTful API development and API security. Through performance optimization and best practices, the efficiency and maintainability of PHP applications are improved.
