This article mainly introduces the detailed introductory tutorial of plotly.js drawing library. Now I share it with you and give it as a reference.
This article introduces the introductory tutorial of plotly.js drawing library and shares it with everyone. The details are as follows:
Plotly
##Origin
In the past two days, I want to display mathematical function images on the front end. I guess there should be a mature js library. So, I simply tried it. Finally decided to use plotly.js. Others such as function-plot also look good. I will take a look at it when I have time.Plotly
plotly.js is the open source JavaScript graphing library that powers Plotly.Plotly can be called the best graphing library to date ,none of them.Simple case
Code
<!DOCTYPE html>
<html>
<head>
<meta charset="UTF-8">
<title>plot 绘制图像</title>
</head>
<body>
<p id="tester" style="width:600px;height:250px;"></p>
</body>
<script src="https://cdn.plot.ly/plotly-1.2.0.min.js"></script>
<!-- test -->
<script>
TESTER = document.getElementById('tester');
Plotly.plot(TESTER, [{
x: [1, 2, 3, 4, 5],
y: [1, 2, 4, 8, 16]
}], {
margin: {t: 0}
});
</script>
</html>

Drawing mathematical images
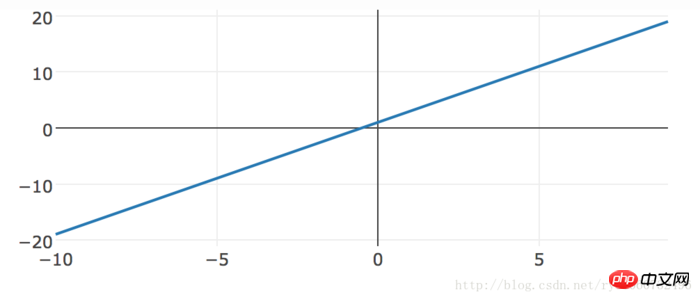
The principles of mathematical image drawing. For example, y = 2*x 1 is actually an image formed by connecting a series of (x, y) points.Code
<p id="math-function" style="width:600px;height:250px;"></p>
<script src="https://cdn.plot.ly/plotly-1.2.0.min.js"></script>
<script>
TESTER = document.getElementById('math-function');
var x = [], y = [];
for(var i = -10; i < 10; i += 1) {
x.push(i);
y.push(2*i+1);
}
Plotly.plot(TESTER, [{
x: x,
y: y
}], {
margin: {t: 0}
});
</script>
How to implement debugging and independent packaging configuration files through webpack projects (detailed tutorial)
Through vue How to modify the project name of the -cli webpack project
How to implement global registration and local registration in the vue component
The above is the detailed content of Detailed interpretation of plotly.js drawing library usage tutorial (detailed tutorial). For more information, please follow other related articles on the PHP Chinese website!


