This article mainly introduces the idea of realizing the circular progress bar of the WeChat applet. It is very good and has reference value. Friends who need it can refer to it
Requirement Summary
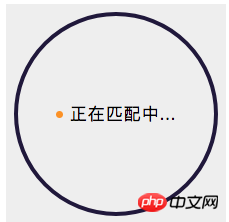
Use circular countdown in the mini program, rendering:

Ideas
Use 2 canvases, one is the background ring and the other is the color ring.
Use setInterval to let the colored rings draw gradually.
Solution
The first step is to write the structure
A box wraps two canvases and a text box;
The box uses relative positioning as the parent, flex layout, and is set to center;
A canvas uses absolute positioning as the background, canvas- id="canvasProgressbg"
Another canvas, using relative positioning as the progress bar, canvas-id="canvasProgress"
The code is as follows:
// wxml
<view class="container">
<view class='progress_box'>
<canvas class="progress_bg" canvas-id="canvasProgressbg"> </canvas>
<canvas class="progress_canvas" canvas-id="canvasProgress"> </canvas>
<view class="progress_text">
<view class="progress_dot"></view>
<text class='progress_info'> {{progress_txt}}</text>
</view>
</view>
</view>
// wxss
.progress_box{
position: relative;
width:220px;
height: 220px;
// 这里的宽高是必须大于等于canvas圆环的直径 否则绘制到盒子外面就看不见了
// 一开始设置 width:440rpx; height:440rpx; 发现 在360X640分辨率的设备,下绘制的圆环跑盒子外去了
// 小程序使用rpx单位适配 ,但是canvas绘制的是px单位的。所以只能用px单位绘制的圆环在盒子内显示
display: flex;
align-items: center;
justify-content: center;
background-color: #eee;
}
.progress_bg{
position: absolute;
width:220px;
height: 220px;
}
.progress_canvas{
width:220px;
height: 220px;
}
.progress_text{
position: absolute;
display: flex;
align-items: center;
justify-content: center
}
.progress_info{
font-size: 36rpx;
padding-left: 16rpx;
letter-spacing: 2rpx
}
.progress_dot{
width:16rpx;
height: 16rpx;
border-radius: 50%;
background-color: #fb9126;
}The second step of data binding
You can see from wxml that we use a data progress_txt, so set the data in js as follows:
 data: {
 progress_txt: '正在匹配中...',
},The third step of canvas drawing
Knock on the blackboard and highlight the key points
1. Draw the background first
Encapsulate a function drawProgressbg that draws a circle in js, canvas draws a circle
Execute this function in onReady;
The canvas component of the mini program is slightly different from the canvas of H5. Please check the document. The code is as follows
drawProgressbg: function(){
 // 使用 wx.createContext 获取绘图上下文 context
 var ctx = wx.createCanvasContext('canvasProgressbg')
 ctx.setLineWidth(4);// 设置圆环的宽度
 ctx.setStrokeStyle('#20183b'); // 设置圆环的颜色
 ctx.setLineCap('round') // 设置圆环端点的形状
 ctx.beginPath();//开始一个新的路径
 ctx.arc(110, 110, 100, 0, 2 * Math.PI, false);
 //设置一个原点(100,100),半径为90的圆的路径到当前路径
 ctx.stroke();//对当前路径进行描边
 ctx.draw();
 },
 onReady: function () {
 this.drawProgressbg();
},The effect is as follows:

2. Draw a colored circle
Encapsulate a function drawCircle for drawing a circle in js,
Execute this in onReady Function;
 drawCircle: function (step){
 var context = wx.createCanvasContext('canvasProgress');
 // 设置渐变
 var gradient = context.createLinearGradient(200, 100, 100, 200);
 gradient.addColorStop("0", "#2661DD");
 gradient.addColorStop("0.5", "#40ED94");
 gradient.addColorStop("1.0", "#5956CC");

 context.setLineWidth(10);
 context.setStrokeStyle(gradient);
 context.setLineCap('round')
 context.beginPath();
 // 参数step 为绘制的圆环周长,从0到2为一周 。 -Math.PI / 2 将起始角设在12点钟位置 ,结束角 通过改变 step 的值确定
 context.arc(110, 110, 100, -Math.PI / 2, step * Math.PI - Math.PI / 2, false);
 context.stroke();
 context.draw()
 },
 onReady: function () {
 this.drawProgressbg();
 this.drawCircle(2)
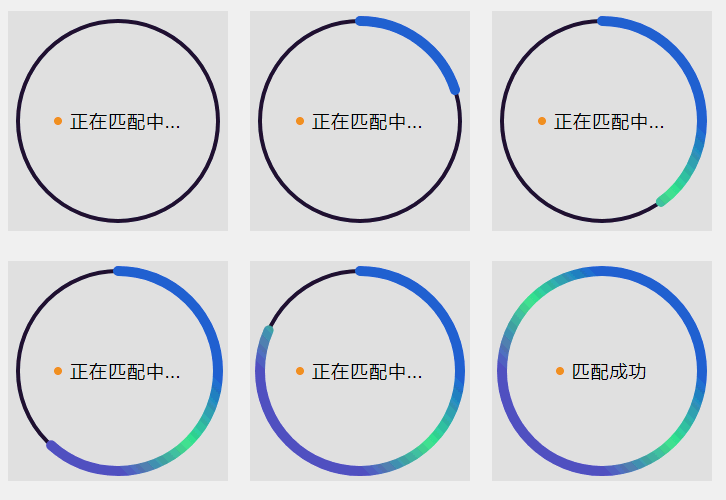
},this.drawCircle(0.5) The effect is as follows: this.drawCircle(1) The effect is as follows: this.drawCircle(2) The effect is as follows:

3. Set a timer
Set a counter count, a step step, and a timer in js data
In js Encapsulate a timer function countInterval in,
Execute this function in onReady;
data: {
 progress_txt: '正在匹配中...',
 count:0, // 设置 计数器 初始为0
 countTimer: null // 设置 定时器 初始为null
 },
 countInterval: function () {
 // 设置倒计时 定时器 每100毫秒执行一次,计数器count+1 ,耗时6秒绘一圈
 this.countTimer = setInterval(() => {
 if (this.data.count <= 60) {
 /* 绘制彩色圆环进度条
 注意此处 传参 step 取值范围是0到2,
 所以 计数器 最大值 60 对应 2 做处理,计数器count=60的时候step=2
 */
  this.drawCircle(this.data.count / (60/2))
 this.data.count++;
 } else {
 this.setData({
  progress_txt: "匹配成功"
 });
 clearInterval(this.countTimer);
 }
 }, 100)
 },
 onReady: function () {
 this.drawProgressbg();
 // this.drawCircle(2)
 this.countInterval()
},Final effect

The above is what I compiled For everyone, I hope it will be helpful to everyone in the future.
Related articles:
How to use div scroll bar to hide but have scrolling effect in vue.js?
How to implement image scrolling using vue?
js implementation of binary data operation method
The above is the detailed content of How to implement a circular progress bar in WeChat mini program. For more information, please follow other related articles on the PHP Chinese website!


