This time I will show you how to develop angular third-party packages and what are the precautions for angular third-party package development. The following is a practical case, let's take a look.
Build a third-party package based on angular from scratch
Test the package to be released locally
Specify the content in the npm or yarn release package
Introduce and use the published package in ordinary angular applications
Basic project construction
General angular apps are created using angular-cli, which can be done directly with ng new name. The generated project hides details such as webpack, AOT, dev server, etc., and also supports various parameters. To configure tests and sass, etc., you can directly use npm run start and npm run build. It can be said that it is very stupid and skips many big pitfalls of learning webpack and so on.
However, if you want to build an angular third-party package, precompiled styles and packaging and deployment are generally not needed. Instead, you need to be familiar with npm (yarn) and tsconfig.
Initialization
The project building command is as follows:
mkdir my-ng-lib
cd my-ng-lib
yarn init
Press Enter all the way (in actual situations, you still need to edit the basic information of the package) and finally get a package.json, then open vscode:

Initialize npm package
Dependency
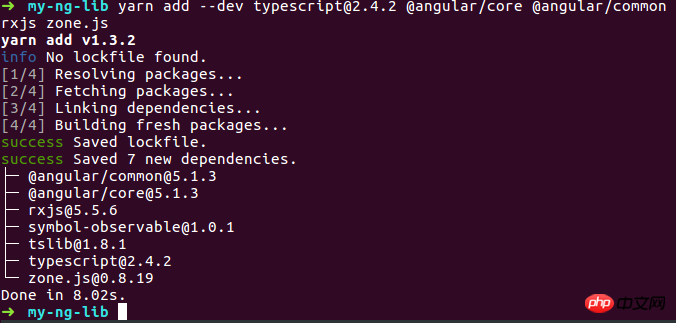
As a third party for angular package, you first need to install the following dependencies:

Dependency installation
The version specified by typescript is to be consistent with the version currently used by angular-cli. In fact, This may not be necessary.
Now we have installed the packages used for development, but these packages will not be used after publishing. In fact, when publishing, what we want is to publish the code we wrote, not the dependent code. This requires Configure peerDependencies in package.json as pre-dependencies, but the package itself will not actually install these dependencies. The actual package should be installed by the application project. Now add peerDependencies into package.json:
"peerDependencies": {
  "@angular/common": ">=5.0.0",
  "@angular/core": ">=5.0.0",
  "rxjs": ">=5.0.0"
}Project preparation
After the basic project is built, we should only have package.json, node_modules and a lock file in the project , now it’s time to add the real project code.
No matter what purpose this package is used to achieve, as a third-party package, it should export its own functions for other projects to introduce and use, so there must first be an index.js file in the project root directory , and what we want to develop is a TypeScript package based on angular. Naturally, we use index.ts, and the content is various export types, interfaces, methods, etc. As an example, only one constant is exported here:
export const myNgLib: string = 'Hello, thie is my angular 3rd part lib';
In order to support TypeScript, we also need a tsconfig.json:
{
 "compilerOptions": {
  "baseUrl": ".", // 基于哪个目录编译ts
  "declaration": true, // 是否生成声明文件即*.d.ts文件,有了它才有TS的代码提示
  "experimentalDecorators": true, // 用于支持TS装饰器如angular中的 @NgModule({}) 之类
  "emitDecoratorMetadata": true, // 用于支持TS装饰器如angular中的 @NgModule({}) 之类
  "module": "commonjs", // 模块化形式
  "moduleResolution": "node", // 模块化形式
  "rootDir": ".", // 以哪个目录为根
  "lib": ["es2015", "dom"], // 支持编译的内置库
  "skipDefaultLibCheck": true, // 是否跳过内置库检查
  "skipLibCheck": true, // 跳过库检查
  "target": "es5", // 编译目标版本
  "suppressImplicitAnyIndexErrors": true, // 几个检查代码的规则
  "strictNullChecks": true, // 几个检查代码的规则
  "noImplicitAny": true, // 几个检查代码的规则
  "sourceMap": true, // 是否生成 .js.map
  "removeComments": true, // 移除注释
  "noFallthroughCasesInSwitch": true // 几个检查代码的规则
 },
 "exclude": [ // 编译时排除以下内容
  "node_modules",
  "*.d.ts",
  "**/*.d.ts"
 ]
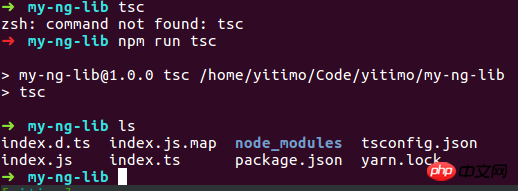
}The rules have their own effects, some are to determine the compilation path, and some are for syntax Check, some have output declarations, exclusion rules, etc. Now you can use tsc to see the effect, but you need to add tsc to the scripts of package.json first:
"scripts": {
  "tsc": "tsc"
 }
Compile to get .js, js.map, .d.ts
Publish
Perfect, such a powerful package, let’s publish it quickly. The publishing command is
yarn publish
But before that, there are a few things to prepare:
npm account
Naturally, you must have an npm account before publishing. Just add it, and finally use npm whoami to confirm the identity.
Basic information of the package
That is to say, we need to improve package.json and let the whole network know that such a powerful package was developed by us, including open source license, package name, Author, version number, etc. The most important thing that directly affects the release is the version number.
Selective publishing
The biggest difference between third-party packages based on angular and ordinary js packages is that the entire package cannot be directly published to npm, so It will cause strange errors because of the .ts file. In fact, only three types of files, .js, .js.map, and .d.ts, need to be published.
因为在其他项目中不一定会使用TypeScript,即使用了也不会刻意包含node_modules目录,也就是说其他项目只管使用,编译的活由我们得包自己来做,相反要是我们还发布多余的.ts文件,只会导致错误。
为了做到选择性发布,需要一个.npmignore文件,和.gitignore配合用来忽略上传的文件,一般这些编译输出我们会添加在.gitignore中,若项目不存在.npmignore,发布到npm时也会使用.gitignore,这不是我们想要的,所以需要再创建这个.npmignore来忽略.ts文件而包含编译输出:
node_modules
yarn-error.log
tsconfig.json
.gitignore
.npmignore
yarn.lock
*.ts
!*.d.ts
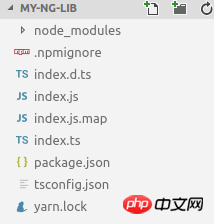
现在我们的项目看起来是这样的:

待发布项目
使用yarn pack命令得到本地打包看看效果如何:

本地打包
看起来非常完美,该有的都有了,不该有的都忽略了,那就可以发布了,不过这里就不发布这个没什么用处的包了 : )
打包至此完成,现在看看用起来怎么样。
本地测试
angular的第三方包要做本地测试的话,与普通的包比有一点不足,就是用不了npm link,这会导致错误,特别是在第三方包使用到依赖注入的情况下,原因是运行时实际是在两个angular环境下,再进一步说是因为第三方包依赖的是自己的node_modules,解决办法也很粗暴,删掉第三方包的node_modules即可,不过这代价显然有点大。找遍GitHub发现的另一个办法是配合--preserve-symlinks参数,不过可能是笔者使用姿势不对一直没效果。
最后笔者自己的曲线救国办法是手动写package.json的scripts,本地测试步骤是:
执行 yarn pack得到本地打包
解压到测试项目的node_modules中假装是安装的项目
测试项目中像使用普通安装包一样使用这个直接复制进来的包
参考脚本如下:
"scripts": {
  "prepublish": "npm run clean && tsc", // 清理并编译
  "clean": "rimraf index.js index.js.map index.d.ts src/**/*.js src/**/*.js.map src/**/*.d.ts linktest.tgz", // 清理编译文件
  "link": "npm run pack && tar -zxf linktest.tgz && rimraf ../lib-test-app/node_modules/my-ng-lib && mv package ../lib-test-app/node_modules/my-ng-lib", // 打包后解压并移动到测试项目node_modules中
  "pack": "npm run prepublish && yarn pack --filename linktest.tgz" // 执行编译并打包
}总结
发布基于angular的第三方包的两个难点:一是如何处理好TypeScript的编译,二是如何处理好angular运行上下文。
本文的命令均使用yarn完成,npm版本命令大同小异均有其对应命令,且发布的包都是在npm托管。
另外本文仅涉及发布最基本的基于angular的第三方包,包的实际功能方面没有做深入。其实对于不同功能的第三方包,仍有需要学习的内容。
相信看了本文案例你已经掌握了方法,更多精彩请关注php中文网其它相关文章!
推荐阅读:
The above is the detailed content of How to develop third-party packages in angular. For more information, please follow other related articles on the PHP Chinese website!
 How to light up Douyin close friends moment
 microsoft project
 What is phased array radar
 How to use fusioncharts.js
 Yiou trading software download
 The latest ranking of the top ten exchanges in the currency circle
 What to do if win8wifi connection is not available
 How to recover files emptied from Recycle Bin


